Ultimate Royal Icing Transfers Guide
Royal icing transfers are popular among cookie decorators worldwide. In this DIY tutorial, I’ll share with you how to make different types of transfers and use them in various real cookie-decorating projects. Let’s get started.
PIN IT for later
WHAT ARE ROYAL ICING TRANSFERS (RIT)?
Royal Icing Transfers are edible sugar decorations made from royal icing. In simple terms, they’re designs piped or spread onto wax paper, parchment, or acetate and left to dry. Once hardened, the motifs are peeled off and used to decorate cookies, cakes, cupcakes, or gingerbread houses. The best part—they can be made ahead of time.
THINGS YOU NEED
- Royal Icing Recipe – for the best result, use icing without added corn syrup.
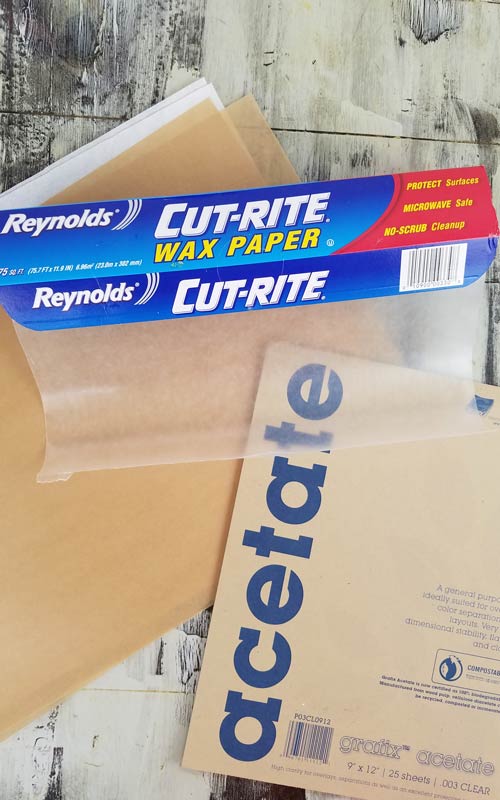
- Backing Materials: wax paper, parchment paper, food-grade acetate sheet, clear, smooth protector sheets
- Templates – these can be printed or hand-drawn on a piece of paper
- Masking Tape – to secure the template and backing sheet in place while you pipe your designs
- Flat Drying Surface – you can use a flat tray, flat cardboard, foam board, or flat cake cardboard or plexiglass
- Sharp blade, spatula – to help release transfer
- Piping Bags, Scribe Tool, Piping Tips (if using), Food Coloring, Sprinkles (if using)
This post contains Amazon affiliate links that earn me a small commission, at no cost to you. I only recommend products that I use and love. Learn more about my affiliate policy here.
WHAT MATERIALS CAN I PIPE ON
- Wax Paper – widely available. This is your cheapest option. From my experience, I find that transfers stick to the wax paper slightly more than they do to the parchment. It’s also easier to keep it flat. I usually prefer wax paper over parchment.
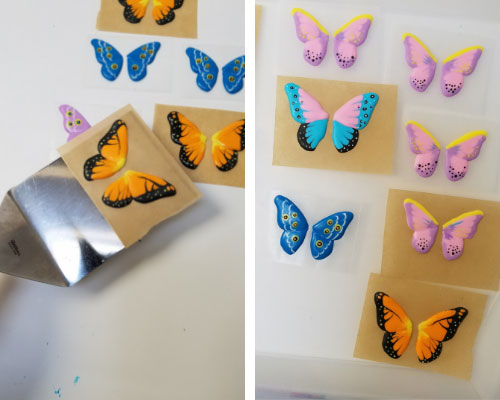
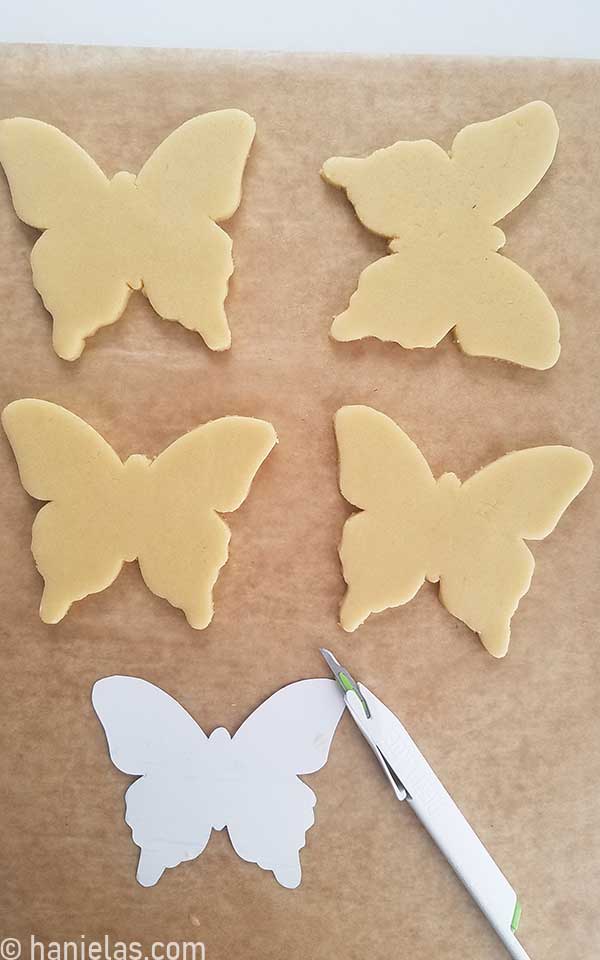
- Parchment Paper – widely available. Not all parchment is the same. When using coated parchment in my experience transfers tend to slide off really easily from the parchment. In some cases this may not be ideal. For example I used a brown parchment to make my butterflies and as soon as I lifted the parchment butterfly wings were sliding off the parchment without me even trying. So be extra careful when using coated parchment. It may also depends on the brand of parchment. I used parchment with light coating on it. Also, parchment on a roll can be difficult to keep completely flat, even with a masking tape.
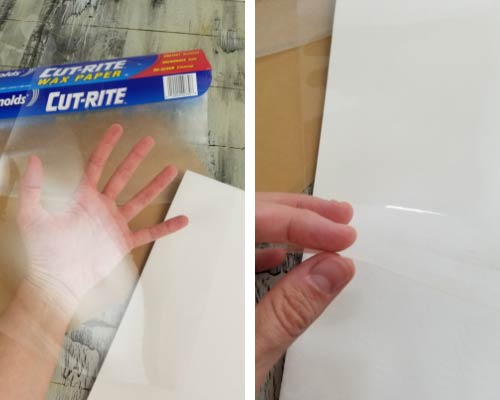
- Food Grade Acetate Sheets/Protector Sheets – these are thin plastic sheets. You can pipe directly onto the sheet.
- Tip: If you use frosting sheets or sugar sheets (for meringues) backing material is usually an acetate. If possible I always save the frosting sheet backing material. It also works great with chocolate.
SHOULD I USE WAX PAPER, PARCHMENT OR ACETATE SHEET?
Both wax paper and parchment paper warp when exposed to moisture. Why is this important? When you trace a design with royal icing onto wax/parchment paper moisture from royal icing will cause the paper to buckle slightly.
And as royal icing is drying it conforms to the shape of the backing material used. While there is nothing to worry about when you are making small to medium size decorations. Uneven underside of royal icing transfer can cause some issues when using larger transfers. Especially when they are to lay on top of a flat cookie.
When the surface of a transfer is uneven when applied to a dry royal icing, there will most likely be a gap between the transfer and the surface it is applied to.
Acetate, on the other hand, doesn’t absorb moisture from royal icing. And transfers made with it have an even underside. Transfers made with acetate take a bit longer to dry.
WHAT SHOULD THE CONSISTENCY OF ROYAL ICING BE?
Royal Icing Consistency and how to use different consistencies in real decorating projects.
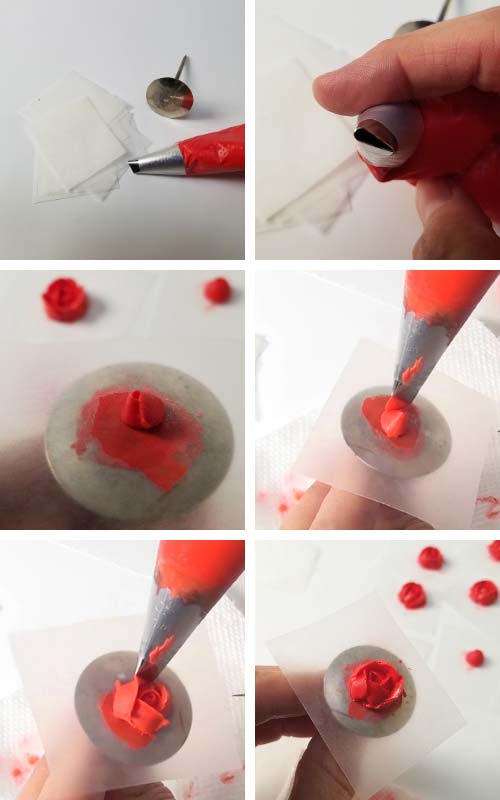
- When you are making piped flowers you’ll need to use stiff royal icing.
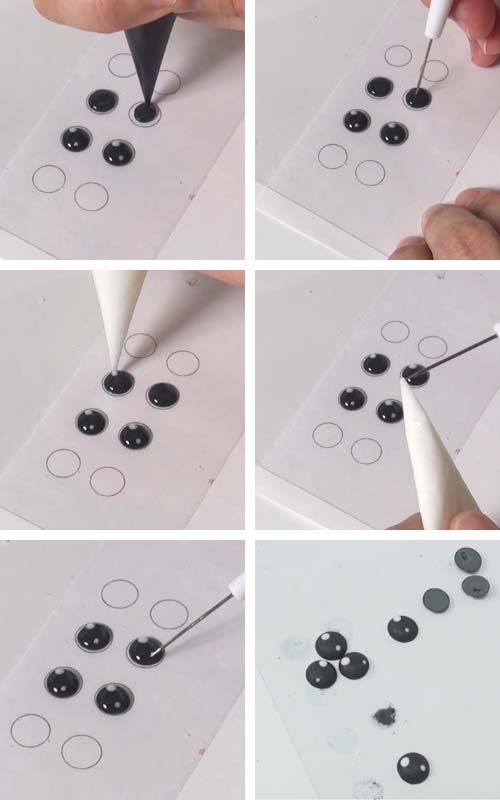
- For example, if you are making eyes, you’ll need about 25-second icing . You can use the wet-on-wet technique to add a black pupil and white reflection dots. Fluid icing also dries with a smooth finish.
- Avoid using icing that is too runny. It’s spread fast and it’s difficult to keep it a desired shape. Which is important when making royal icing transfers. Also, transfers made with icing that is too runny tend to be more fragile.
- I generally use 20 + consistency for small royal icing transfers. On occasion when making flat transfers I’ll use 15 second consistency.
HOW TO MAKE TRANSFERS
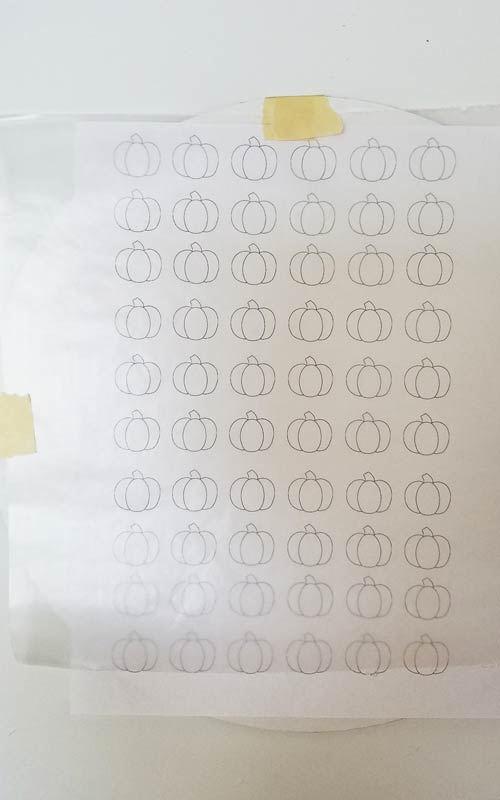
If you plan on making lots of small transfers, it is best to pipe them in bulk. Place a template on a flat surface that is a bit larger than your template. You can use a flat cardboard (I used a cake board), cut up flat foam board, or a baking sheet. Secure template onto the cardboard with a piece of masking tape. Then layer wax paper or parchment over the template and secure it on the board with masking tape. Make sure wax paper is flat without creases. Or insert template into a clear protector sheet and pipe directly onto the acetate.
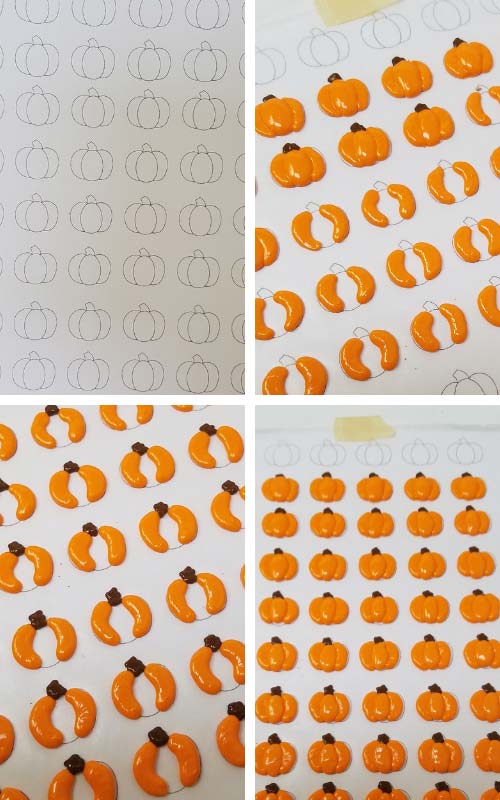
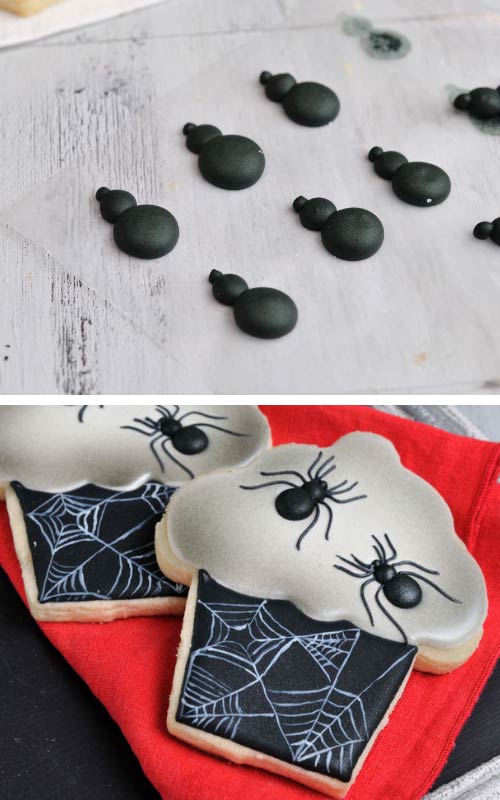
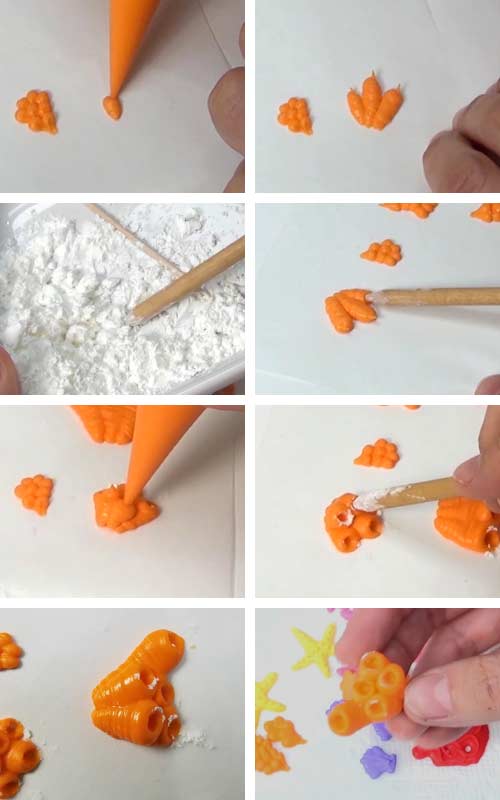
These small pumpkins are piped in steps.
- I piped 2 sides with orange icing(25sec). I let them crust.
- Then I piped the stem with brown icing (25sec). I let it crust again.
- And lastly, I filled in the center section.
- If you see any uneven spot, use a scribe tool to smooth the icing.
- Allow transfers to dry for 8-12 hours and longer when using acetate.
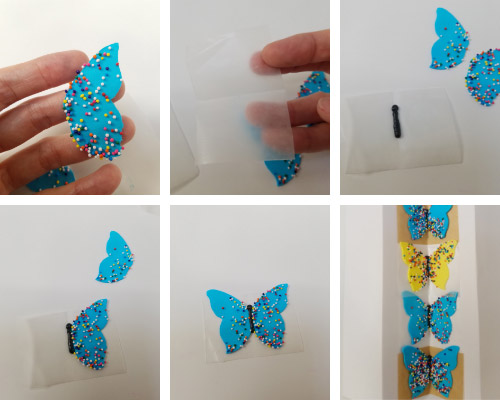
I often make royal icing butterflies. I Usually pipe them on individual piece of parchment.
TYPES OF ROYAL ICING TRANSFERS
You can make so many different transfers: piped florals like roses, sunflowers, snowflakes, eyes, spider body, Flower centers, Butterflies, Sprinkles and so much more. Sky is the limit
- 3D Transfers: Florals, pressure piping ( for example, animals).
- 2D/Flood: Eyes, butterflies, snowflakes, flat characters, ladybugs, apples, baskets, snowman, pumpkins, bunny, corals, spiders, bugs, tears, leaves, etc.
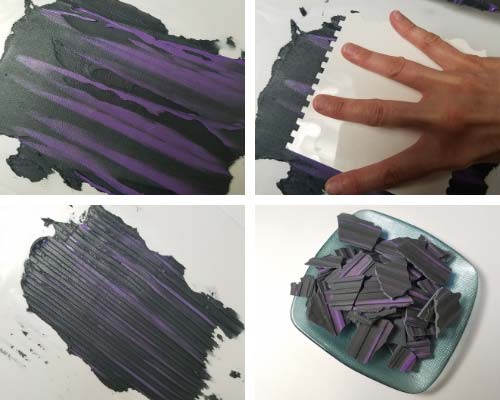
- Textured Transfers: Use decorating combs, palette knife, toothbrush, toothpicks, or a fork to create textured royal icing.
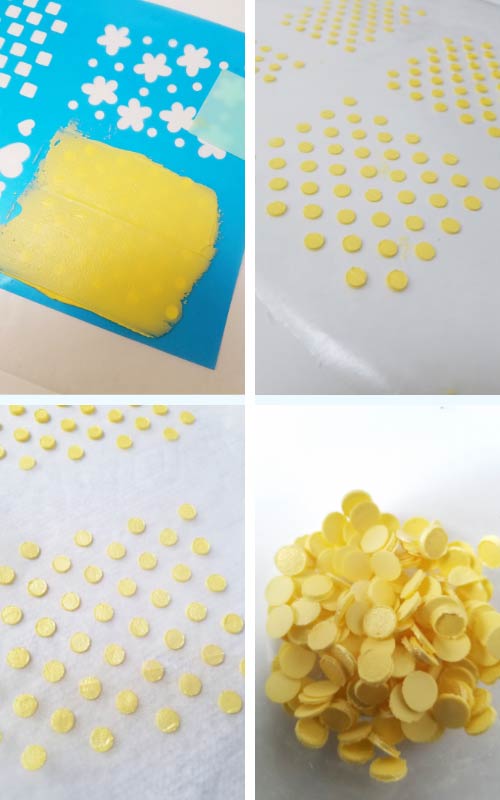
- Stenciled RIT: This is the easiest and most effective method of creating royal icing transfers. Use stencils to make leaves, gold coins, buttons, hearts, stars, butterflies.
3D TRANSFERS
- To make most of the piped flowers you’ll need
- flower nail
- wax paper squares,
- piping tips
- royal icing
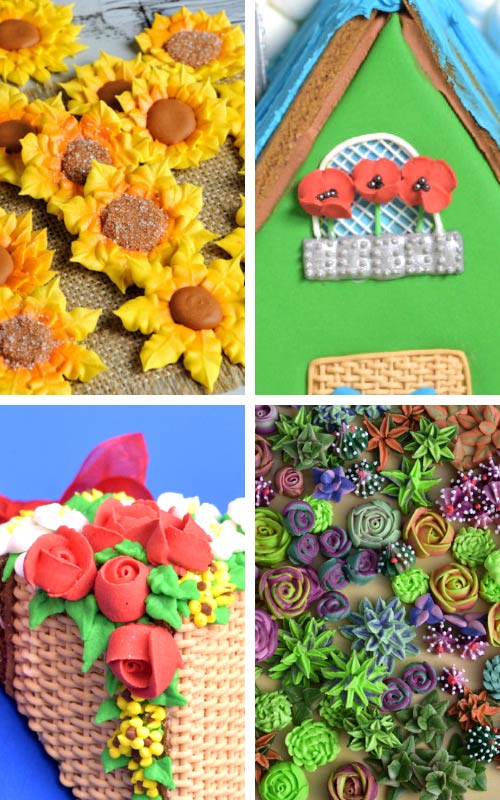
Sunflowers, Poppy Flowers, Roses, Succulents
- Sunflowers Sugar Flowers
- Wizard of Oz Gingerbread House – poppy flowers
- Royal Icing Succulents
- Snow White and 7 Dwarfs Gingerbread House – Small daisies and roses
2D TRANSFERS
Apple Baskets, Decorative Window Frame
- Snow White Gingerbread House – apples and apple basket
- Beauty and the Beast Gingerbread House – window frame
Eyes and Flower Centers
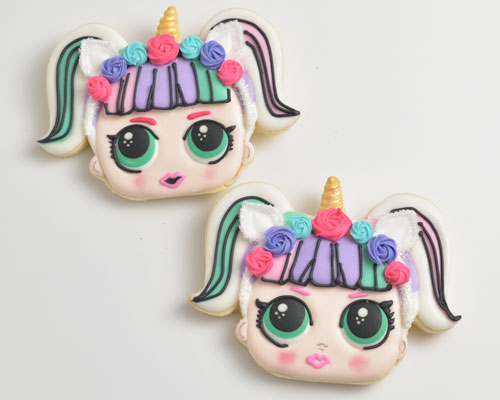
- Unicorn LOL Doll Cookies – eyes
- Sunflower Cookies – flower centers
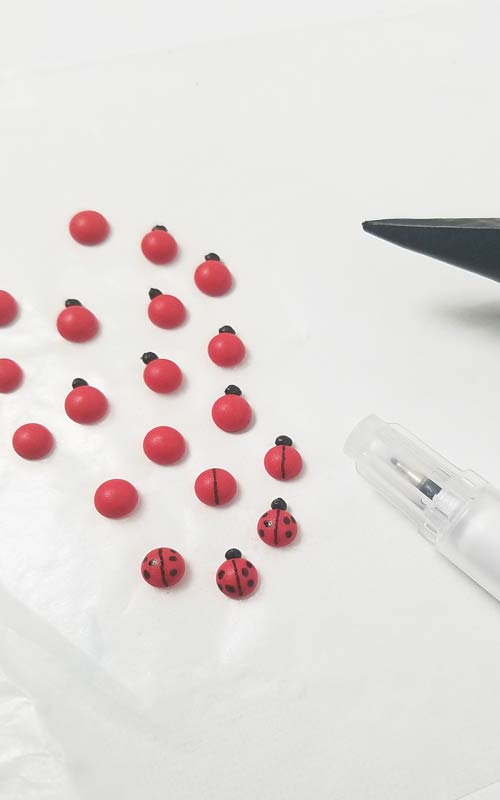
Ladybugs
- Snow White Gingerbread House – tiny ladybugs, I used edible marker to draw on dry icing
Halloween Spider Cupcake Cookies
- Spider Cupcake Cookies – spider body is a transfer
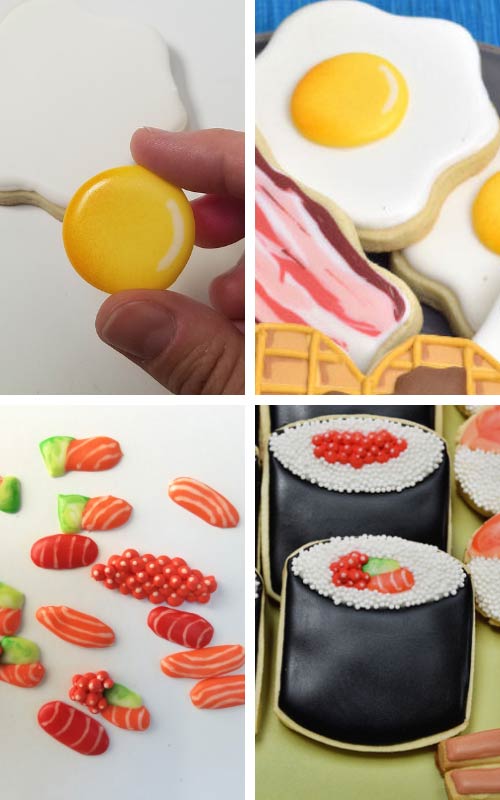
Egg and Sushi Cookies
- Egg – Egg yolk is a transfer, yellow round is airbrushed to give it more realistic appearance
- Sushi Cookies – Salmon, Tuna, Caviar and Salmon with Avocado are transfers
TEXTURED TRANSFERS
Roof shingles

STENCILED TRANSFERS
Stars
- Toy Story Woody Cookies – sheriff star badge
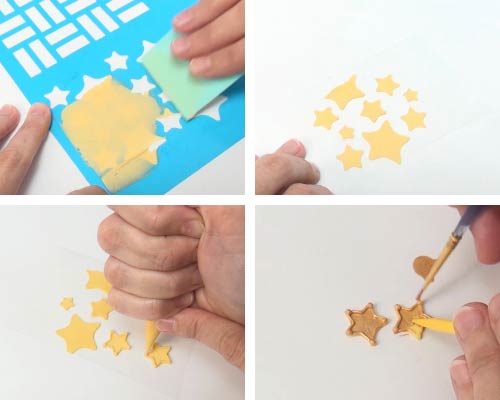
I used a star transfer to make Sheriff Star on my Woody Toy Story Cookies.

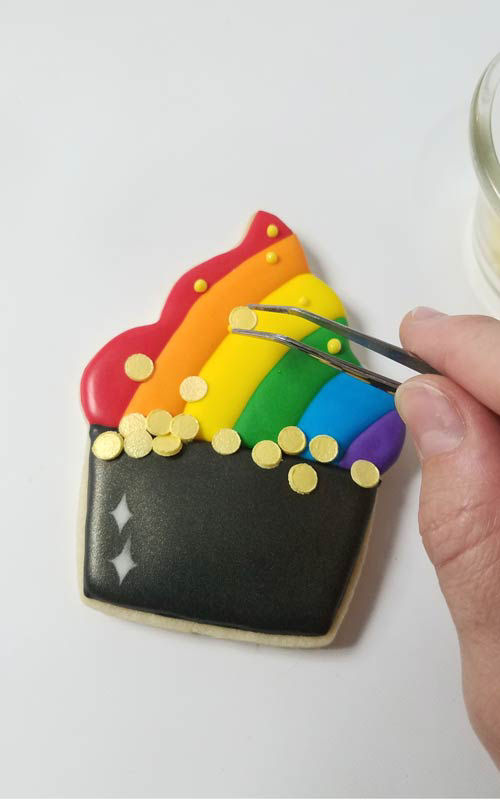
Sprinkles
- Saint Patrick’s Day Pot Of Gold Cookies – gold coins
Use tweezers to handle small decorations.
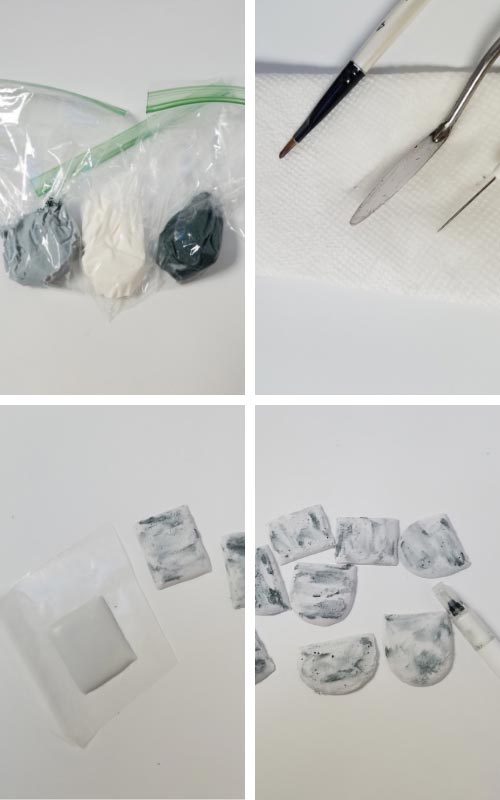
Marbled Hearts
- Pretty Heart Cookies – marbled hearts transfers
Place heart transfers onto wet icing and let dry.
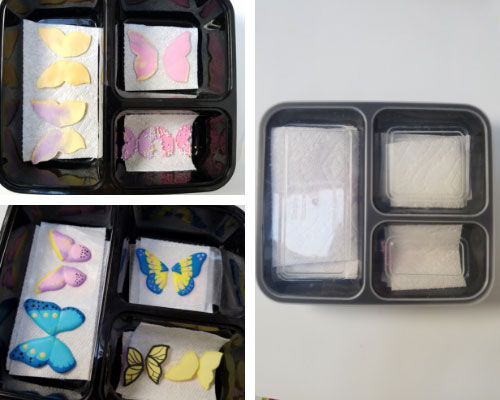
Stenciled Butterflies
- Royal Icing Butterflies – pink and marbled butterflies

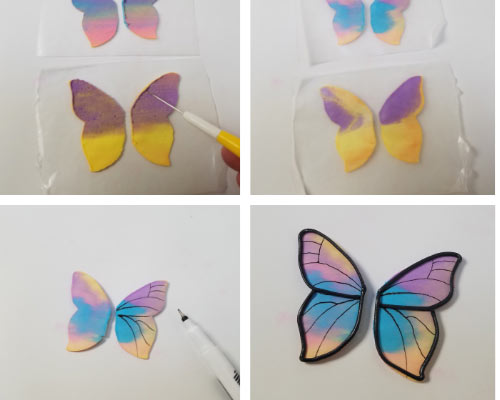
Shape transfers using a V shape drying tray to give butterflies life like appearance.
CAN I SHAPE ROYAL ICING TRANSFERS?
- Corn Starch – dip a toothpick, spoon, fondant tool in starch and shape thick royal icing
- Curved Surface – secure wet transfers onto a curved surface and let icing dry (How to make flowers using this drying method)
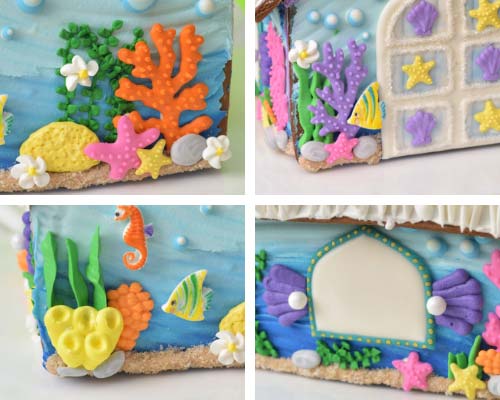
Coral
- Mermaid Gingerbread House – coral transfer
To shape thick royal icing you can use piping tips and corn starch. Dip a fondant tool or a toothpick into corn starch. Starch works as a barrier between sticky icing. It allows you shape stiff royal icing. Let icing dry. Brush off corn starch residue if needed.
Black Ballerina Silhouettes
- Ballerina Tutu Cake – black silhouettes
I needed to shape royal icing transfers on a curve so I could then use them to decorate the side of a 6-inch cake. First, I piped one silhouette at a time with black royal icing onto a parchment. I transferred a freshly piped black ballerina silhouette onto a slightly curved surface. I determined that most coffee mugs have the same curvature as the 6-inch cake pan, so I used several mugs to dry my transfers. Once the icing dried, I peeled the parchment. And then, I attached black ballerina silhouettes onto the swiss buttercream cake with royal icing.
I used the same technique to make Armenian saying in silver letters and glued them onto the fondant Christening Cake.
HOW TO USE ROYAL ICING TRANSFERS IN COOKIE DECORATING?
DRY ON DRY APPLICATION
This mean that sugar transfer is applied on a dry surface, may it be dry royal icing, fondant or a bare cookie.
To glue the transfer onto a surface, use a little bit of royal icing on the back of the transfer. Then, gently place the transfer onto a cookie. I use a gentle shifting motion to ensure it lays flat and as flush with the surface as possible.
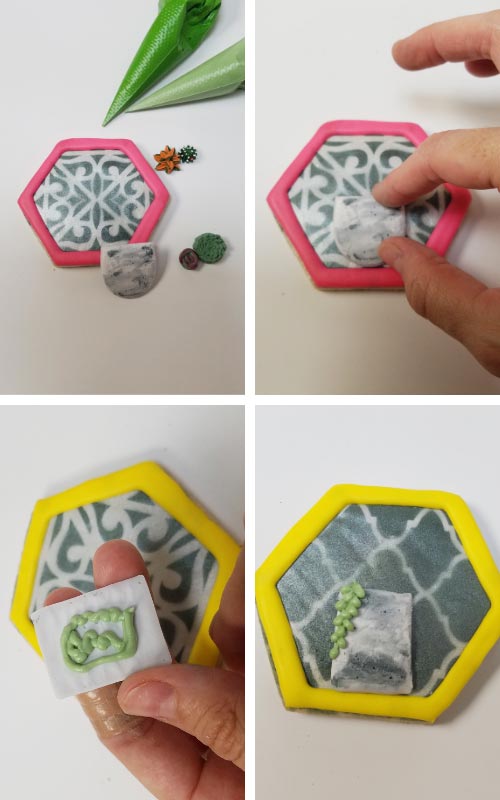
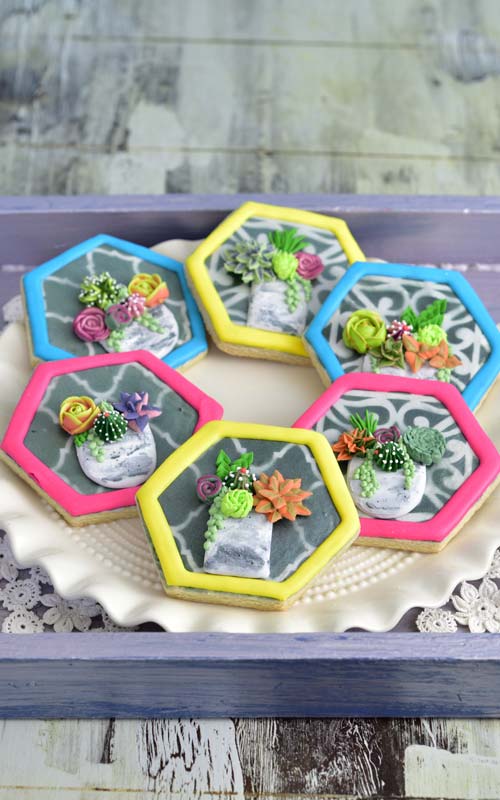
Succulent Cookies– flower pots, royal icing succulents
Not only I used piped royal icing succulents to decorate these cookies. But I also made concrete flower pots as royal icing transfers.
Dry flower pot along with dry succulents are attached onto dry royal icing. You can also pipe filler greens with fresh icing to elevate the design.
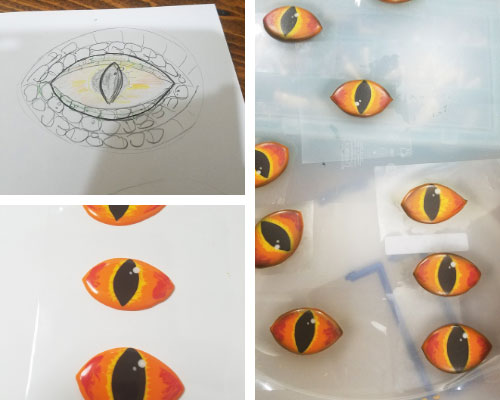
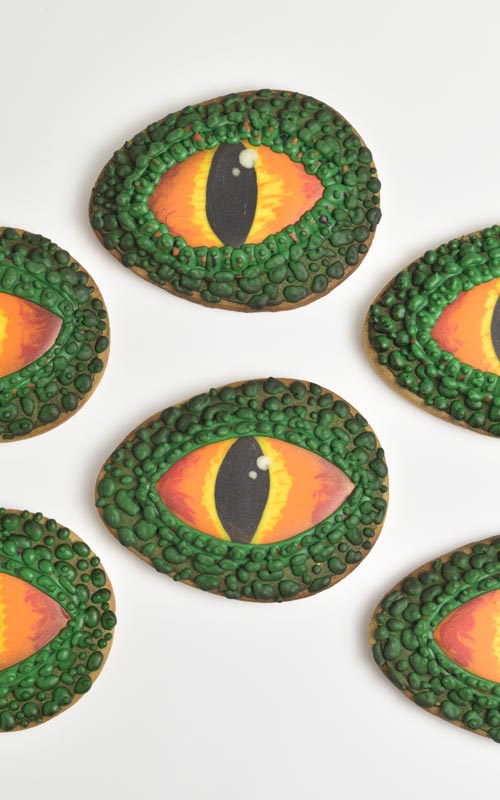
Dinosaur Eye Cookies – eyes
I prepared eye as royal icing transfer. I piped each eye on a separate piece of acetate.

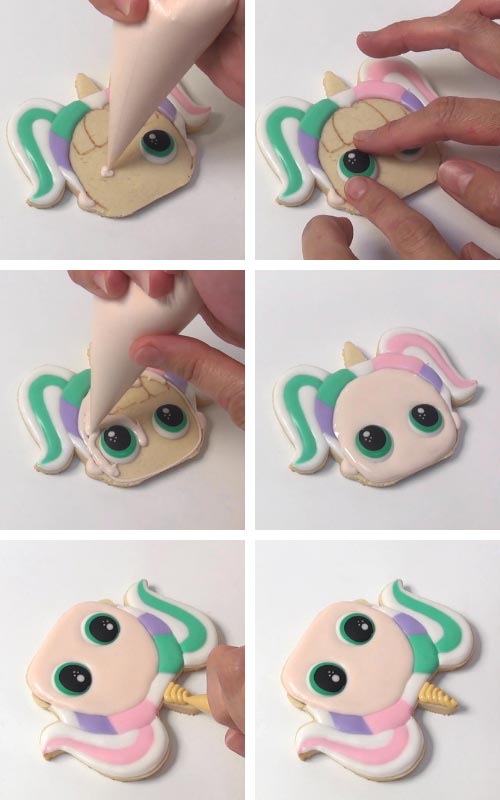
Unicorn LOL Doll Cookies – eyes, ears, bangs
To make Unicorn Cookies I used 3 RIT. I made eyes, ears and bangs as transfers.
Attach dry eyes onto a cookie.
Mermaid Gingerbread House – windows, corals, starfish, seashells,
My unique underwater and mermaid inspired gingerbread is decorated with lots of pre-made sugar decorations. I made corals, starfish, seashells, rocks, underwater bubbles. To glue them onto the cookie I used little bit of royal icing.

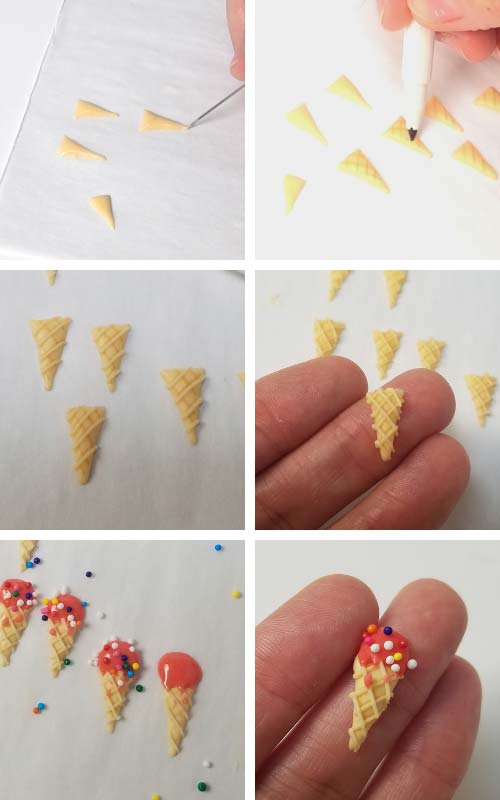
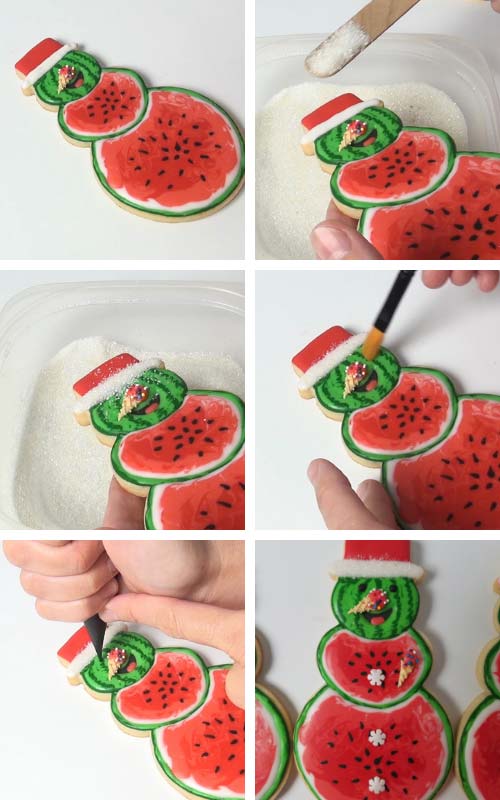
Watermelon Snowman Cookies – mini ice cream cone
I prepared tiny ice cream cone transfer and used it to make a Snowman’s nose.
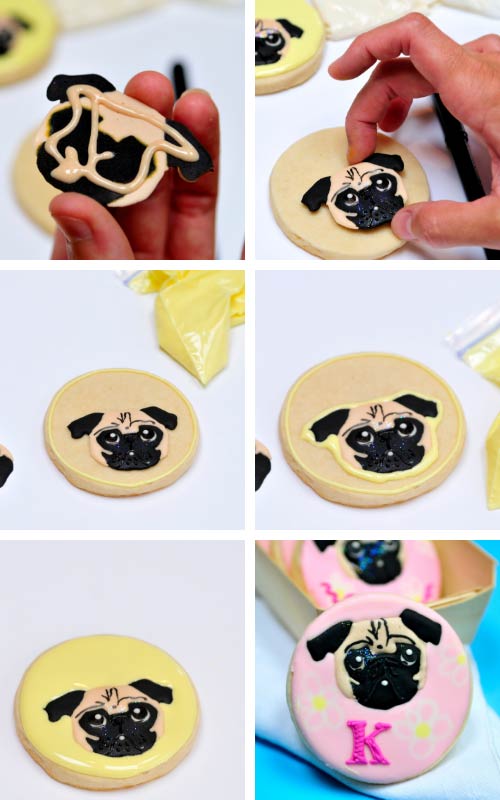
Pug Cookies – pug face
I decided to glue transfer onto a cookie and then ice the area around it. It worked. I rarely use this technique with this kind of a transfer. But I wanted to throw it out there.
DRY ON WET APPLICATION
This means that dry sugar decoration is applied onto a wet surface. Whenever possible I like to use this method.
Transfer sinks into the icing and in most cases gap between the base layer of icing and the transfer is minimal and with smaller decorations such as avocado are non-existent.
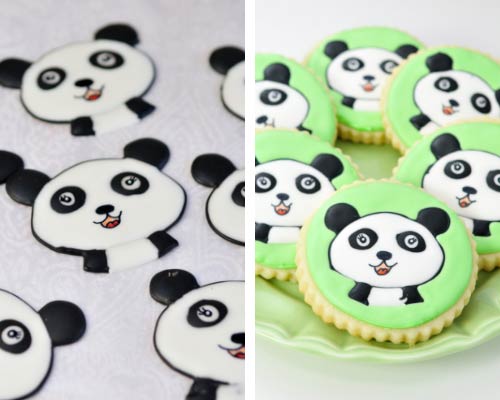
Panda Cookies – panda face
Making these Panda Cookies I’ve learned a valuable lesson. I attempted to add my panda transfers onto a dark background using dry on wet application. Several hours in I noticed dark color seeping through the white panda transfers. It’s was time to start over.
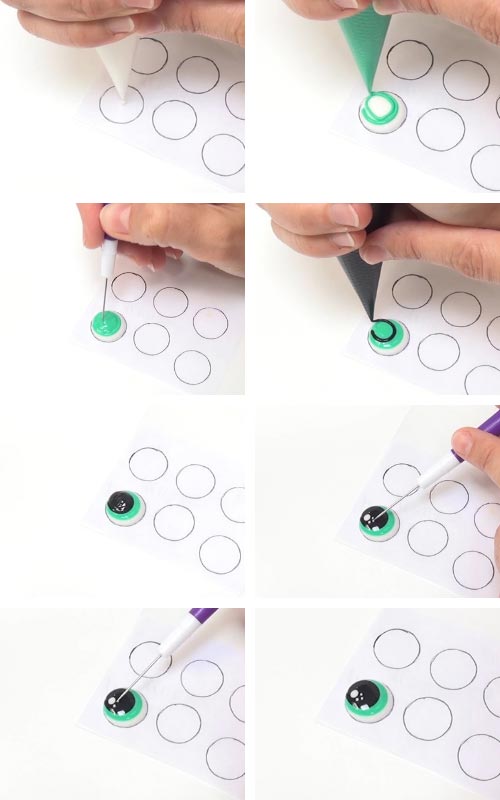
Owl Cookies – eyes
Make the eyes and let them dry. Then pipe a star with purple (stiff icing) and gently press black eye transfer into purple icing.

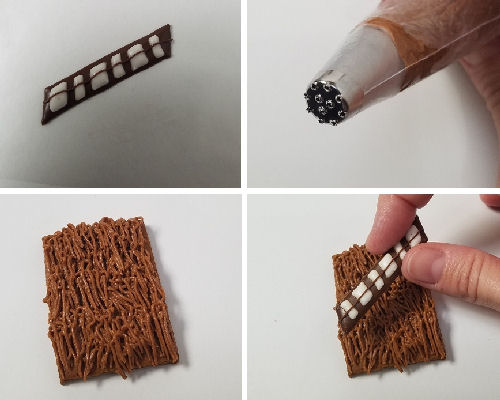
Chewbacca Cookies – belt
First I piped belt onto a wax paper and let it dry. Then with a grass tip and brown stiff royal icing I piped icing onto the cookie. And immediately after and while icing was still wet I gently pushed belt into the brown icing.
Avocado Cookies – brown stone
I used wax paper to make avocado stone royal icing transfers. Then I shaded them with brown petal dust. I placed dry pit onto wet icing.
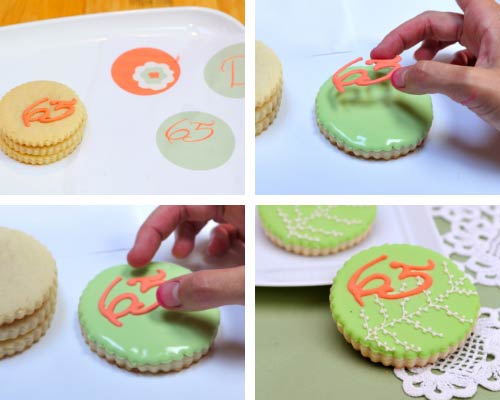
Birthday Cookies – number 65
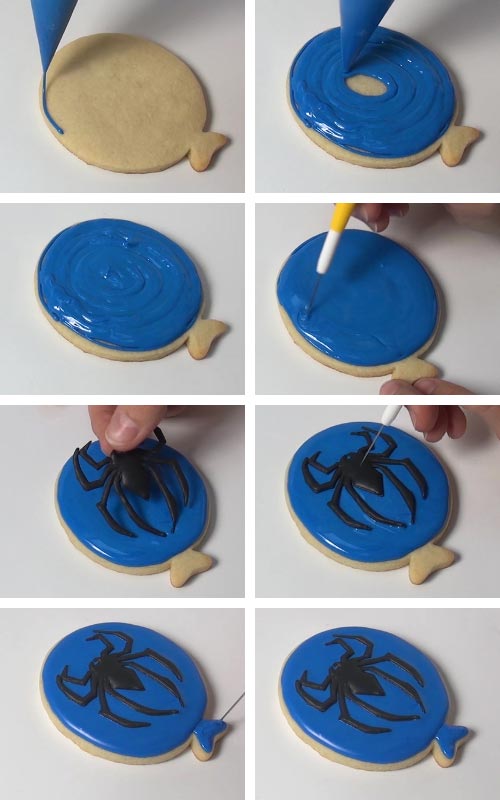
Spider-Man Cookies – spider
To make the spider I used acetate sheet. Notice how spider is covering a good portion of a cookie. Larger the transfer more important it is that decoration is flat. Remember that talk I had about acetate sheet versus wax/parchment paper (at the top of the post).

TRANSFERS IN CAKE DECORATING
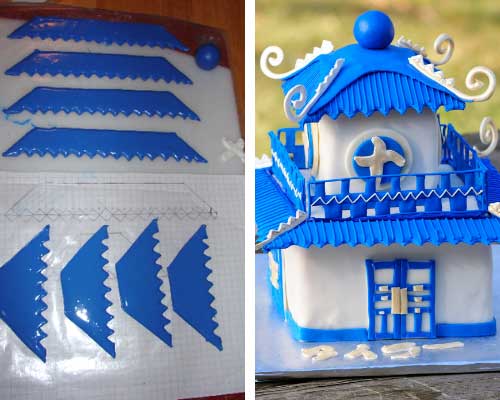
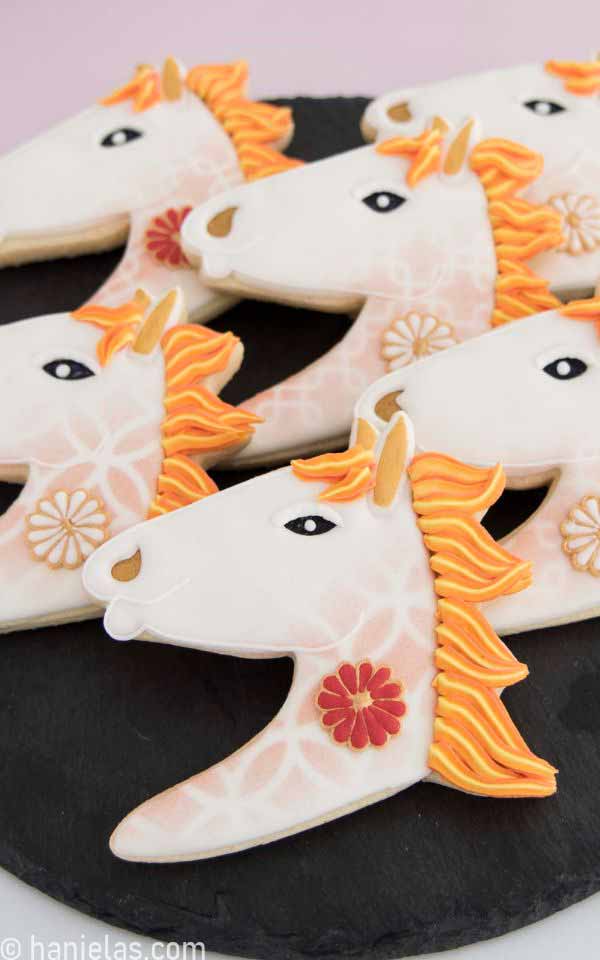
Japanese Pagoda Cake – roof panels, fence
I made this cake 10 years ago for our friend’s son birthday. I first attempted to make roof from fondant. Unfortunately it wasn’t drying fast enough and so I made RIT instead. They saved the day.
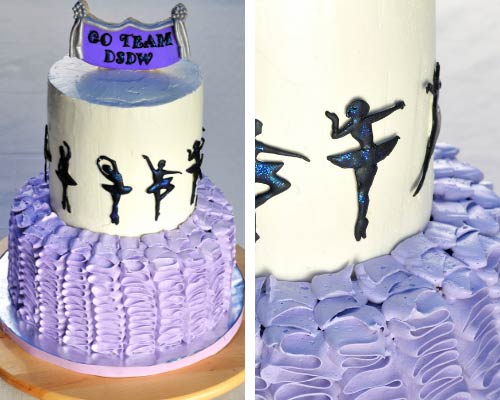
Ballerina Cake – black silhouettes
To make black ballerina silhouettes I used black royal icing and sparkling dust. To make royal icing decoration slightly curved I dried transfers on a curved surface. Then I glued them onto a cake with additional royal icing.
STORING ROYAL ICING TRANSFERS
Store sugar decorations in a dry place, away from the moisture and direct sunlight. Moisture will soften transfers and direct sunlight will fade the color. I store them layered between paper towel sheet in an airtight container. If you live in a humid area it is best to invest into food grade silica gel packets and include a packet with royal icing transfers. Or alternatively you can use rice. You can shape a small pouch from a food wrap and spoon a tablespoon or 2 of rice into a pouch and place it into a container. Replace it every 3-4 months.
SUCCESS TIPS
Let transfers crust first. Then place them in front or under a fan. Don’t have the fan running at full speed.
Allow 6-8 hours for small piped flower such roses.
Some pieces may require 8-12 hours drying time. Plan your project accordingly.
Royal Icing Decorations can be prepared ahead of time. They can last for years. My in laws gifted me a adorable royal icing decorations 10 years and I still have them.
PIN IT for later
This post contains Amazon affiliate links that earn me a small commission, at no cost to you. I only recommend products that I use and love. Learn more about my affiliate policy here.

Hi, I’m Hani
Welcome!
Thank you for visiting Haniela’s. On my blog, you’ll find delicious sweet & savory recipes made with simple ingredients. Why not start a new adventure? Discover a world of cookie decorating with my step-by-step tutorials.

Hi, I’m Hani
Welcome!
Thank you for visiting Haniela’s. On my blog, you’ll find delicious sweet & savory recipes made with simple ingredients. Why not start a new adventure? Discover a world of cookie decorating with my step-by-step tutorials.


Thank you so much for sharing your knowledge with us, I really appreciate it as I am trying new methods and you make it so easy.
Hi Shirley,
that is wonderful to hear. Enjoy and happy creating.
Do you have a link the princess crown gems?
Hi Marie,
I updated the supply list with the link my template shop. Princess Gem Transfer sheet is free in the template shop. You’ll need to scroll down in the gallery to find the templates.
Hani
Hi, thank you for this very detailed post. Have you ever tried placing royal icing transfers on a cake frosted with buttercream? If not, would you believe this may work?
Hello Jenny,
I have used them on a cake. You can see the pictures in the post, under using transfers in cake decorating.
I used royal icing as barrier and a glue so they wouldn’t absorb fat from the buttercream. Transfers I used where on the sides of the cake.
Hello, if you add royal icing transfers to a fondant cake, can you put the cake in the refrigerator or will the royal icing transfer melt after you take it out of the fridge? Thanks!
Hi Grace, from my experience if is fine. I used royal transfers on fondant and had the cake in the fridge overnight with no problems.
Hi Hani, i do follow you and i love your tutorials. Just out of curiosity, i read about the Armenian cake you made for christening and me being Armenian was curious to know if you are too 😊
Hi Rosaline,
thank you so much. I’m not Armenian, the cake I made was for a friend, who is Armenian.
This is very informative thank you! I made gingerbread transfers, they’re not dry yet but when decorating them they were already crumbling. I’m worried they will be way too delicate?
Any tips?
Hi Arielle,
Were you making gingerbread men transfers?
I’m curious how thick was your royal icing? When you say crumbling, I’m not understanding the part when you say when decorating them?
How long were they drying for?
Thank you for this! Very informative! How long can you store the RIT as you describe?
Hi Lisa,
transfers will keep at least for year and more. Just store them away from the direct sunlight and moisture.
So much great information in this post! I especially love the idea of using stencils like the butterflies. Gives you consistency!
Thank you June. I’m all for making decorating easier. Stay Safe.
So happy I found you! I’m new to transfers! How do you prevent cratering in the small areas ??? Please help!
Hi Carrie, try using thicker icing 20-30 second. Or you can try decorating in 2 steps.
Example : First Pipe a line down the middle of the section you suspect will most like have a crater, let it crust well and then flood over it. Middle crusted line acts like a support in area where icing tends to sink in. This method can be a hit or miss, when the support line is too tall or thick it can end up showing through the top layer of icing when icing dries.
Hi
My first attempt at RIT was a fail. After an hour or so they melted and crumbled. I had made “20” transfers in celebration of 2020 and put them on cupcakes iced with Italian buttercream. Any idea what went wrong? Could it Possibly be:. Buttercream is too moist so moisture went into the transfer? Transfer was too delicate? I used too thin of royal icing ( I used a 20 sec icing) Are RIT only good if you lay them flat on the cookie/ cupcake surface?
I will keep researching but am wondering if you have some insight.
Thanks
Hello Jayelle,
I’m sorry to hear you are having issues with RIT. While transfers can be used on cakes and cupcakes depending on the buttercream fat can seep into transfer. However it shouldn’t really cause transfer to fall apart unless there is a significant amount of moisture and it breaks up the royal icing transfer. I used transfers on these cupcake along with Swiss Buttercream. What I noticed is that transfers started to “drink” up fat from the buttercream on a second day and overtime they turned darker however they maintaining its shape.
I used transfers on these Gingerbread House Cupcakes
Tip : In the future pipe additional icing (blob of thick icing) on the back of the transfer as a barrier between buttercream and transfer.
When you applied the dry transfer to a wet royal icing or piped wet icing around the transfer, how did you prevent the transfer from absorbing moisture from the wet royal icing? I made royal icing doors for gingerbread house cookies and “glued” the doors on the dry cookies, then piped around the door to give it a “recessed” look. When the cookie started to dry, I noticed the doors looked like they had “wet” spots. Have you encountered this? If so, how do you prevent it?
Thanks:).
Very informative post, thank you!!
Hi Lorna,
it sounds like you experienced called a butter bleed. When butter stains the icing. You can try few things in the future
After cookies are baked let them cool on the baking sheet for about 5-6 minutes then transfer them onto a cooling rack. Once cooled place them on a paper towel. Paper towel seems to absorb excess fat that could cause the bleeding. Try adding little bit of white food coloring to your royal icing, it can also help with this issue. Overall though butter bleed doesn’t affect the taste. Often, in my experience in a period of 2-3 days icing becomes fully “stained” and icing ends up being darker.