Fondant Cookies
Are you looking for a quick and easy way to decorate stunning cookies in no time? Have you thought of using rolled icing to make Fondant Cookies?
HOW TO MAKE FONDANT COOKIES STEP-BY-STEP
In this cookie decorating tutorial, I’ll show you how to make simple fondant cookies using the marbling decorating technique I think you’ll love. It’s fun and quick and produces showstopping cookies in minutes.
WHAT ARE FONDANT COOKIES
Fondant cookies are covered with a thin layer of rolled icing. Fondant is rolled out, cut to the desired shape, and then glued onto the cookie with water or edible glue. Then fondant decorated cookies are left out to let the fondant harden and dry. Cookies can then be packaged and stacked. Fondant cookies can be simple or elaborate pieces of art.
TOOLS FOR FONDANT COOKIE DECORATING
For today’s simple cookie decorating project, you need a rolling pin, cookie cutter, and food-only paintbrush
- If you get into fondant cookie decorating, there are many other tools that you can use to create unique designs.
- Rolling Pin
- Fondant Tools: smoother, ball tool, veining tool, dresden tool, scribe tool,
- Silicone Mat
- Palette Knife
- Cookie Cutters
- Pastry Wheel
- Exacto Knife
- Embossing Mat or Rolling Pins
- Decorative Molds
- Paintbrush
- Edible Glue or use water
- Corn Starch
- Piping bags – for adding piped details with royal icing or glaze
- Decorating Powders: petal dust, luster dust, etc.
- Food Gel Colors – to color fondant
- Tylose Powder – to make fondant harden faster or to make quick gum paste
- Pasta Machine – it’s often used to roll out fondant

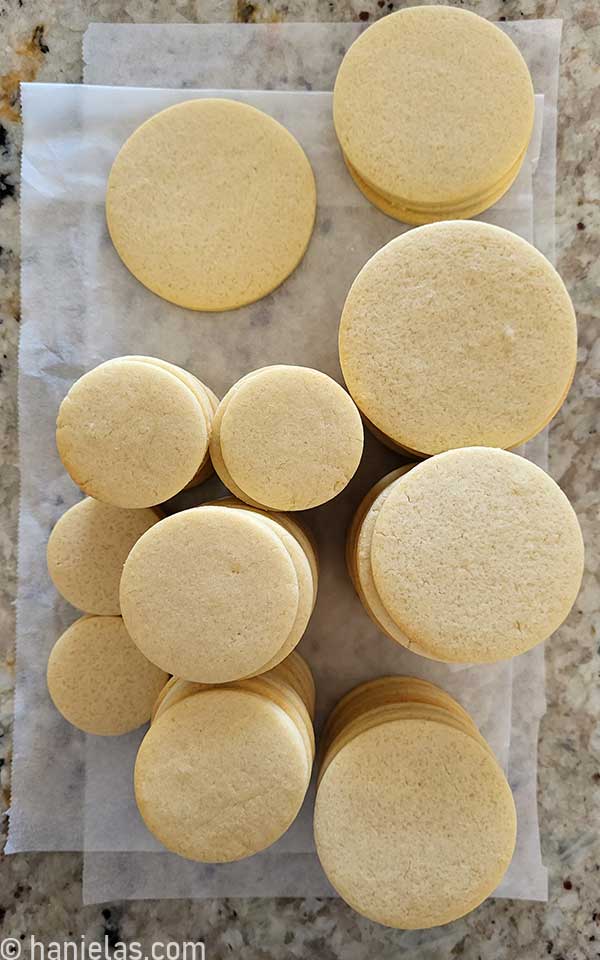
COOKIES FOR DECORATING
First, you need to bake cookies. I used my popular Vanilla Cut-Out Sugar Cookie Recipe. You can use any cookies that bake flat. Applying fondant layer on cookies with a flat top is much easier.
FONDANT
I like using homemade marshmallow fondant. It tastes great, it’s cheap, and super easy to prepare. You can prepare a small or mini-batch if you need just a little bit. It’s easy to flavor with extracts, emulsions, or oil flavorings.
Which fondant tastes the best? I like the taste of homemade marshmallow fondant. Of course, you can purchase fondant; many cake decorators prefer commercially prepared fondant for different reasons. You can also knead marshmallow fondant and store-bought fondant to make a hybrid fondant.

HOW TO COLOR FONDANT
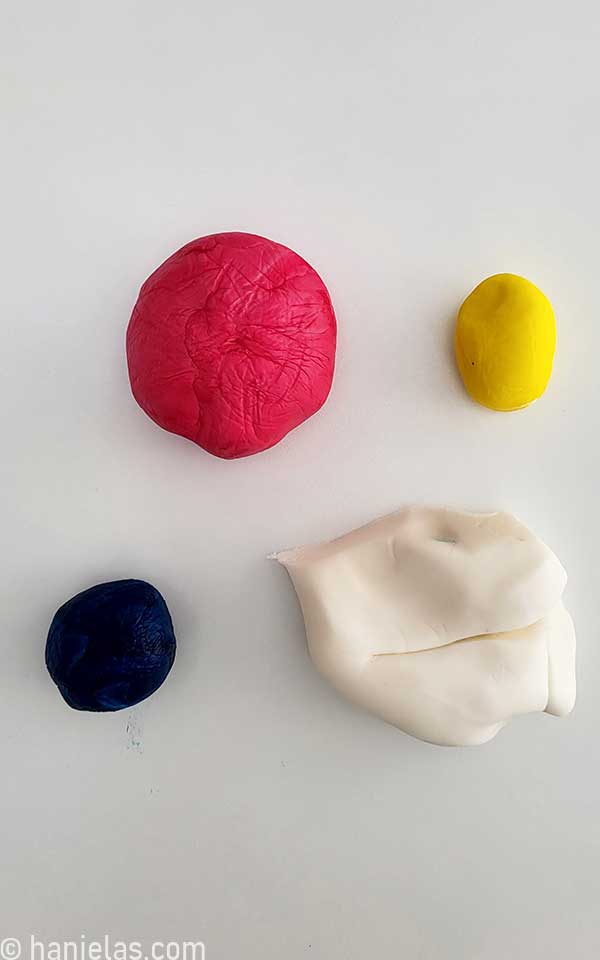
Before you can create marbled fondant, you need to color it. I used yellow, sapphire blue, and electric/hot pink gel food colorings to tint the fondant. How much of what color you make depends on the design. If you want to achieve a design with a lot of blue, make more blue fondant. I wanted my dominant color pink, so I dyed more fondant with pink.

Make a well in the fondant and pour a few drops of food coloring. If you haven’t colored marshmallow fondant before, you can follow my easy tips on coloring fondant.
I highly suggest you wear food-only gloves. Otherwise, you’ll also dye your hands. If that happens, don’t panic. You can use a foaming shaving cream like Barbasol to clean your skin from food dye. Let the cream sit on your skin for about 30 seconds, gently massage it, and then rinse.

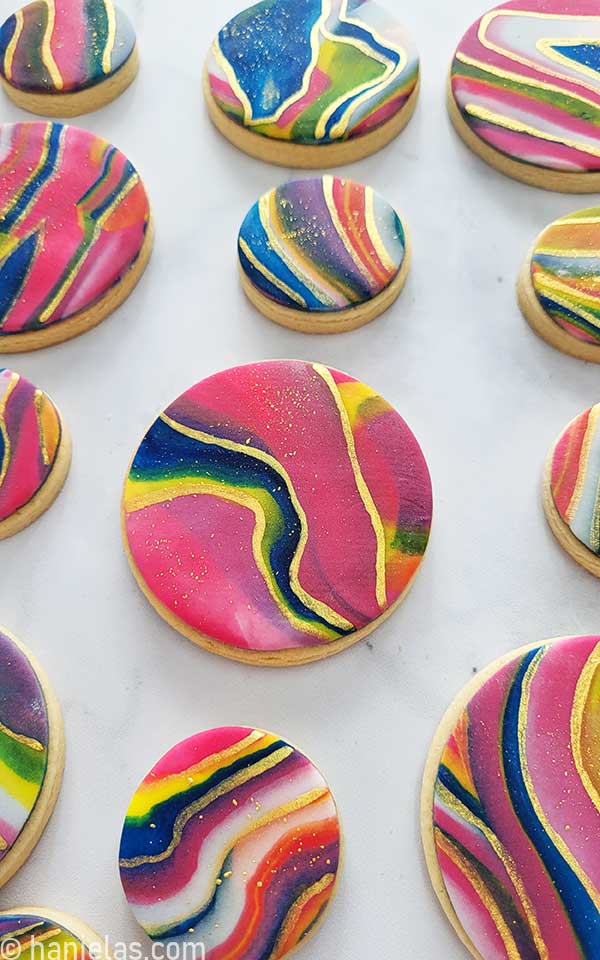
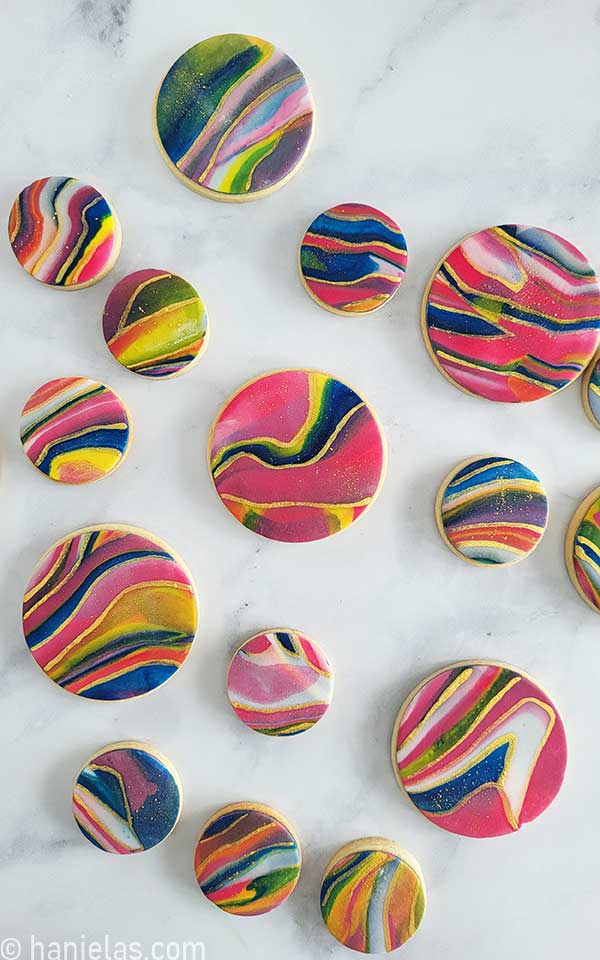
HOW MAKE MARBLED FONDANT COOKIES
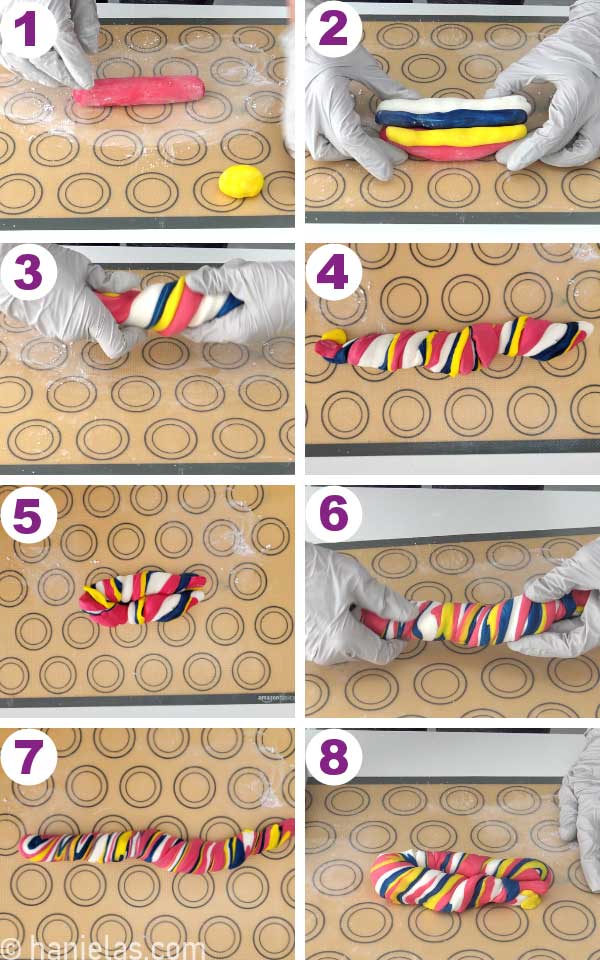
To make the marbled design, I used pink, yellow, and blue, and to create highlights in my marbled fondant, I also used white fondant.
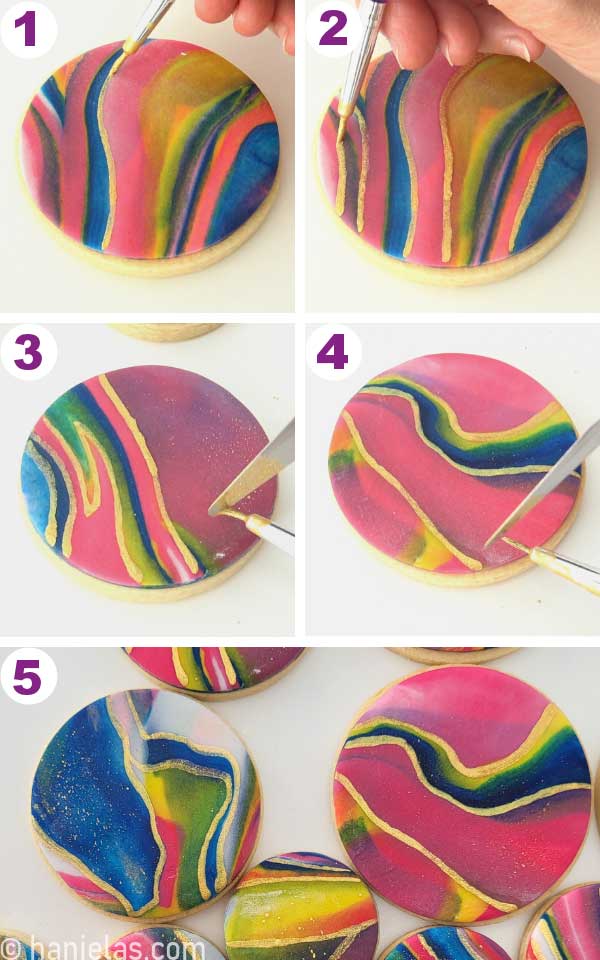
Shape each piece of fondant into a log. Place white and pink logs next to each other and then place blue and yellow on the top (steps 1-2). Gently twist the whole log (steps 3-4). Fold the twisted log in half, twist it again, and fold it in half (steps 6-8).
ROLL-OUT MARBLED FONDANT
Lightly dust your work surface with cornstarch, and press the twisted and folded fondant log down with the palms of your hands (steps 1-2). Use a rolling pin and roll out fondant into a thin sheet (steps 3-5).
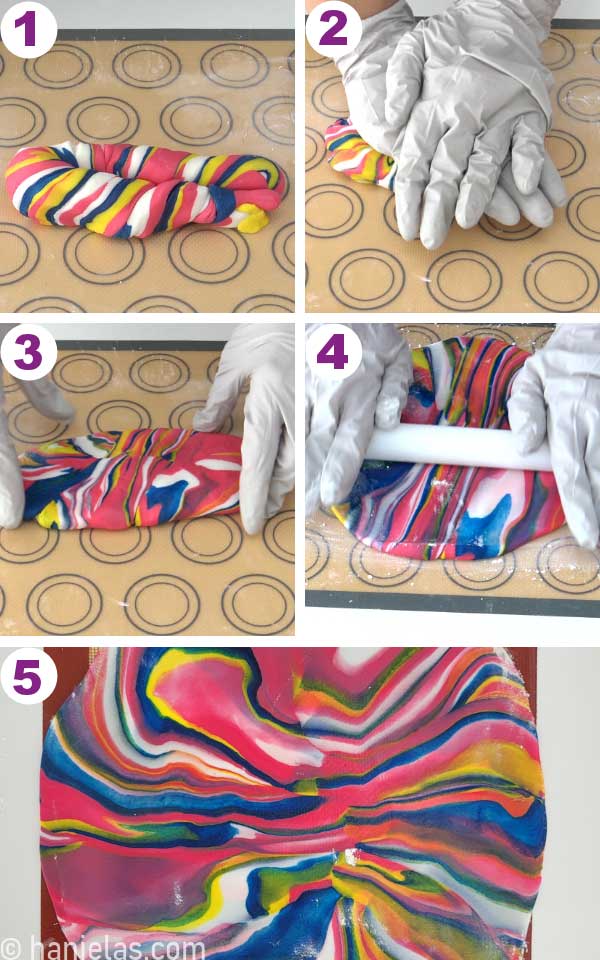
How thick should you roll the fondant for cookie decorating? I like to roll it out about or little less than an eighth of an inch (1/8”), 2-3 mm thick. You can make it thicker but don’t make it too thick so it’s not overpowering it’s also better not to make it too thin because it can tear if it’s too thin.
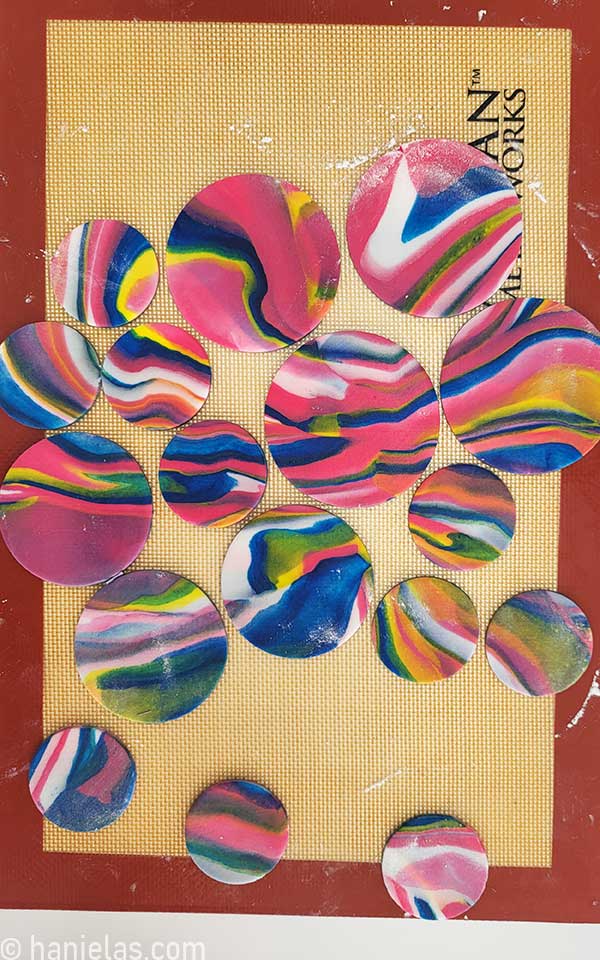
FONDANT CUT OUTS
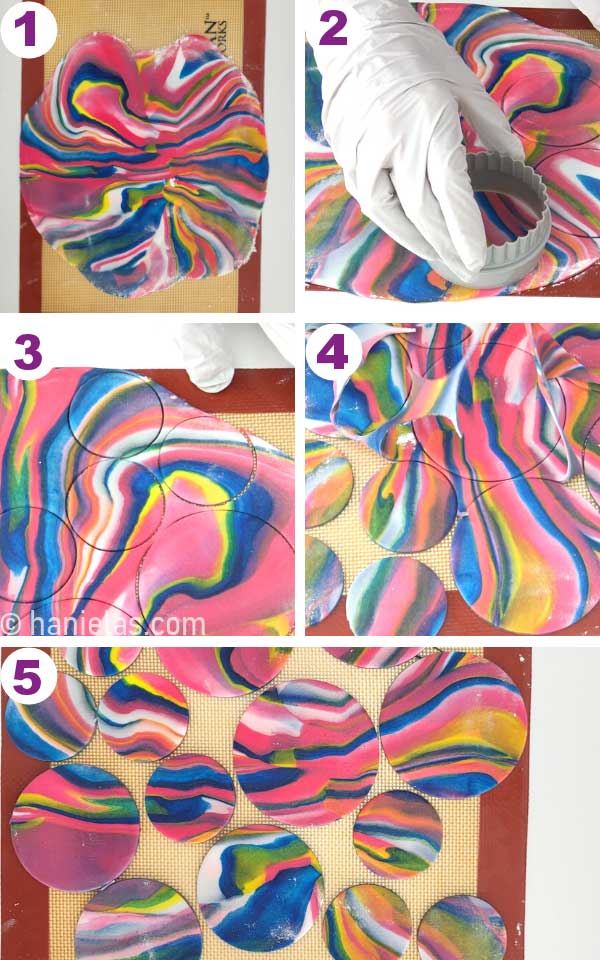
Ensure that rolled-out fondant is not sticking to your work surface. You can gently lift it with your hands or use a long flat decorating spatula and carefully run it underneath. If needed, dust the surface with additional cornstarch to prevent the fondant from sticking (step 1). Use the cookie cutter you used to cut out cookies and cut out as many fondant cut-outs as possible (steps 2-3). Carefully lift the scraps away (steps 4-5).
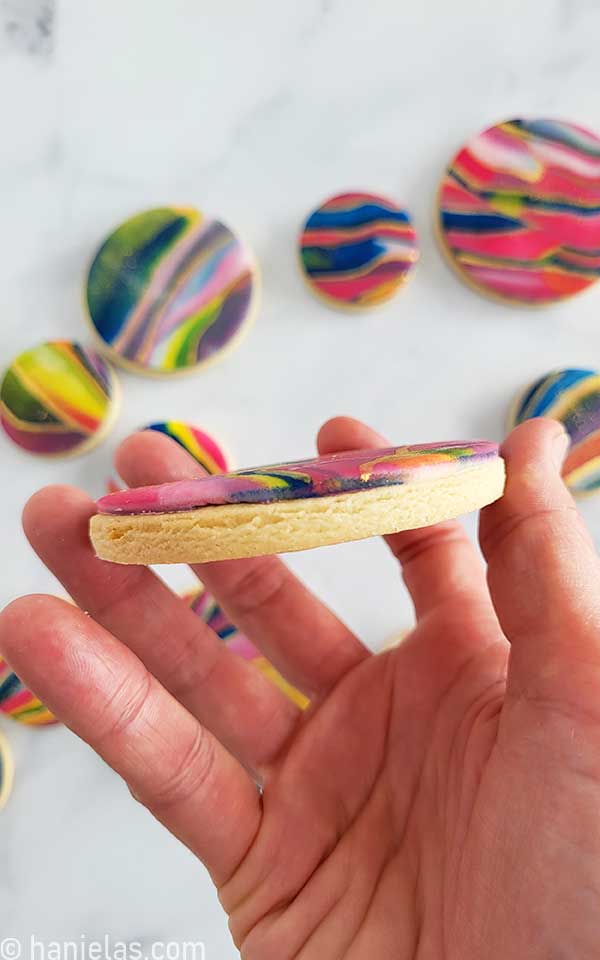
I love the fondant marbling technique; each fondant piece is unique, and no two are the same.
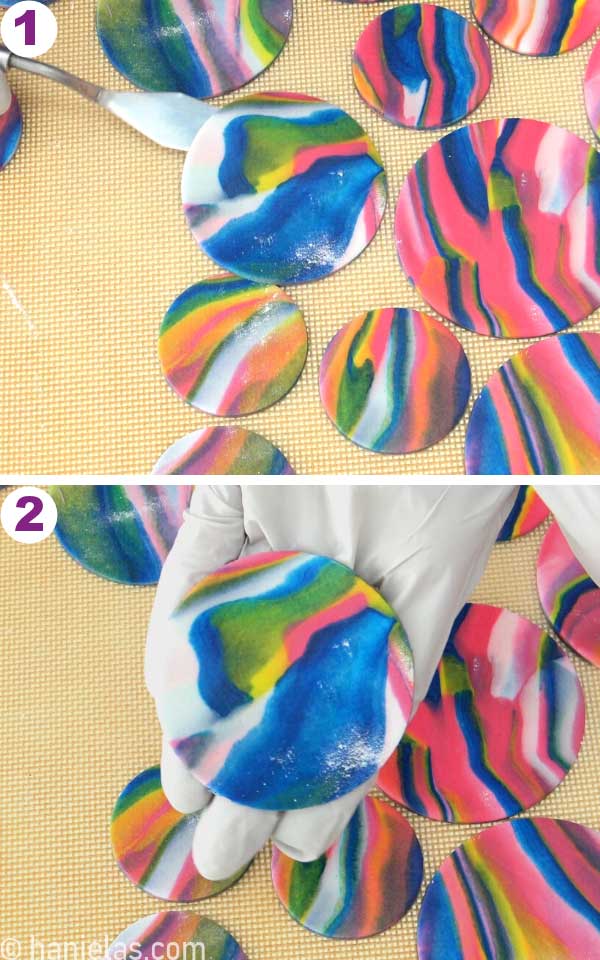
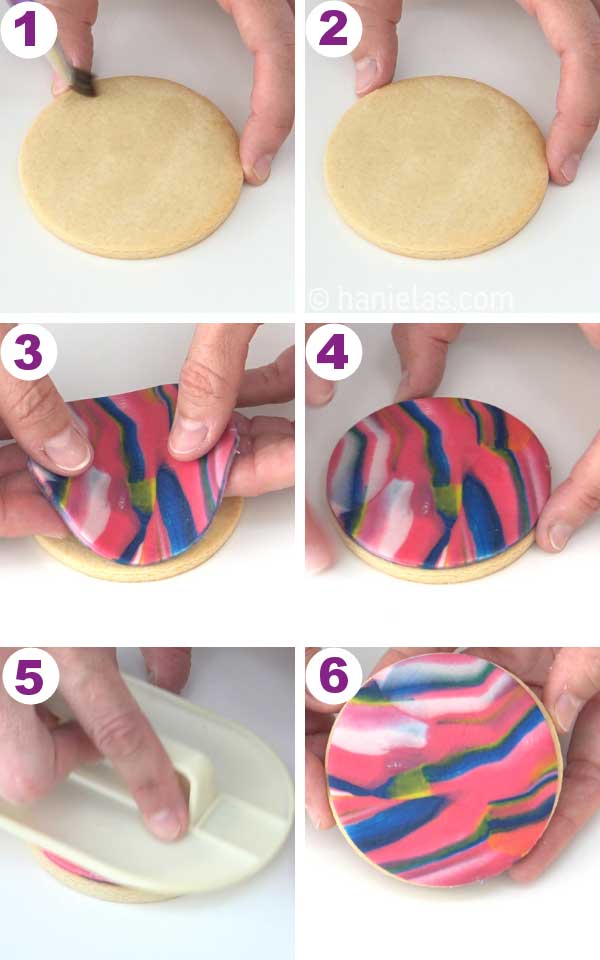
HOW TO APPLY FONDANT TO COOKIES
Use a spatula to carefully lift the cut-out (steps 1-2).
Brush a little water onto a cookie (steps 1-2). Immediately place the fondant cut out onto the cookie (steps 3-4). Smooth the fondant and edges using a fondant smoother (steps 5-6).
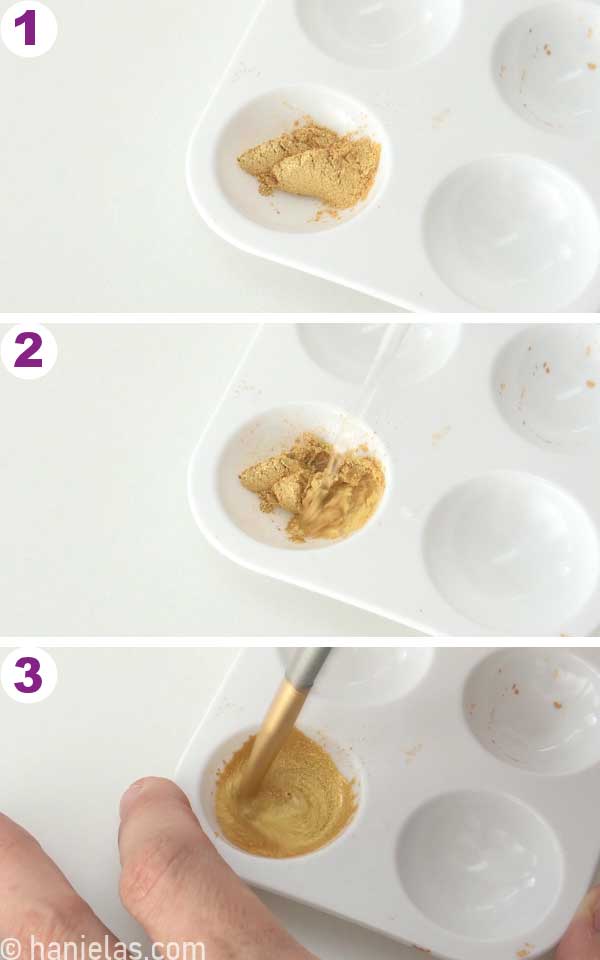
PAINT EDIBLE GOLD ONTO FONDANT
To paint gold lines on fondant, you can use pre-mixed edible metallic paints (for example, Glamourous Gold by Sweet Sticks) or gold luster dust mixed with alcohol.
I used gold luster dust. Add gold luster dust powder (for example, Aztec Gold by Roxy & Rich) into a palette cavity, and pour in a few drops of Everclear (grain alcohol) or clear Vodka (for example, Spirytus Polish Vodka). Mix it to make gold-luster dust paint. If your paint is too runny, let it sit for a couple of minutes until alcohol evaporates and vice versa.
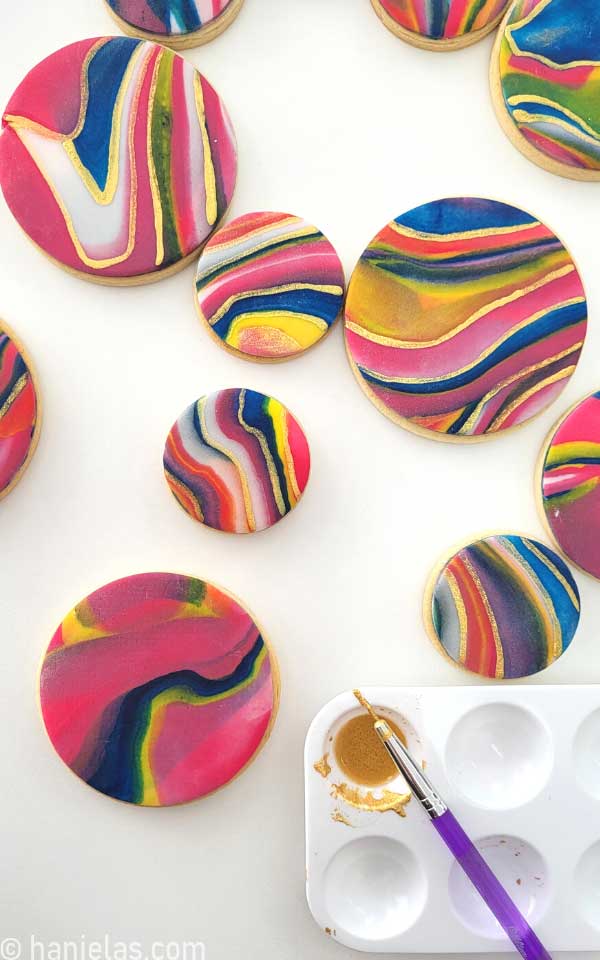
Dip a food-only paintbrush into the edible gold paint, and paint lines across the marbled fondant. Follow natural color borders in fondant (step 2). Then create a soft splatter – run a tip of a palette knife or toothpick thru the paintbrush bristles dipped in edible gold paint. Let the splatter fall onto the fondant (steps 3-4). Allow fondant to hard for 8-24 hours before packaging (step 5).
FONDANT COOKIE DECORATING SUCCESS TIPS
- To glue fondant onto a cookie, I use water.
- How thick should you roll out fondant for cookie decorating? Aim for a thickness of around 1/8” inch (3mm). I like to roll it out to about 2mm thick, a little less than 1/8 inch.
- If you want to package fondant cookies, let the fondant dry and harden. Drying can take anywhere from 8-24 hours.
- Fondant decorated cookies last for two weeks if properly stored.
- Can I freeze cookies decorated with fondant? Yes, as long as the fondant is dry. Package cookies and freeze them in an airtight container for up to 3 months. Let cookies defrost for 8-12 hours, don’t open the container while defrosting.
- You can use royal icing to add delicate piped details on top of the fondant.
- Store fondant-covered cookies in a cool area, not in the fridge, and away from direct sunlight.
- When fondant is exposed to light for an extended period of time colors will fade out.
- If the fondant is too sticky, use some cornstarch.
- And if your fondant is too dry, knead if glycerin to make it more pliable.
- The elephant skin effect can be easily fixed by spraying fondant with water and kneading it in.
- Use gloves when coloring fondant; it can get messy.
- If you get food color on your skin, use foaming shaving cream like Barbasol.
- Use a thin pin needle to remove air bubbles in rolled-out fondant. Poke the hole thru fondant at a shallow angle to pop the air bubble. Learn more about how to remove air bubbles from fondant via Yeners Way.
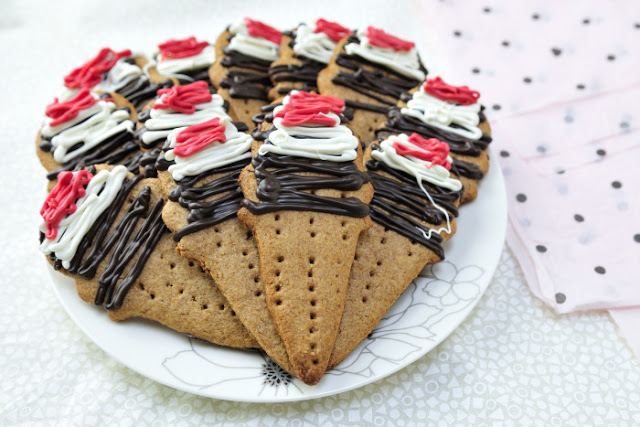
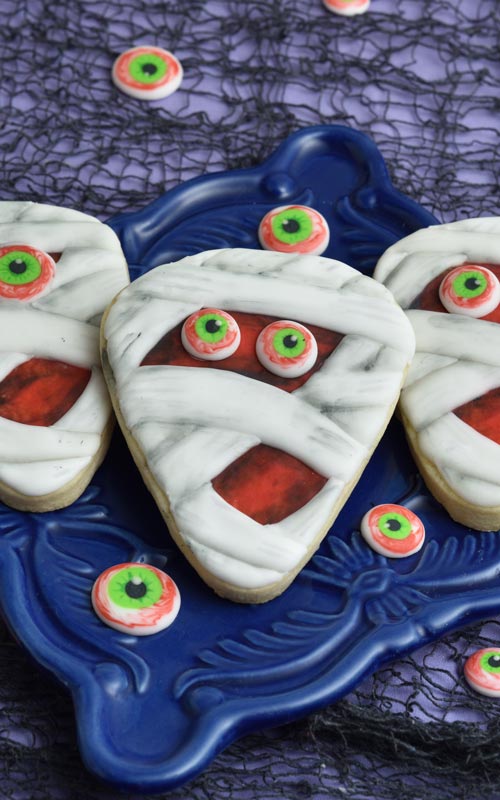
COLORFUL COOKIES IDEAS
- Simple Butterfly Cookies
- Pop Art Spider Cookie
- Unicorn Cookies via LilaLoa
- Day of the Dead Cupcake Cookies
- Mandala Cookies


Hi, I’m Hani
Welcome!
Thank you for visiting Haniela’s. On my blog, you’ll find delicious sweet & savory recipes made with simple ingredients. Why not start a new adventure? Discover a world of cookie decorating with my step-by-step tutorials.

Hi, I’m Hani
Welcome!
Thank you for visiting Haniela’s. On my blog, you’ll find delicious sweet & savory recipes made with simple ingredients. Why not start a new adventure? Discover a world of cookie decorating with my step-by-step tutorials.


hi, i am making the sugar cookies which i have finally happy with, first time doing the fondant top on it, so once ive put it on the cookie, do i then stamp it, and leave to dry a bit before i put it into a cellophane bag, if i made to fondant before hand,would i just add to the cookie the next day with some edible glue. Any suggestions highly appreciated. thankyou
HI Barbara,
To make the fondant with a stamp, it’s best to roll out the fondant,
Impress it with a stamp, cut it out, and attach it to a cookie.
You can also leave the rounds dry out a little before adding them to the cookie with edible glue, a tough of water or piping gel works.
I was looking for another cookie decorating idea to do with a group of elderly ladies and this one is perfect for them! Thank you! I’ll likely need more ideas that are easy enough for them to do so keep posting : )
Hi Debbie,
That’s fantastic! Thank you.
Can really feel from this post the passion you have for what you do! Very informative and well written. Can’t wait to give them a go.
Thank you, Deborah.
This is a super helpful article! I’m struggling with biscuits going soft when left out overnight for the fondant to dry/harden. Any tips please?
Hi Ginnie,
Thank you for your question. Have you tried letting the cookies rest for a day before decorating them with
fondant? Or maybe try baking them for a little longer. Do you live in a humid climate?
No, I’ve just baked some and popped them into a air tight container to decorate tomorrow- hopefully that will help. Also baked a little longer this time, thank you 🙂
Not particularly humid at this time of year, no!
Keep me posted on how it goes.
Good Luck.
Hani
How long after making the fondant do you add it to the cookie? Can you freeze the fondant top and add it to a sugar cookie a week later?
Hello Diandra,
You can prepare fondant rounds, let them slightly air dry for a day, store them in an airtight container between layers of parchment, and then add to the cookies when ready.
If you make them in advance, a week or two, they are fine.
Hi! I love these! Can you tell if you used all the equal size color logs or are some color logs smaller?
Thanks so much!
Hi Mindy
If you can, I recommend making the logs about the same length. I used different colors amounts, but it depends, on what color you want dominant.
Happy Baking.
Hani
Can fondant cookies be kept in the fridge?
Hi Nicole,
Personally, I don’t like to store fondant cookies in the fridge as the condensation can cause issues. If you can make sure the fondant is dry, you should be fine storing them in the fridge, in one layer. That being said
if you need to make cookies ahead of time, make sure the fondant is fully dry, and package cookies. Freeze them stacked upright (vertically)
and then when ready to use let them slowly thaw on the counter overnight.
These are really beautiful Hani, I need to make your fondant recipe!
Thank you so much, June. They were fun to make. So easy, too.:-)