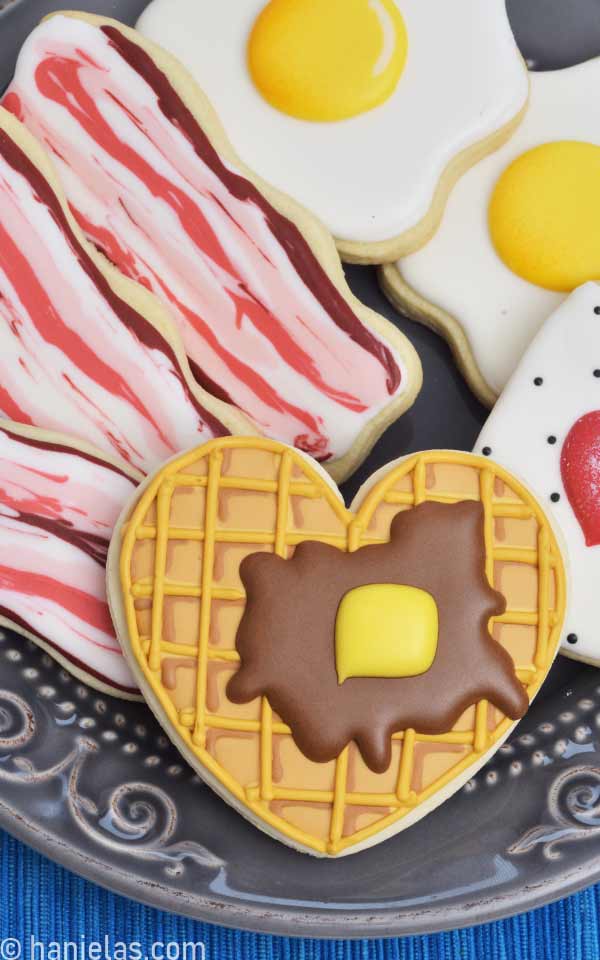
Decorated Breakfast Cookies: Waffle, Bacon, Egg and Coffee with Whipped Cream
Delight your taste buds and eyes with playful royal-icing decorated Breakfast Cookies. Today I’ll show you how to creatively decorate waffles, eggs, coffee with whipped cream, and bacon cookies with royal icing.
updated from 2019
HOW TO DECORATE BREAKFAST COOKIES WITH ROYAL ICING
- Beginner’s Guide To Cookie Decorating
- Ultimate Guide to Cut-Out Cookies (tips, tricks, troubleshooting)
- Royal Icing Recipe
- Small Batch Royal Icing Recipe
- Cookie Icing Recipes (includes vegan royal icing, glaze, fondant)
- Guide To Royal Icing Consistencies with Visual Help(what is stiff, flood icing, etc.)
- How To Freeze Royal Icing
- How To Make Royal Icing Transfers
- Royal Icing FAQ ( for example: how to make black icing, color bleeding, storage, and more)
- How To Make a Cookie Cutter Template
- Ultimate Guide To Cookie Decorating Tools
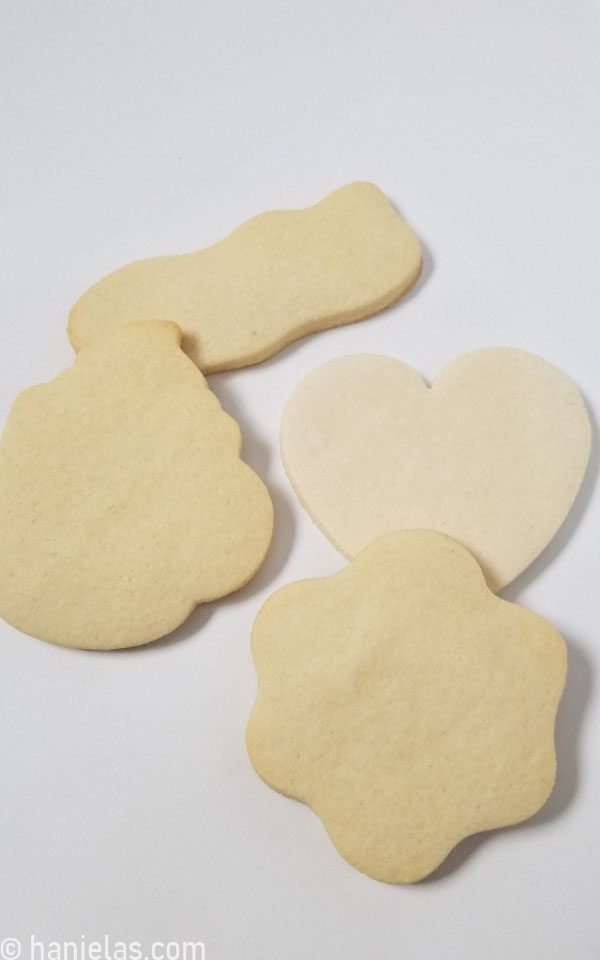
WAFFLE, EGG, BACON COFFEE MUG COOKIE CUTTERS
First, find cookie cutters that resemble waffles, eggs, bacon, and coffee. You can look in your existing cookie cutter collection to find suitable cutters for this fun cookie decorating project. For example, a waffle can be a heart or a square. The egg can be easily made from a large daisy flower or a slightly misshaped oval, or a round. Use a mug cutter to make coffee cookies, and cut out a wavy strip to make the bacon.
They are many cutters on the market already. But if you don’t want to spend money on new cutters, look at what you have or make your own cookie-cutter templates.
DECORATED EGG COOKIES
Ice the cookie with 15-second consistency white icing and let the icing dry.

- Make and egg yolk as royal icing transfer.
- Draw small circles onto a piece of paper. The size of the circle depends on the size of the cookie. For example, for a 3-inch round cookie, make egg yolk circles 1 inch in diameter or slightly over 1 inch. Slide the template with circles into a smooth protector sheet, or lay wax paper over the template. Learn more about Royal Icing Transfers.
- And now you can pipe yellow rounds with 20-second consistency warm yellow royal icing – into white icing, add lemon yellow with a minuscule amount of orange to get a warm yellow (steps 1-3).
- Immediately pipe a white reflection line with white 15 to 20-second icing. Run the tip of the scribe or toothpick thru a white line to shape it. Let dry overnight (steps 4-5).
- Once yellow circlers are dry, lightly airbrush the opposite edge to the white reflection with orange airbrush color. Let dry for 5 minutes (step 6).
- Peel the wax paper to remove the egg yolk circle. These transfers can be made ahead of time (steps 7-8).
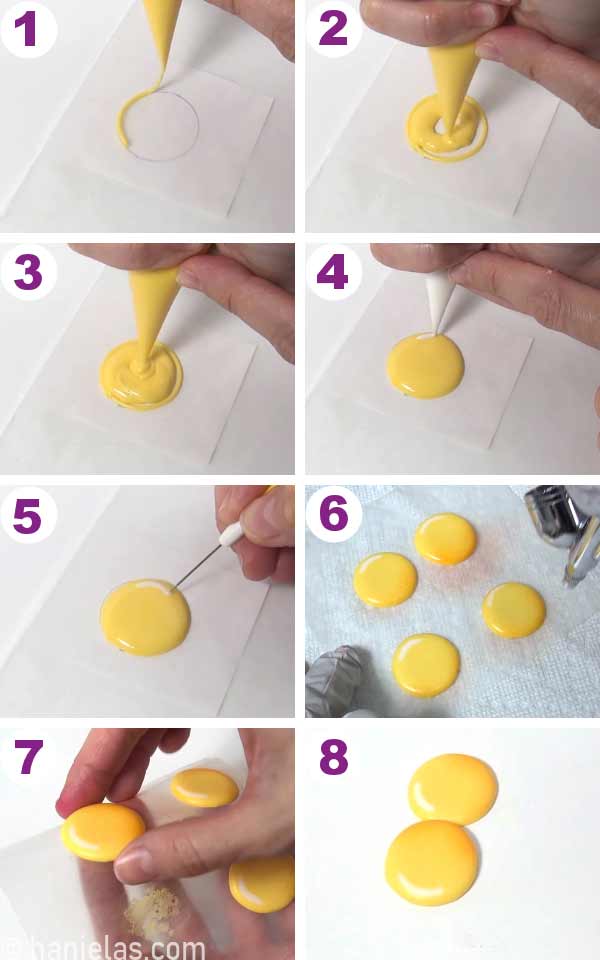
Pipe a small amount of white icing on the back of the egg yolk. Place it onto the dry white icing and use gently shifting motion to make it stick.

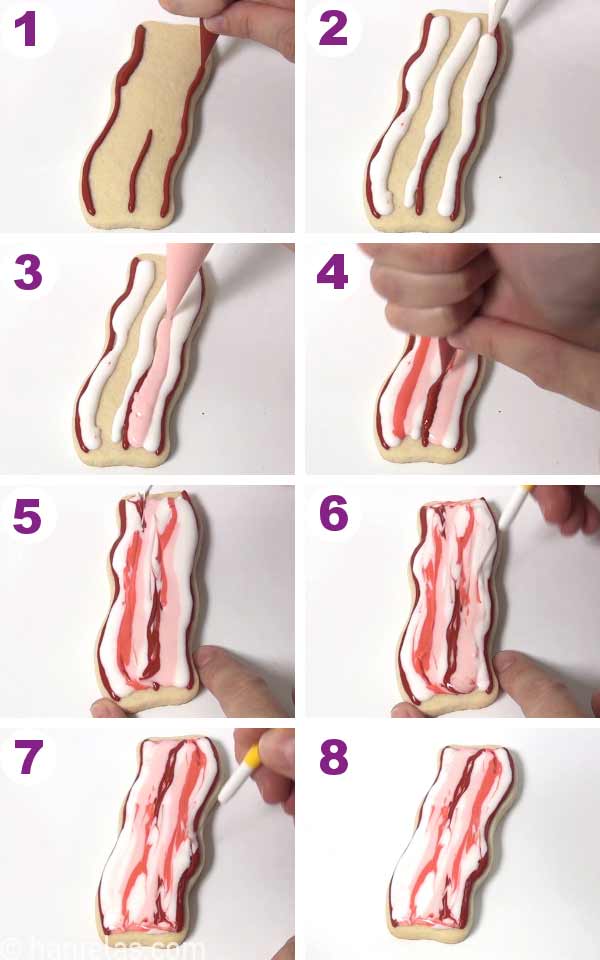
HOW TO DECORATE BACON COOKIES WITH ROYAL ICING
If you are struggling with the bacon design, I recommend trying it first, on a piece of wax paper or parchment. It can’t hurt to have rehearsal before the premiere.
- To make the bacon cookies I used 15-second consistency icing
- White – create highlights in the design.
- Light pink – prepare pink icing and mute it down with a touch of ivory gel food coloring. Use a toothpick to pick a small amount of color on the tip. Don’t add too much color at once.
- Medium Red – color icing with red gel color until light red, then add a touch of ivory to mute it down.
- Maroon – color icing with red gel color, and add a minuscule amount of brown to tint the red. Use a toothpick to pick up a tiny amount of food coloring just on the tip of the toothpick. It’s better to use less and then add more if needed.
Start by piping lines with maroon icing, then add white (steps 1-2). Fill the gaps with light and dark pink (step 3). Add more maroon if needed (step 4).
Don’t wait for the icing to crust; immediately, with the scribe tool or a toothpick, run the tip of the tool thru the icing. Disturb the borders so the colors somewhat blend into each other, creating more natural bacon pattern.

EASY DECORATED WAFFLE SUGAR COOKIES
These waffle cookies are really easy and fast to create. Use wet on wet royal icing decorating technique to create the base layer grid and shading. Then pipe a raised outline and grid to finish the waffle design.
- Base layer (15-second icing) – color icing with ivory, then add a touch of yellow, and a touch of brown gel food colors.
- Wet-on-wet grid (15-second icing) is light tan color – to white icing, add a minuscule amount of brown and yellow.
- Wet on-wet corner shading (15-second icing) is light brown icing.
- Raised grid (piping consistency) – you can use the same color you used for the wet-on-wet grid or make it slightly more yellow.
- Chocolate syrup (15-second icing) – color icing chocolate brown gel color.
- Butter slice (20-second consistency) – color consists of lemon yellow a sublime amount of orange – just like egg yolk.
Outline and flood the cookie with 15-second consistency icing, then immediately, using the wet-on-wet royal icing technique, pipe the grid with light shade of brown (steps 1-8).
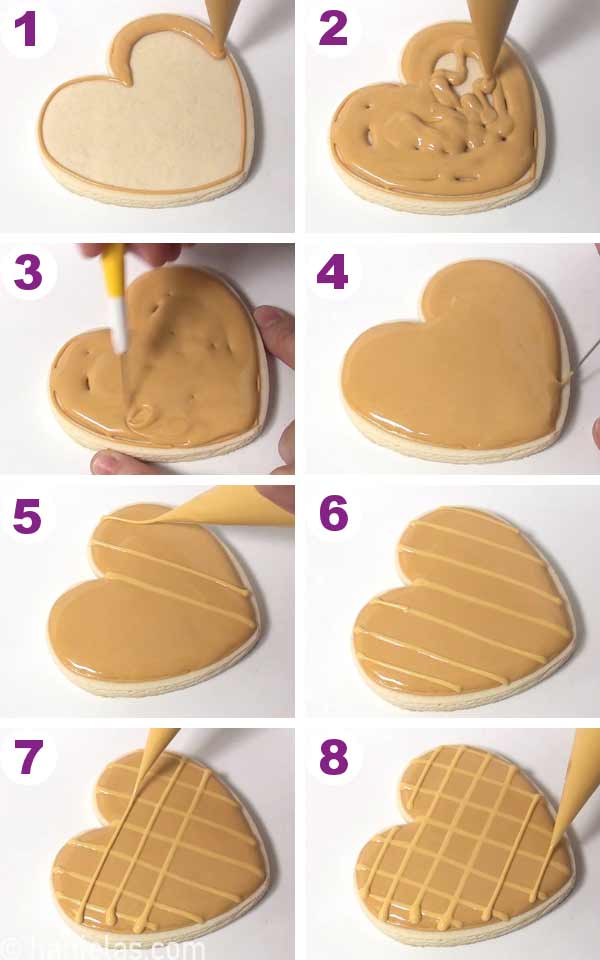
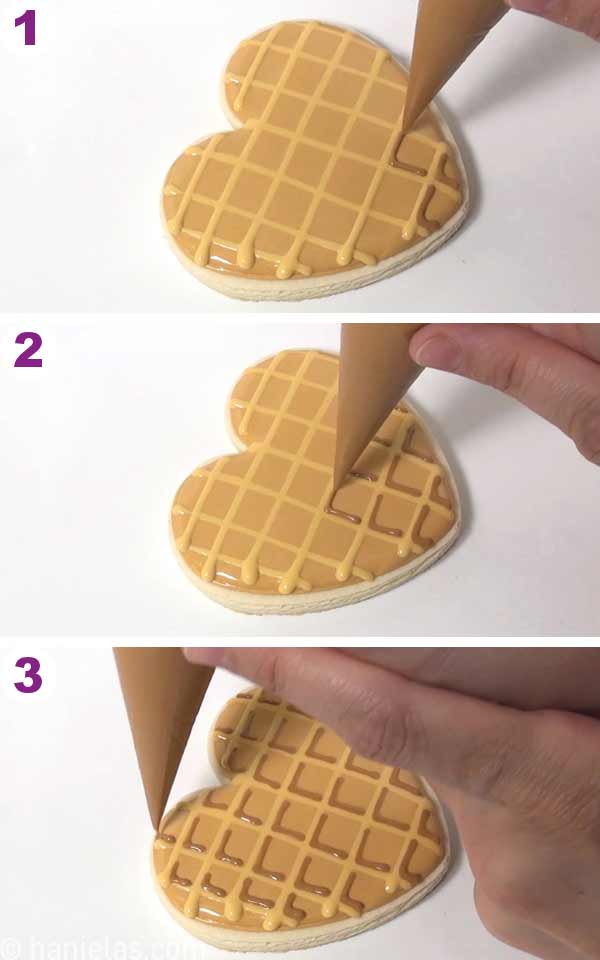
Don’t let the icing crust. Create corner shading with dark brown icing, again, using wet-on-wet decorating technique (steps 1-3). When piping lines onto the wet base, it’s important not to make the opening on the piping bag too big. I use tipless bag and the opening on my piping bag is equivalent to a round piping tip #1. Let the icing dry.
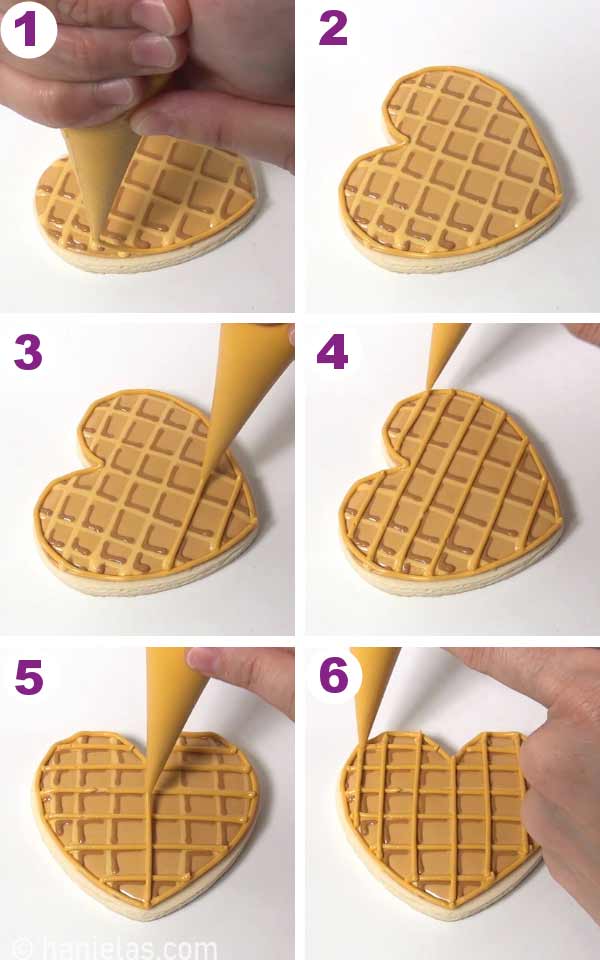
With piping consistency icing pipe the outline and pipe the grid, overlapping the 1st wet-on-wet grid (steps 1-6). Let icing crust well before moving onto the next step.
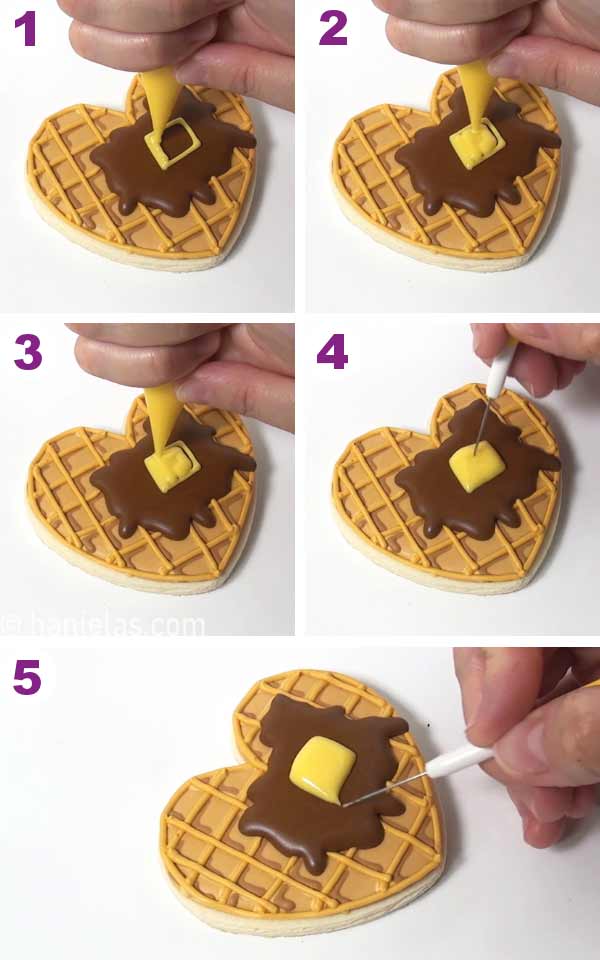
With chocolate brown royal icing pipe the chocolate syrup (steps 1-5). Let it crust well.

Lastly, let’s add some butter. Pipe a square/rectangle with 20 – second icing, use a scribe to shape the icing (steps 1-5). Let icing dry before packaging.
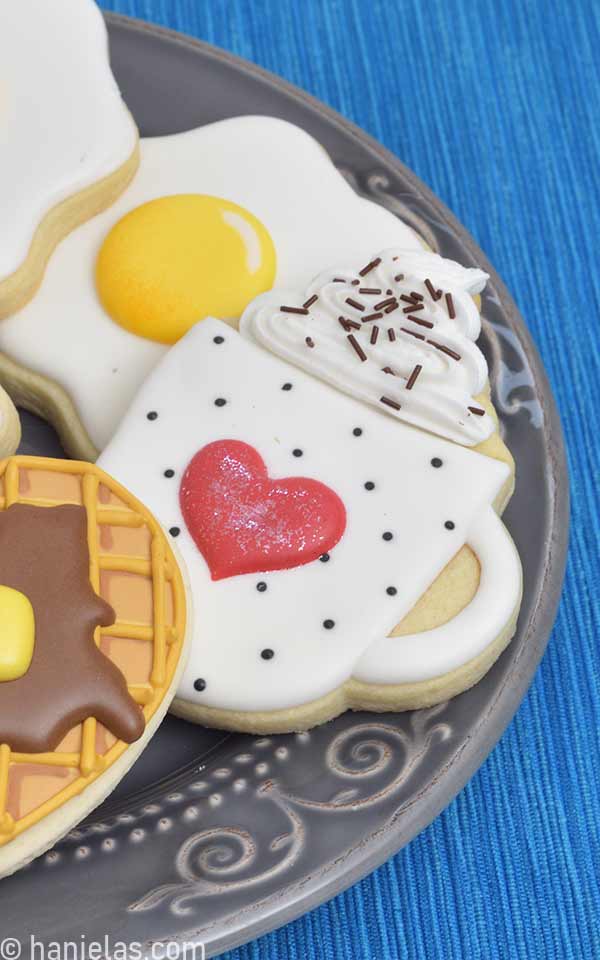
BREAKFAST COFFEE MUG COOKIES DECORATED WITH ROYAL ICING
This specific cookie cutter is designed in a way so you can pipe a swirl / dollop of whipped cream on the top, above the cup. If you have a simple cutter without it you can skip the whipped cream and/or instead add realistic coffee bubbles using simple decorating technique.
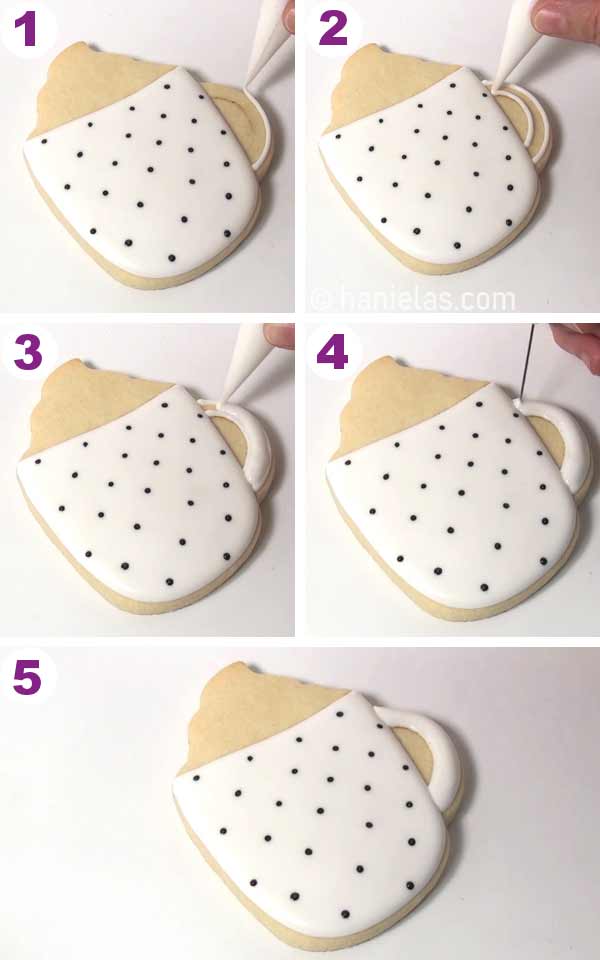
If you are unsure where to start piping, use an edible marker and draw the top outline onto a cookie. Outline and flood the cup with 15-second consistency white icing (steps 1-4). Immediately, using 15-second consistency black icing, pipe a polka dot pattern onto the wet white base. To pipe polka dots, I start in the middle and then I stagger the dots accordingly (steps 5-8). Let the icing crust.

Now you can make the handle. Outline and fill he section with white icing. If you are concerned about cratering you can pipe a small, support line in the middle, let it crust and then flood the handle.
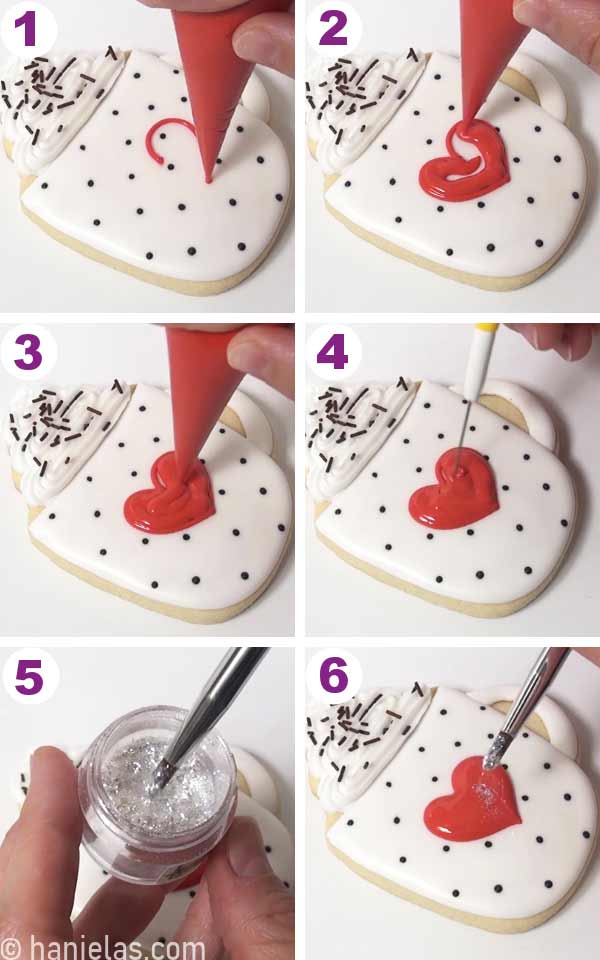
Pipe the whipped cream with stiff royal, using a start piping tip #21. Immediately, dust icing with sprinkles. If you wait for the icing to crust sprinkled won’t stick to it (steps 1-3).

And lastly, for a burst of color you can pipe a heart in the middle of the mug with 15-second consistency red icing. To make the heart sparkle, dust wet red icing with edible glitter (Sugar Art Diamond Dust). Let dry before packaging.
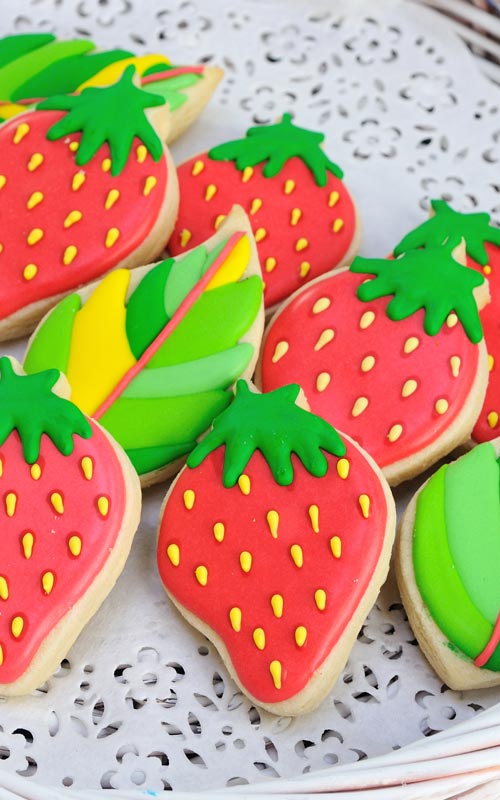
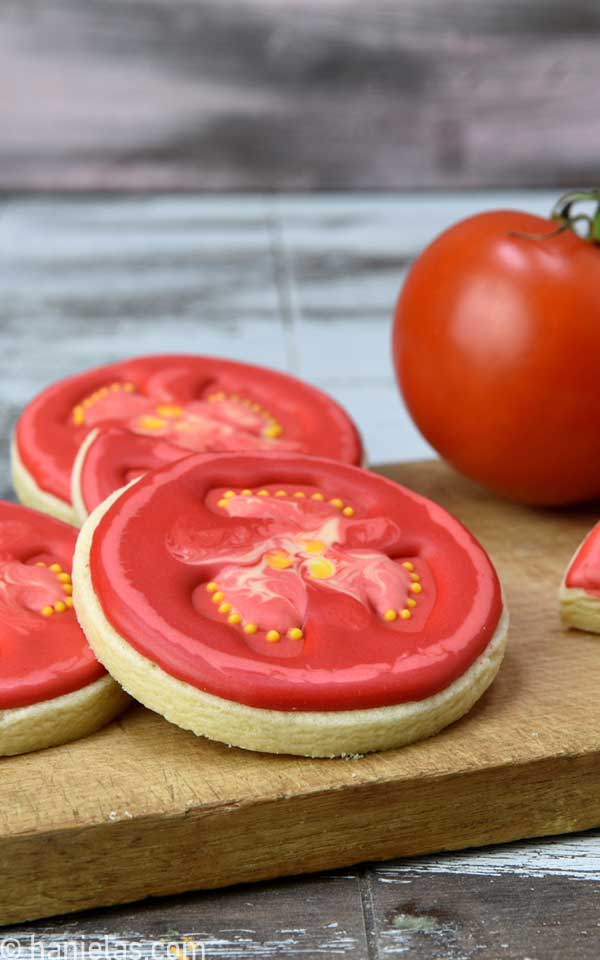
MORE CREATIVE COOKIES THAT LOOK LIKE OTHER FOODS
- Cantaloupe Cookies
- Decorated Tomato Cookies
- Sushi Cookies
- Decorated S’more Cookies
- Watermelon Pinata Cookies
- Garden Vegetable Produce Cookies
- Decorated Hamburger Cookies
- Shrimp Pasta Salad Cookies

Did you make these Decorated Cookies? Tag @hanielas on Instagram and hashtag it #hanielas
TO MAKE DECORATED BREAKFAST COOKIES YOU NEED
- Cut Out Cookie Recipes (includes classic, vegan, gluten free, chocolate and more)
- Royal Icing Recipe
- Cookie Cutters: Mug Cookie Cutters, Egg Cutter (use wide daisy, or misshaped round), Bacon (use a wavy strip), Waffle (use a square or heart)
- Tipless Piping Bags
- Scribe Tool/Toothpick
- Gel Food Colors: yellow, orange, ivory, brown, pink, black, red
- Airbrush (optional)
- Orange Airbrush Color (optional)
- Star Piping Tip #21 to pipe the dollop of whipped cream onto the coffee mug
- If you prefer using piping tips to decorate, I suggest using these round piping tips:
- #3 for flood work
- #2 or PME #1.5 for details (waffle grid)
- #1 for fine wet-on-wet technique (for example waffle grid, shading, polka dots)
This post contains Amazon affiliate links that earn me a small commission, at no cost to you. I only recommend products that I use and love. Learn more about my affiliate policy here.

This post was originally published on January 16th, 2019. On April 24th, 2023 I updated this tutorial with step-by-step pictures, written instructions and a video.

Hi, I’m Hani
Welcome!
Thank you for visiting Haniela’s. On my blog, you’ll find delicious sweet & savory recipes made with simple ingredients. Why not start a new adventure? Discover a world of cookie decorating with my step-by-step tutorials.

Hi, I’m Hani
Welcome!
Thank you for visiting Haniela’s. On my blog, you’ll find delicious sweet & savory recipes made with simple ingredients. Why not start a new adventure? Discover a world of cookie decorating with my step-by-step tutorials.


Olá, gosto muito do seu canal. Continue a fazer-me sonhar.
Fiz uma publicação no meu blogue com um link de um dos seus vídeos. Espero que não se importe com esta humilde bloguer. Caso não concorde com a publicação que fiz, diga-me que eu retiro do blogue.
Obrigada 🙂
Obrigado por me avisar, basta ligar de volta para o meu blog. Obrigado.