
Easy Homemade Hot Dog Buns |Sof & Fluffy|
I’ve been baking these soft, eggless homemade hot dog buns since 2014, and after more than a decade of reader feedback, it’s easy to see why this recipe has stood the test of time. Home bakers love how soft and fluffy the buns turn out, how easy the dough is to work with, and how versatile the dough is, from hamburger buns to dinner rolls.
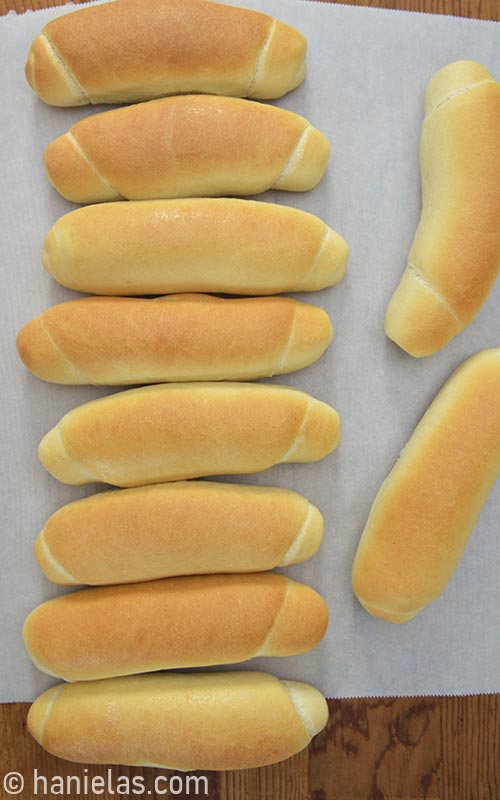
updated from 2018
WHY READERS LOVE THESE HOMEMADE HOT DOG BUNS
- Incredibly soft and fluffy: These buns bake up light, tender, and pillowy with the perfect texture for hot dogs: they’re soft enough to bite into without falling apart.
- Easy enough for beginner bread bakers: The dough is smooth, forgiving, and easy to shape, with step-by-step instructions that make homemade buns approachable even if you’ve struggled with yeast dough before.
- Made with simple pantry ingredients: No specialty flours or dough conditioners required – just everyday ingredients that come together into bakery-quality buns.
- Reliable results every time: Many readers say this has become their go-to recipe because it consistently produces beautiful, soft buns batch after batch.
- Better than store-bought: Once you’ve tasted these fresh homemade buns, it’s hard to go back to packaged versions filled with preservatives and unnecessary additives.
- Works for hamburger buns and rolls, too: Use the same dough to make hamburger buns, dinner rolls, or sandwich rolls, making it one of those recipes you’ll reach for all year long.
- Buns freeze beautifully: I make a double batch every 2 weeks, and they freeze like a charm.
Featured Comment ⭐⭐⭐⭐⭐- “Finally! A truly outstanding hot dog bun recipe. Thanks so much for posting this. So light. So savory and So EASY! It is now my go-to recipe for all things bun-ny.” Jonathan
A TASTE OF MY CHILDHOOD
Growing up in Czechoslovakia, these incredibly soft buns were among the most popular breads you could buy at the local grocery store or bakery. They’re still a staple throughout Slovakia and the Czech Republic today, often enjoyed with hot dogs, sausages, or simply spread with butter for breakfast.
If you’ve ever visited Prague or Bratislava, there’s a good chance you’ve tasted one. Their soft, fluffy texture makes them perfect for breakfast, lunch, or dinner. They’re exactly the kind of bun I still love to bake at home. Let me show you how to make our favorite homemade hot dog buns.
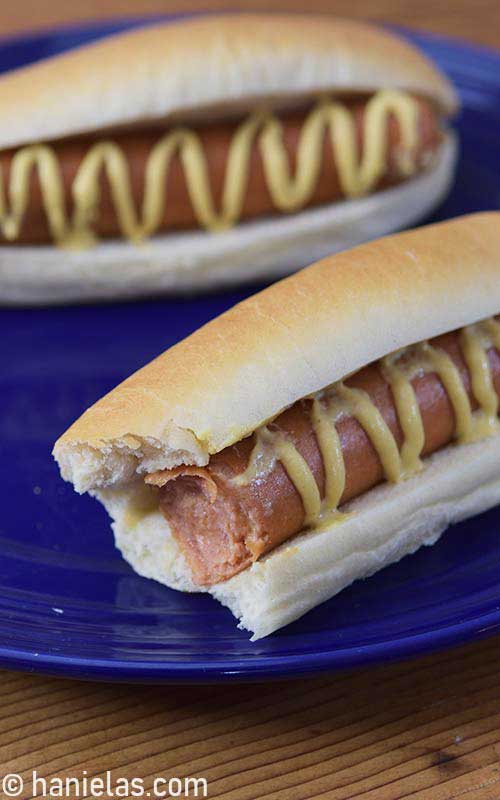
INGREDIENTS YOU’LL NEED
This homemade hot dog bun recipe uses just a handful of pantry staples. The main ingredients are flour, yeast, and fat.
- Flour – Bread flour, all-purpose flour, or a combination of both (see flour tips below).
- Yeast – Active dry yeast or instant yeast.
- Water – Warm water activates the yeast and hydrates the dough.
- Honey or sugar – Just a pinch helps feed the yeast and helps with browning.
- Fat -Softened butter, vegan butter, lard, duck fat, or olive oil all work well. For vegan hot dog buns, simply use vegan butter.
- Salt – Adds flavor and strengthens the dough.
CHOOSING THE RIGHT FLOUR
I’ve tested this recipe with several types of flour over the years, and all of these options produce delicious, soft buns.
- Bread flour (recommended) – Produces the softest, chewiest buns. Look for a protein content of 11–13% for the best results.
- All-purpose flour – A good-quality all-purpose flour, such as King Arthur or Pillsbury, works great!
- A blend of bread flour and all-purpose flour – If that’s what you have on hand, use any combination, such as 1:1, 2:1, or 1:2.
Tip: Don’t worry if you only have a small amount of bread flour. Mixing it with all-purpose flour still produces soft, fluffy homemade hot dog buns.
PREPARE DOUGH
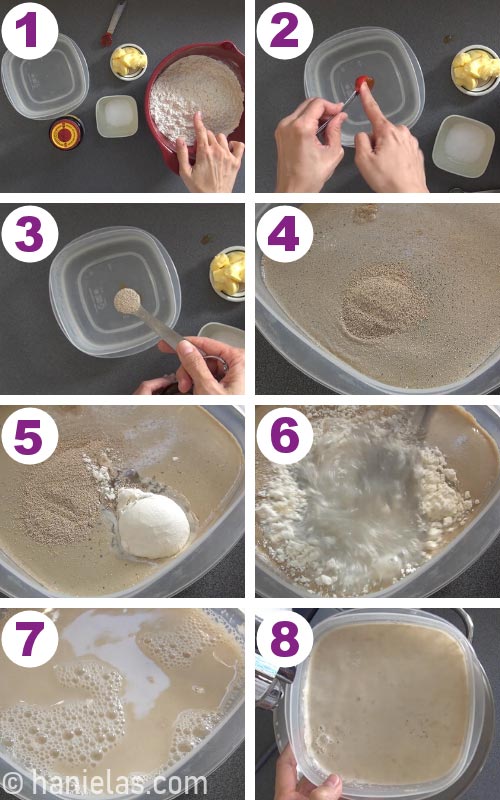
1. Make the yeast sponge: Pour the room-temperature or warm water into a bowl or plastic container. Add the honey (or sugar), dry yeast, and 1 tablespoon of flour. Whisk everything together and let the mixture rest for about 5 minutes, until it’s foamy and bubbly. This tells you the yeast is active and ready to use.
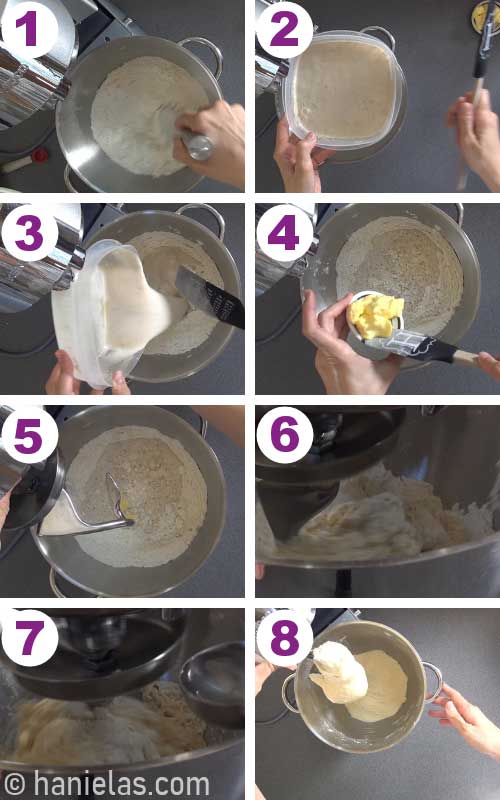
2. Knead the dough: Add the flour and salt to the bowl of a stand mixer and whisk to combine. Make a well in the center and add the bubbly yeast mixture along with the softened butter (or other fat). Mix until a shaggy dough forms, then knead with the dough hook for 5-10 minutes, or until the dough is smooth and elastic.
TIP: When in doubt, use room-temperature water. Hot water can kill the yeast, while cooler water is perfectly safe—it may just take a few extra minutes for the yeast to become foamy and active.
TIP: Different flours absorb moisture differently, so don’t be surprised if your dough needs a slight adjustment. Add water, 1 tablespoon at a time, if the dough feels very dry, or 1–2 tablespoons of flour if it feels too sticky. The dough should be soft, smooth, and slightly tacky, but not sticky.
FIRST RISE | PORTION THE DOUGH

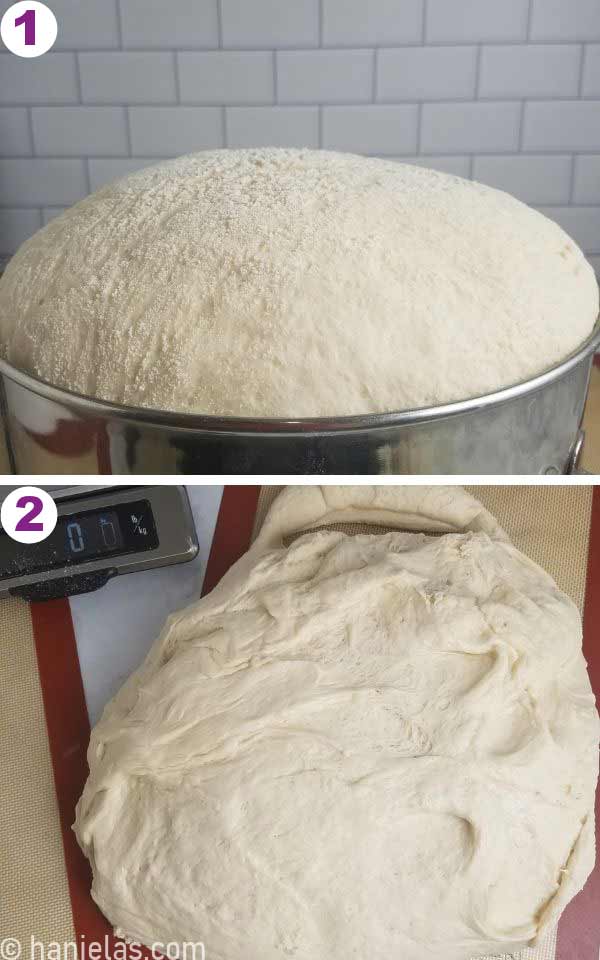
1. First rise: After kneading for 5–10 minutes, the dough should be soft, smooth, and slightly tacky. It’s perfectly normal if some of it is still clinging to the dough hook. Transfer the dough to a clean work surface and shape it into a smooth ball (steps 1-4).
Lightly grease the mixing bowl with olive oil or nonstick spray (steps 5-6). Return the dough to the bowl, cover it with plastic wrap and a damp kitchen towel, and let it rise in a warm, draft-free spot for about 30 minutes, or until doubled in size (steps 7-8).
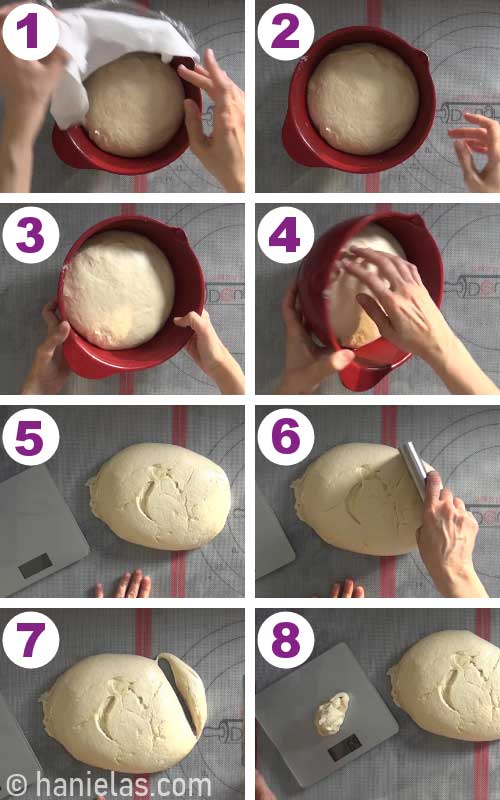
2. Portion the dough: Turn the risen dough out onto a clean work surface and weigh it. Divide the dough into equal portions, using a kitchen scale to ensure each piece weighs about the same. This helps the buns bake evenly and finish at the same time.
Tip: For standard hot dog buns, I portion the dough into 90–100 grams (3-3.5oz) pieces. If you prefer smaller buns, simply make each portion a little lighter. For large hamburger buns aim for 100-110 grams ( 3.5-3.8 oz).
PRE-SHAPE THE DOUGH
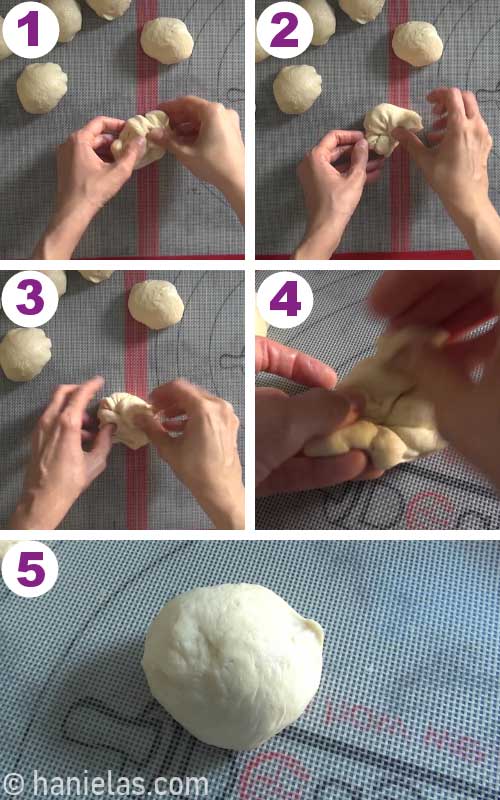
Shape each portion of dough into a smooth ball. Cover the dough balls with a kitchen towel and let them rest for 5 minutes. This short rest relaxes the gluten, making the dough easier to roll out and shape.
ROLL & SHAPE THE HOT DOG BUNS
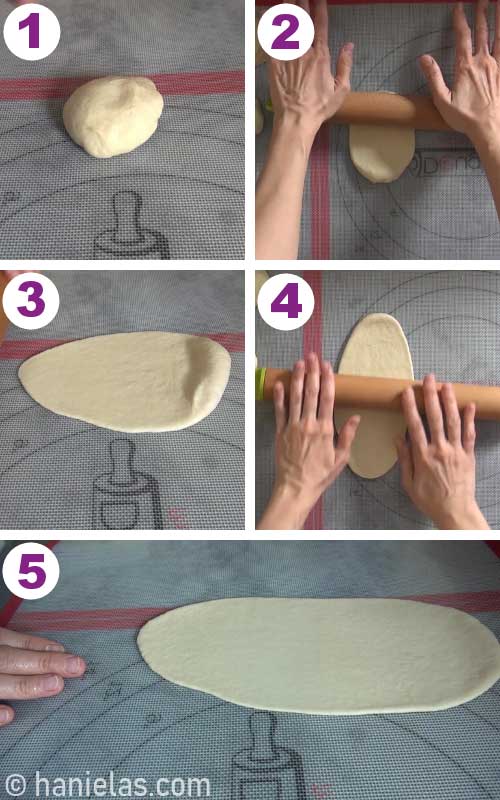
1. Roll the dough into ovals: Roll each dough ball into a thin oval. I like to do this on a silicone baking mat using a silicone rolling pin. The dough lightly grips the mat, making it easier to stretch into shape without adding extra flour. A silicone rolling pin also tends to stick less than a wooden one.
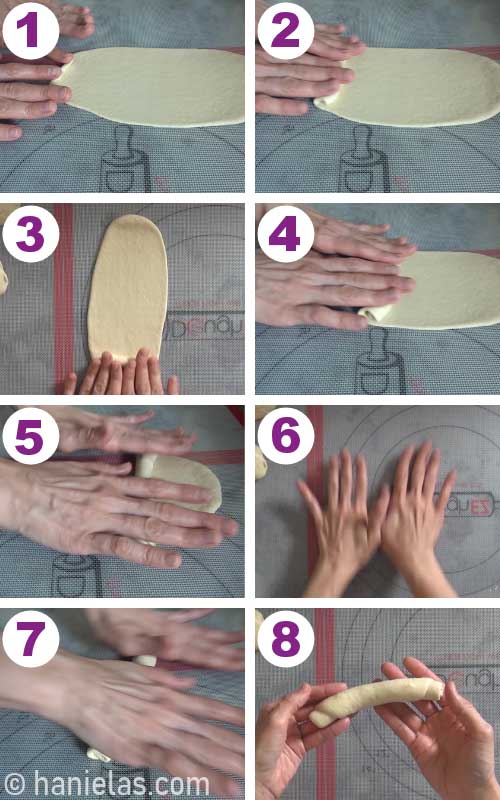
2. Shape hot dog buns: Starting at the short end, roll the dough into a log, working away from you. Use the palms of your hands to gently press and seal the dough with each roll.
Once you reach the end, keep your palms lightly on the dough and roll it back and forth a few times. As you roll, apply slightly more pressure toward the ends while moving your hands outward. This creates gently tapered ends, giving the buns their classic shape.
Tip: For the easiest shaping, use a silicone baking mat or roll the dough directly on a clean granite or quartz countertop. If neither is available, line your work surface with a few overlapping sheets of food-grade plastic wrap. All three methods help keep the dough from sliding around, making it easier to roll into an even oval without adding extra flour.
ARRANGE THE BUNS | SECOND RISE
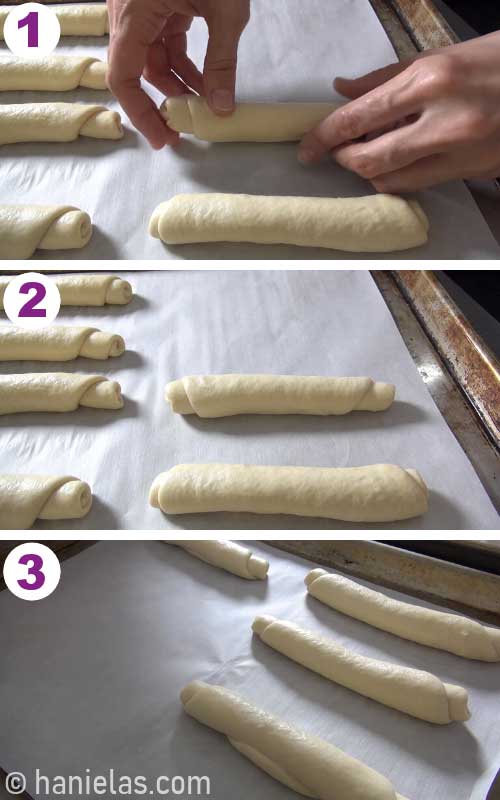
1. Arrange the buns: Place the shaped buns on a parchment-lined baking sheet, leaving 2–3 inches (5–7.5 cm) between each bun to give them room to expand as they rise and bake.
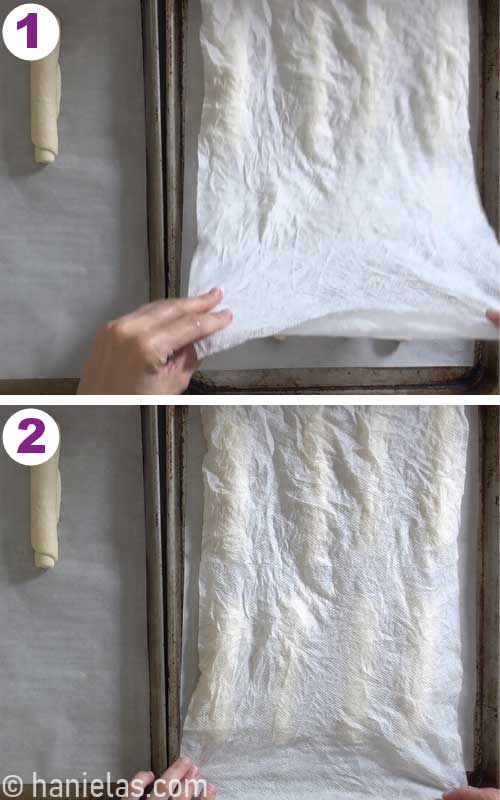
2. Second rise: Loosely cover the buns with a damp kitchen towel or damp paper towels. Let them rise in a warm, draft-free spot for about 30-45 minutes, or until noticeably puffy.
Tip: If covering the buns with paper towels, make sure they’re just lightly damp, not wet, to prevent sticking. You can also loosely cover the buns with well-greased plastic wrap or a lightly floured kitchen towel.
PREPARE FOR STEAM BAKING | SPRAY BUNS
Have you used steam in bread baking? Introducing steam, especially during the first few minutes of baking makes a big difference in the texture and appearance of homemade hot dog buns.
- Maximizes oven spring – Steam keeps the surface of the dough soft and flexible, allowing the buns to expand to their full volume before the crust sets.
- Creates a lighter, fluffier crumb – Without steam, the crust forms too quickly, limiting expansion and resulting in denser buns.
- Promotes beautiful browning – Steam helps dissolve natural sugars on the surface of the dough, encouraging an even golden-brown crust.
- Creates a smooth, slightly shiny crust – Moisture gelatinizes the starches on the surface, giving the buns their soft, bakery-style finish.
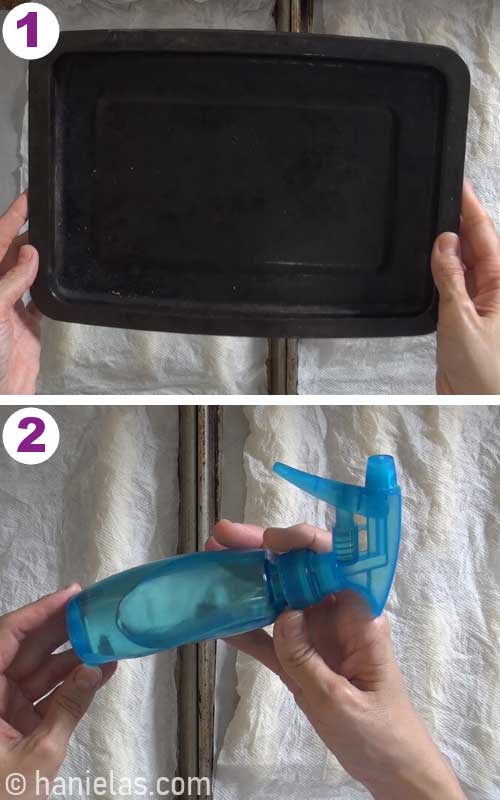
1. You’ll need:
- A shallow oven-safe dish or tray (I use a small tray from an old toaster oven, don’t use glass)
- A spray bottle filled with room-temperature water.
- Place the shallow dish on the bottom oven rack before preheating the oven.
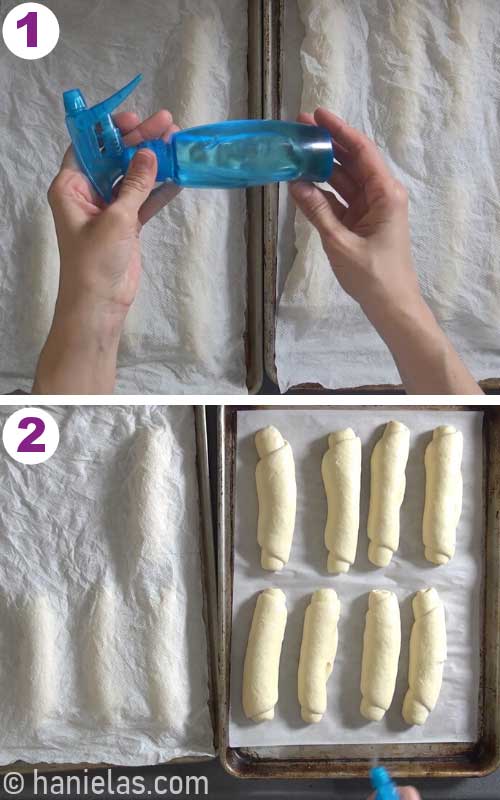
2. Preheat the oven to 425°F (220°C) with the shallow dish on the bottom rack.
Once the buns have finished their second rise, remove the cover. Just before baking, generously spray the tops with room-temperature water (steps 1-2), then immediately transfer the buns to the preheated oven.
CREATE STEAM IN THE OVEN
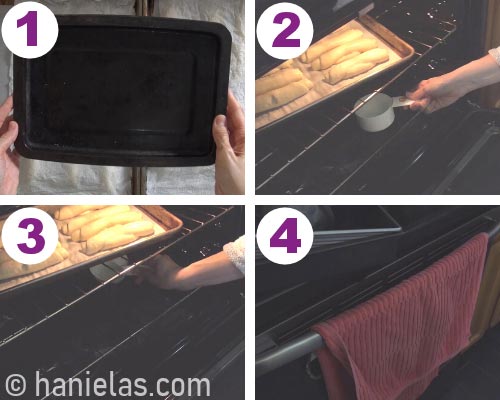
Immediately place the baking sheet in the preheated oven. Carefully pour about ⅓ cup of water or add a handful of ice cubes to the hot shallow dish on the bottom oven rack. The water will instantly create steam, so close the oven door right away to trap it inside.
Tip: Be careful when adding the water, the burst of steam can be hot. Pour the water into the hot dish from a safe distance and keep your face and hands away from the steam.
BAKE UNTIL GOLDEN| COOL COMPLETELY
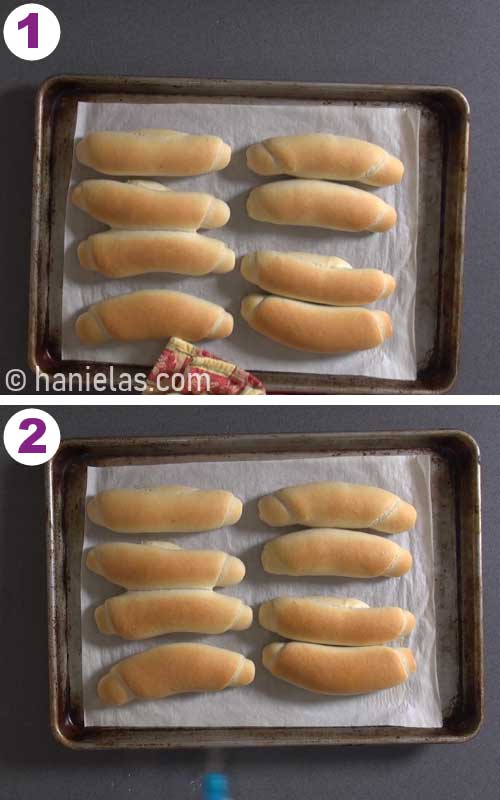
1. Bake untill golden: Bake the hot dog buns for 12–13 minutes, or until they’re lightly golden brown. Remove them from the oven and, while they’re still hot, generously spray the tops with room-temperature water. This final spray helps keep the crust soft as the buns cool. Transfer the buns to a wire rack. If baking in batches, repeat with the remaining buns.
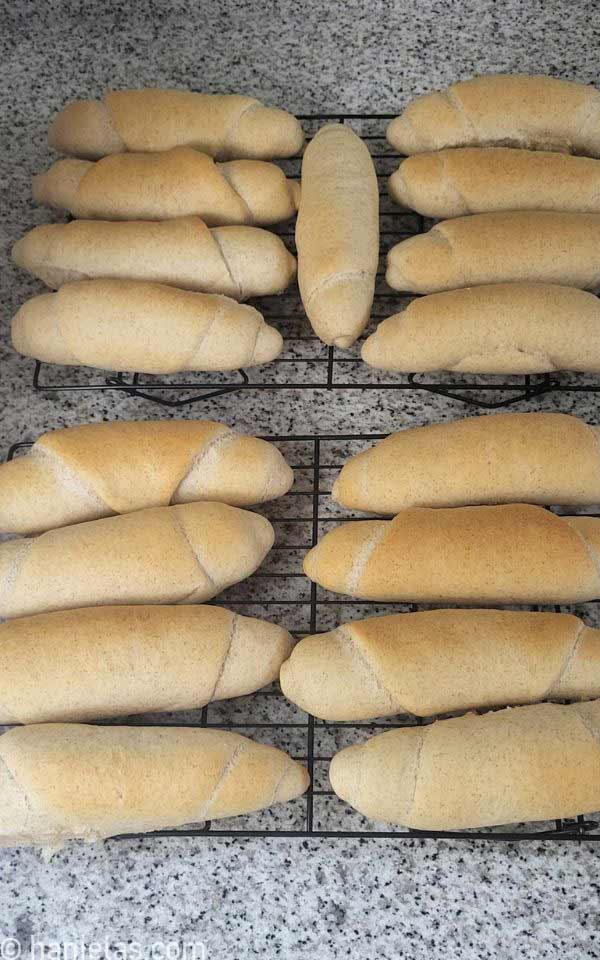
2. Cool completely: Let the buns cool completely on a wire rack before slicing. Cooling allows the crumb to finish setting while preventing condensation from making the bottoms soggy. Once cooled, the buns will have a soft, fluffy interior and a tender crust.
SOFT AND FLUFFY BUNS
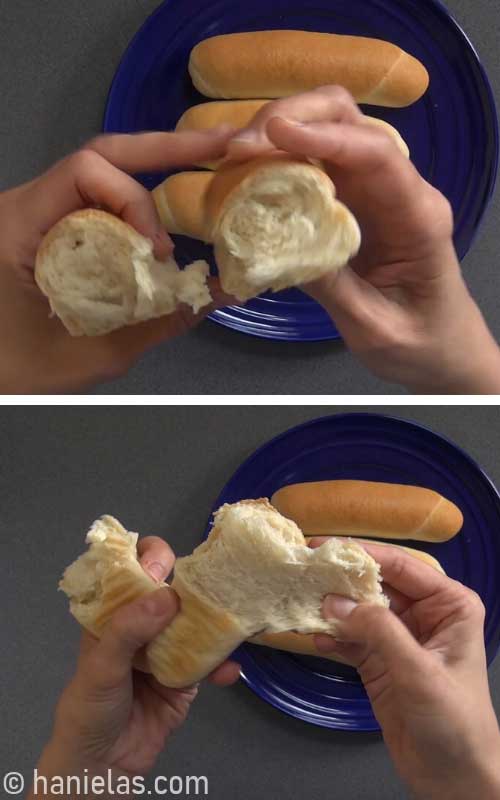
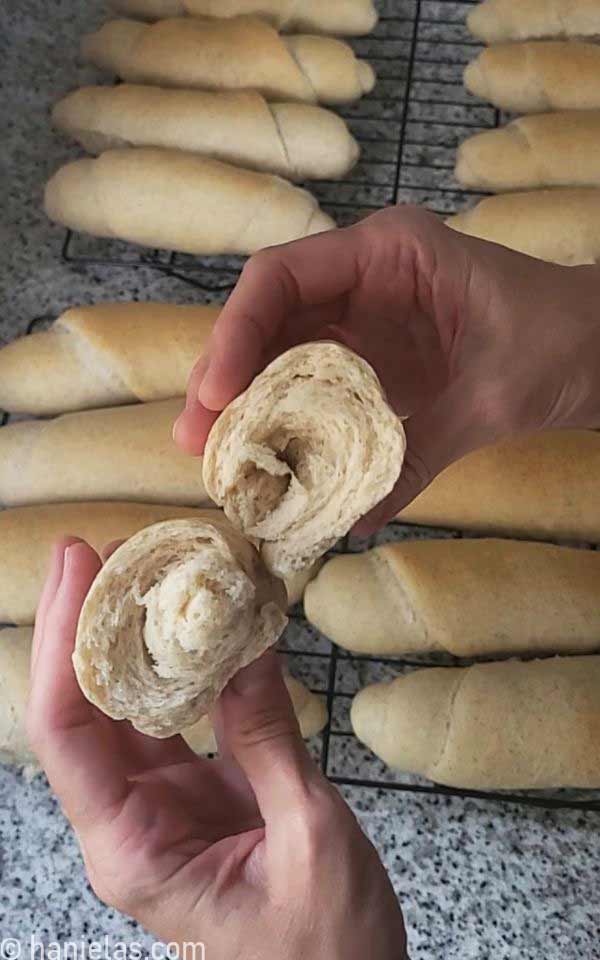
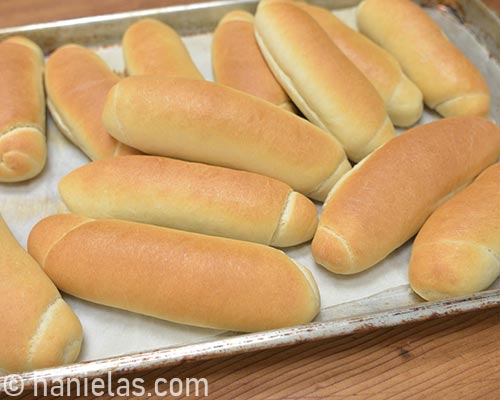
These homemade hot dog buns have a light, fluffy crumb and a thin, soft crust that stays tender even after cooling. They’re sturdy enough to hold your favorite hot dogs or sausages, and all the toppings without becoming soggy or falling apart.
MAKE AHEAD AND FREEZE
Buns freeze exceptionally well. After they’ve cooled completely, store them in a freezer-safe zip-top bag, removing as much air as possible before sealing. Freeze for 2 months then thaw at room temperature. They taste just as soft and delicious as the day they were baked.
RECIPE VARIATIONS & HELPFUL MODIFICATIONS
- Make vegan hot dog buns: Replace the butter with vegan butter. Myself and multiple readers reported excellent results using plant-based butter while keeping the buns soft and fluffy.
- Bread machine option: Use the dough cycle on your bread machine, then shape, proof, and bake as directed.
- Turn them into hamburger buns: I suggest 100-110 grams for a moderate hamburger buns. Shape them into buns and let rise before baking. If you are looking for a truly increadible hamburger bun recipe made with mashed potatoes and buttermilk, my recipe is
- Whole grain variation: 420 grams Bread flour, 80 grams Whole grain flour, plus add about 1 tablespoons of water and for the best result use freshly squeezed lemon juice or orange juice. I also use it to tenderize whole wheat flour in my recipe for Graham Crackers.
- Rye flour variation: 455 grams Bread flour, 45 grams Rye flour, if it gets too sticky, add 1-2 tablespoons of bread/all-purpose flour. If the dough is sticking to your hands, lightly oil them instead of adding more flour. This makes it easier to shape a smooth dough ball while keeping the dough soft.
BAKING SUCCESS TIPS
- can I double the recipe?
- how many buns does this recipe make?
- how to create a warm and draft-free spot?
- bake with the seasons: cold or hot kitchen baking tips
- baker’s tip: frid portioning method
- baker’s tip: improvise with what you have
- how to make the dough by hand
Can I double this recipe?
This recipe doubles beautifully. My standard-size KitchenAid stand mixer easily handles a double batch.
How many buns does this recipe make?
One batch makes 9 to 10 medium to large hot dog buns. Do you want to make small or mini hot dog buns? To make mini hot dog rolls divide the yeast dough into smaller balls of dough (50 grams-70 grams, 1.7 oz. to 2.5oz), yielding 16-11 buns.
How to create a warm and draft-free spot?
- Bring 3 cups of water to a boil and carefully pour it into a shallow oven-safe dish.
- Place the dish on the bottom rack of your oven, then place the bowl of dough on the rack above it or beside it, depending on the available space.
- Close the oven door and let the dough proof for the recommended time.
- The warm, humid environment encourages the dough to rise more quickly and helps prevent the surface from drying out.
- Looking for other proofing options? I share several easy ways to create the perfect proofing environment, including methods that don’t require an oven.
Bake with the seasons
The temperature of your kitchen has a big impact on how quickly yeast dough rises. Over the years, I’ve learned to make a few simple seasonal adjustments that help keep fermentation consistent and produce tasty buns all year long.
- In a warm kitchen (summer): Dough ferments much faster. I like to use a stainless steel mixing bowl for the first rise because the metal stays cooler than plastic or silicone, helping slow bulk fermentation. When proofing shaped buns, I let the baking sheet or parchment rest directly on my granite countertop, whose naturally cool surface helps keep the dough from overproofing.
- In a cool kitchen (winter): I switch to a plastic or silicone bowl, which doesn’t conduct heat as readily and helps the dough stay warmer while it rises. If my buns are proofing on a baking sheet or directly on parchment paper, I’ll place a folded kitchen towel underneath to insulate them from the cool granite countertop.
- Remember: Proofing times are only a guide. The best indicator is the dough itself, it should look puffy, feel light, and approximately double in size.
Baker’s Tip: Grid portioning method
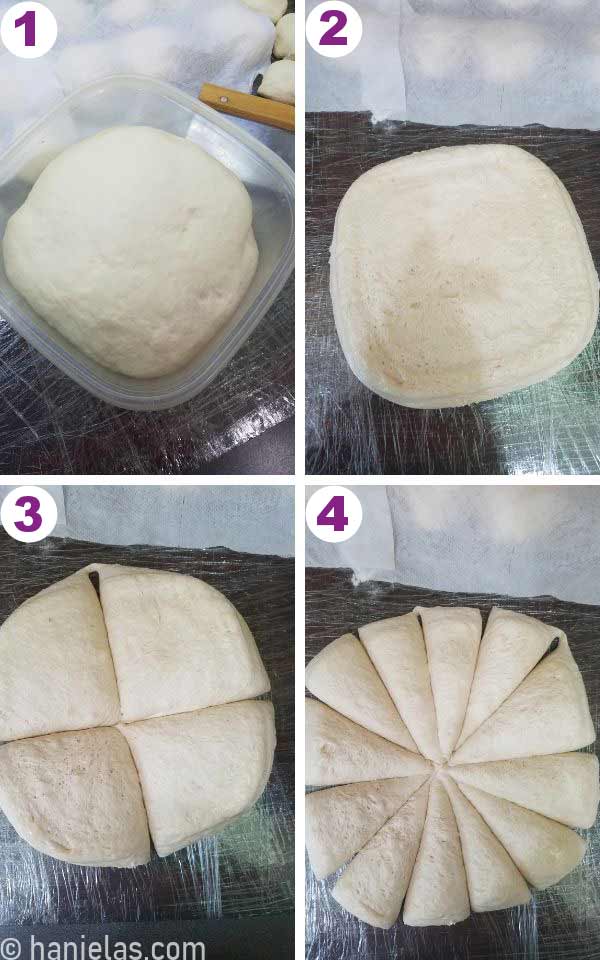
A kitchen scale is the easiest way to divide the dough into equal portions, but it’s not essential. No kitchen scale? No problem. Simply divide the dough in half, then continue dividing each piece in half until you’ve portioned the dough into evenly sized pieces. This simple grid method gets you surprisingly close to equal portions, helping the buns bake evenly.
Fun story: I used this method while we were moving. My stand mixer, rolling pin, and baking tools were all packed away in boxes, so I kneaded 8 batches by hand and I let it proof in a large plastic containers and divided it by eye using the grid method. It worked surprisingly well!
Baker’s Tip: Improvise with what you have
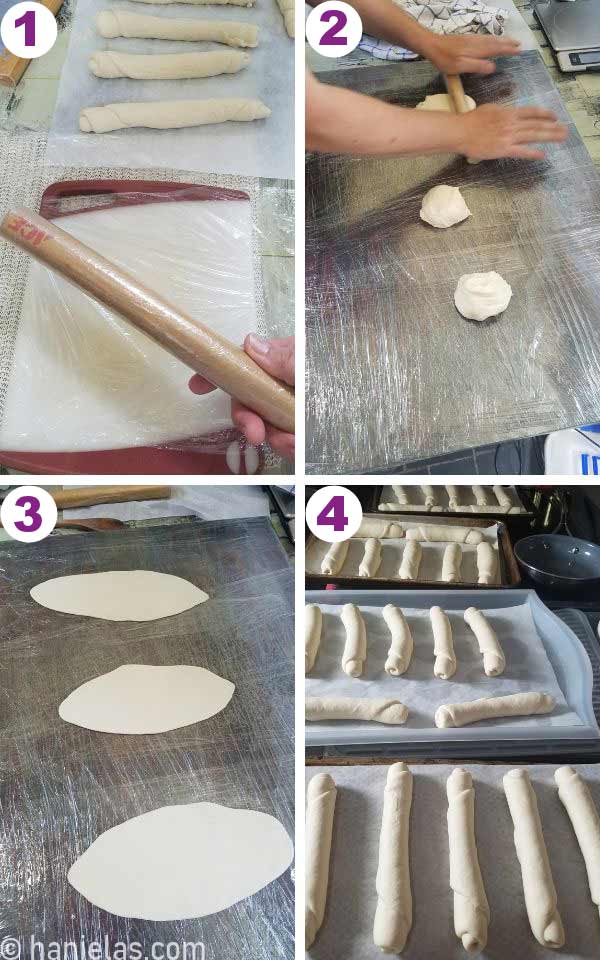
Don’t let a missing rolling pin or silicone mat stop you from making homemade hot dog buns. During that same move, I got a little creative! I wrapped one of my plywood photography backdrops in food-grade plastic wrap to create a smooth work surface. For a rolling pin, I wrapped a smooth bamboo pole (a wooden dowel or rod works just as well) in plastic wrap and rolled the dough exactly as I normally would. Sometimes the best baking tool is simply the one you already have.
How to make the dough by hand
- Prepare the yeast sponge.
- In a large mixing bowl, whisk together the flour and salt.
- Make a well in the center and add the prepared yeast mixture and softened butter (or your preferred fat).
- Stir with a wooden spoon until a soft, shaggy dough forms and all of the flour is incorporated.
- Transfer the dough to a lightly floured work surface. Knead the dough for 8–10 minutes.
- Kneading process
- At first, the dough will be shaggy, and you may need both hands to help fold it in half toward you. Then, using the heels of your hands, gently push the dough away from you while stretching it.
- Give the dough a quarter turn and repeat the same fold, push, and turn motion for 8–10 minutes, until the dough becomes smooth, soft, and elastic.
- Shape the dough into a smooth ball and place it in a lightly oiled bowl.
- Cover the bowl with plastic wrap and let the dough rise in a warm, draft-free spot for about 30 minutes, or until doubled in size.
BEYOND HOT DOG BUNS
This dough is incredibly versatile. Of course, it’s perfect for hot dogs, but that’s just the beginning. I also use it to make:
- Easter Bunny Rolls – Shape the dough into adorable bunny rolls for Easter—or anytime. They’re just as fun to make as they are to eat!
- Avocado Cream and Bacon Crostini. -Sliced and toasted buns make a delicious base for appetizers.
- Pupáky (Bobáľky) – A traditional Slovak dish made with cubed buns soaked in warm milk, tossed with ground poppy seeds and sugar, then drizzled with melted butter.
- My Mom’s Bread Pudding – Cubed leftover buns are perfect for this comforting dessert topped with a fluffy meringue.

Easy Homemade Hot Dog Buns
Equipment
- 1 A small, food-only spray bottle
- 1 A shallow oven-safe dish
Ingredients
- 1¼ cup warm water 300 grams/ml
- 1 tsp honey
- 2 1/2 tsp dry yeast
- 1 tbsp flour
- 3½ to 4 cups bread flour 500 grams
- 1 1/4 tsp salt
- 2 tbsp softened butter, lard, duck fat, vegan butter 30 grams
Instructions
Yeast Mixture
- In a small dish whisk together warm water (1cup + 1/4 cup warm water, 300 ml), honey (1 teaspoon), yeast (2 teaspoons+ 1/2 teaspoon), and flour (1 tablespoon). Let sit for 5 minutes until foamy. Tip: Don't use hot water. Hot water will kill the yeast.
Knead Soft Yeast Dough
- In a bowl of your mixer whisk together flour(3 ½ cups, 500 grams) and salt (1 ½ teaspoons).
- Pour the foamy yeast mixture and softened butter (2 tablespoons) into the bowl with the flour mix. Attach a hook attachment to your stand mixer. Knead until a smooth dough is formed. If the dough appears too dry, you can add 1 tablespoon of room temperature water. Alternatively, if it appears too wet, add 1-2 tablespoons of flour.TIP: Don't have a mixer with a hook attachment? You can make the dough by hand: see the blog post.
- Knead the dough with the dough hook for 5-10 minutes. The dough should be soft and elastic and may still cling to the hook. Turn it out onto a lightly floured work surface and knead it by hand for 1-2 minutes, shaping it into a smooth ball.
1st Proof
- Transfer the ball of dough into a lightly oiled bowl. Cover with a plastic wrap and let it rise in a warm, draft-free spot, for 30-45 minutes.
Shape the Hot Dot Buns
- Turn the risen dough out onto a clean work surface or silicone mat. Divide the dough into 3-3.5 oz (90-100 grams) portions, using a kitchen scale for the most even-sized buns.Shape each portion into a smooth ball, then cover with a kitchen towel and let the dough rest for 5 minutes. This short rest relaxes the gluten, making the dough easier to roll and shape into hot dog buns.Tip: Don't use additional flour on your work surface; it makes it harder to shape the buns.
- To shape the hot dog buns, first roll out each small piece of dough into a thin, long oval shape, about 1/8 inch (3mm) thick.Tip: A silicone mat helps the dough cling slightly to it so it doesn't retract as much, and it's easier to shape the rolls.
- Starting at the short side of the oval, use both hands to roll the dough into a log. Keep your hands close together at first, then gradually move them outward as you roll. Apply slightly more pressure to the ends than the center to gently taper them, creating an evenly shaped hot dog bun.Tip: Place the shaped hot dog buns seam side down on a baking sheet lined with parchment. Leave about 3 inches between the rolls.
2nd Rise
- Cover rolls on a baking sheet with a damp paper towel or a damp kitchen towel and let rise for 45 minutes in a warm, draft-free place.
Bake
- Halfway through the second rise, place a shallow metal dish on the bottom oven rack and preheat the oven to 425°F (220°C). Avoid using glass, as the sudden temperature change may cause it to crack.
- Once the buns have finished their second rise, remove the cover. Generously spray the tops with room-temperature water just before baking, then immediately transfer the baking sheet to the middle (2/3) oven rack of the preheated oven.
- Immediately pour ¼ to ⅓ cup of water into the hot shallow dish on the bottom oven rack. As soon as the water hits the hot dish, it will create steam. Quickly close the oven door to trap the steam insideTip: You can also use ice cubes in place of water, use about 4-5 medium-size ice cubes.
- Bake hot dog buns for 12-13 minutes. The buns are done when the tops turn a light golden brown. If they're still pale, bake them a little longer. Remove the buns from the oven and immediately spray the tops with room-temperature water. Let them cool on the baking sheet for 1–2 minutes, then transfer them to a wire rack. Since the buns are very soft while hot, use kitchen tongs to move them without pressing on the crust.
Video
TO MAKE HOMEMADE HOT DOG BUNS YOU NEED
- Find all the tools you need in my Amazon Shop
- Baking Sheets
- Kitchen Scale
- Parchment Paper
- Stand Mixer
- Bowls
- Spray Bottle
- Silicone Baking Mat
- Rolling Pin
This post was originally published on April 2nd, 2018. On March 20th, 2020, I updated this post with step-by-step pictures, written text, and a video.
This post contains Amazon affiliate links that earn me a small commission, at no cost to you. I only recommend products that I use and love. Learn more about my affiliate policy here.

Hi, I’m Hani
Welcome!
Thank you for visiting Haniela’s. On my blog, you’ll find delicious sweet & savory recipes made with simple ingredients. Why not start a new adventure? Discover a world of cookie decorating with my step-by-step tutorials.

Hi, I’m Hani
Welcome!
Thank you for visiting Haniela’s. On my blog, you’ll find delicious sweet & savory recipes made with simple ingredients. Why not start a new adventure? Discover a world of cookie decorating with my step-by-step tutorials.



These were great! I wanted hot dogs for 4th of July- I decided last minute. When I researched all the hot dog recipes, yours rose to the top. It was Easy and Fast. I can ruin a bread recipe so I needed something I could count on. Your recipe was it! They came out fluffy and perfect! I made sure the pan in the oven was hot and when I sprayed the rolls and put them in to the hot oven, that water I poured in created a steam sauna for the buns. I sprayed as soon as they came out- and they were soft and delicious. I love this recipe. No more bad ingredient store buns!! Thank you!
Hi Tina,
That’s awesome.
I’m thrilled you enjoyed them and thank you so much for giving it a try.:-)
Happy Summer!
Hani
I want to try this receipe tomorrow but need to know how to measure out the dough without a scale? I have no scales, taught by Mom, eyeball or measuring cups.
thanks Kim
Hi Kim,
I wasn’t able to reply in a timely matter. What you can do is invert the dough onto a work surface, gently push it down to form a disk and then cut
the thick ‘disk’ of yeasted dough into wedges. Start by cutting it in half, then each half in half etc. I hope it make sense.
just quick question, do u weigh your ingredients when u bake generally or do u use cups , i don’t know which one to side with . also have u tried both weighing and cup methods for this recipe and which one came out better
Hi Lindsey,
What a great questions. Thank you.
I prefer using a scale to weigh the ingredients.
I list cups as I know many people prefer them, but as you know this method is a bit nuances due to inconsistencies, with the use of different cups. For example 1 cup(236ml, us cup) gives me a cup of flour that is 140 grams, pretty much consistently. But this all depends how dry is the flour, how packed etc.
It’s hard to say which one is better. I haven’t made it using cups in a while, I usually double the batch and use a scale and they come out great. I often use different form of fat, too. However, I always check the dough consistency, and if it’s too sticky I add a little more flour, or water if it’s too dense. Some flour batch can be drier than other, even from the same brand.
Lindsey, how bout you? Have you tried making these hot dog buns? What was your experience?
I made your hot dog buns yesterday and they were delicious. I’m so glad that I finally tried your recipe. The dough was so soft and easy to work with. My only problem was with the amount of dough I used for each roll. I made 9 rolls (94 grams each) and I thought they were just a little too large. Next time I’ll divide and make 10 rolls.
I love these rolls!
Hello Joseph!
That is fantastic. So happy to hear you enjoy them.
We love them – I just made 4 batches to freeze for the month. 🙂
Have a great day!
I made these for the first time. I really love the simplicity of the recipe, especially the ingredients. My only request is that you provide a nutrient profile. If I missed it I apologize, but I looked and looked.
Thank you so much 🙏
Sincerely, Liz
Hi Liz,
thank you so much. I’ll look into that ASAP.
Happy Baking,
Hani
Finally! A truly outstanding hot dog bun recipe. Thanks so much for posting this. So light. So savory. So EASY! It is now my go-to recipe for all things bun-ny
Thank you so much, Jonathan. I’m glad you like this recipe. It’s our favorite.
I’m getting ready to make these for the third time. I love this recipe so much I can’t believe I haven’t left a glowing review before but I was probably eating. Yes these are so good I’ll eat them by themselves. Now I’ve got the perfect recipes for vegan hot dogs and hot dog buns and I’m happy. Thank you for the recipe Hani!!!
Hi Joe,
thank you so much. 🙂 I also love them plain. Happy Sunday.
Just finished eating the homemade bun. Totally as I remember them from my czeck republic holidays! Great!!! Thanks a lot!
Hi Nadja,
that’s wonderful. I’m happy to hear it brought back memories.
This recipe gives conflicting information in several of it’s directions.Please edit
Hi Van,
thanks for letting me know.
They turned out beautifully! Great recipe that I’ll be making agai for sure!
Hi Betty,
that’s awesome! We love these so much.
Happy Baking.
Hani
I make these all the time now. I cheat and use the dough cycle in my bread machine and they are perfect every time. They make fantastic hamburger rolls also!
I make these all the time. I make hamburger buns too. They rock!
Thank you Joel, I’m glad you like them. They are a staple in our kitchen, too.
I don’t know where to begin to thank you for this wonderful, simple, delicious recipe. I made it for our new year’s party and we were all blown away. I made some more today because we love it sooooo very much. God bless you
We are plant based so we used vegan butter, this was one of the best recipes I’ve ever tried. Thank you kindly
Thank you so much Christine. I’m so happy to hear you like it. Happy New Year.
When I made these the damp paper towel stuck to the dough when I went to remove it. But I discovered that if you spray it before removing the paper towel and lift it from the center and not t edges it will come off even if it was sticking to begin with. Hope this helps save someone else’s batch. Right now I’m waiting for the first batch to come out of the oven. 😬😁
Hello Marcella,
thank you! How did they turn out?
Can you use a bread machine for the dough?
Thank You
Hi Carmen,
I don’t have a bread machine but I don’t see why not. Please keep me posted.
WARNING: You NEED to include a warning about adding water to a glass container. I was following your instructions to a T, but when I added water to a dish in the bottom of the oven, it exploded. You cannot use glass for this step!!!
HI Sarah, so sorry your glass dish broke.
I generally don’t use glass in the oven above 400F unless it’s marked safe above 400F by a manufacturer. Unfortunately not all glass oven safe dishes are made to be used at high temperatures.
It’s best to make sure that the dish you are using is oven safe at high temperatures. I assume you glass dish though oven safe it probably wasn’t designed to be used at over 400F.
Any glass dish will explode under thermal shock. Even a glass casserole on a damp towel will break or explode. I always use cork pads to sit glass on. A metal cake pan works for the method of steam.
These have the perfect consistency for hot dog buns. I only needed 4 buns so turned the rest into rolls and they turned out great. I’m going to roll them out next time into burger buns. I’m guessing about 1/4″ thick and around 4 inches round for the second raise.
Thank you Karrie, I’m glad you like them. I think 1/4 to 1/2 inch should be fine. Let me know how it goes. Thank you.
Since staying in, I’ve been searching for breads, buns etc. Today we wanted to bbq smokies but had no buns and thankful that I came across your recipe! This is an awesome, easy recipe. Your step-by-step instructions with visuals helped tons. I am so pleased with this recipe. My whole family loved them. I may even use this same recipe to make hamburger buns. Thanks Hanuela!
Hi Lori,
So happy to hear you enjoy the recipe. I make them bi-weekly now. They also freeze well. Thank you.
My hot dog buns are doing their second rise now…here’s to hoping I didn’t accidentally kill the yeast (fingers crossed).
Hi Amanda, how did it turn out? Hope you like them.
I made these today for the munchkins! So so delicious! I had a hit dog on one and snuck one right out of the oven with butter on it. Heaven!
Yum. I’m so glad you like them June. ♥
A tablespoon of salt!!!
Made these and had to throw them out way too salty.
Made again using a teaspoon of salt and perfect, you need to edit your recipe
Hello Geoff,
I’m glad you like the buns after you adjusted the amount to salt. Thanks for trying them again and for your feedback. Have a great day!
Made a double batch last night using bacon fat, they are Perfect! I’ve tried so many hot dog bun recipes but these win! Love the texture, we’ll be snacking on them for more than just hot dogs!
HI Mikayla,
That’s so awesome!
I made double batch last night, too for real. What a coincidence.
I’m so glad you enjoy them. Stay Safe.