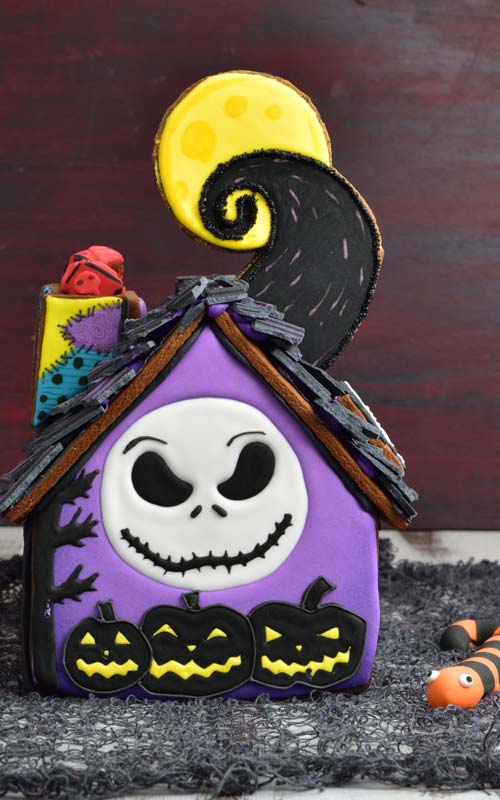
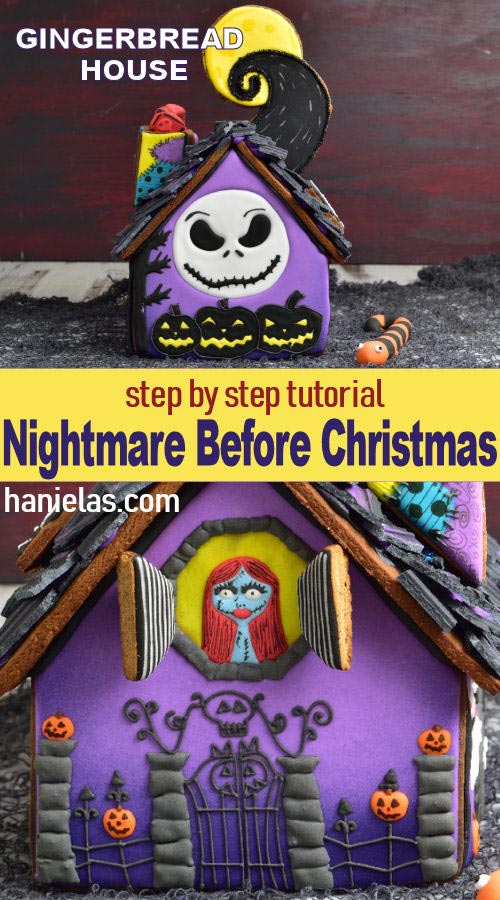
Nightmare Before Christmas Gingerbread House
Don’t get bored! Make this Halloween Nightmare Before Christmas Gingerbread House. My detailed tutorial guides you through all the steps of creating this one of a kind gingerbread house. Inspired by a dark musical fantasy I’m going to show you how make Sally, Jack Skellington, Zero the Dog, Grave Yard, Bat Bow Tie, Pumpkins, Giant Snake, Spiral Hill, Oogie Boggie and so much more.
JUMP TO RECIPES AND TOOLS | PIN IT for later
Updated post from 2018.
- TABLE OF CONTENTS
- Gingerbread House Panels and Cookies.
- Sally.
- Jack Skellington.
- Oogie Boogie.
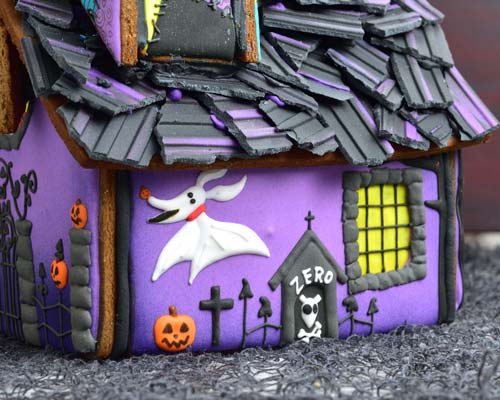
- Zero the Dog.
- Giant Snake Nightmare Before Christmas.
- The Spiral Hill.
- Red Royal Icing Roses.
- Roof Shingles.
- Nightmare Before Christmas House Assembly.
- How long does a Gingerbread House last?
- How can I preserve it?
- Can I eat it?
- Where you shouldn’t keep your gingerbread house.
- Do you have a good tasting recipe for houses ?
- Recipe, Tools, Templates
HOW TO MAKE THE NIGHTMARE BEFORE CHRISTMAS GINGERBREAD HOUSE
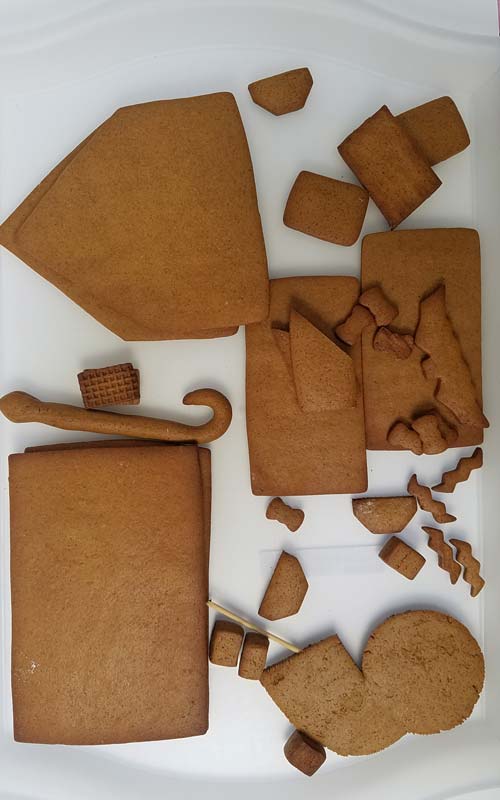
When making gingerbread houses for decoration only I like to bake my house panels until brown around the edges. Once cooled house panels should be firm to the touch. Construction like this will last at least a year.
NIGHTMARE BEFORE CHRISTMAS GINGERBREAD HOUSE PANELS AND COOKIES
Using this Gingerbread House Cookie Cutter Kit I cut-out and baked 2 front panels, 2 sides and 2 roof panels. You can bake all the cookies ahead of time. Week ahead is perfectly fine. Store gingerbread in an airtight containers.
OTHER CUTTERS USED :
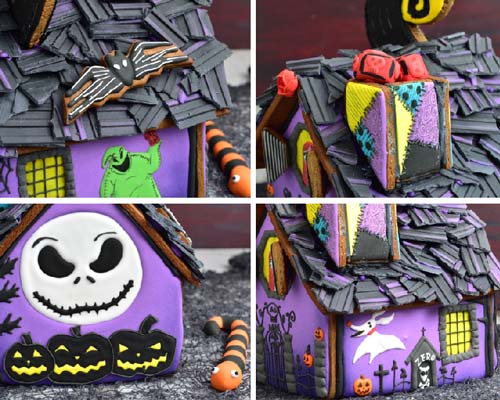
- Bat Cookie Cutter – Jack Skellington Bow Tie
- Window Shutters – I used a small hexagon cutter and I cut the unbaked cookie in half.
- Spiral Hill Cookie, Chimney – use a template listed in the Recipes and Tools at the bottom of this post
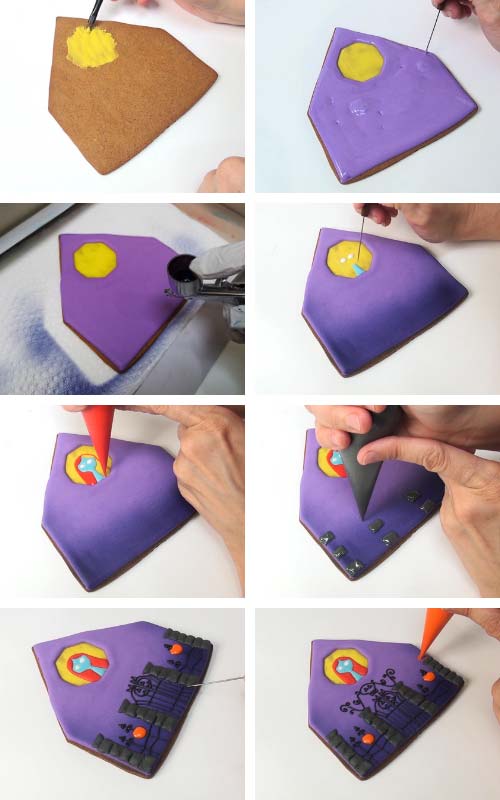
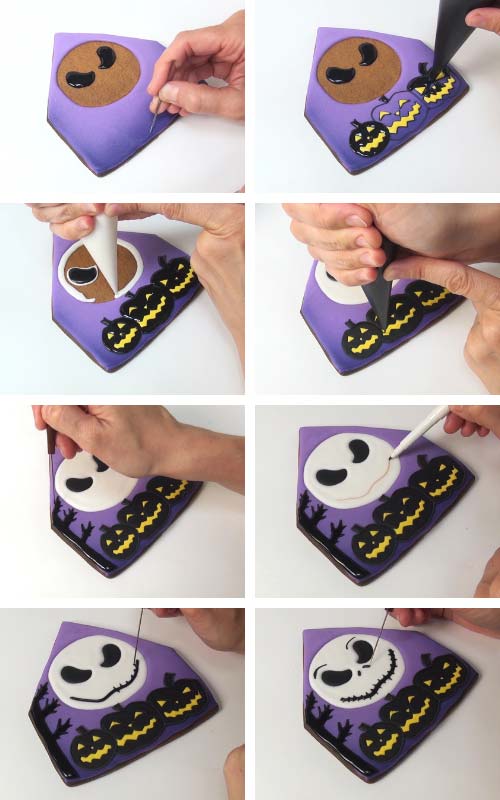
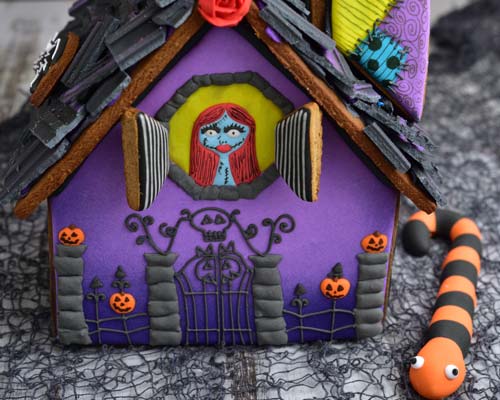
SALLY HOUSE PANEL
Front house panel design includes : Sally in the window, grave yard iron gate, pumpkins and shutters (Jack Skellington). Iron gate is probably my favorite part of the house aside from the roof. I love the roof!
ROYAL ICING AND CONSISTENCIES :
- Purple – 10 to 15 second consistency
- Yellow – 5 second consistency
- Light Blue (Sally), White (Sally), Red (Sally Hair), Orange (pumpkins), Dark Gray (iron gate rocks, window border), Brown (pumpkin stem), Black (window shutters, chimney) Yellow (chimney), Purple (chimney), Turquoise (chimney) – 20 second consistency
- Black – piping consistency – iron gate, eyelashes, stitches on the chimney
DECORATING STEPS :
Trace the window outline on a cookie – I used a small hexagon cutter (same cutter I used to make window shutter cookies). Brush a thin layer of yellow icing (5 sec) onto the window area. Let dry.
Then outline the window and the whole house panel and flood it with purple icing (10 to 15 sec). Let it dry overnight.
Airbrush the bottom and sides with purple airbrush food coloring.
SALLY’S FACE
With a needle tool draw/scratch the surface of yellow icing to make an outline for Sally’s face. Flood Sally’s neck with light blue (20sec), and eyes with white icing (20 sec). Let it crust and then finish flooding the head portion with light blue. Let it crust again and then flood the hair with red (20 sec).
After icing dries use a fine tip edible marker and draw the Sally’s facial details and hair strands. Use black piping consistency royal icing to make the eyelashes.
Pipe a window frame with dark gray icing (20 sec). Make the frame in sections. Letting first layer crust before adding the second layer. Let dry.
GRAVE YARD IRON GATE
With a needle tool draw the iron gate onto the icing. Start piping the stone posts. Flood every other section with dark gray icing (20sec). Let each stone crust before piping a stone right next to it. Let the stones posts crust. Then with a piping consistency pipe the iron gate design.
PUMPKINS
With an orange icing (20sec) pipe the pumpkins, let them crust and then pipe the brown stem (20sec). After icing dried draw faces onto orange pumpkins with a black edible marker.
WINDOW SHUTTERS
Shutters represent Jack Skellington. Decorate window shutters with black icing (20second) and immediately after you flood cookies pipe white lines across (20sec).

CHIMNEY – SALLY’S DRESS
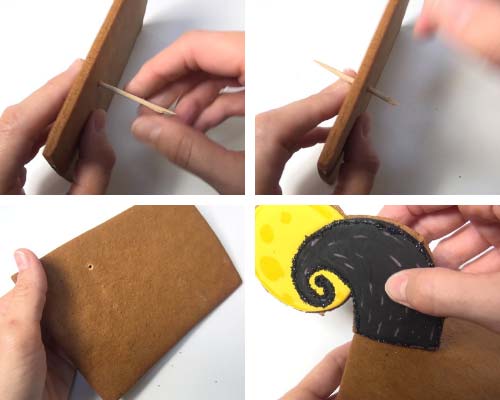
I wanted to also include Sally’s dress in my design. It is so colorful it would be shame not to include it. It creates a nice eye catching detail. In the past I implemented similar idea in my Harry Potter Gingerbread House. I used the chimney shape to make the cauldron. To make the chimney you can use a template – it’s listed in the Tools section at the bottom of this post.
With an edible marker draw the section outlines on the chimney cookies. Then decorated with yellow, black, purple and turquoise icing (20sec). Decorate in sections letting neighboring sections crust. Then let dry. Finish by drawing lines and curly shapes onto dry icing. Next I piped short stitches with black piping consistency royal icing. Let dry.
Lastly, glue the chimney pieces together with thick royal icing and let dry overnight.

JACK SKELLINGTON HOUSE PANEL
ROYAL ICING AND CONSISTENCIES :
- Purple – 10-15 second consistency
- White – 10 to 15 second consistency, 20 second (bow tie)
- Black – 15-20 second (eyes, pumpkins, tree, mouth), piping consistency (to outline pumpkins)
- Yellow 20 second (pumpkins)
- Red – 10 second (3D dice) , 20 second (small piped dice)
DECORATING STEPS :
JACK SKELLINGTON FACE
Trace the Jack Skellington outline onto a cookie using template and edible marker. After flood the eyes with black icing (15sec). Flood the whole panel with purple icing (10 to 15second). Let icing dry overnight. Next day airbrush the bottom and sided with purple airbrush color. Fill the face of Jack Skellington with white icing (10- 15sec).
With black icing piping consistency pipe the eye brows and nostrils. And to make the mouth use black icing (15sec) and shape the icing while still wet.
BLACK PUMPKINS
With a needle tool or a pin draw/scratch the icing to make an outline for 3 pumpkins. 1st outline pumpkins, mouth and eyes with black piping consistency royal icing. Let crust.
After fill the eyes and mouth with yellow icing (20sec). Let crust for a couple of minutes. Next flood inside of the pumpkins with black royal icing (15sec). Let the icing crust and then finish the middle pumpkin. Let dry.
Outline pumpkins with black icing piping consistency.
Pipe the tree with black icing (15sec). Use a needle tool to shape the branches while icing is wet. Let dry.
JACK SKELLINGTON BOW TIE
Ice the cookie with black icing (15-20sec). Let it crust then pipe the middle section. Let crust again. Pipe the eyes and lines with white icing (20sec).

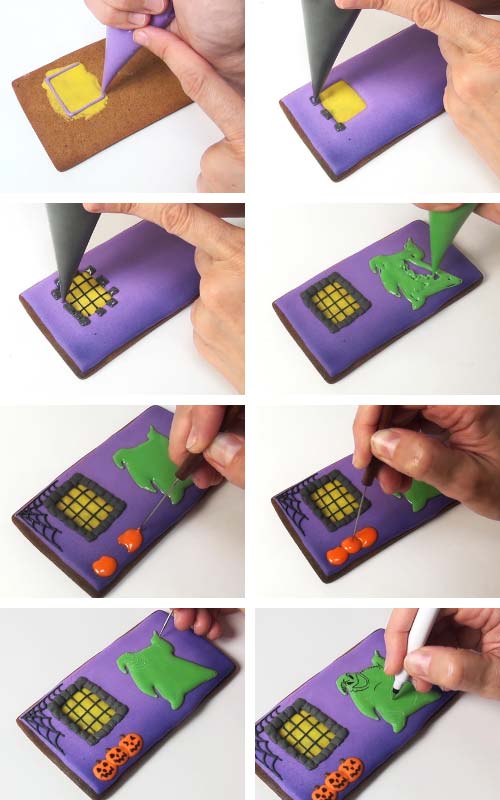
OOGIE BOOGIE HOUSE PANEL
ROYAL ICING AND CONSISTENCIES :
- Purple -10 to 15 second consistency
- Yellow – 5 second consistency
- Green – 15 s second consistency
- Dark Grey (window frame), Orange (pumpkins), Brown (stem), Red (dice) – 20 second consistency
DECORATING STEPS :
With edible marker draw a window outline on a cookie. Then brush a thin layer of yellow icing (5sec) on the window section, let dry.
After flood the whole cookie with purple icing ( 0 to 15 sec). Let dry. Airbrush the bottom with purple airbrush food color. Let dry for 5 minutes.
Then pipe a first layer of stones around the window with dark gray icing (20sec). Allow sections to crust and then add the second layer of gray stones around the window. Let it crust again and after pipe the grid across the window with dark grey (20sec).
OOGIE BOGIE BODY
Trace the Oggie Boggie outline onto the dry icing. Flood the section with a green icing (15sec). Let crust. Pipe red dice (20sec) in Oggie Boggie’s hands. Let dry.
After green icing dries finish Oggie Boggie design with a fine tip black edible marker (make stitches) and with a regular tip marker (make mouth eyes and red dice).
With orange icing (20sec) pipe the pumpkins, pipe 2 outside ones first, let them crust. Then pipe the center pumpkin. Let dry. Pipe the stems with brown icing (20sec)
OOGIE BOGGIE DICE
Shape unbaked gingerbread dough into cubes. Bake and let cool.
Pour red icing (10sec) on the dice to coat. Let dry. Then pipe skull design with red icing (20sec) on the sides. Let dry. Finish dice design with black edible marker.

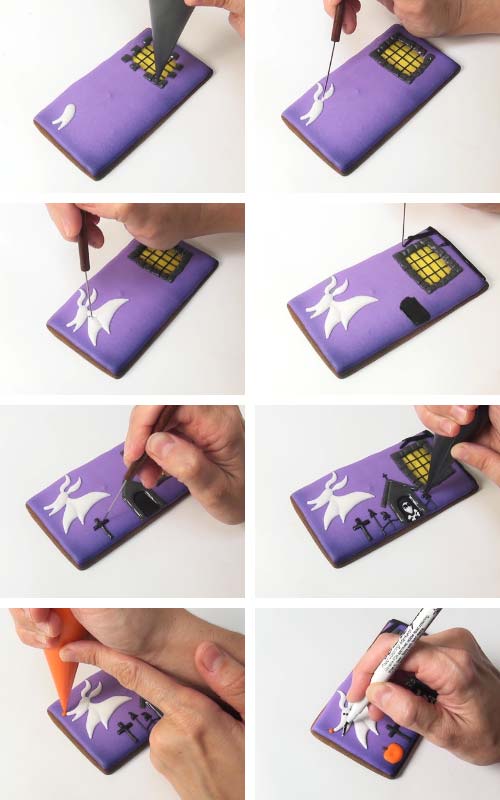
ZERO THE DOG HOUSE PANEL
ROYAL ICING AND CONSISTENCIES :
- Purple – 10 to 15 second
- White – 20 second
- Dark Gray – 20 second
- Yellow -5 second
- Orange, Brown, Black -20 second
DECORATING STEPS :
With edible marker draw a window outline on a cookie. Then brush a thin layer of yellow icing (5sec) on the window section, let dry. After flood the whole cookie with purple icing ( 0 to 15 sec). Let dry. Airbrush the bottom with purple airbrush food color. Let dry for 5 minutes.
Then pipe a first layer of stones around the window with dark gray icing (20sec). Allow sections to crust and then add the second layer of gray stones around the window. Let it crust again and after pipe the grid across the window with dark grey (20sec).
ZERO THE DOG BODY
With a needle tool draw the Zero’s outline. With white icing (20sec) flood the dog in sections letting each section crust before adding a next section. Let crust and then with orange icing (20sec) pipe the nose. Let dry and draw the mouth and eyes with black edible marker. Add details with white icing (20sec).
DOG HOUSE
To make a dog house, brush a thin layer of black icing on a dry icing. Then make the house with dark gray icing (20sec). Let crust and after make the roof with dark gray icing (20sec). Let crust. With white icing (20sec) write ZERO on the house. Also pipe the dog head onto the brushed section of the dog house. Pipe the eyes onto the white while still wet. Let crust.
Make the pumpkin with orange icing (20sec), let it crust and then make the brown stem (20sec). After pumpkin dries draw eyes and mouth with black edible marker. Finish this house panel with pipping the iron fence and a cross.
GIANT SNAKE
To make the snake cookie I shaped the gingerbread dough before it was baked. I used gingerbread dough for centerpiece. It holds it’s shape really well even when exposed to heat. Bake the 3D snake cookie and let it cool before decorating.
ROYAL ICING AND CONSISTENCIES :
- Orange, Black – 10 second consistency
- White, Black – 20 second consistency
DECORATING STEPS :
With edible marker divide snake into section. Ice every other section with orange icing (10sec). Let crust. Then flood section between with black icing (10sec). Let dry.
Pipe white eyes (20sec) and make a black dot in the center with black icing (20sec). Let dry.

THE SPIRAL HILL WITH MOON
Cut out iconic curly hill shape using a template (locate template in the Recipe and Tools Section below). Insert a skewer into an unbaked cookie and bake as usual. Let cool on the baking sheet.
ROYAL ICING AND CONSISTENCIES :
- Black, Yellow, Purple – 15 second consistency
- Black – piping consistency
DECORATING STEPS :
Outline swirly design with yellow icing (15sec) and then flood the section. Let it crust. Flood the remaining area with black icing (15sec). Use purple icing (15sec) to make short strokes in the black icing while wet. Let it dry.
Then outline black section with piping consistency royal icing and dust the outline while wet with black sanding sugar.
Finish moon with yellow and brown edible markers.
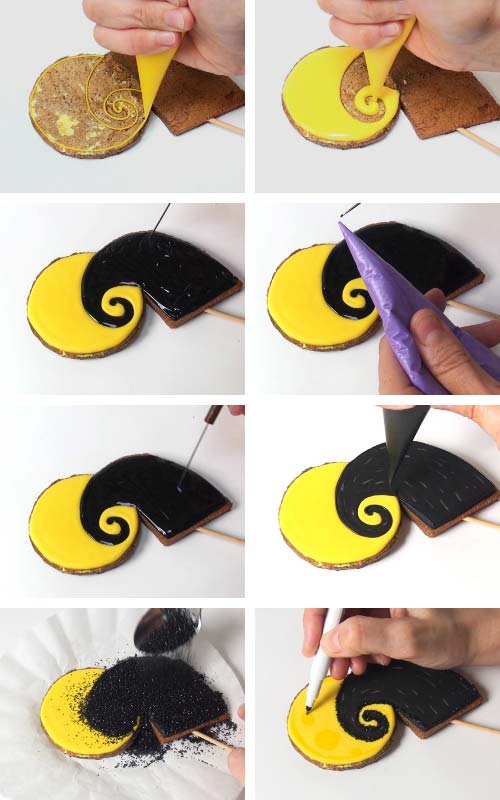
Use a toothpick or a skewer to make small hole in the roof. Then double check if moon cookie fits nicely on the roof panel.
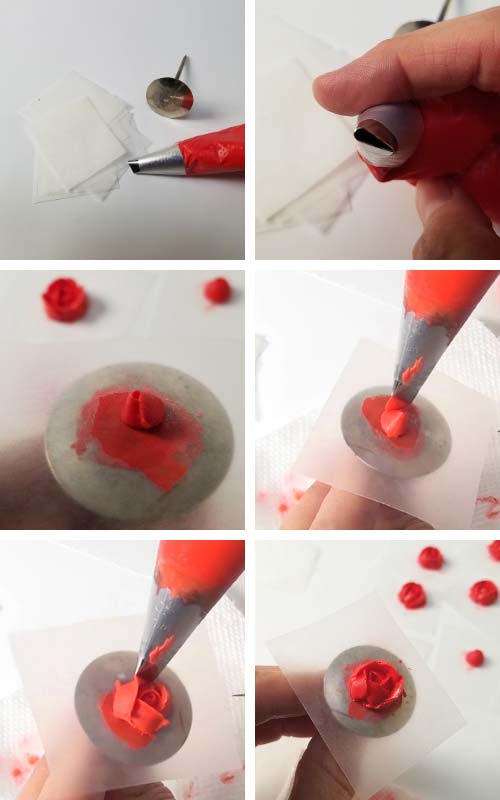
RED ROYAL ICING ROSES
Royal icing roses are not really that important in this gingerbread house design but it doesn’t hurt to know how to pipe them for future. Or if you’d like to make my Beauty and the Beast Gingerbread it might come really handy.
ROYAL ICING AND CONSISTENCIES :
- Red – stiff royal icing
DECORATING STEPS :
To make roses I used Petal Tip #101. If you’d like to make larger roses use a larger petal piping tip. Use stiff icing and let the piped roses dry completely before removing them from the wax paper/parchment square.
First fit a piping bag with a Petal Tip #101. Place a piece of wax paper on a flower nail. Pipe a first cone shape with petal tip, narrow part of the piping tip facing up. Turn the flower nail as you pipe. Continue piping first, second, third petal. If desired pipe another row of 5 petals. Let roses dry overnight. Then peel off the wax paper and use as desired. Royal Icing Flowers can be prepared ahead of time and stored in an airtight container.
Intrigued by royal icing flowers? Try your hand at making beautiful Royal Icing Succulents.
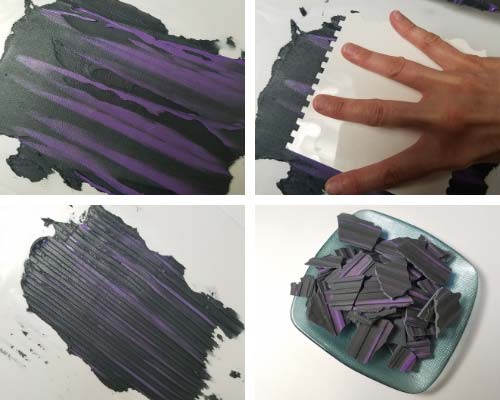
ROOF SHINGLES
I wanted to create something with texture but not too symmetrical or organized. I wanted chaos on the roof, so to speak.
ROYAL ICING AND CONSISTENCIES :
- Dark Gray/almost black, Purple – stiff consistency
DECORATING STEPS :
You’ll need to make 2 roof textured panels (see the picture below for the size reference for 1 panel). Spread dark gray/black icing about 3/8 inch thick over the wax paper. Then spread some purple onto the black. With a spatula marble 2 colors. Then with a decorating comb create texture. I chose basic stripe comb design. Let royal icing panels overnight. Next day peel off the wax paper and broke the panels into smaller pieces These will be roof shingles. Shingles can be made ahead of time, just like red roses.
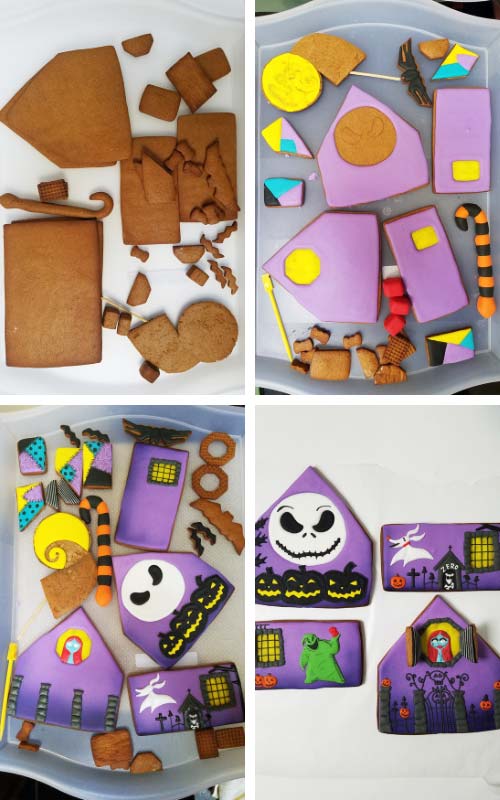
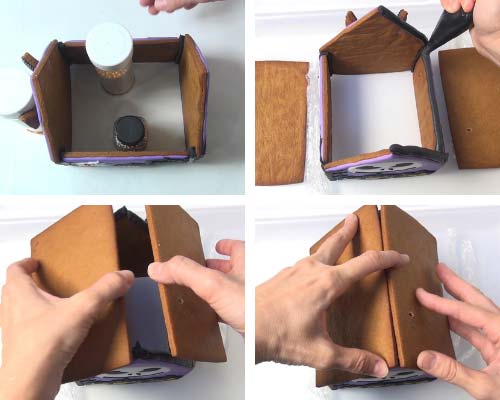
NIGHTMARE BEFORE CHRISTMAS GINGERBREAD HOUSE ASSEMBLY
When all the panels and decorations are ready you can glue the base panels together.
I can’t emphasize this enough. Use thick royal icing to glue house panels. And build the house in steps.
Use thick icing to glue the panels but make sure your icing is not too stiff. If icing is too stiff it will not create a strong bond. Once dry it will most likely just fall off the cookies. If icing is too runny you’ll have a hard time keeping the gingerbread panels upright.
ROYAL ICING AND CONSISTENCIES :
- Dark Gray – stiff
DECORATING STEPS :
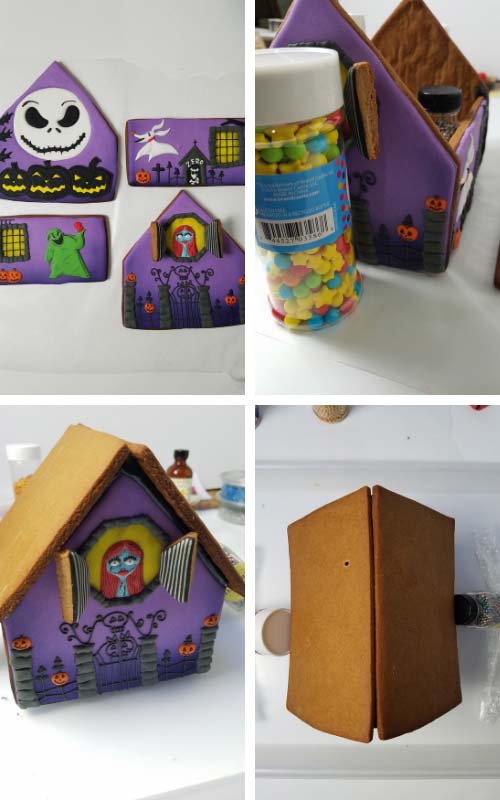
Start by gluing sides onto the front panel, then glue the back panel on the sides. Let the base structure dry for 5-6 hours before adding the roof on the top.

Pipe icing on the edges of the base. Then carefully press the roof panels onto the base. Hold the roof panels in place for 30 second. Use small bottles or skewers to support the walls while drying. Also, use skewers to support the roof panels. Let dry overnight.
TIP : Non stick rubber liner keeps the skewers from sliding.
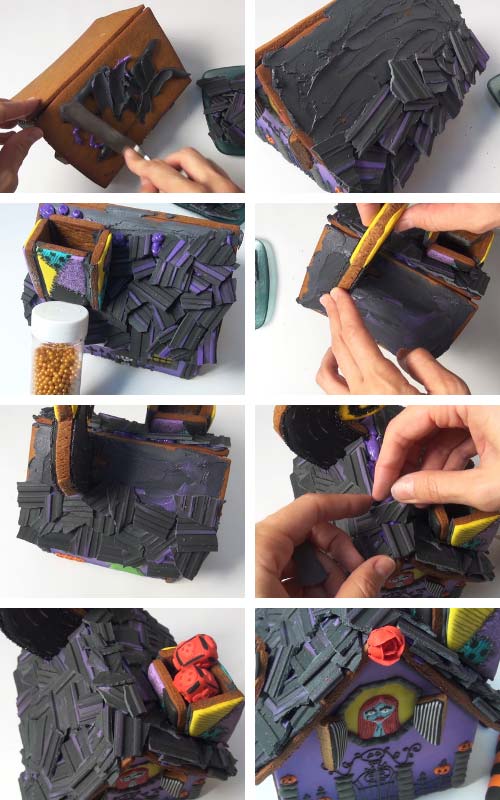
DECORATE WITH SHINGLES
Now it’s time to decorate the roof of with shingles. Spread thick icing on the roof and start layering shingles at the bottom. Add more glue / thick icing as you go up the roof panel. Glue the chimney onto the roof panel and support it with a long skewer. It will prevent it from sliding while icing is drying. Continue layering shingles.
Spread a layer of icing on the opposite roof panel. Attach the Spiral Hill cookie and hold it in place for 30 second. If needed support it with a skewer. Continue layering shingles. Let dry.
Next day remove the support skewers. Place red dice into the chimney and glue a red rose on the front of the house.
HOW LONG DOES A GINGERBREAD HOUSE LAST?
I’ve kept each house I built for at least a year. House is good at least for a year.

I WANT TO PRESERVE IT, WHAT SHOULD I DO?
You can use a spray varnish.
CAN I EAT IT?
For display purposes I use a structural gingerbread cookie dough. Though fully edible, I use extra spices to make it very fragrant and so I don’t really recommend this dough for eating.
USE THESE RECIPES TO MAKE HOUSES FOR EATING :
- Gingerbread Cookie Dough
- Honey Cookie Dough (it’s very popular with kids, use only 1/4 tsp baking soda for construction pieces). I used this dough to make my Easter House and 3D Easter Egg Baskets.

WHERE YOU SHOULDN’T DISPLAY YOUR GINGERBREAD HOUSE
EXTREME HEAT
Extreme heat dries out icing too much and houses can fall apart if exposed to these conditions for a long time (2+weeks). Mostly likely you will never have to worry about this. But I thought I’d mention it. I wouldn’t display the house right next to the running wood stove for too long. How do I know? I kept the house too close to our wood stove and it dried out so much it literally fell apart.
I often keep my houses on display in the kitchen on a high window sill. This spot get a good amount of sunlight. Colors of icing exposed to sunlight for a prolonged time fade. (5 months and more)
EXTREME HUMIDITY
Humidity can play tricks on you and house panels can become soft. If you plan on displaying your house for a long time time dry out house panels well in the oven before decorating.

DO YOU HAVE A GOOD GINGERBREAD RECIPE FOR HOUSES THAT IS ALSO GOOD FOR EATING?
- Gingerbread Cookie Dough
- Honey Cookie Dough(it’s very popular with kids, use only 1/4 tsp baking soda for construction pieces). I used this dough to make my Easter House and 3D Easter Egg Baskets.

TO MAKE NIGHTMARE BEFORE CHRISTMAS GINGERBREAD HOUSE YOU NEED
- RECIPES
- Gingerbread Dough for Houses and Centerpieces
- Royal Icing
- TOOLS
- Gingerbread House Cookie Cutters or use templates and hand cut the cookies with pen blade knife
- Templates
- Food Colorings : yellow, black, red, orange, green, purple ( I use sky blue and electric pink to make purple ), turquoise,
- Airbrush
- Piping Bags
- Edible Markers – Black Super fine tip edible marker
- Black Sanding Sugar
- Needle Tool or toothpicks
MORE BEAUTIFUL GINGERBREAD HOUSES WITH STEP BY STEP TUTORIALS
PIN IT for later
I updated this post with new step by step photos, written text and a video.
This post contains Amazon affiliate links that earn me a small commission, at no cost to you. I only recommend products that I use and love. Learn more about my affiliate policy here.

Hi, I’m Hani
Welcome!
Thank you for visiting Haniela’s. On my blog, you’ll find delicious sweet & savory recipes made with simple ingredients. Why not start a new adventure? Discover a world of cookie decorating with my step-by-step tutorials.

Hi, I’m Hani
Welcome!
Thank you for visiting Haniela’s. On my blog, you’ll find delicious sweet & savory recipes made with simple ingredients. Why not start a new adventure? Discover a world of cookie decorating with my step-by-step tutorials.


This is amazing!! It’s one of my husband’s favorite movies and I’ve put a reminder on my calendar for next fall to make this for my husband, then I can keep it up through Christmas 😉 Thanks for such a detailed tutorial!
Thank you so much Lora. If you decide to make it I’d love to see it.
Absolutely breathtaking! I love all of your work and thank you for all of the step by steps and videos for each of your recipes. I am blown away by the roof shingles. My kids and I are going to try this. I’m a little heavy on my pipe lines but I’m sure with practice, I’ll be able to make them nice and thin. How long does it usually take for the icing to harden on the house/cookies?
Hi Tara,
Thank you so much. I also love the roof shingles. I would say to let the base layer dry overnight. Then you can gradually keep adding details, and simplify if you need to. I know these are pretty detailed so you can easily draw the iron gate with edible marker, and maybe use chocolate rocks for the posts. That’s something kids can do, too.