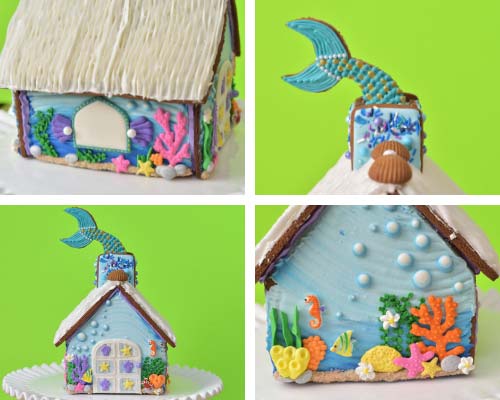
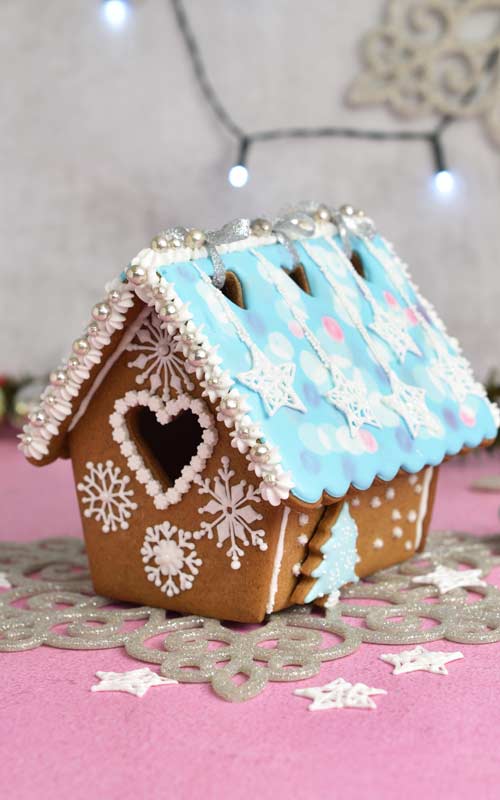
Mermaid Gingerbread House
To create this magical Mermaid Gingerbread House I dove into the blue ocean for inspiration.

JUMP TO VIDEO|JUMP TO TOOLS AND TEMPLATES | PIN IT for later
HOW TO MAKE MERMAID GINGERBREAD HOUSE
To make this unique underwater mermaid gingerbread house I used Gingerbread Cookie Dough for centerpieces and a basic house cookie cutters to make the cookies.
- TABLE OF CONTENTS
- House Panels Textured Design
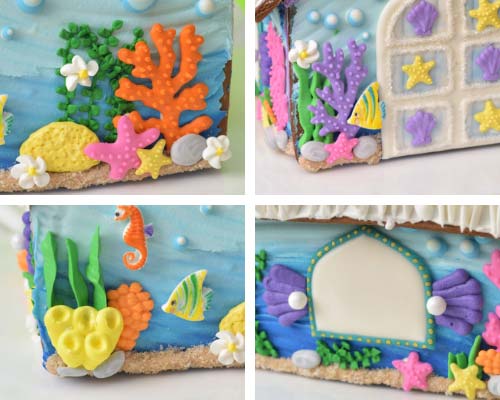
- Royal Icing Transfers : corals, sponge, starfish, underwater bubbles
- Fondant Decorations : Little Mermaid Fish, Seahorse, Crab
- Windows and Doors
- Mermaid Tail Cookie
- Chimney
- Decorate with Royal Icing Transfers
- How to Make a Leaf Piping Tip
- House Assembly
- Roof
- Recipes, Tools, Templates
In this tutorial I’m going to show you how to make royal icing and fondant underwater decorations and little mermaid tail cookie. Then we’ll go through the process of decorating each house panel. And I’ll show you how to put it all together and create this beautiful under sea decorated mermaid gingerbread house.

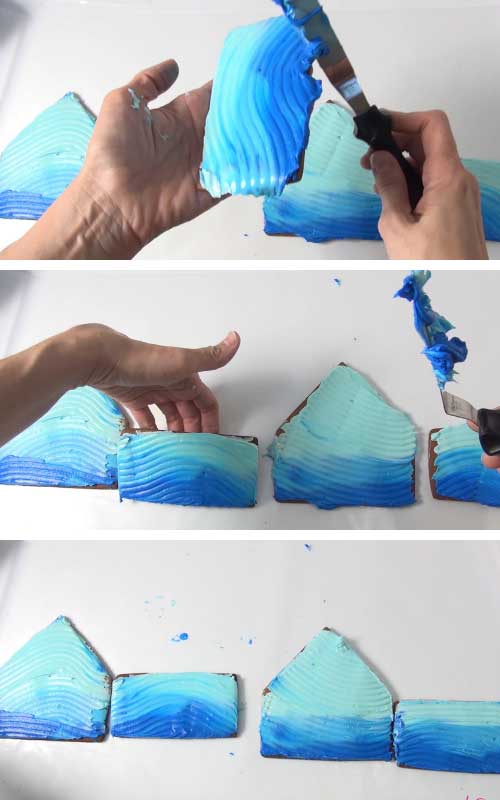
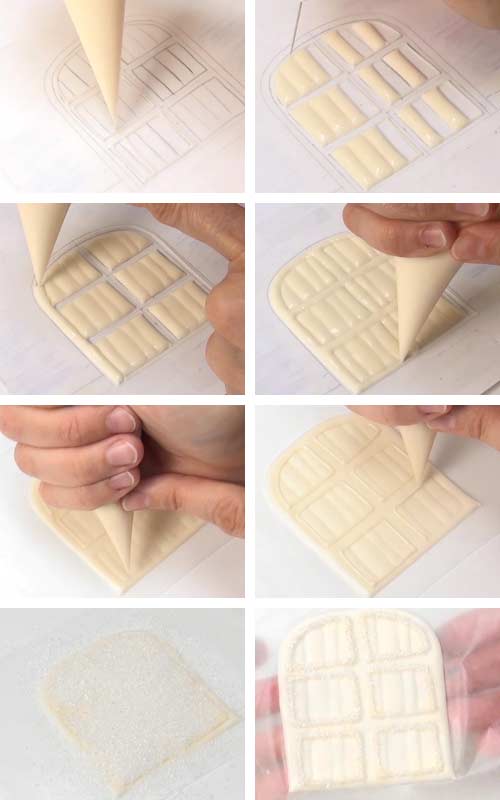
GINGREBREAD HOUSE PANELS
To create underwater scene I decided to use 3 shades of blue royal icing. I wanted to give water some movement and I used a decorating comb to create texture. To be able to create texture it’s important to use stiff icing.
ROYAL ICING COLORS AND CONSISTENCY :
- Blue (3 shades) – stiff consistency
DECORATING STEPS :
Pipe layers of different shades of blue royal icing onto the house panels. Start with the darkest blue at the bottom and finish with the lightest blue at the very top.

Then spread icing, blending it slightly with an offset spatula. Take an icing comb, use a wavy profile, and run it in a wave line across the house panels. If needed wipe the decorating comb into a damp paper towel.
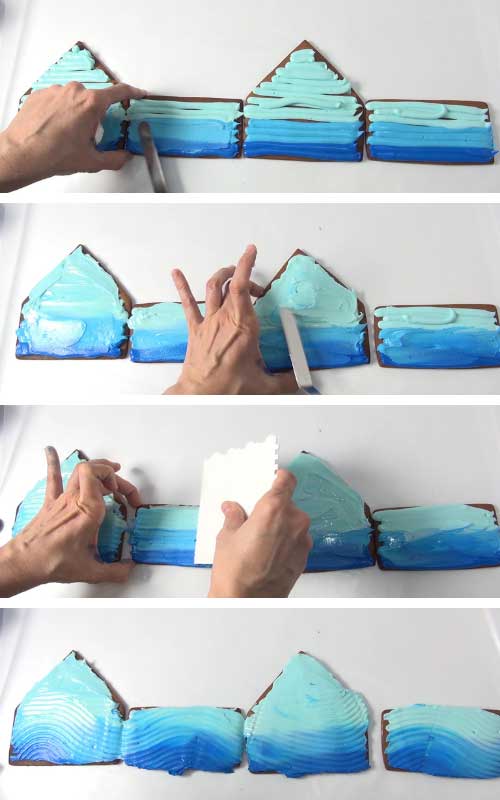
Clean up the edges of each house panel. Scrape off icing with a spatula an let house panels dry.
ROYAL ICING TRANSFERS DECORATIONS
While house panels are drying I prepared all my royal icing decorations. I love making and using Royal Icing Transfers. They are super easy to make and can be made ahead of time.
WHAT ARE ROYAL ICING TRANSFERS (RIT)?
To put it simply Royal Icing Transfer is basically dry royal icing that was piped on a piece of wax paper, parchment paper or and acetate sheet. And it was left to dry. Once royal icing dries decoration can be removed from the backing material. Then these sugar decorations can be used use to accent cookies, cakes, cupcakes and gingerbread house.
HERE ARE FEW EXAMPLES OF ROYAL ICING TRANSFERS :
- Royal Icing Succulents
- Butterflies
- Eyes
- Spiders(2D), Spiders(flat)
- Flat Roses
- Gingerbread House Roof Shingles
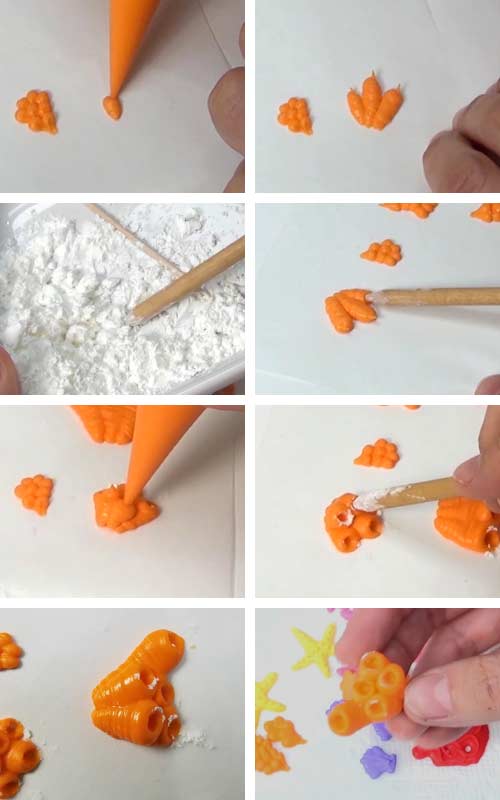
For this colorful underwater mermaid cookie project I made lots corals, tunicate corals, sponges, starfishes, scallop seashells, rocks and underwater bubbles.
ROYAL ICING COLORS AND CONSISTENCY :
- Orange, Yellow, Purple – stiff consistency (Tunicate Coral, Large Scallop Seashells, Sponge)
- Purple, Yellow, Red – 25 second consistency (Small Scallop Seashells, Starfish, Flat Corals)
- Red – 20 second consistency (Flat Corals)
- Gray, White -25 second -rocks
- Medium Blue, Light Blue, White – 20 to 25 second consistency – underwater bubbles
DECORATING STEPS :
Pipe all royal icing transfers on a backing material – wax paper, parchment or acetate sheet (if using acetate sheets be sure to let icing dry for extended time as icing takes longer to dry when using acetate)
Tunicate Coral
I used orange icing (stiff) to pipe tube shapes next to each other. Then to shape them I dipped a wooden fondant tool into dry corn starch. Gently push icing with the corn starch dipped tool until there is an visible hole in the icing. Repeat with all the tubes.
Then let the tubes dry. Then pipe another set of tubes on the top of the first layer. These corals can be made with different colors. Just make sure to use stiff royal icing.
Starfish
Place wax paper over a template and with purple royal icing (25sec) pipe starfish shapes. Use a needle tool to shape the icing while wet. Then let starfish shapes crust well. After pipe small dots onto the top of each starfish shape with purple royal icing (25sec). Let dry.
Small Scallop Seashells
With purple icing (25sec) pipe small scallop seashells in stages. First pipe 3 lines(prongs). Let them crust and then pipe additional lines between. Let it crust again and finish with few more lines on the top until you are finished with the scallop seashell shape. Pipe the bottom and let dry.
Large Scallop Seashells
Fit a piping bag with a round piping tip #4 or #5. Pipe shell sections with purple icing (stiff). Then clean up the bottom edge with a small spreader, spatula or a palette knife. Let icing dry.
Rocks
In a small dish marble some white and gray icing ( 25sec). Pour gray/white icing into a piping bag. Pipe blobs of icing onto a wax paper. Smooth the tops with a needle tool. Let dry.

Sponge
Using stiff icing pipe blobs of yellow icing onto a wax paper. Dip a tip of a toothpick in corn starch and poke little holes into the icing. Repeat dipping toothpick into starch and into icing until you are happy with the sponge decoration.
Underwater Bubbles
Onto a wax paper pipe a large dot using medium blue royal icing (20 to 25 sec). Then into wet medium blue dot pipe another dot with lighter blue icing. Finish with piping a white dot into the light blue. Let dry.
Flat Coral
To make red coral use red icing (20sec), let it crust then pipe tiny dots all over. Let dry.
Let all royal icing transfers dry completely before removing the backing layer. Then you can store transfers in an airtight container until ready to use. RIT can be prepared months in advanced. Store away from moisture and direct sunlight.
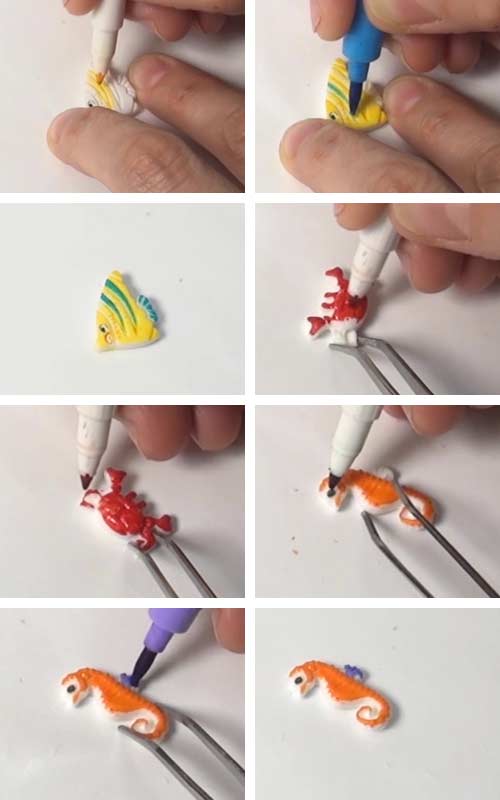
FONDANT DECORATIONS
I decided to use fondant to shape Little Mermaid Fish, Seahorse and Crab (Sebastian). In all honesty I was lazy coloring fondant with gel colors. And so I used white fondant. Once fondant was dry I used edible markers to color fondant.
Shape a small piece of fondant into a ball. Press it into a silicone mold. Roll a small rolling pin or a handle of a needle tool over the fondant. Trim the excess and freeze for 10 minutes. Then carefully unmold each piece from the mold and let dry.
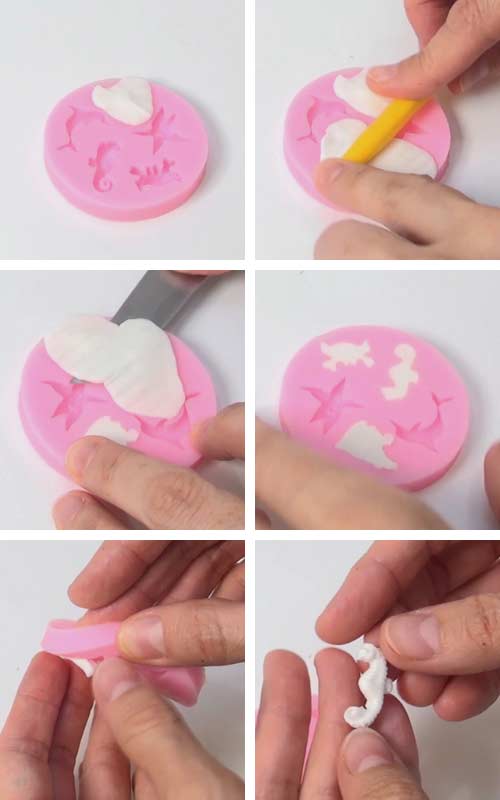
Draw on fondant with edible markers.
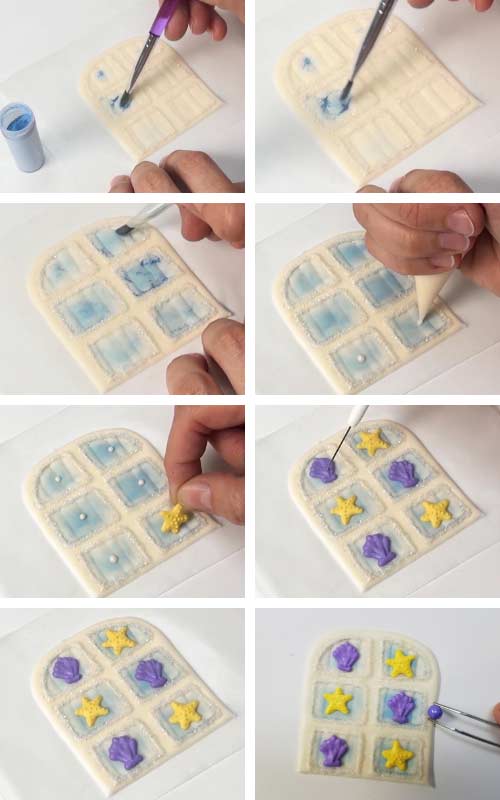
WINDOWS AND FRONT DOOR ROYAL ICING TRANSFERS
Windows and Front Doors are also royal icing transfers.
ROYAL ICING COLORS AND CONSISTENCY :
- Teal – 20 second consistency (window frame)
- White – 15 second consistency (window pane)
- Ivory – 20 second, piping consistency (door)
DECORATING STEPS :
Pipe a window frame with teal icing (20 sec). Then immediately flood the center with white icing (15sec). Use a needle tool to accentuate the corners while icing is wet. Let dry.
Then paint the window frame with gold luster dust. In a small dish mix together edible Aztec Gold Luster dust with few drops of lemon extract. Stir well with a food only paint brush. Paint small dots on the window frame.
Window
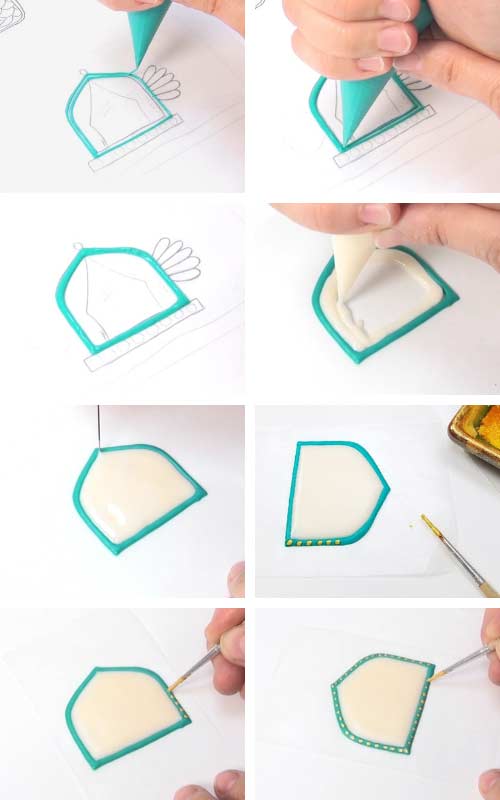
Door
Place a wax paper over a template. Pipe door panel sections with ivory royal icing (20sec). Let sections crust before you pipe the panel next to it. This creates dimension. Pipe the frame and then let the door dry.
Once dry, outline inner panels with ivory icing (piping) and dust the icing with white sanding sugar for little sparkle.
Brush blue petal dust onto the panels with dry food only paint brush. Then glue small starfish and scallop seashells on the panels. Use a small dot of icing for the glue.
MERMAID TAIL COOKIE
I don’t have a mermaid tail cutter. And so I used a template and exacto knife to cut out a mermaid tail cookie.
ROYAL ICING COLORS AND CONSISTENCY :
- Teal – medium stiff
DECORATING STEPS :
With edible marker draw outline for the tail on the cookies.
Fit a piping bag with a round piping tip #2 or #3. Pipe the tail fins first. Then continue piping the tail scales.
While icing is wet attach blue pearls onto the tail. Use tweezers to position pearls onto icing. Let dry.
After, I painted some of scales with Aztec Gold Luster Dust ( in a small dish mix together little bit of edible gold luster dust and few drops of lemon extract or Everclear – grain alcohol)

GINGERBREAD HOUSE CHIMNEY
To decorate chimney panels I used pretty mermaid sprinkles.
ROYAL ICING COLORS AND CONSISTENCY :
- Light Blue – 15 second consistency
DECORATING STEPS :
Ice cookies with light blue icing (15sec) then decorate icing with mermaid sprinkles while icing is wet. Let dry.

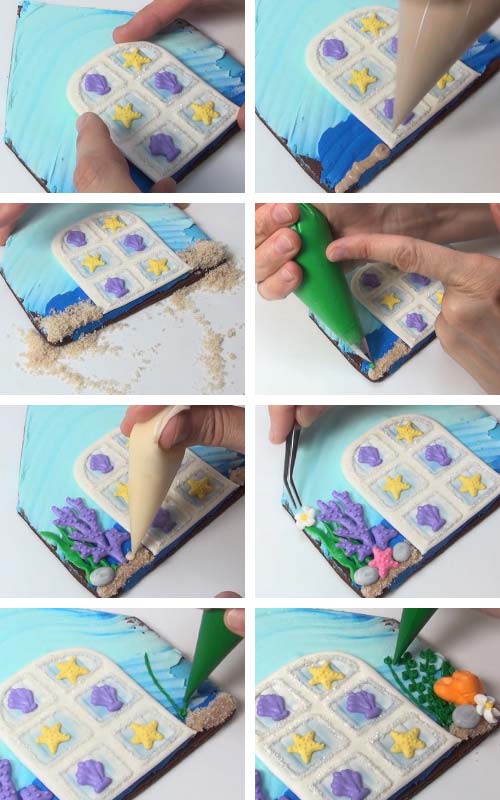
HOW TO DECORATE GINGERBREAD HOUSE WITH ROYAL ICING TRANSFER DECORATIONS
ROYAL ICING COLORS AND CONSISTENCY :
- Ivory – 20 second consistency (base for the sand, and glue to attach decorations on the panels)
- Leaf Green – stiff ( seagrass using a petal tip #102 or 103 )
- Dark Green – medium stiff (seagrass using a small leaf tip)
DECORATING STEPS :
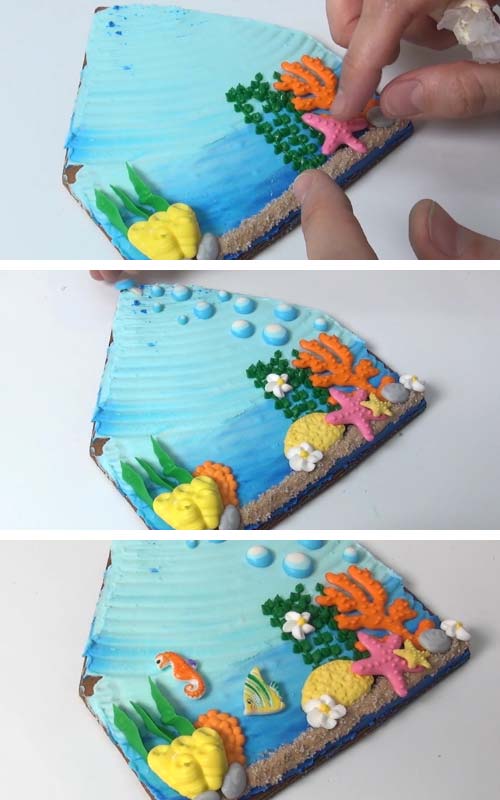
To decorate house panels use premade royal icing transfer and fondant decorations. To glue them onto the house panels use royal icing for the glue.
I decorated bottom of each house panel with edible sand (it represents ocean floor). To make edible sand you can either use crashed graham crackers or other light colored cookies. For this project however I used sugar. I combined white sugar and brown (1:1ratio).
Pipe a thick line of ivory icing (20 sec) on the bottom of each house panel. Immediately dust it with edible sand. Continue with decorating panel with decorations you made.

To make seagrass you can use a petal piping tip and leaf green icing (stiff). Be sure to pipe with an narrow part of the petal tip facing up.

HOW TO MAKE A LEAF PIPING TIP
To make other type of seagrass you can also use a leaf tip. To make a leaf tip cut a small V shape opening on the piping bag.

Notice how I layered seagrass with piped leaves. Let layers crust before piping another layer of green leaves on top of the first layer.
Use tweezers to attach underwater bubbles.
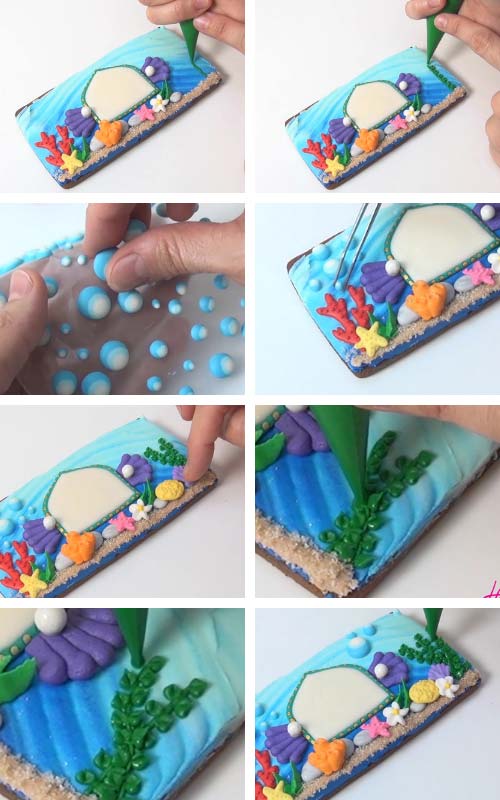
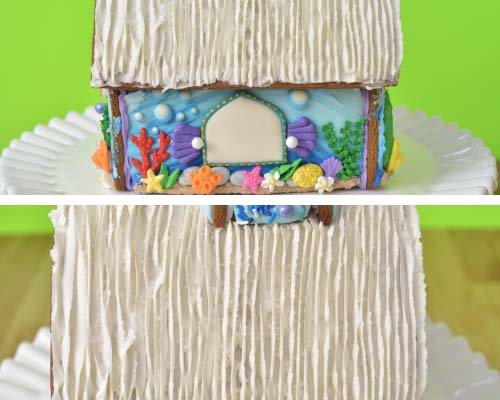
Continue decorating front and back panel of mermaid gingerbread house with royal icing transfers. Be creative, use edible sand, corals, rocks, bubbles, scalloped seashells and starfishes. Pipe seagrass with a leaf tip.
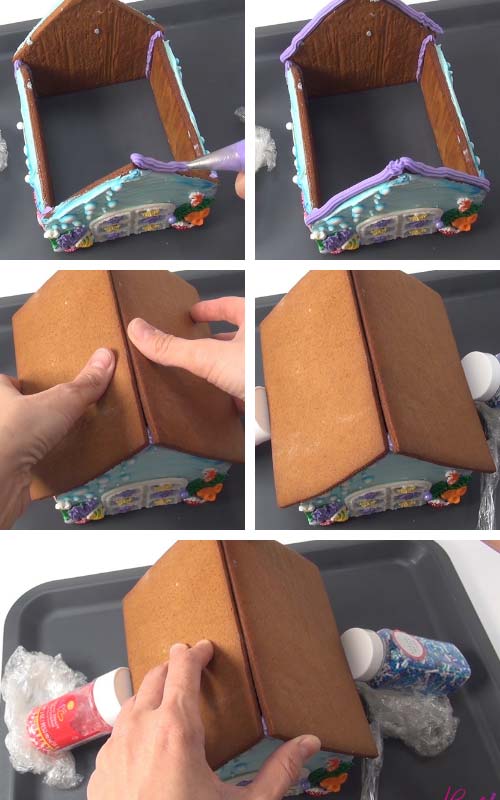
MERMAID GINGERBREAD HOUSE ASSEMBLY
Be sure to use thick icing for the glue and let the base of the house dry for at least 4-5 hours before you glue the roof panels on the top.
ROYAL ICING COLORS AND CONSISTENCY :
- Purple – thick consistency
DECORATING STEPS :
Have all the base panels ready to go.

Pipe a thick line of thick icing on the back panel. Glue the side panels on the back panel. Right after glue the front panel on the side panels. Use small bottles to keep the panels from sliding in or out. This is especially true with side panels. They tend to lean inwards or outwards during the first stages of drying. Let the base dry for at least 4-5 hours.

Then pipe a thick line of icing on the top edges and attach the roof panels. Hold the panels in place for 30 seconds. Check if the front and back of the house is covered by the roof.
Support roof panels in place with small bottles or use skewers. You can see how to use skewers in my Star Wars Gingerbread House Tutorial. Let the house dry overnight.
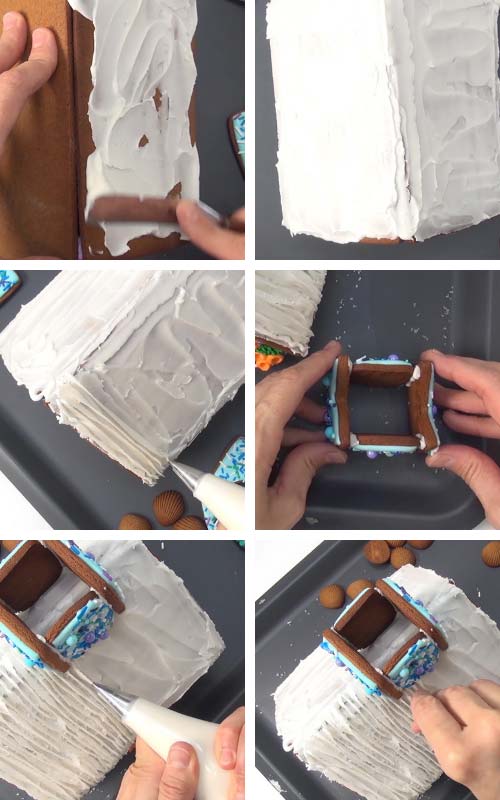
DECORATE ROOF
ROYAL ICING COLORS AND CONSISTENCY :
- White – stiff
DECORATING STEPS :
Spread thick white icing over the roof panels. Then fit the piping bag with a petal tip # 103. Pipe lines across the roof, having narrow part of the piping tip facing up. Dust the roof with some white sanding sugar for sparkle.
Whole you are piping the roof don’t forget to assemble the chimney and glue it on top of the roof. Continue piping the roof.
Decorate top of the roof with gingerbread seashells cookies and large pearls. I shaped seashell cookies with a silicone mold. Shape a small piece of gingerbread dough into a ball and press into a mold. Then unmold the shell and bake it at 350F for 7-9 minutes.
Lastly we need to attach beautifully decorated teal mermaid tail cookie into the chimney. Pipe some stiff icing into the chimney and attach the mermaid tail. While icing is drying support the tail with a piece of plastic food wrap or rolled wax paper. Let dry.

Finished Mermaid Gingerbread House.
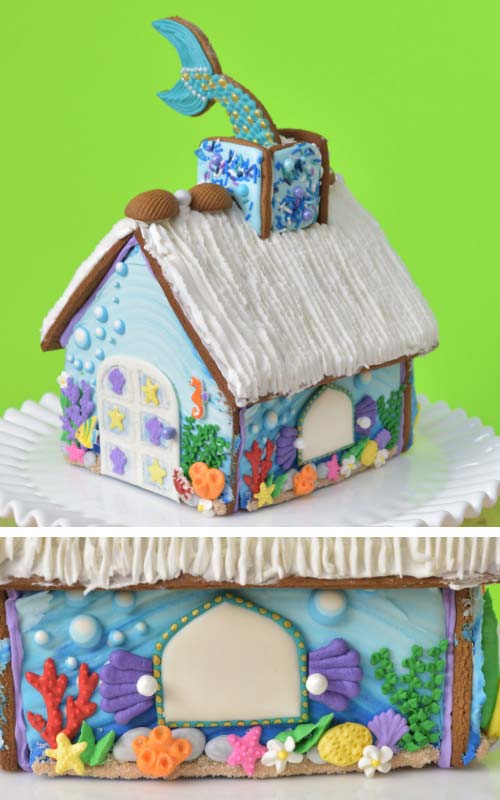
Piped roof represents seagrass in the ocean. I imagined house sitting on the bottom of the ocean floor with a roof covered with unusual white seagrass.
Remember, imagination has no boundaries. And being creative takes courage. Not everyone will love what you create. And that’s okay. Don’t be afraid to experiment. And most of all have fun doing it.
TO MAKE MERMAID GINGERBEAD HOUSE YOU NEED
- RECIPES
- Gingerbread Cookie for Centerpieces and Gingerbread House (display only)
- Gingerbread Cookie dough for eating (use 1/4tsp baking powder only)– can be used for houses
- Royal Icing
- TOOLS
- House Cutters
- Templates – Front Door and Corals, Mermaid Tail and Window
- Seashell Silicone Mold – it’s similar to the one I used
- Silicone Mold to make seahorse, fish and crab
- Corn Starch
- Wax Paper
- Piping Bags
- Mermaid Sprinkles
- Blue Pearls
- Tweezers, Toothpick
- Needle Tool
- Piping Bags
- Food Colors
- Small Spreader
- Icing Comb
- Offset Spatula
- Piping Tips – #102, #103, #2
- Food Paint Brush
- Aztec Gold Luster Dust
- Blue Petal Dust
- Dropper
- Lemon Extract or Everclear
- RELATED TUTORIALS
- Ultimate Guide To Royal Icing Consistency
- Can I Freeze Royal Icing
- Royal Icing FAQ
MORE CUTE GINGERBREAD IDEAS :
- Star Wars Gingerbread House
- Snow White Gingerbread House
- Holiday Gingerbread Bird House
- Cute Gingerbread Men Cookies
- Gingerbread Snowflake Wreath
- Grinch Gingerbread House
PIN IT for later

On September 7th, 2019 I updated this post with new step by step photos, written text and a video.
This post contains Amazon affiliate links that earn me a small commission, at no cost to you. I only recommend products that I use and love. Learn more about my affiliate policy here.

Hi, I’m Hani
Welcome!
Thank you for visiting Haniela’s. On my blog, you’ll find delicious sweet & savory recipes made with simple ingredients. Why not start a new adventure? Discover a world of cookie decorating with my step-by-step tutorials.

Hi, I’m Hani
Welcome!
Thank you for visiting Haniela’s. On my blog, you’ll find delicious sweet & savory recipes made with simple ingredients. Why not start a new adventure? Discover a world of cookie decorating with my step-by-step tutorials.


This is so cute! The bubbles and coral are my favorite details, and there are so many great details on this house.
Thank you so much June. I love bubbles on this so much.