How to make Decorated Panda Cookies
Panda cookies make fantastic party favors or thoughtful gifts to share with friends and loved ones. Today I’ll show you, step-by-step, how to create these charming fluffy black and white bear cookies at home. Let’s go!

updated from 2012
DECORATED PANDA COOKIES STEP-BY-STEP
- Beginner’s Guide To Cookie Decorating
- Ultimate Guide to Cut-Out Cookies (tips, tricks, troubleshooting)
- Royal Icing Recipe
- Small Batch Royal Icing Recipe
- Cookie Icing Recipes (includes vegan royal icing, glaze, fondant)
- Guide To Royal Icing Consistencies with Visual Help(what is stiff, flood icing, etc.)
- How To Freeze Royal Icing
- How To Make Royal Icing Transfers
- Royal Icing FAQ ( for example: how to make black icing, color bleeding, storage, and more)
- How To Make a Cookie Cutter Template
- Ultimate Guide To Cookie Decorating Tools
Subscribe to Haniela’s Cookie Club on Patreon and get access to exclusive and ad-free tutorials, templates, sneaks peeks, and more.
THINGS YOU NEED
- Bear head cookie cutter
- Nose and Panda Decorating Template
- Gel Food Coloring: black, green, yellow, pink
- Dark Pink Color Dust/Petal Dust
- Gray Petal Dust (optional)
- Food Only Paintbrushes
- Edible Markers
- Tipless Piping Bags
- Scribe Tool
This post contains Amazon affiliate links that earn me a small commission, at no cost to you. I only recommend products that I use and love. Learn more about my affiliate policy here.

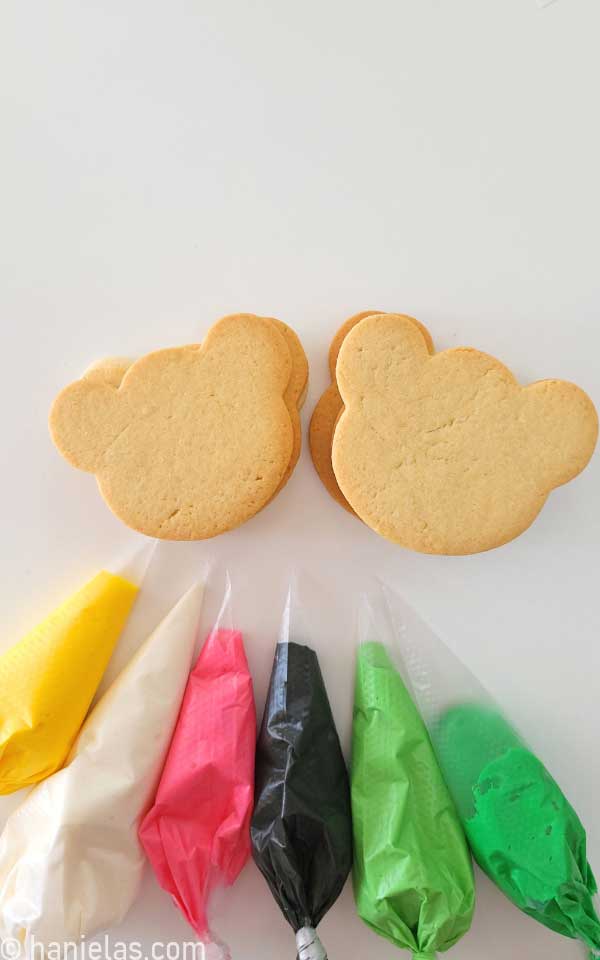
BAKE COOKIES
Use your favorite cut-out cookie recipes to prepare the cookies. Or you can use one of these tested cut-out cookie recipes. To cut out cookies use a bear shape head cutter or if you don’t have a specific cutter, you can make your shape using 2 round cookie cutters. Piece the head shape together, using 3-inch round cutter for the face and about 3/4 inch for the ears.
ROYAL ICING COLORS AND CONSISTENCIES
- Black Icing: 20-25 second consistency (eyes, ears), piping consistency (eye outline)
- White Icing: 20-25 second consistency (eyes), 15 second consistency (face), medium thick consistency (white daisies)
- Pink Icing: 15 second consistency
- Light and Dark Green Icing: medium consistency (leaves, headband)
- Yellow Icing: 25-second consistency
DECORATE PANDA COOKIES
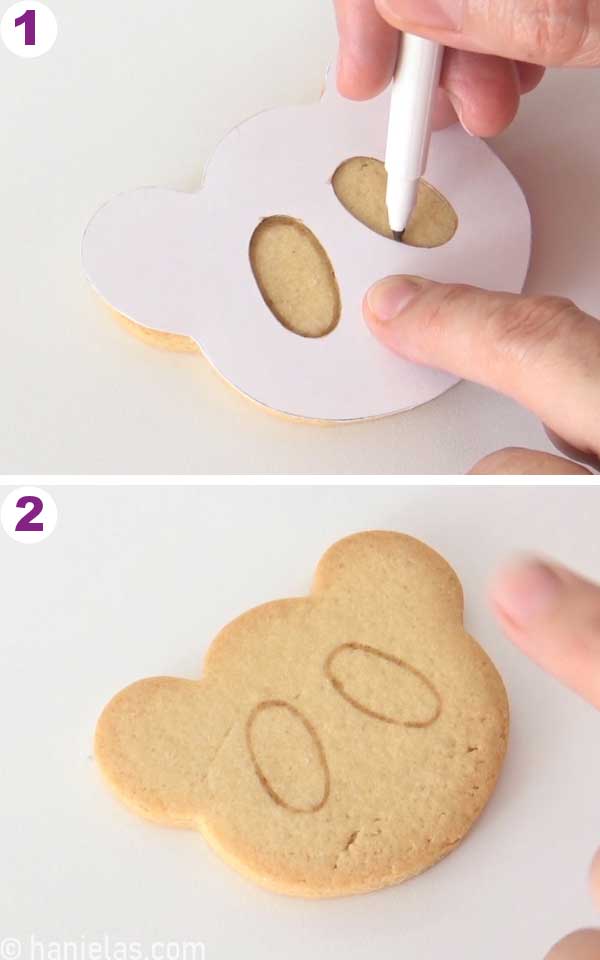
Start by tracing the eye outlines onto the cookies. I used brown edible marker and my handy cardstock template (steps 1-2).
HOW TO PIPE PANDA EYE WITH ROYAL ICING
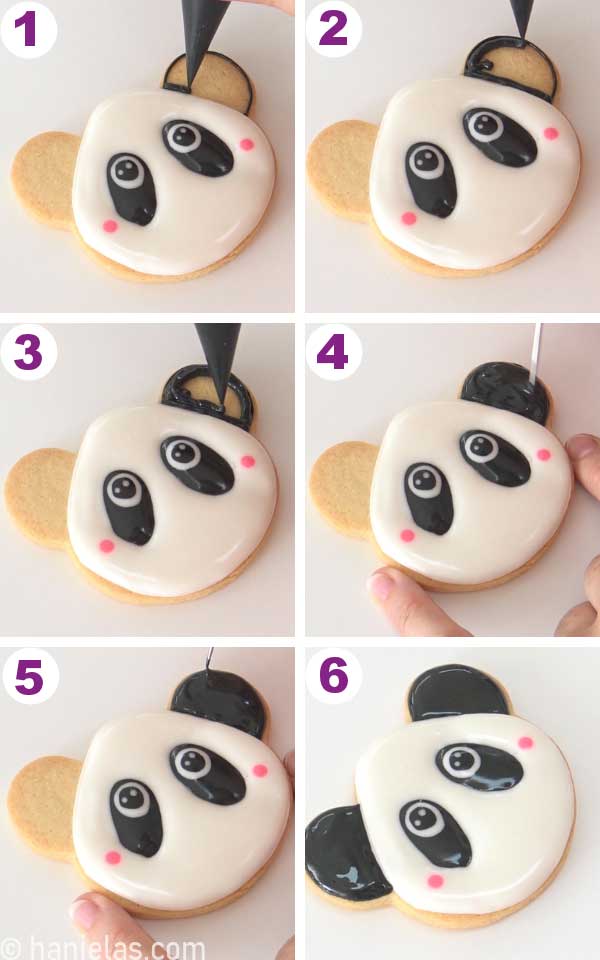
Now get ready to make the eyes. Outline and fill the oval shape with black icing (20-25 seconds), and immediately pipe a large white dot near the top edge (steps 1- 3). Then, change the piping bag and pipe another black dot in the middle of the white dot (step 4). Finish the eye design by piping two reflection dots, one larger than the other (step 5). And after you are done with the first eye, decorate the second eye (steps 7-8).

DECORATE PANDA BEAR HEAD
There is no need to wait for the eyes to crust, you can outline and flood the cookie with white icing (15-seconds) immediately. Outline the cookie and then squeeze the piping bag a little more and pipe icing around the eyes and fill the area with icing (steps 1-3). Move the icing with the scribe and smooth out any dimples and spikes (steps 4-5). Then if using, pipe the pink cheeks – 2 large pink dots on the sides, by the bottom of the eyes (steps 6-8).

Right after, you can outline and flood the ears with black icing (20-25 second consistency (steps 1-6). Let the icing dry.
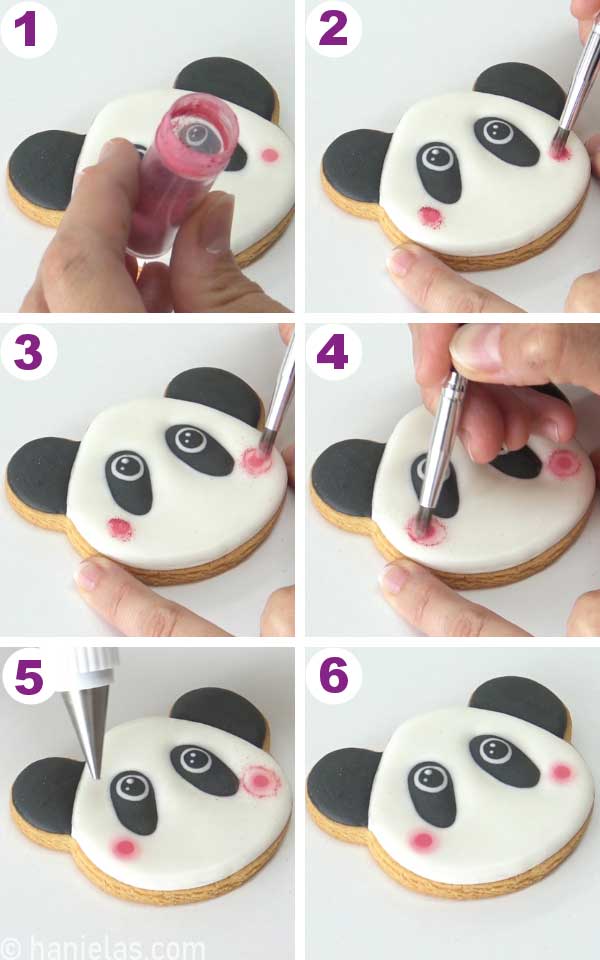
HOW TO MAKE PINK CHEEKS
To enhance the cheeks I decided to use deep pink color dust/petal dust. Apply a small amount of dry dust onto the cheeks with a dry food-only paintbrush (steps 1-3). Spread the dust with a paintbrush using circular motion (steps 3-4). To lift residue dust, use an empty decorating bottle and blow the dust away with air (steps 5-6).
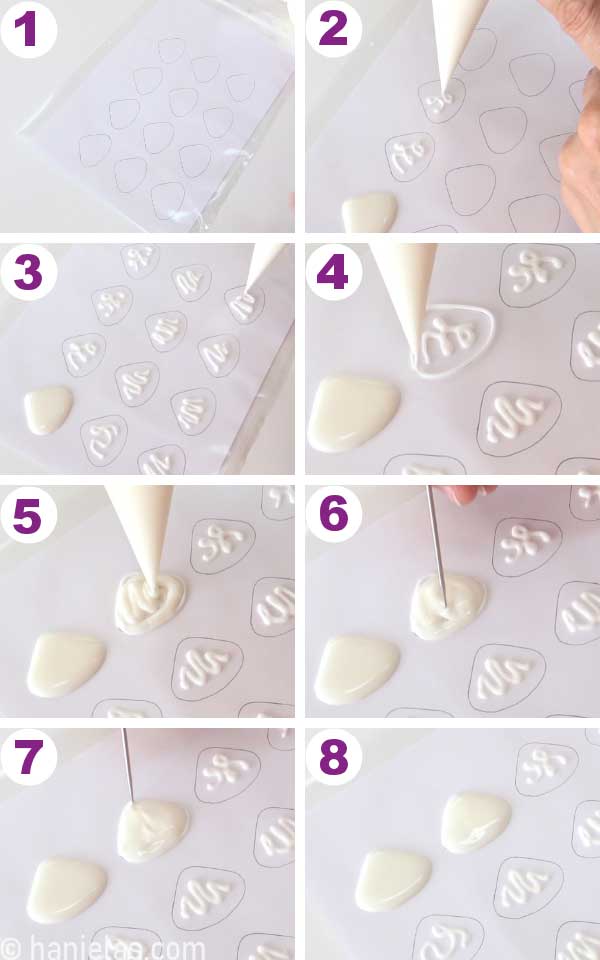
ROYAL ICING TRANSFERS-MAKE PANDA NOSES
To make the panda noses, I used a nose transfer sheet (view tools section at the top of the page for the template). Place the transfer sheet into a clear smooth protector sheet (step 1). To prevent cratering, pipe a squiggly line across the middle of each nose and let it crust for 10 minutes (steps 2-3). Then outline and fill each nose with white icing (20-seconds), and let dry on a flat surface overnight (steps 4-8).
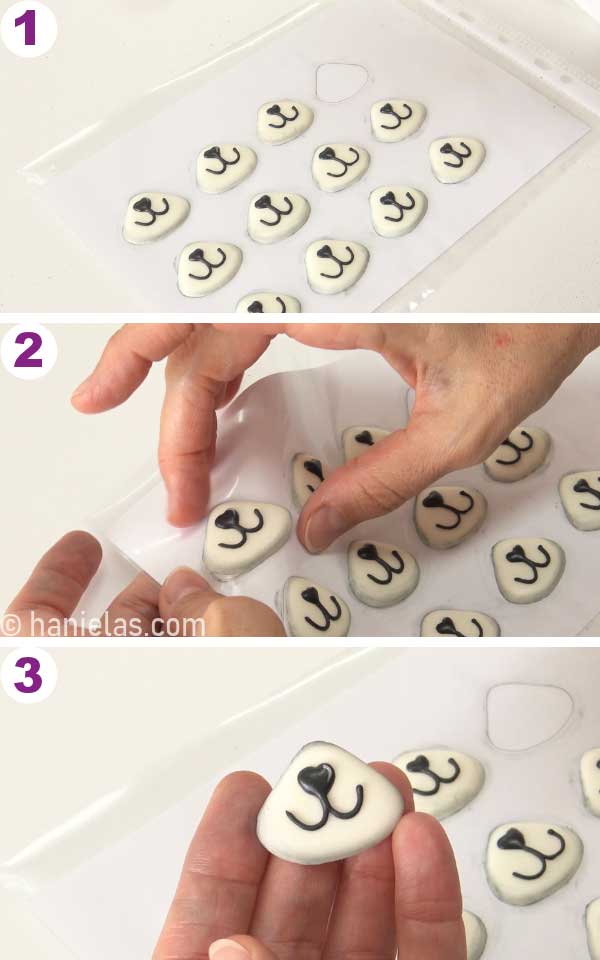
Now, with black icing 20-25 second consistency, pipe the mouth and heart-shaped nose (steps 1-4). Pipe a small white reflection line onto the heart with 20-second white icing (step 5). Let dry for 2 hours.

And finally, shade the outer edge with gray color dust/petal dust. This is an optional step. Feel free to skip it. Dust the outer edge of each nose with dark dust. Run a dry food-only paintbrush around the edge. Remove excess dust with a decorating bottle (steps 1-8).

Carefully remove noses from the acetate (steps 1-2). Learn more about Royal Icing Transfers.
ATTACH NOSE TRANSFER
Outline each eye with piping consistency icing (steps 1-3). Pipe white icing onto the back of the nose and attach the nose between the eyes (steps 4-8).

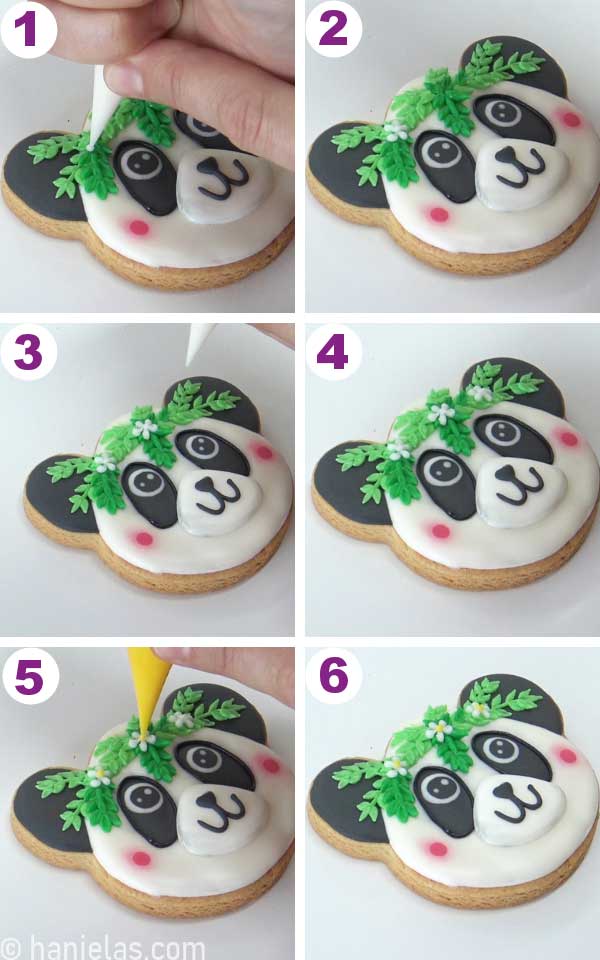
HOW MAKE A LEAFED HEADBAND
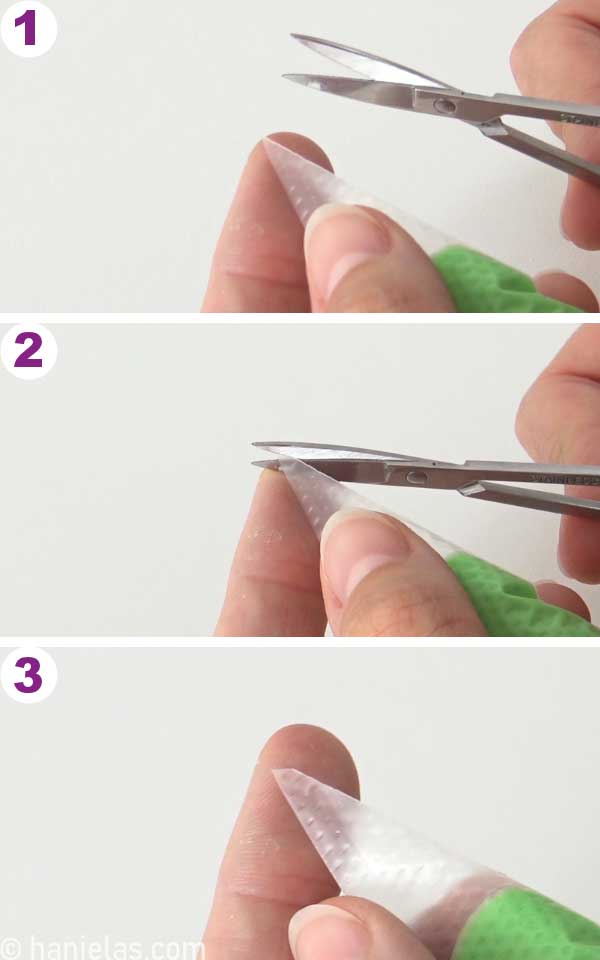
To pipe the leaves, I used piping/medium consistency icing. Don’t use icing that is too runny. First, prepare piping bags. Cut the tip of the piping bag at an angle, as shown in the picture below (steps 1-3).
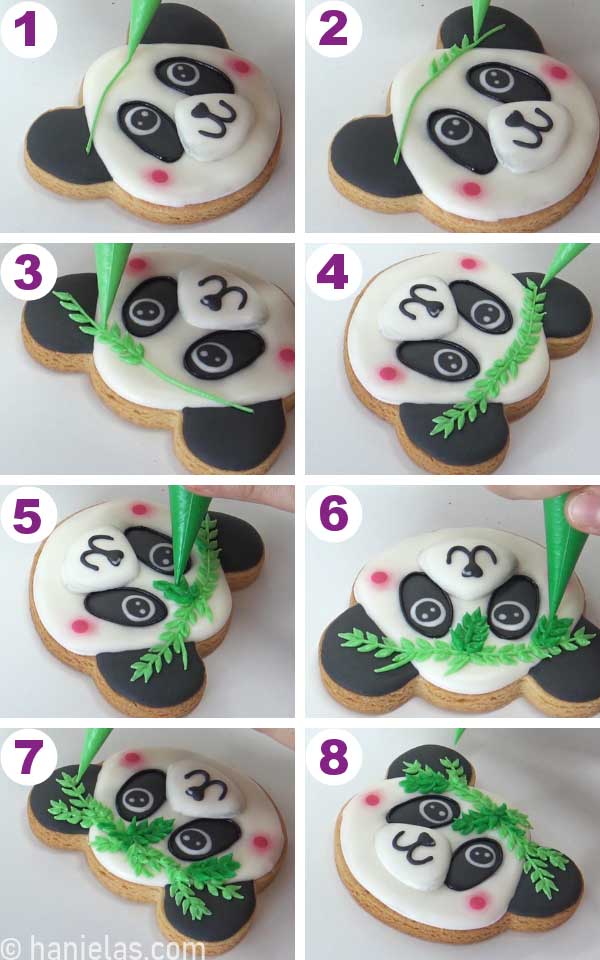
Hold the piping bag with the longer end facing up, pipe the stem (step 1). Then pipe the leaves – gently squeeze the piping bag and slowly pull away to pipe a leaf. Repeat. Pipe light green and dark green stems with leaves (steps 2-8).
To make the daisies, use thicker white icing that doesn’t spread and holds its shape. Pipe 5-6 teardrop shapes connected in the middle (steps 1-4). Then add a dot of yellow (25-second icing) to the center of the flower.
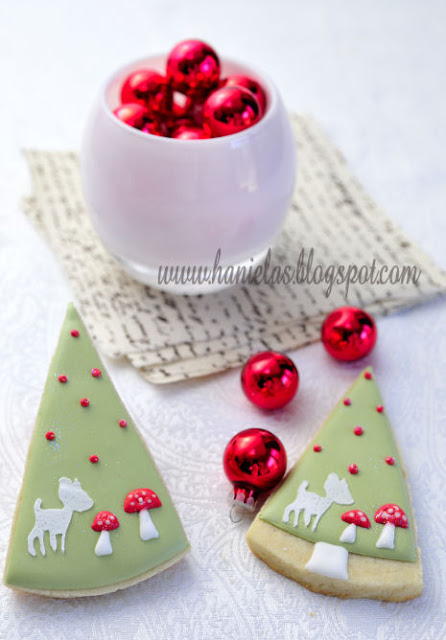
MORE ANIMAL DECORATED COOKIES
Panda bear cookies are mainly associated with baby showers and birthday parties, but with a creative spark they can be used at weddings and Valentine’s day.
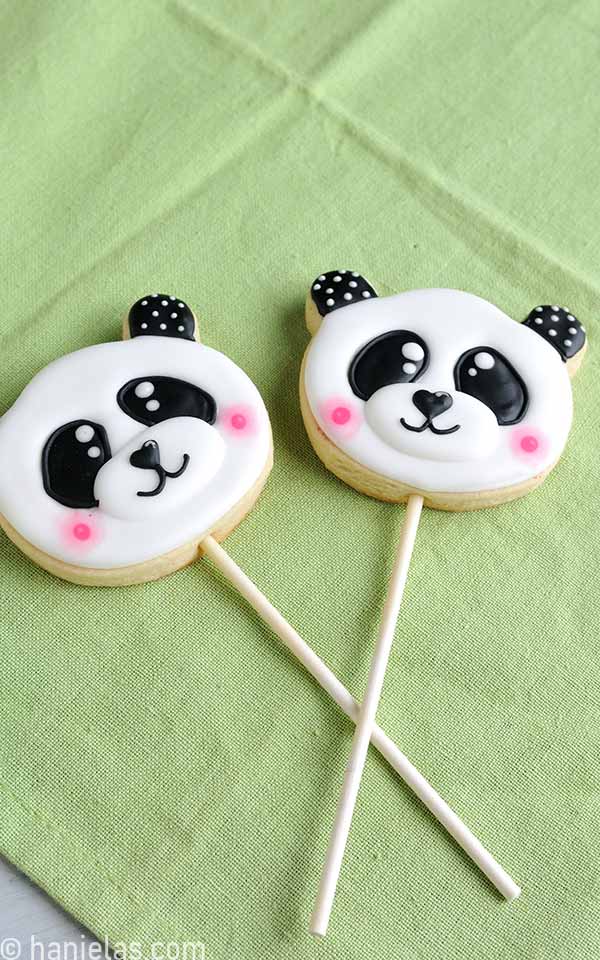
PANDA COOKIES FROM THE PAST
Bellow are the pictures of panda cookies I created in the past.

Cookies on a stick are perfect for cake decorating. You can use them as cake toppers – insert lollipop stick into the cake. How to make cookies on a stick/cookie pops.
This cookie decorating tutorial was published on February 13, 2012. On August 4, 2023, I updated this tutorial with new step-by-step pictures and written text, and a video.

Hi, I’m Hani
Welcome!
Thank you for visiting Haniela’s. On my blog, you’ll find delicious sweet & savory recipes made with simple ingredients. Why not start a new adventure? Discover a world of cookie decorating with my step-by-step tutorials.

Hi, I’m Hani
Welcome!
Thank you for visiting Haniela’s. On my blog, you’ll find delicious sweet & savory recipes made with simple ingredients. Why not start a new adventure? Discover a world of cookie decorating with my step-by-step tutorials.