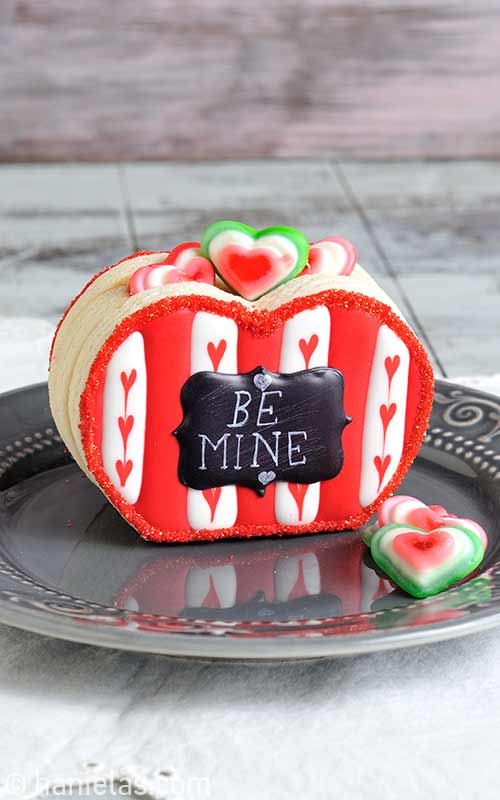
Valentine’s Day Heart Cookie Box
This decorated Valentine’s Day Heart Cookie Box is perfect for engagement, bridal shower parties and of course for Valentine’s Day. It’s super cute and really easy to make. Fill decorated 3D heart cookie box with candies, chocolates or mini cookies.
updated post from 2015
HOW TO MAKE 3D VALENTINE’S DAY COOKIE BOX
This pretty in red bee mine decorated heart shaped cookie box was inspired by 3D Christmas Stocking Cookie.
- TABLE OF CONTENTS
- 3D Heart Cookie Design
- Bake Cookies
- Decorate with Royal Icing
- Wet on Wet Hearts
- How to make card stock template
- Chalkboard effect
- Assemble 3D Heart Cookie Box
- Recipes and Tools
3D HEART COOKIE DESIGN
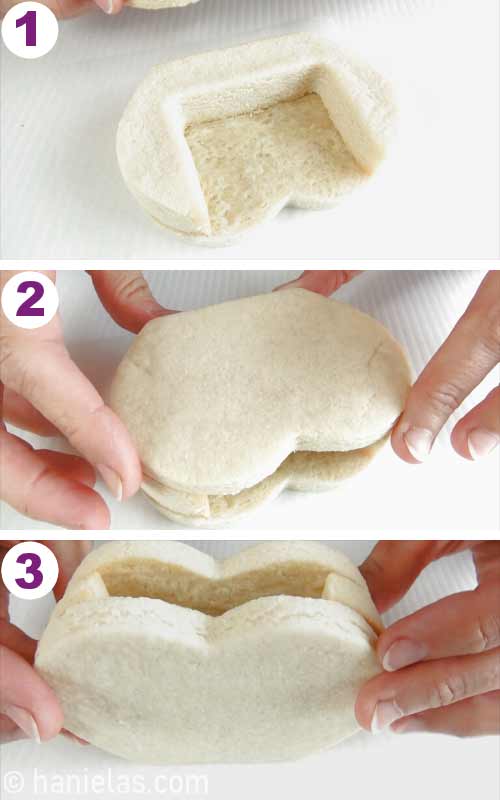
To make a 3D cookie with a cavity in the middle you’ll need a total of 3 cookies : front, middle (with the cavity) and a back cookie.
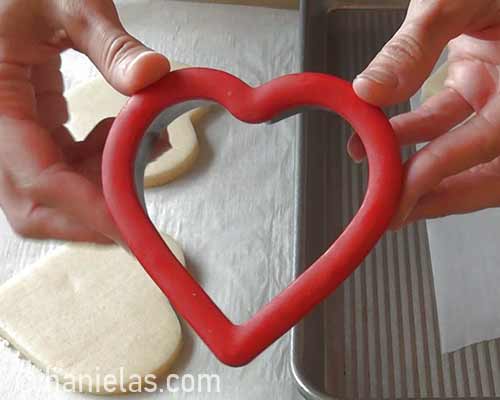
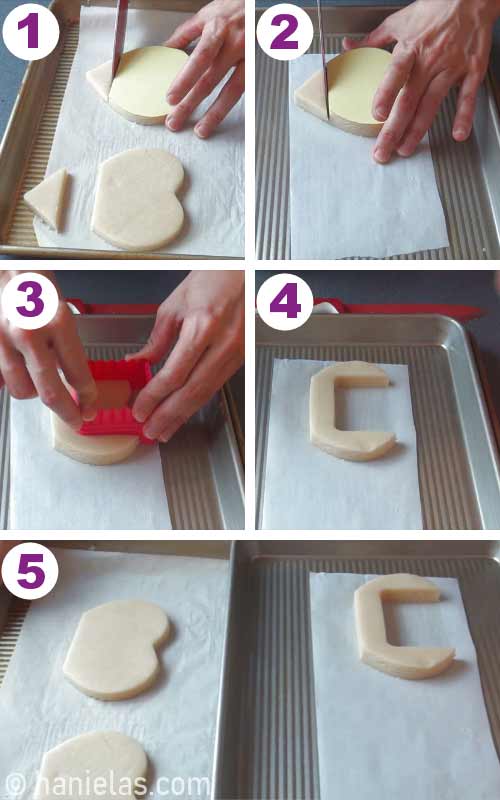
I used a large heart cookie cutter (4 inches across) to cut out all the cookies. Then I used a card stock template to trim the bottom of the heart. And another square cutter to cut out middle section of the thicker cookies.
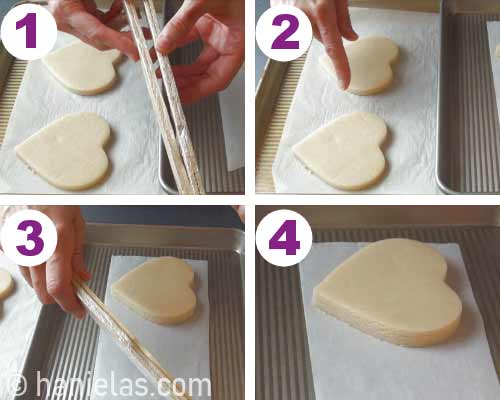
To roll the cookie dough I used rolling guides.
First I cut out 6 heart cookies to ¼ inch thick (step 1-2). Then I gathered all scraps and rolled out remaining sugar cookie dough to ½ inch thick and I cut out 3 heart cookies (step 3-4). If possible use rolling guides to make sure the cookie dough is evenly rolled out.
Using a template trim the bottom of the heart cookies (step 1-2). Then with a square cookie cutter cut out a middle section from the ½ inch thick heart cookies (step 3-4). Then if you still have some cookie dough left use it to make additional boxes or cut out small cookie shapes. These can be used to fill the cookie box.
BAKE COOKIES
Bake cookie at 375F for about 10 -11 minutes, until no longer puffy and shiny in the center. Allow cookies to cool for 10-15 minutes on a baking sheet before transferring cookies onto a cooling rack. Be sure to use a flat cookie spatula to transfer warm cookies.
This is what an undecorated heart box looks like.
DECORATE WITH ROYAL ICING
To decorate Valentine’s Day heart box cookies I used Royal Icing. Traditional Royal Icing has egg whites and so if you rather use icing without egg whites you can try my Vegan Royal Icing.
ROYAL ICING COLORS AND CONSISTENCIES :
- Red, White – 15 second consistency
- Red – piping consistency
- Black – 20 second consistency
DECORATING STEPS :
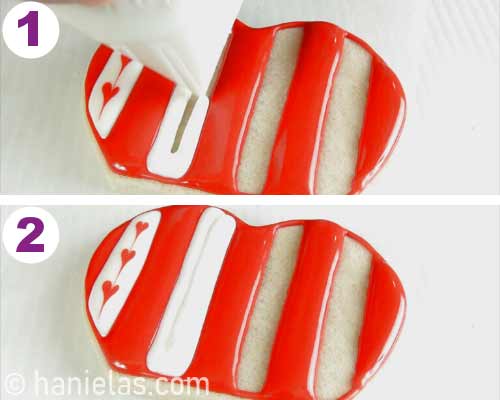
Start by outlining and dividing a heart cookie into sections (step 1-4). Flood every other section with red royal icing (15sec). Use a needle tool or a toothpick to distribute the icing and accentuate the points (step 5-8).

WET ON WET HEARTS
Now you are ready to flood all the empty sections between red areas. With white icing (15sec) flood one section at a time (step 1-2).
Immediately pipe red dots (15sec) into the white icing. Take a needle tool and run the tip of the pointy tool through the red dots. Starting at the top and pulling the tool through the icing and through the middle of red dots. You’ll see hearts being formed in seconds.
In order for this wet on wet heart technique to work icing has to be fluid. That’s why it’s best to work with one section at a time. Repeat until you covered all of the cookie with icing. Allow icing to dry overnight.

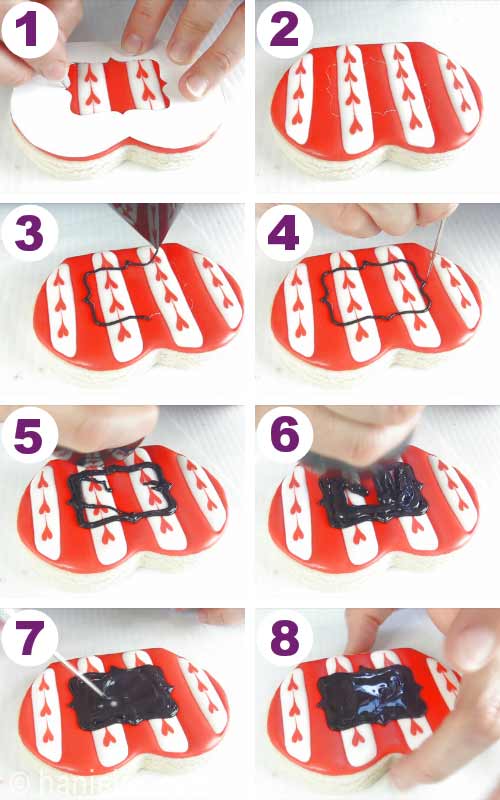
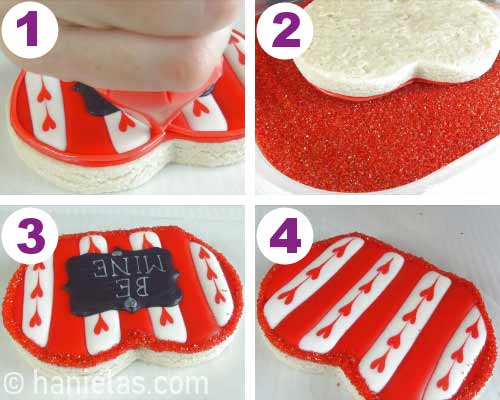
HOW TO MAKE A CARD STOCK TEMPLATE FOR COOKIE DECORATING
I often make card stock templates to trace outlines on cookies. They help me achieve a desired cookie design. You can grab the template at the bottom of the post under Tools Section.
First be sure to protect your work surface. I usually use a cutting board underneath my card stock template Cut out the plaque shape with an exacto knife.

Take the template and a push pin. Scratch the surface of the icing following the template outline. Or you can use an edible marker and trace the plaque outline onto the dry icing. (step 1-2).
Now take black royal icing (20sec) and outline and the flood the plaque shape. With a needle tool accentuate the points. To smooth the icing give the cookie a light tap onto the work surface. Allow icing to dry (step 3-8).
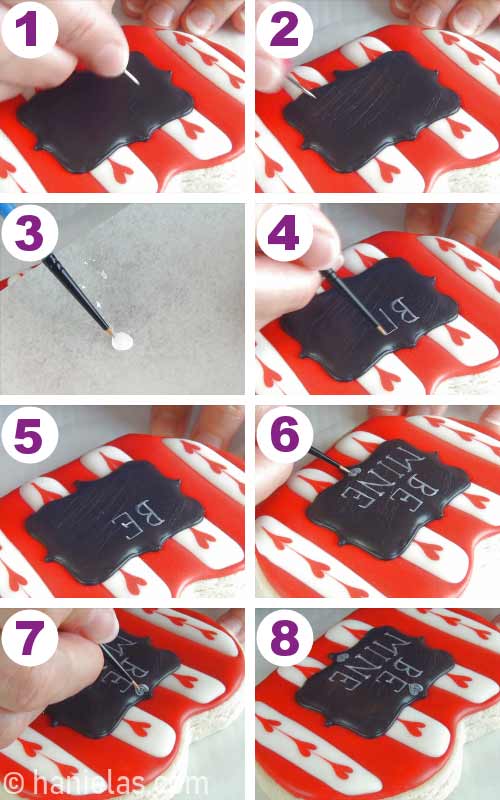
CHALKBOARD EFFECT
Create chalkboard effect by scratching dry black royal icing with a push pin. Then with a food only paint brush and white food gel coloring write Bee Mine onto black royal icing. Allow white color to dry for 20 minutes or so.
APPLY SANDING SUGAR
Outline both heart cookies with red icing (piping consistency). Then dip each cookie into red sanding sugar. Allow to dry.
ASSEMBLE HEART COOKIE BOX
To assemble pretty bee mine Valentine’s Day Heart Cookie Box simply glue pieces together. Pipe royal icing on the middle section and then glue front and back cookie on it. Allow to dry for couple of hours (step 1-4).
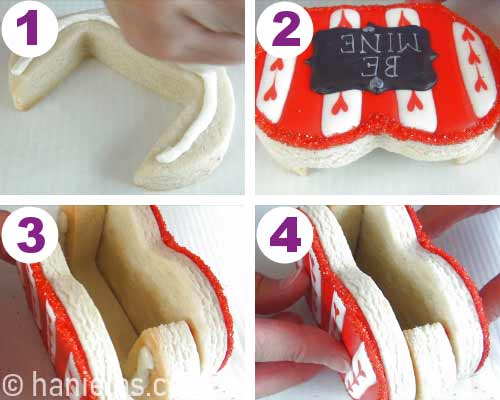
Then fill the cavity with small candies. I used heart gummy candies I found at local Wegmans store (step 1-3)

TO MAKE DECORATED VALENTINE’S DAY HEART COOKIE BOX YOU NEED
- RECIPES
- Cut Out Sugar Cookies
- Chocolate Cookies
- Royal Icing
- TOOLS
- Get all the tool in my Amazon Shop
- Heart Cookie Cutter
- Square Cookie Cutter
- Template
- Needle Tool or a toothpick
- Piping Bags
- Food Colors – super red, super black, white
- Exacto Knife
- Push Pin
- Gummy Hearts
- Food Only Paint Brush
- Heart Cookie Box Video Tutorial with narration

MORE VALENTINE’S DAY IDEAS :
- Heart Roasted Potatoes
- Fortune Cookies
- Valentine’s Day Cake Balls
- Geeky Valentine’s Day Cookies
- Valentine’s Day S’mores
This post was originally published on February 12, 2015. On January 5th, 2020 I updated this post with new step by step photos, written text and a video.
This post contains Amazon affiliate links that earn me a small commission, at no cost to you. I only recommend products that I use and love. Learn more about my affiliate policy here.

Hi, I’m Hani
Welcome!
Thank you for visiting Haniela’s. On my blog, you’ll find delicious sweet & savory recipes made with simple ingredients. Why not start a new adventure? Discover a world of cookie decorating with my step-by-step tutorials.

Hi, I’m Hani
Welcome!
Thank you for visiting Haniela’s. On my blog, you’ll find delicious sweet & savory recipes made with simple ingredients. Why not start a new adventure? Discover a world of cookie decorating with my step-by-step tutorials.