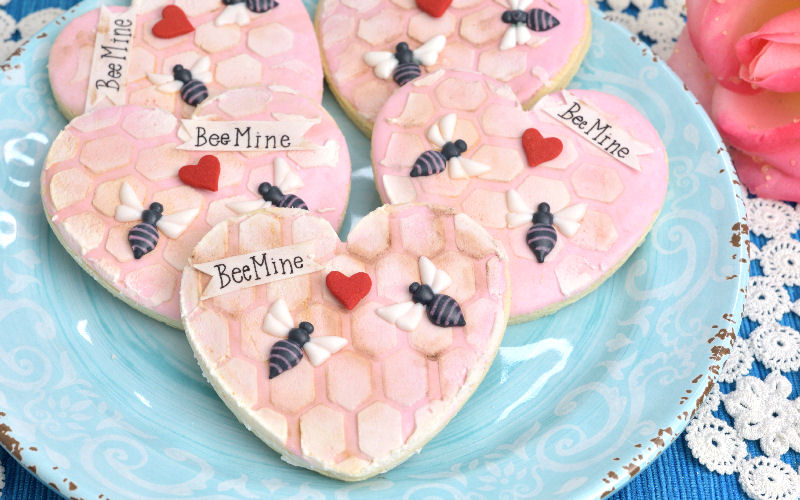
Bee Mine Honeycomb Valentine’s Day Cookies
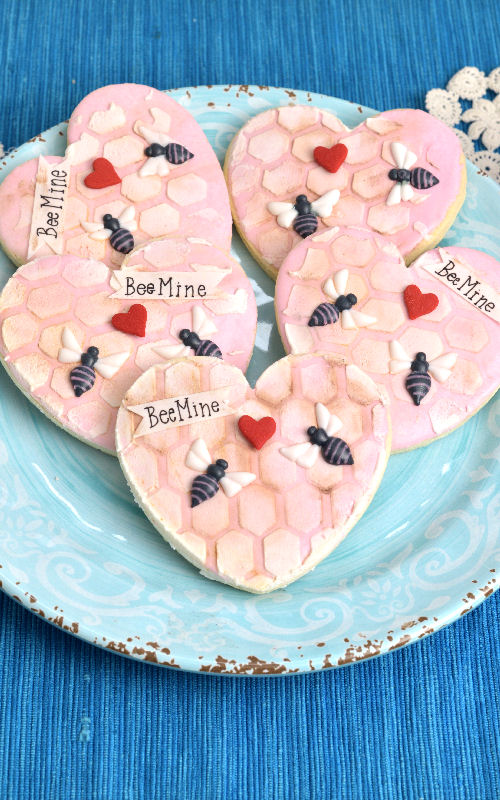
Few weeks ago I shared with you a recipe for Vegan Royal Icing. I used vegan royal icing to make these pretty Bee Mine Honeycomb Cookies.
Before I jump into a tutorial let me tell you little bit about my favorite gadget of 2018!
The best tool I got last year was a Bag Sealer.
- This thing saved my wrist from going to the hospital. I tell you it’s so awesome I recommend it to anyone who has to bag a lot of piping bags.
- If you decide to get one be sure to get a the tape as well as it doesn’t come with one, or mine didn’t.
- One roll of tape will last you through at least a thousand + bags.
- What I love about this sealer is that I can mark my piping bags based on the consistency which is incredibly useful. For example: thickest icing gets 1 stripe, more fluid icing get 2 stripes and so on.
- Before I use the sealer to seal the end of the piping bag I twist the end of the bag and the section I want to apply the seal to.
- Sealer also come with the cutting blade attached at the bottom. This is really useful if you are using a larger piping bags and need to cut the end of the bag. It really works like a charm.
- Be sure to watch the video below to see it in action.
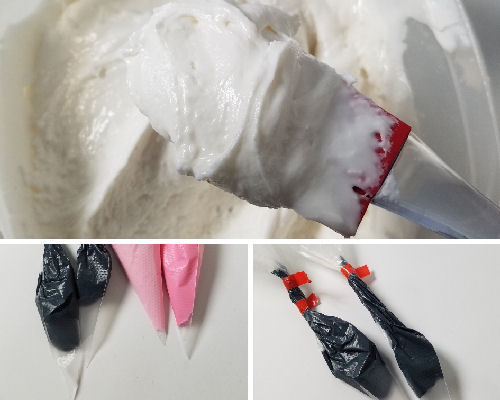
Royal Icing Transfers
- I made bees’ body as royal icing transfer. I used a wax paper and a small hand drawn template.
- When piping small decorations like these make sure you use icing that is thicker (20-25 second consistency), it doesn’t spread as much and you can create a bit of a dimension.
- Plus you’ll be able to fight the cave-ins much better with the thicker icing.
- Make sure to let the transfers dry overnight.

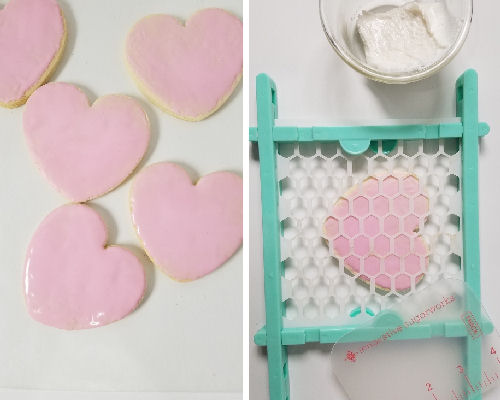
Stenciling with Royal Icing
- Use thick royal icing.
- Apply icing onto a spatula or a spreader not on the stencil.
- Use a stencil holder or magnets to keep the stencil down.
- Ideally you don’t want the stencil holder to be shifting so if you can have a rubber liner underneath or use a silicone mat.
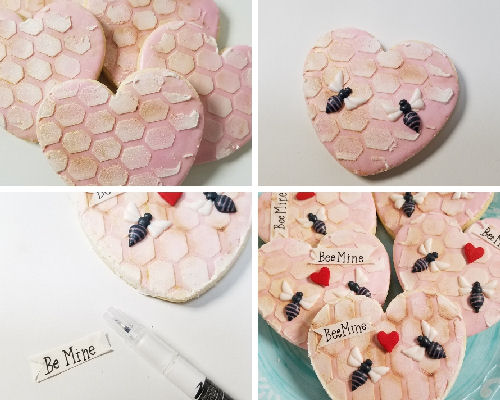
Shading with Dry Color Dust and Luster Dust
- After icing dries you can use dry color dust to give little more interest to the design. I used Cappuccino Petal Dust and a food only paint brush.
- I also use gold luster dust give icing a little bit of shimmer.
Frosting Sheet on Cookies
- Using a frosting sheet is really simple. It’s like edible paper. Depending on the brand some paper are thinner than others.
- I mostly use what is widely available to me. I used Wilton brand but you can use what ever you have available and are familiar with.
- Cut the small piece write with an edible marker and then remove the backing acetate or paper sheet.
- To glue the frosting sheet on the royal icing I used a little bit of white royal icing. Color of dark royal icing will most like seep through the white frosting sheet.
Bee Template

Watch me how I decorated these pretty Bee Mine Honeycomb Cookies in this video tutorial
To make Bee Mine Honeycomb Cookies you need
- RECIPES
- Sugar Cookies or use other Cut Out Cookie Recipe
- Fresh Royal Icing (meringue based, egg whites)
- Vegan Royal Icing
- TOOLS
- Honeycomb Stencil, Honeycomb Stencil
- Stencil holder
- Food Coloring : pink, black
- Frosting Sheets(bulk) by KopyKake, Frosting Sheet(1pc) by Wilton
- Edible Marker, fine tip
- Scissors
- Piping bags
- Bag Sealer and Tape
- Needle tool
- Paint Brush
- Cappuccino Petal Dust
- Gold Luster Dust (aztec gold)
- Wax paper
This post contains affiliate links. Learn more about my affiliate policy here.

Hi, I’m Hani
Welcome!
Thank you for visiting Haniela’s. On my blog, you’ll find delicious sweet & savory recipes made with simple ingredients. Why not start a new adventure? Discover a world of cookie decorating with my step-by-step tutorials.

Hi, I’m Hani
Welcome!
Thank you for visiting Haniela’s. On my blog, you’ll find delicious sweet & savory recipes made with simple ingredients. Why not start a new adventure? Discover a world of cookie decorating with my step-by-step tutorials.