Halloween Spider Gingerbread House
In 2013 I made my very first Ghost Haunted Gingerbread House. Since then, I made several Halloween houses inspired by movies like Hocus Pocus, Harry Potter, Addams Family and Nightmare Before Christmas, to name a few. This year I decided to create something slightly creepy : Halloween Spider Gingerbread House.
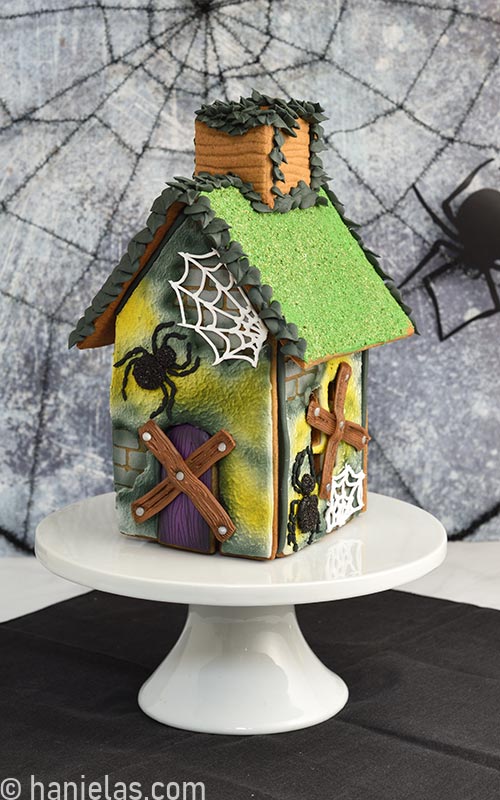
HOW TO DECORATE HALLOWEEN SPIDER GINGERBREAD HOUSE
In this step by step tutorial I’ll show you how to create :
- Black royal icing spiders
- Textured wood planks with royal icing
- We’ll create cool brick texture with royal icing
- Stucco/fur texture with royal icing
- I’ll show you fun airbrushing technique
- Use cookie moss to decorate cookies
- And how to build a a simple gingerbread house
- Recipe and Tools
BAKE GINGERBREAD COOKIES
Let’s start with gingerbread house panels. To make the panels I used my construction gingerbread cookie dough recipe. I generally use this recipe when making display pieces.
To cut out panels I used a template (scroll down to tools to print the template) along with a small square cookie cutter to cut out windows.

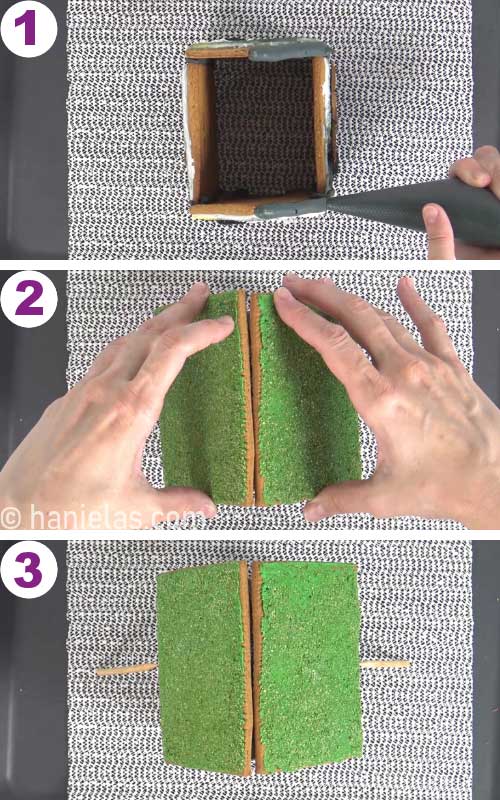
CLEAN UP THE EDGES
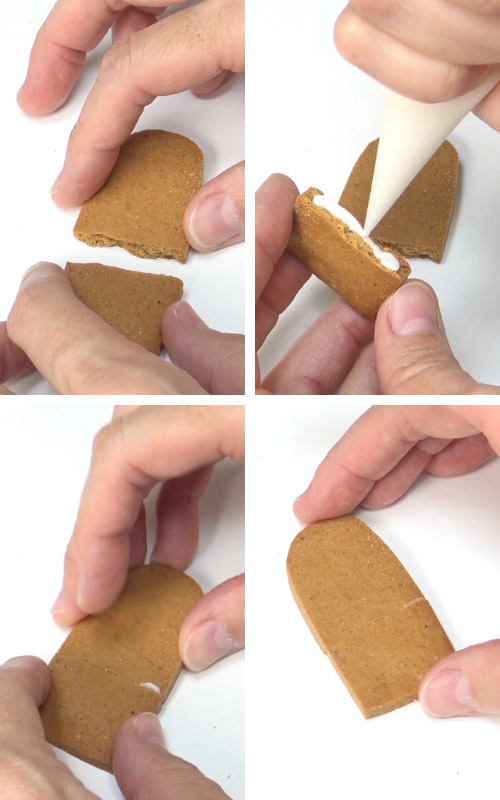
What can sometimes happen is that door opening can shrink slightly during baking or door cookie itself can expand ever so slightly during baking. This will cause door not to fit snugly into the opening. To address this problem I used a handy microplane zester to shave off some of the cookie from the edges,(steps 1-4).
TIP : You can use a microplane zester to keep cookie edges super sharp, for example when making square/rectangular cookies.

HOW TO FIX BROKEN COOKIES
In the process I inadvertently broke the door cookie in half. To glue it back together I used royal icing. Allow icing to set for several hours before handling the cookie.
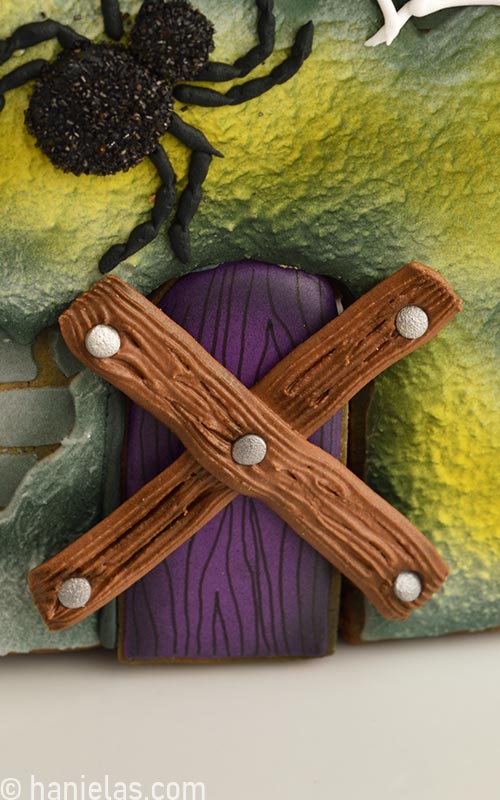
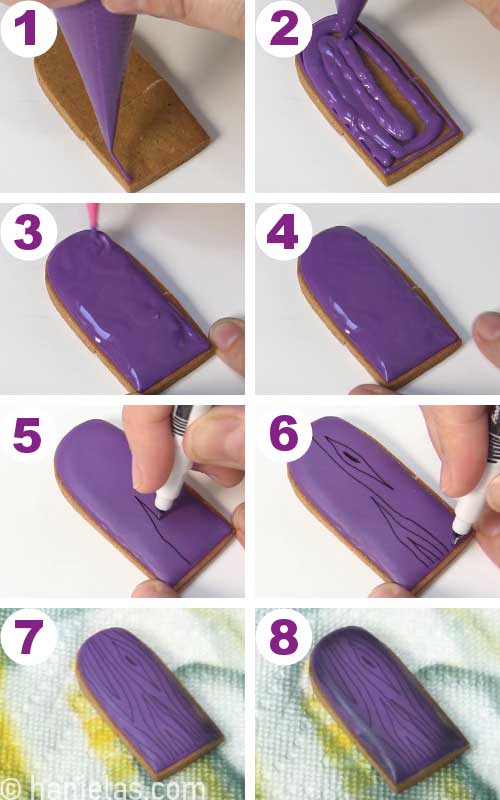
FRONT DOOR
To decorate front door I used purple royal icing of 15 second consistency. Outline and flood the cookie. Use a scribe tool to distribute the icing evenly and let it dry, (step 1-4).
Then after icing dries you can draw wood grain pattern onto the icing. I used a fine tip edible marker, (steps 5-6) Check the tools’ section for details.
And the last step is airbrushing. With black airbrush color airbrush the edges of purple door cookie, (steps 7-8).
MAKE BLACK SPIDER WITH ROYAL ICING
Royal icing spiders are really easy to make. I’ve used the same technique to make these creepy Spider Cupcake Cookies.
Start by placing a template on a flat surface, cardboard, tray or a baking sheet works well, too. Layer a piece of wax paper/parchment over your template.
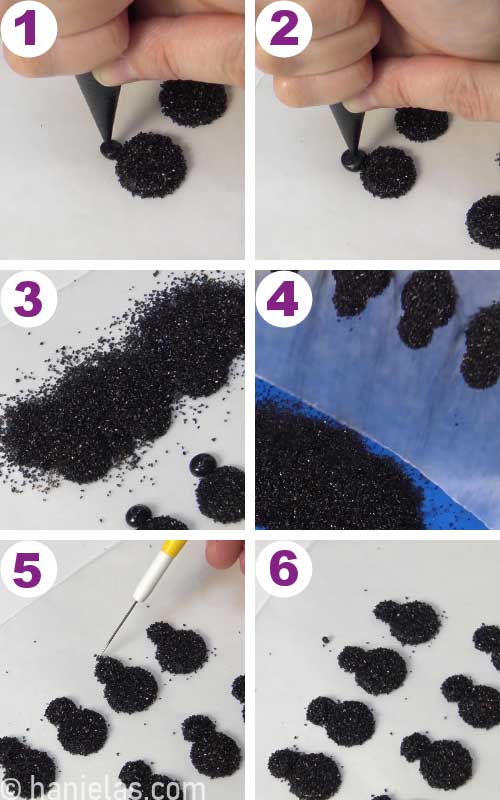
To make the spider bodies I utilized a simple method created by Corianne’s Custom Cookies that helps prevent cratering in royal icing (often called royal icing cratering, cave-ins).
Start with 25 second consistency black icing and pipe small dots in the middle of each circle. Let these crust for 10 minutes,(step 1). Then with the same icing pipe a large dot of black icing over a small crusted dot. Bottom crusted dot acts like a support beam, not letting the top layer of icing sink in the middle. Use a scribe tool to smooth the icing,(steps 2 -5). Lastly pour black sanding sugar over wet dots of black icing ,(step 6).
With care lift up wax paper and pour excess sanding sugar into a bowl, (steps 7-8). Then lay the wax paper with black dots dusted with sanding sugar onto a flat surface.

Finish spider body design by piping a smaller dot right on the edge of the larger dot. Immediately dust with black sanding sugar, (steps 1-3). Carefully lift the wax paper and allow sanding sugar to fall into a tray/bowl. Let spider bodies dry overnight, (steps 4-6).
It’s important to let spider bodies dry overnight (step 1). Then you can carefully remove black spider bodies from the wax paper, (steps 2-4) Try no to put too much pressure onto the seam or bond between 2 dots can break (step5). Transfers can be prepared ahead of time, days, week, even months in advance, (step 6).
LEARN MORE ABOUT ROYAL ICING TRANSFERS

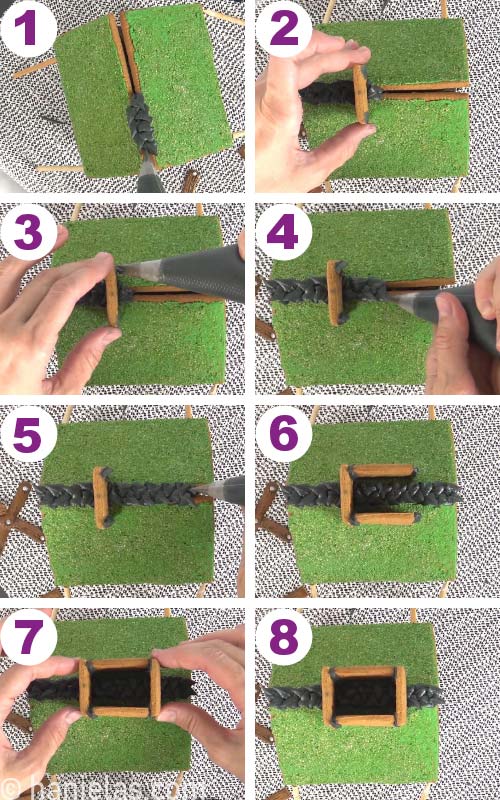
HOW TO MAKE WOOD PLANKS WITH ROYAL ICING
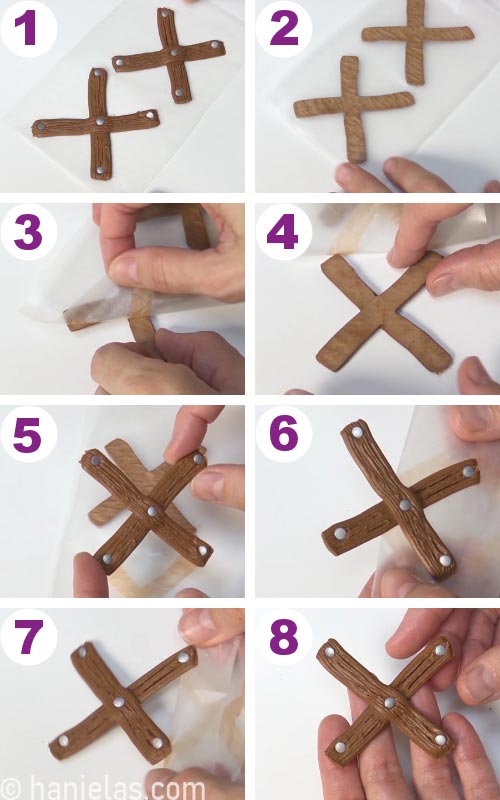
To make wood planks I used stiff royal icing that I colored with brown food coloring. If you lack brown color you can achieve brown by mixing red and green.
I created planks as royal icing transfers. Depending on the size of the windows and doors you might need to make the crossed planks bigger or smaller. You just want to make sure that planks are long enough to overlap the door and windows.
To pipe use a basket weave piping tip, (step 1). Place a piece of wax paper over your template. Pipe straight lines forming a cross, (steps 2-4).
To texturize royal icing use a scribe needle tool or a toothpick. Run it through wet royal icing to shape it the way you want, (step 5). To make the nails use silver confetti style sprinkles. One by one gently push silver sprinkles into wet icing, (steps 6-8). Allow icing to dry overnight.
HOW TO MAKE HOMEMADE CONFETTI SPRINKLES

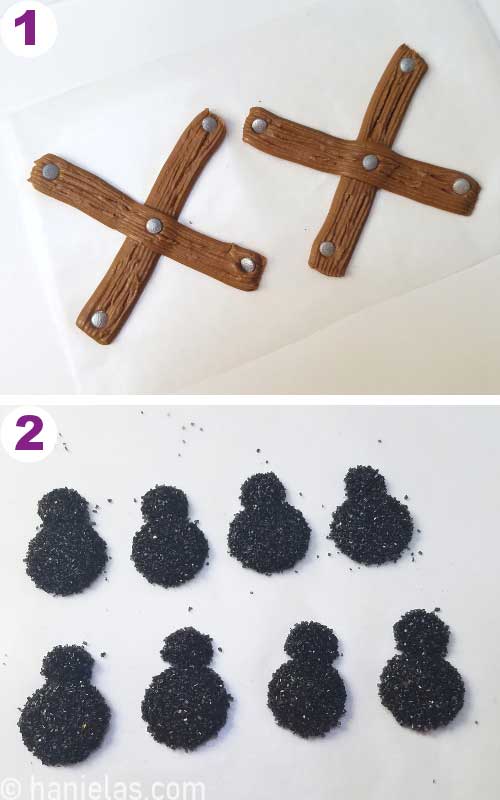
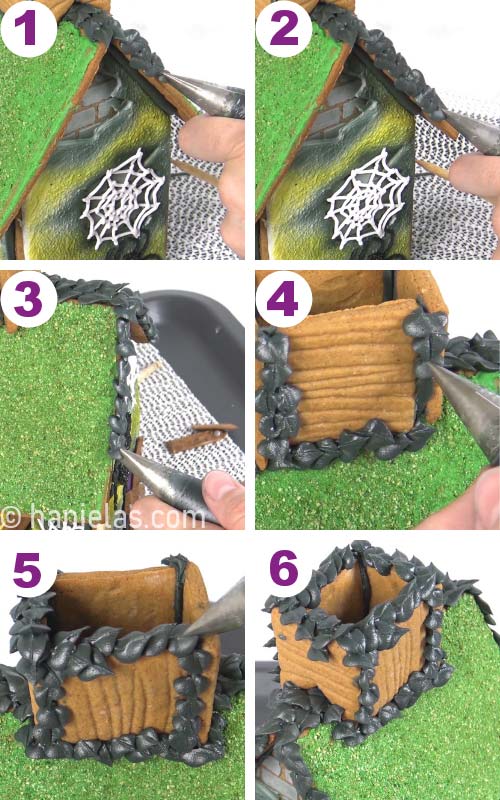
Once icing is dry you can carefully remove dry royal icing wood planks decoration from the wax paper, (steps 1-8). Store them in a dry place, away from direct sunlight.
Lastly, to make wood planks look more realistic I decided to airbrush them with brown airbrush color.

ROYAL ICING TRANSFERS DECORATIONS
Both of the decorations, crossed wood planks and spider body transfers can be prepared ahead of time. Store them between pieces of paper towel in an airtight container.
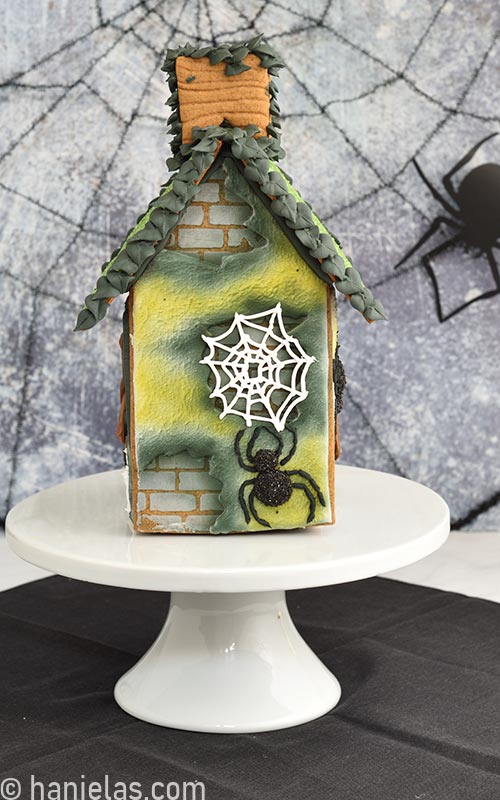
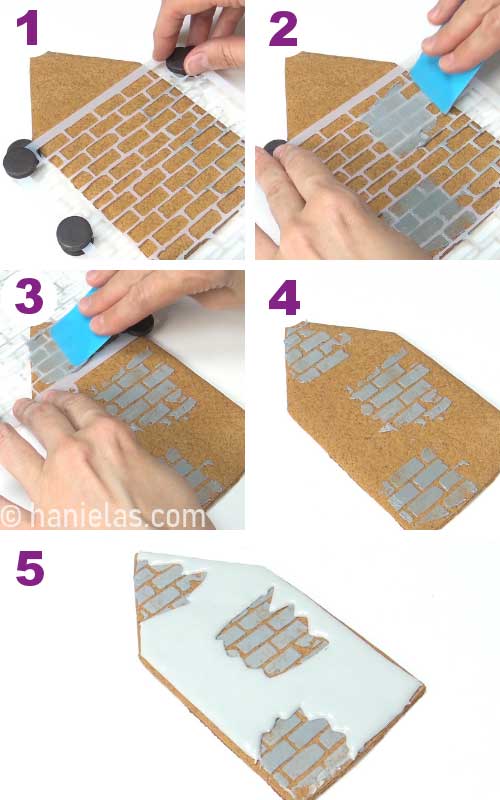
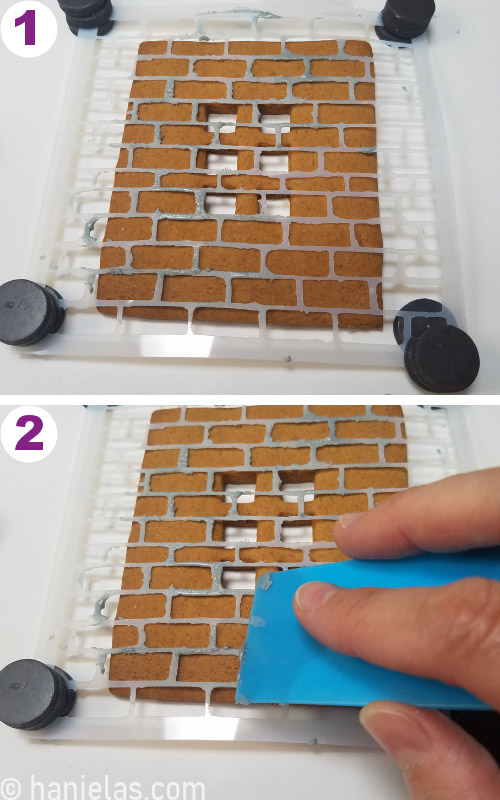
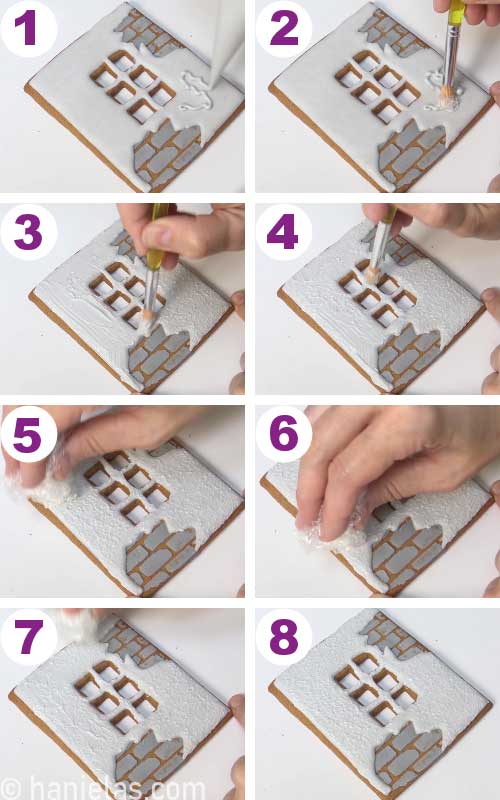
STENCIL BRICK DESIGN WITH ROYAL ICING
To create brick texture I optioned to use a brick stencil and royal icing.
Secure stencil over a cookie with magnets, (steps1). Then spread a thin layer of medium thick consistency gray icing over a small section of the cookie, (steps 2-3). Carefully lift up stencil, (step 4-5). Repeat on another section, (steps 6-8).
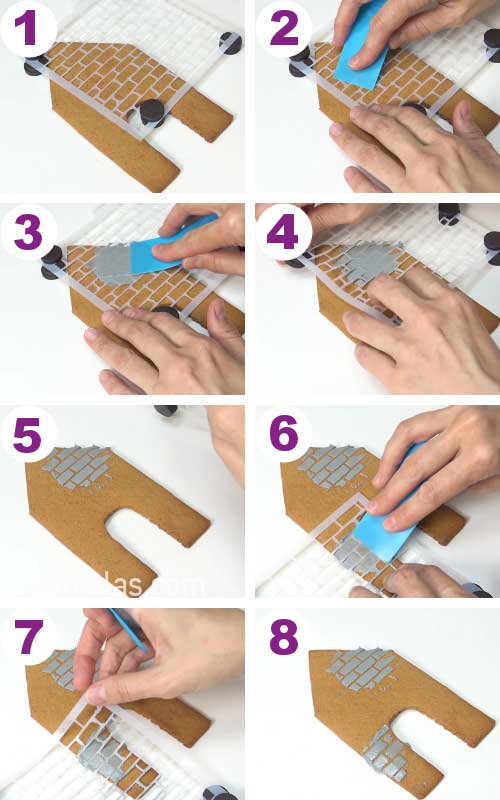
Repeat the brick stenciling on rest of the cookies. (steps 1-4). And allow icing to crust before flooding the cookies, (step 5).
USE MAGNETS TO SECURE STENCIL
There are number of ways you can secure stencil when decorating cookies. You can use stencil holders, however if you don’t own a stencil holder old fashion magnets work as well.
ULTIMATE GUIDE TO COOKIE DECORATING TOOLS
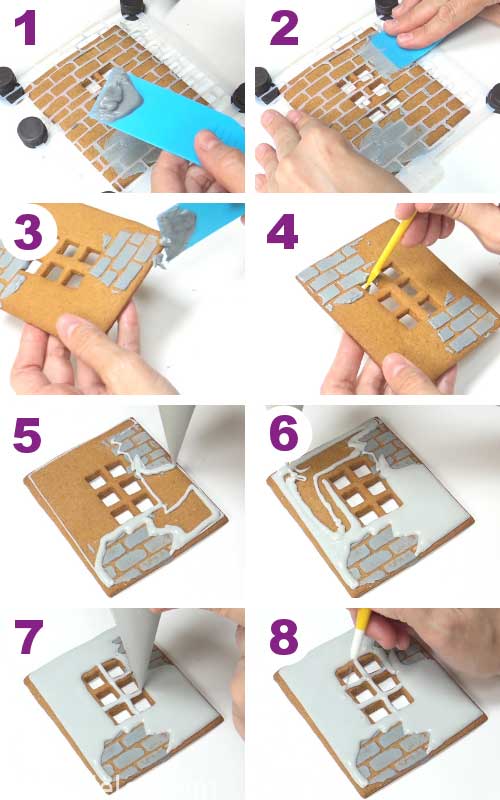
FLOOD THE COOKIES
In this next step I used 15 second flood consistency icing to ice the cookies. I’d recommend that you use a thicker scribe tool to distribute the icing. You can also use a brush or a small spatula.
I find that with a thicker scribe tool I’m able to distribute icing faster. With larger cookies if it takes too long to ice the cookie icing can start crusting. For fine details I usually switch to a fine point scribe needle tool.

Stencil and flood the sides of the house.
HOW DO YOU MAKE “STUCCO” AND “FUR” ROYAL ICING TEXTURE?
To create “stucco” texture I used a medium thick consistency light gray icing. You want icing to hold its shape when you pipe it, but it shouldn’t be to stiff.
I used a coarse food only paint brush and crumpled food wrap, (steps 1-4).

I decided to decorate gingerbread house panels with textured icing in sections. Pipe icing onto an iced cookie, spread it with a paint brush, (steps 1-2). Wipe off excess icing into a paper towel. DON’T WET THE BRUSH WITH WATER. Use a dabbing technique to create texture in wet icing with a dry brush, (step 3).
Additionally I also used crumpled food wrap to even out some of the uneven spots. Though, using crumpled food wrap it’s not necessary, (step 4). Continue with texturing rest of the cookie, (steps 5-8).
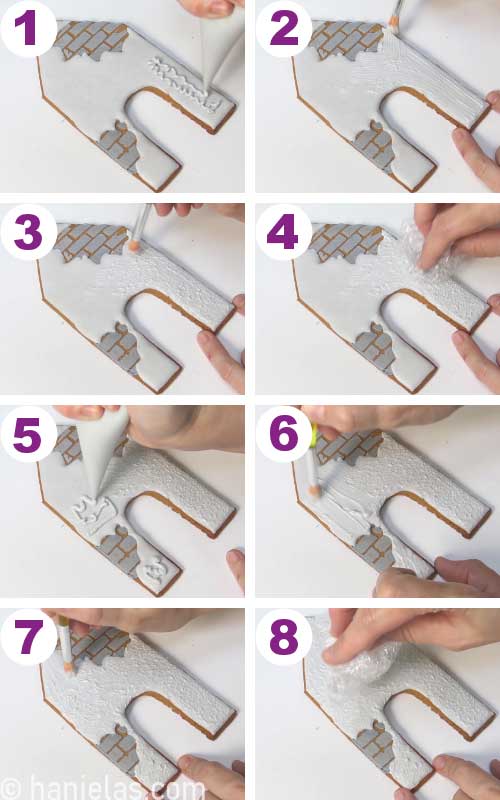
Apply same texturing technique to decorate the sides of the Halloween spider gingerbread house.
Allow textured icing to dry.
TIP : This technique can also be use to create fur texture, I used it on Teddy Bear Cookies.

AIRBRUSH
In this next step I airbrushed cookies with yellow and black airbrush color.

Repeat airbrushing with the rest of the house panels.
TIP : Airbrush all the panels with yellow and then switch to black.
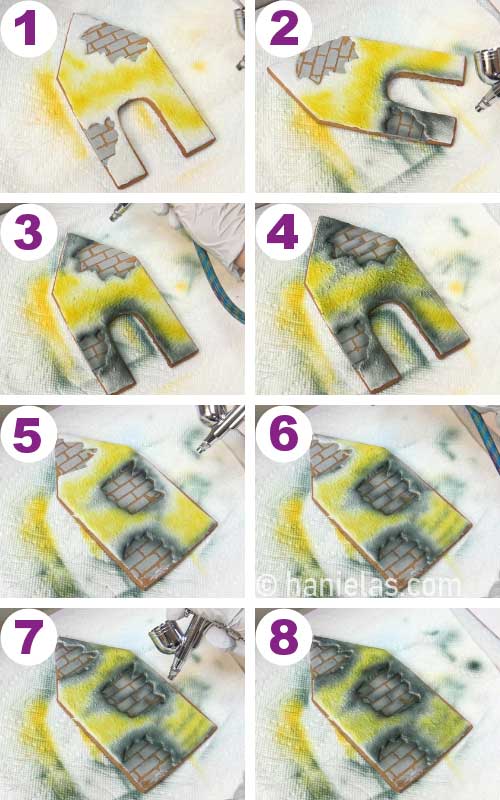
See the difference black airbrushing makes!

If you don’t own an airbrush you can also paint cookies with edible food paints.
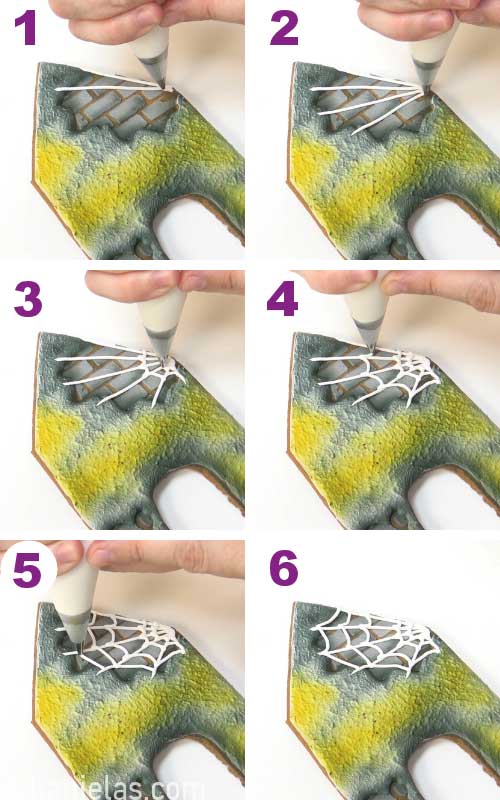
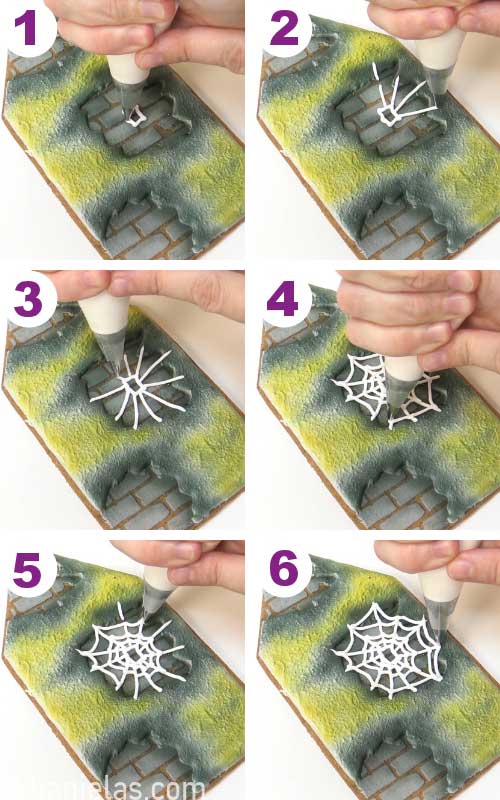
PIPE SPIDER WEBS
Now we are ready add some creepiness to this Halloween spider gingerbread house!
To pipe white cobwebs I used a piping consistency white icing and a round piping tip #2.
MAKE BLACK SPIDER WITH ROYAL ICING
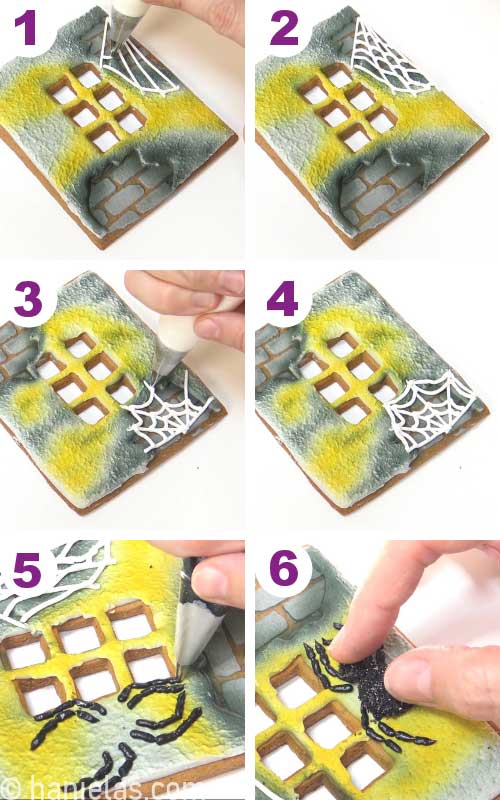
Now we can attach those spider bodies wet made earlier from royal icing. It would look odd without its legs and so to make this spooky black spider I decided to use a fine tip black edible marker and first draw the legs’ guides onto the icing.
Position spider body onto a cookie. Then with a black, fine tip edible marker (Rainbow Dust Brand) draw legs’ guides onto the icing, (steps 1-5).

And now we can pipe legs with black icing piping consistency. I’m using a round piping tip #2 to pipe the legs in segments.
Pipe the first segment and then try to pipe the next segment starting just under the tail of the previous segment. Repeat until you are done with all the legs, (steps 1-8).

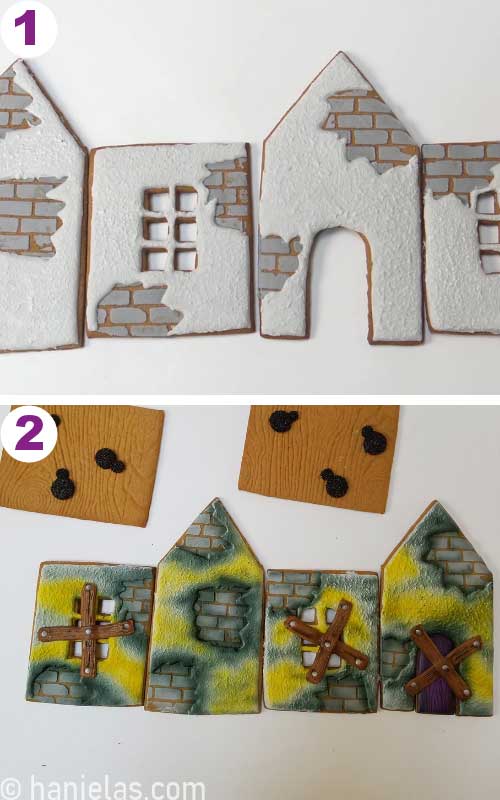
Create variety of spiderwebs.
Don’t forget to attach those spooky black spiders on each gingerbread house panel.
DECORATE COOKIES WITH A COOKIE MOSS
Have you guys worked with a cookie moss? Cookie moss it’s super easy to make at home. It’s just cookie crumbs colored with food coloring. You can find all the details on how to make it my tutorial for Easter Gingerbread House.
With a small icing spreader or a spatula spread green icing of 15 to 20 second consistency over a roof panel cookie, (steps 1-5). Then dip cookie into a cookie moss, gently wiggle the cookie to make sure all the iced cookie surface is coated with the cookie moss. Shake off the excess and allow to dry, (steps 6-8)
TIP : I love using funnel tray (blue tray) to hold cookie moss or sprinkles.

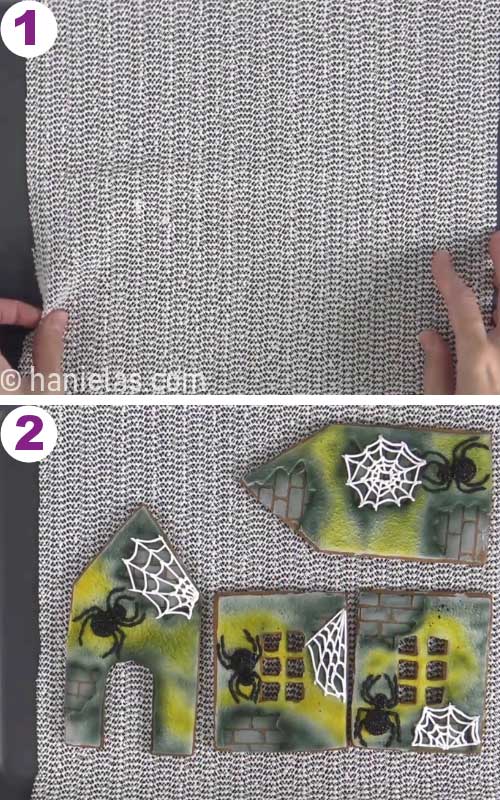
ASSEMBLE HALLOWEEN SPIDER GINGERBREAD HOUSE
Finally we got here. It’s time to assemble this slightly creepy Halloween Spider Gingerbread House!
I often assemble my houses on a rubber liner. It helps to prevent house from sliding.
TIP : You can also glue the house directly onto a cake board. Decorate cake board with sugar, sprinkles, or create a festive scene with pretzels and candies. Then use the cake board to transfer gingerbread house onto a table, cake stand, etc.
USE THICK ICING TO GLUE PANELS
To glue house panels use thick, but not overly stiff icing. Pipe icing on the front panel, glue the sides onto the front panel, (steps 1-5). Then pipe icing on the sides and glue the back panel onto the sides. Prop the house panels up with small cans, sprinkle bottle or toothpicks. Allow to dry for 3-4 hours before attaching the roof panels, (steps 6-8).

ATTACH ROOF
To attach roof pipe icing on all angled edges of front and back panel. Then take both roof panels and gently press them onto the base. Hold in place for 30 second. Check if the front and back is aligned. If needed slowly move roof panels so they are aligned. Use small skewers or toothpicks to support the panels from sliding down, (steps 1-3). Allow to dry for 4 hours.
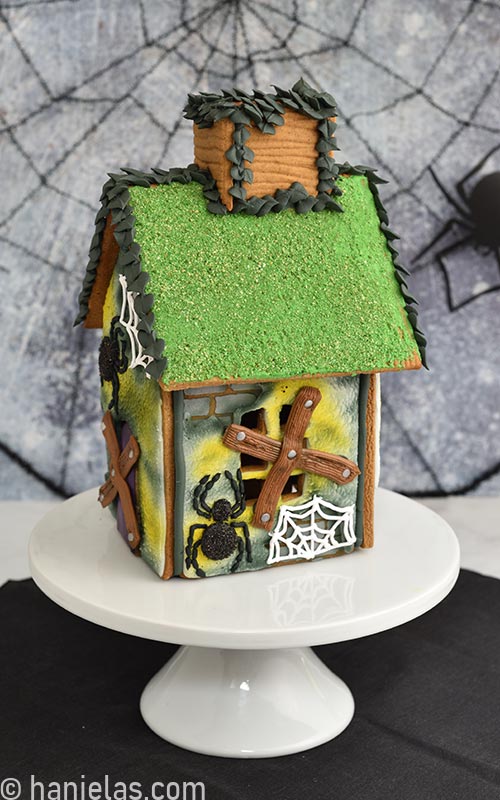
CHIMNEY
Now with a leaf piping tip pipe a decorative border between 2 roof panels, (step 1). Attach the chimney parts, panel by panel, (steps 2-8).
PIPE A BORDER WITH A LEAF TIP
To finish this fun Halloween Spider Gingerbread House design I decorated edges with a piped border using a leaf tip.
Gingerbread houses are perfect for creating a festive mood in the house. Not only they are pretty to look at, they also smell amazing. Display them on a dinning room table or in the kitchen, etc. They are also great for gift giving.
In general I use construction gingerbread cookie dough for my display houses. Because of the amount of spices used and no leavening agent this cookie dough can be pretty hard and very spicy. However for gingerbread houses that you want to munch on I’d recommend my other recipe for Edible Gingerbread Houses.

TO MAKE HALLOWEEN SPIDER GINGERBREAD HOUSE YOU NEED
- RECIPES
- Construction Gingerbread Cookie Dough for houses -it bakes hard, is sturdy and it can be spicy, because of the amount of spice I use; I like it fragrant
- Edible Gingerbread House Cookie Dough
- Royal Icing
- TOOLS
- Find all the tools for this project in my Halloween Spider Gingerbread House Bundle in my Amazon Shop
- Templates : Spider Body, House Templates ( Roof and side and front, back and chimney ), Crossed Wood Planks
- Disposable Piping Bags
- Scribe Tools : 2-in-1 decorating tool (boo stick) and fine tip scribe needle tool, or use a toothpick
- Brick Stencil
- Small Icing Spreader
- Paint Brush
- Tweezers
- Airbrush
- Airbrush Colors : black, yellow, brown
- Basket Weave Piping Tip
- Round Piping Tip #2
- Gel Food Colors : Black, Purple (I used Regal Purple by Americolor), Leaf Green, Brown
- Black Fine Tip Marker by Rainbow Dust
- Silver Confetti Sprinkles
- Black Sanding Sugar
- Green Cookie Moss (tutorial)
MORE FUN HALLOWEE DESSERT IDEAS:
- Cute Halloween Cookies
- Monster Eye Cake for Halloween
- Rice Krispie Treat Pumpkins
- 10 Creative ways to decorate Halloween Pumpkin Cookies
This post contains Amazon affiliate links that earn me a small commission, at no cost to you. I only recommend products that I use and love. Learn more about my affiliate policy here.

Hi, I’m Hani
Welcome!
Thank you for visiting Haniela’s. On my blog, you’ll find delicious sweet & savory recipes made with simple ingredients. Why not start a new adventure? Discover a world of cookie decorating with my step-by-step tutorials.

Hi, I’m Hani
Welcome!
Thank you for visiting Haniela’s. On my blog, you’ll find delicious sweet & savory recipes made with simple ingredients. Why not start a new adventure? Discover a world of cookie decorating with my step-by-step tutorials.


I’m pretty much in love with this spooky spider house! When I followed the link for the template, though, it brought up Harry Potter images. Am I doing something wrong? Thanks for sharing your talents! 🙂
HI Christie,
Yes it’s the same size as Harry Potter house that’s why. Thank you so much.
So many great textures…. but I’m loving that 🕷🕷🕷🕷🕷🕷🤣
Thank you so much June. I had so much fun making this house and you know how much I love sugar spiders! Crawling kind not so much. lol