Halloween Decorated Pumpkin Cookies
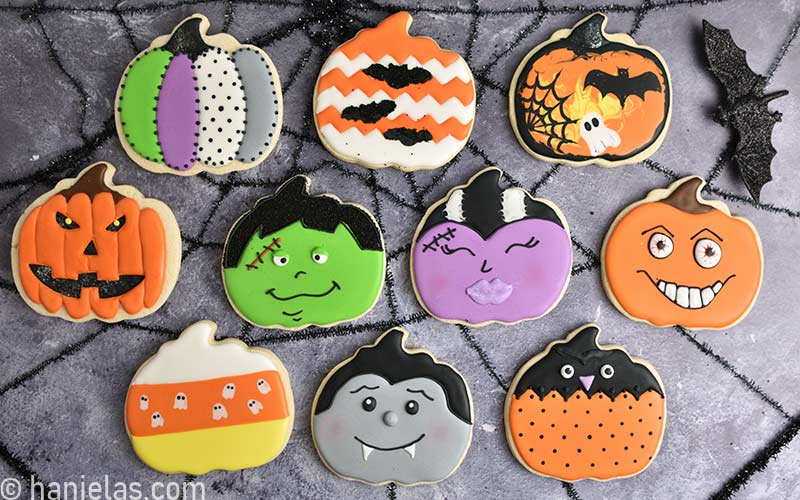
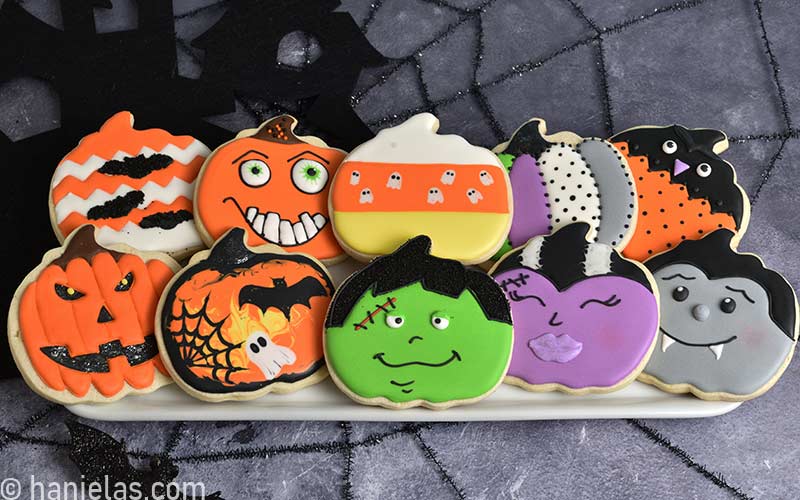
Got a pumpkin cutter? Awesome! Today I’ll show you how to creatively use a pumpkin cookie cutter to make variety of decorated cookie designs for Halloween. We’ll make 10 Halloween Decorated Pumpkin Cookies from dracula, simple wet-on-wet candy corn with ghosts to jack-o-lantern, Frankenstein and more. Let’s get started.
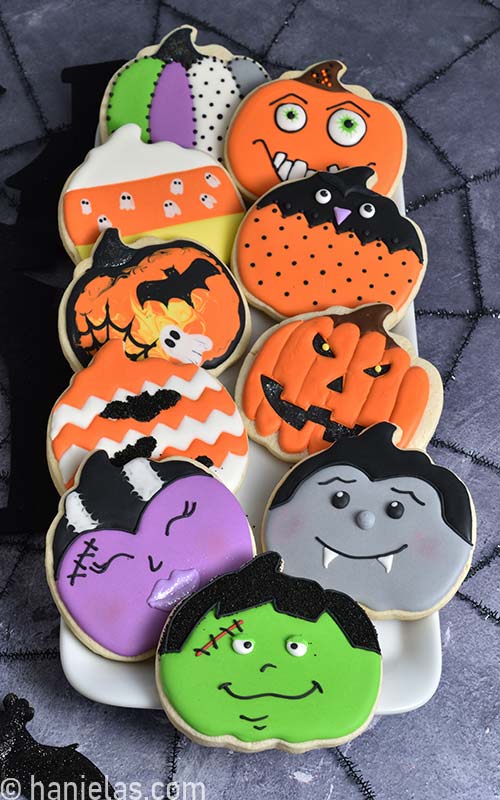
updated post from 2010
10 CREATIVE HALLOWEEN DECORATED PUMPKIN COOKIES
To make these creative Halloween Decorated Pumpkin Cookies I used a 3 inch pumpkin cookie cutter and to decorate I used Royal Icing. If you haven’t made cut out cookies before you can try my popular Sugar Cookie Recipe (cross between shortbread and sugar cookies). And if you’d like to try something different you can choose a recipe from my cut out cookie recipes collection. And if you want to make these extra special flavor sugar cookie dough with 1tsp of pumpkin spice.
- TABLE OF CONTENT
- Dracula Cookies
- Jack-o-Lantern Cookies
- Colorful Pumpkins
- Chevron Bat Pumpkins
- Owl Cookies
- Wet on Wet Spooky Cookies
- Frankenstein
- Bride of Frankenstein
- Candy Corn Pumpkin Cookies
- Scary and Fun Pumpkins
DECORATED DRACULA COOKIES
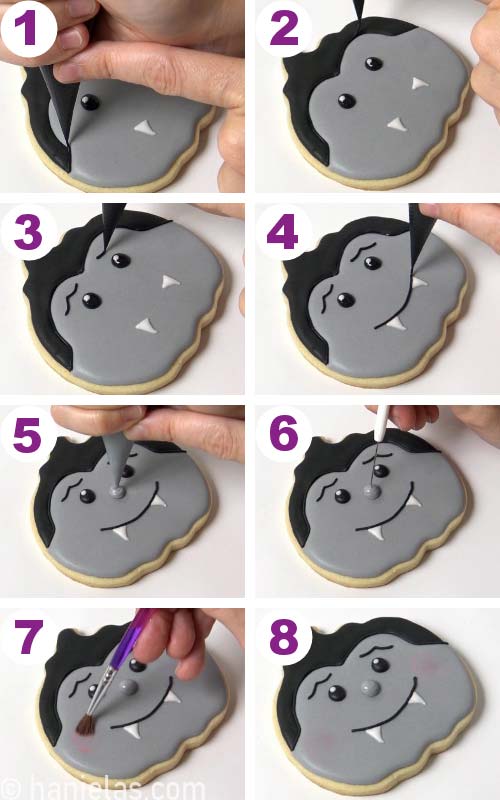
To make dracula cookies I used gray, black and white royal icing.
Start by drawing top outline onto a cookie with edible marker,(step 1). Then flood the gray section with 15 second royal icing. Let the icing crust and then flood the black top section. Use a needle tool to shape the icing while wet. And allow it to dry well, (steps 2-8).

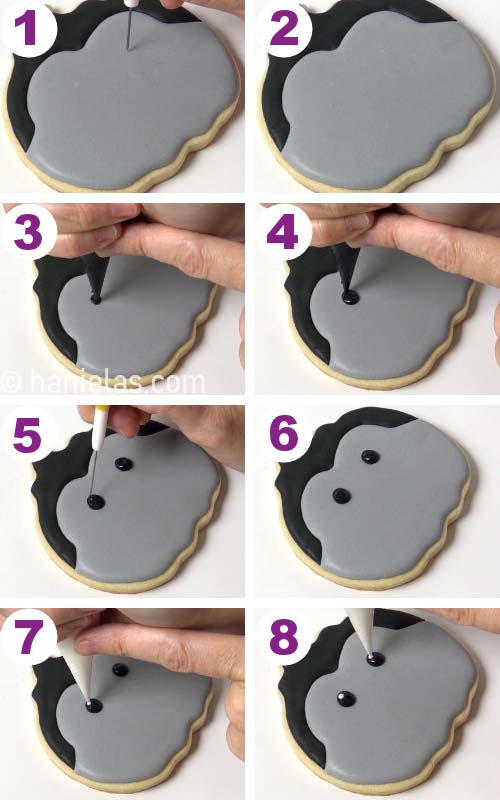
To make eyes first I made 2 subtle marks with a needle tool in dry or well crusted icing, (steps 1-2). And then I piped the icing over small marks made with a needle tool. You can pipe eyes without a guide, however, I prefer using guides to make sure eyes are somewhat centered on a cookie.
Pipe eyes with back royal icing of 25 second consistency, use a needle tool to shape the icing, (steps 3-6). Immediately pipe white reflection dots onto wet black icing, (steps 7-8).
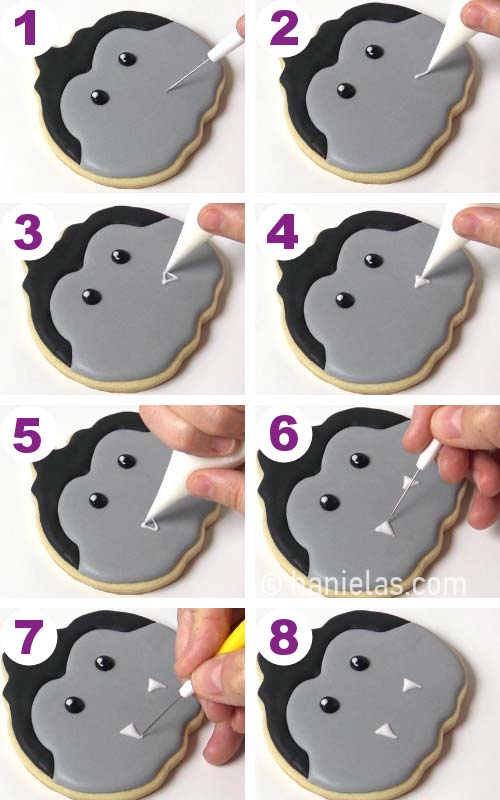
Similarly like when making guides for eyes with a needle too, l scratched dry icing gently to make a mouth guide, (step 1). Then use this simple guide when you pipe white fangs with white icing, 25 second consistency, (steps 2- 5). Shape fangs with a needle tool while icing is still wet. Then allow to crust, (steps 6-8).
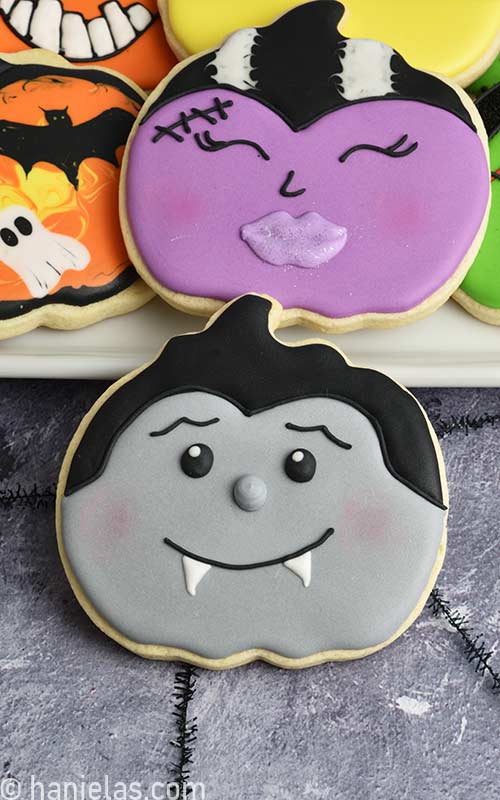
Lastly, with black icing (piping consistency) outline the top section. Make eyebrows and a mouth. With gray icing (25 second consistency) pipe a nose. Shape it with a needle tool. And finish this cute hallowed dracula cookie by brushing pink or red petal dust onto the cheeks with a food only, dry paint brush.
JACK-O-LANTERN SUGAR COOKIES
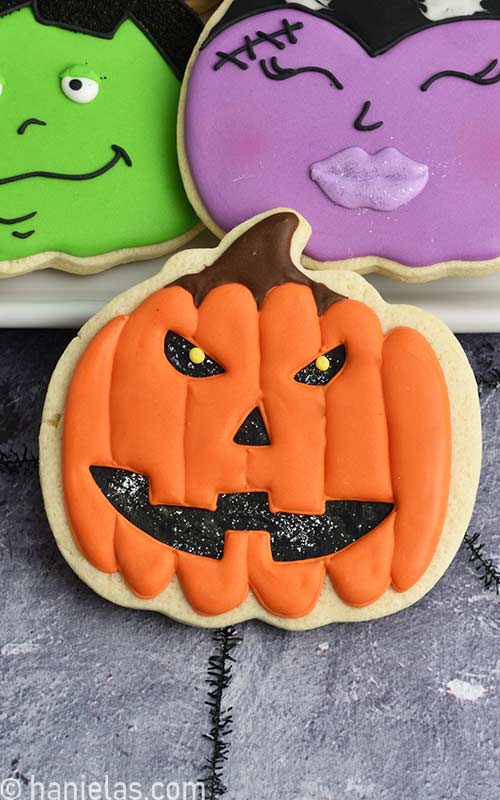
This classic Jack-o-Lantern pumpkin cookie design is a must have for Halloween.
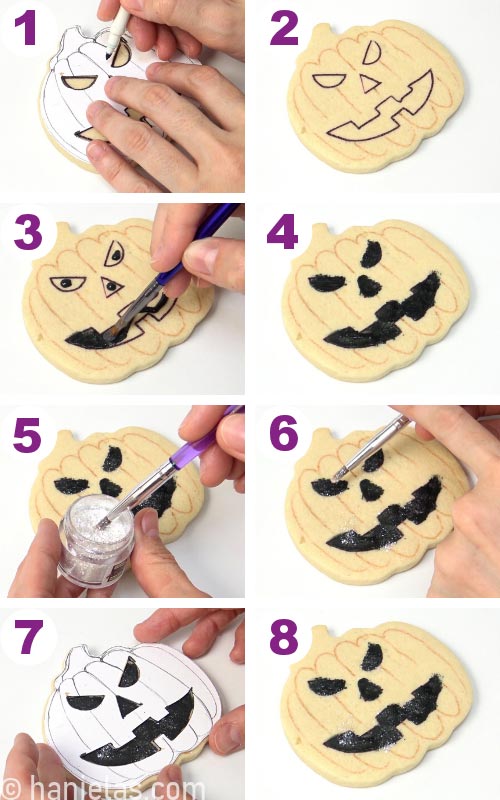
Start by tracing outlines for eyes, and mouth with a template and edible marker. Then divide cookie into sections, (steps 1-2).
Now brush a thin layer of black icing with a food only paint brush onto the mouth and eye sections. Immediately dust wet black icing with white edible jewel dust, (steps 3-8).
TIP : Dip dry, food only paint brush into an edible glitter. Gently shake off excess. Then hold brush just above the section of the cookie you want to apply dust on and gently tap the brush handle and let the dust fall onto the icing.
Outline mouth, eyes and pipe segments with 20 second consistency icing, (steps 1-2). Flood every other section and let icing crust. Then flood remaining sections between. Let crust well, (steps 3-6).
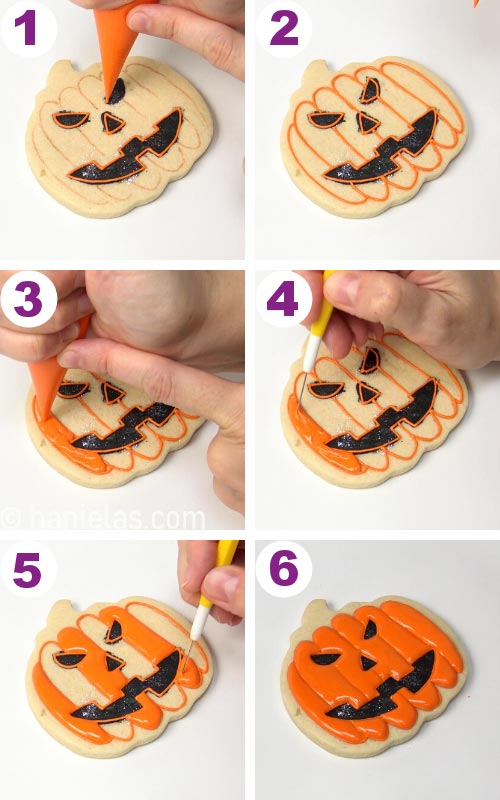
Make a stem with brown icing (20 second consistency). Be sure to shape icing while wet, (steps 2-3). Lastly pipe yellow dots into the eye openings’ with 20 second consistency icing, (steps 4-6).

COLORFUL PUMPKINS
These colorful pumpkins are super easy to make. Get creative and use fun, colorful combinations. Get inspired by popular patterns and use them to decorate pumpkin segments.
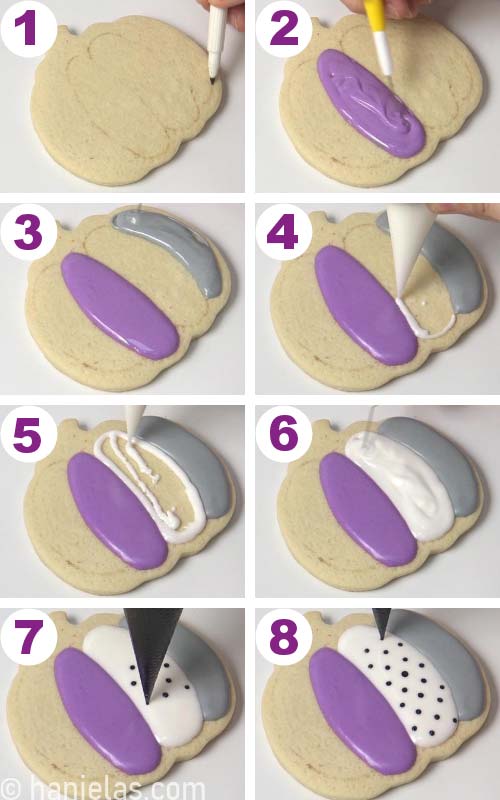
Start by dividing pumpkin cookie into segments. Draw segments’ outlines with an edible marker, (step 1). Then decorate every other segment with royal icing. Use different colors and 15 to 20 second royal icing. Allow icing to crust for 20 minutes and then continue flooding neighboring sections, (steps 2-6).
I decided to make one segment with polka dot pattern. I created polka dot pattern with super easy wet-on-wet royal icing technique. Flood section with white icing and immediately while icing is wet pipe small black polka dots into white icing. Start in the center and space out dots evenly.
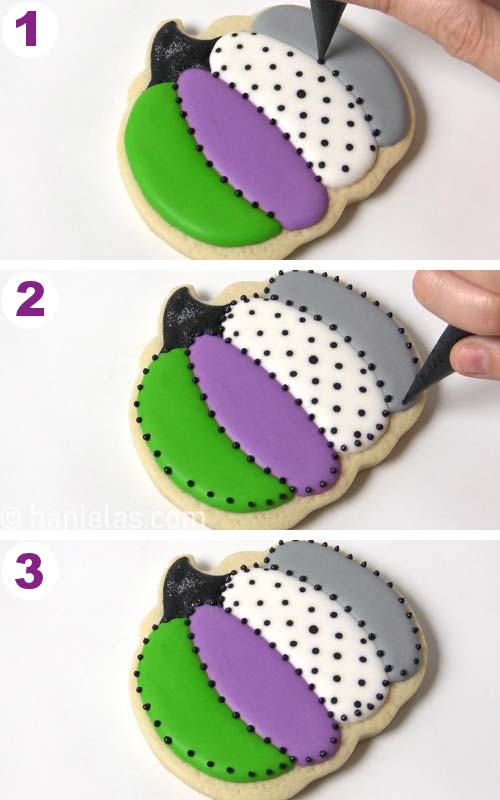
Continue flooding remaining green segment, (steps 1-2). Allow icing to crust. Then with black icing about 20 second consistency flood the stem. Use a needle tool to shape icing while wet, (steps 3-5). Then to give it an extra sparkle I dipped dry food only paint brush into a white Jewel Dust and I dusted wet black icing with it, (steps 6-8).

To finish this designs pipe black dots on the edge, around all the segments.

CHEVRON BAT PUMPKINS
I love chevron pattern. And so in this next design I used a simple cut-out paper chevron pattern to trace the zig-zag design onto a cookie with a brown edible marker, (step 1).
Then flood every other section with royal icing (20 second consistency). Allow sections crust and then flood the sections between. Be sure to utilize a needle tool to shape the icing while wet, (steps 6-8). Allow to dry.

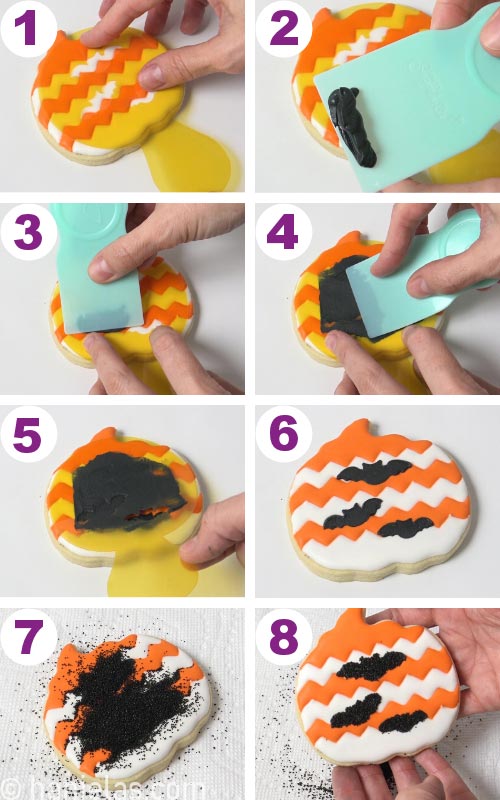
Next, I stenciled black bats onto a chevron pattern. If you can’t find any Halloween stencils you can also make it yourself from a mylar stencil sheet. It’s super easy. Use an exacto knife to cut out a design from mylar plastic sheet.
HOW TO MAKE HOMEMADE STRIPE STENCIL
Position stencil onto a cookie with dry royal icing layer. Then pipe black medium thick icing onto a small icing spreader or a small spatula, (step 1-2). Spread icing over the stencil. Carefully lift up stencil to reveal a stenciled design underneath, (step 3-6).
This next step is totally optional. Right after you stencil bats onto a cookie dust stenciled bat design with black sanding sugar. Gently shake off sanding sugar and voila there they are, super pretty chevron bat cookies for Halloween.
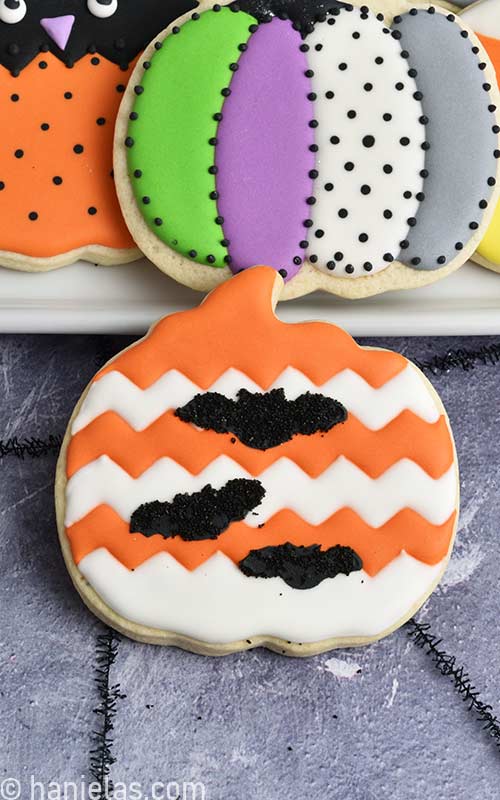
HALLOWEEN OWL COOKIES
Owl Cookies are a must for Halloween. They are so fun to decorate no matter the occasion but they are especially popular around Halloween. I’m sure it’s no surprise I had to include and owl in my 10 Halloween Decorated Pumpkin Cookies, too.
I’ve made decorated owl cookies in this past, too. For example this Owl Frankie Cookie design, Kawaii Owl Cookies or these Owl Mummy Cookies from my Halloween Gingerbread House.
In this tutorial I made super simple Owl Cookies. Start by tracing zig-zag pattern onto a cookie, using a cardstock template and brown edible marker, (step 1). Then outline and flood the bottom part of the pumpkin cookie with 15 second consistency orange icing , (steps 2-5). After, immediately pipe small polka dots with black royal icing (15 second consistency) into wet orange icing. Let crust well for 30 minutes.
TIP : If you don’t know how to start piping polka dot pattern, try this following method. Start piping first dot in the middle of freshly flooded area. Then pipe first line of dots in a straight line either horizontal or vertical. Then you can pipe second polka dot line next to the first. You want to pipe polka dots between 2 polka dots from the previous line.
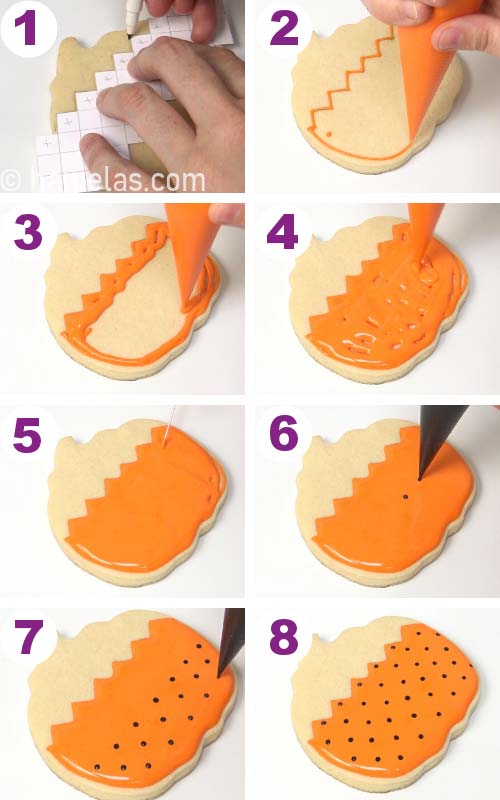
Flood the top with black icing of 15 second consistency, (steps 1-2). Use a scribe needle tool to shape icing while wet. Accentuate the corners/points, (steps 3-5). Let crust again for 20 minutes.

Pipe the beak with purple icing (20-25 second consistency). Use a needle tool to shape the icing, (steps 1-3). Then on each side of the beak pipe the eyes with white and black icing (20-25 second consistency). First, pipe large white dot and then pipe smaller black dot into the middle of the white dot.
And lastly, make white reflection dots. To make reflection dots, first gently push the piping bag so a tiny amount of icing comes out. Then pick up a small ball of icing with a tip of a needle tool. Carefully place a ball of icing attached onto a needle tool on the edge of black dot, (steps 7-8).
TIP : How to make purple icing? You can use straight from a bottle Americolor Regal Purple Gel Coloring or use sky blue and electric pink/pink food color.

Finish by piping black eyebrows above the eyes, (steps 1-3). And lastly pipe dots onto the zig-zag line.


WET ON WET SPOOKY HALLOWEEN COOKIES
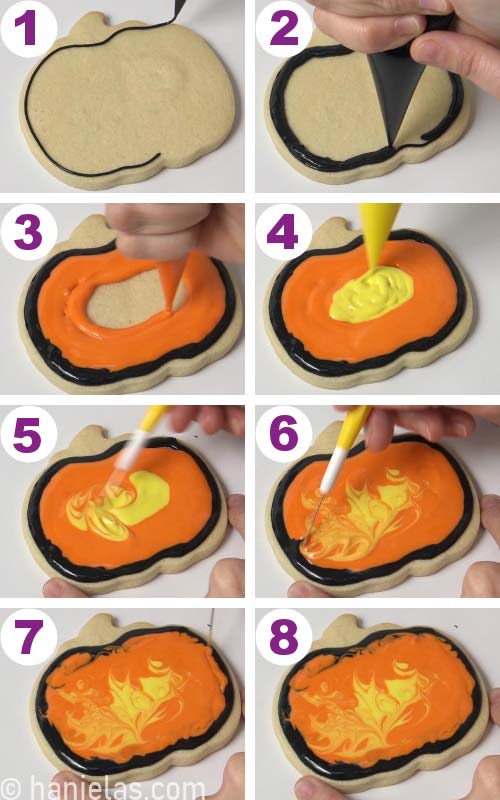
In this wet on wet design I’ll show you how to create a spooky design with royal icing using 15 second consistency royal icing.
Pipe a thick outline with black icing, immediately flood the inside with orange and yellow icing. Marble colors using a needle tool. Don’t let the icing crust. Use 15 second consistency.
TIP : Try not to overfill the cookie with icing. Remember you’ll be piping more shapes onto the base layer. Too much icing can cause icing to slowly fall off the cookie.
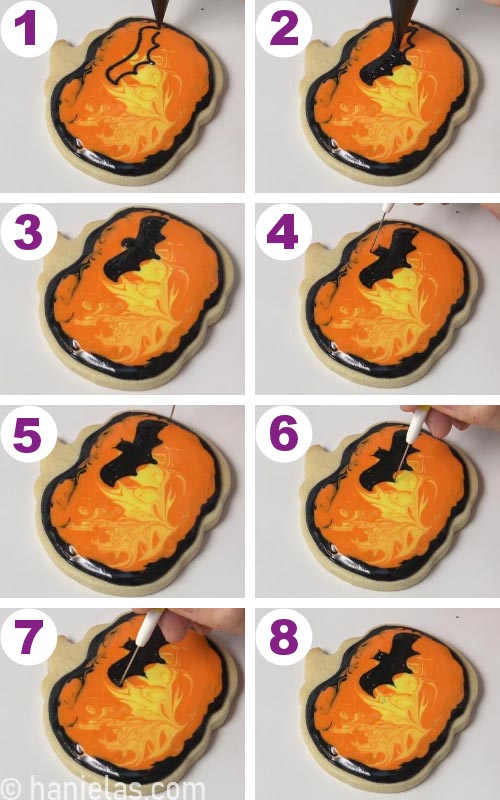
First, with black icing pipe a bat outline and then fill it with black icing, (steps 1-3). Now, take a needle tool and shape the bat design – accentuate the ears and wings, (steps 4-8). Immediately continue with the next step.
TIP : To better control the amount of icing coming out of the piping bag when piping shapes such as bats make a small opening on a piping bag – equivalent to round piping tip #1 or less.
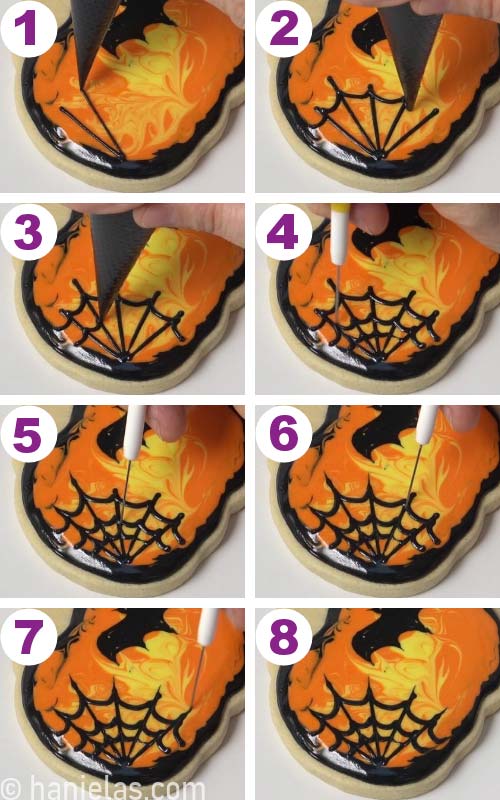
With same black icing pipe the cobweb. To help accentuate the spider web design run a tip of a needle tool through the center lines of cobweb, (steps 1-8).
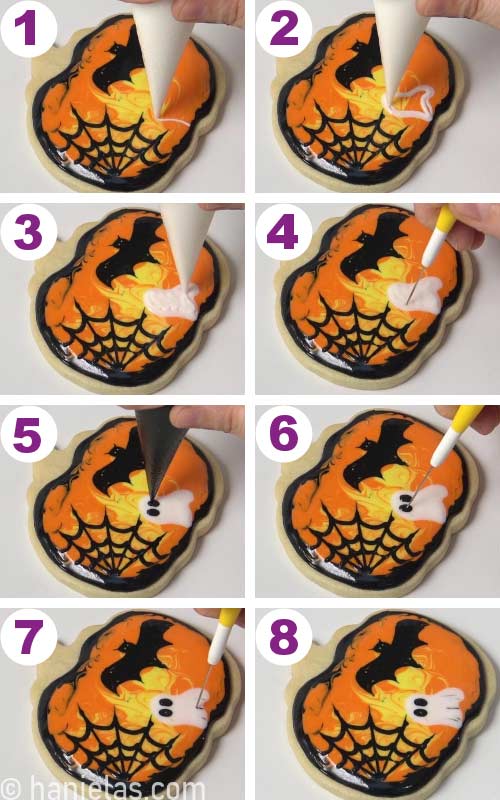
Immediately continue with piping a white ghost next to the cobweb. Pipe white ghost onto orange/yellow marbled icing. Use a needle tool to shape the ghost outlines. Dip the very tip of a needle tool in black icing and then run it through the bottom of the ghost to shape the “skirt” part of the ghost. Pipe black oval eyes and after allow icing to crust.
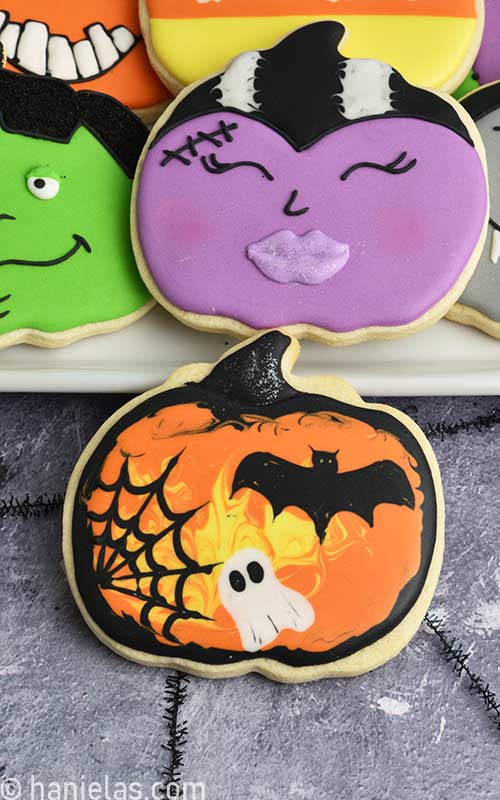
Outline and flood the stem with black icing. Immediately dust it with white jewel dust. Dip a dry only food paint brush into jewel dust, shake off excess. Then hold the brush above wet icing and gently tap the brush to apply jewel dust onto wet icing. Let dry completely.

FRANKENSTEIN HALLOWEEN COOKIE
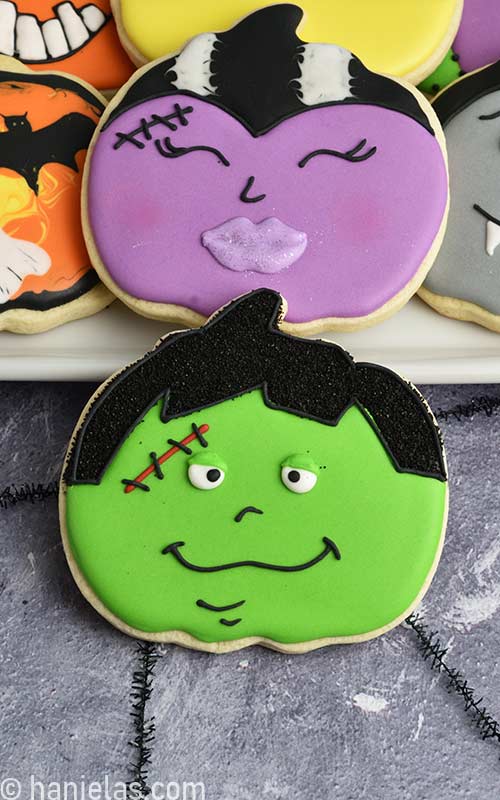
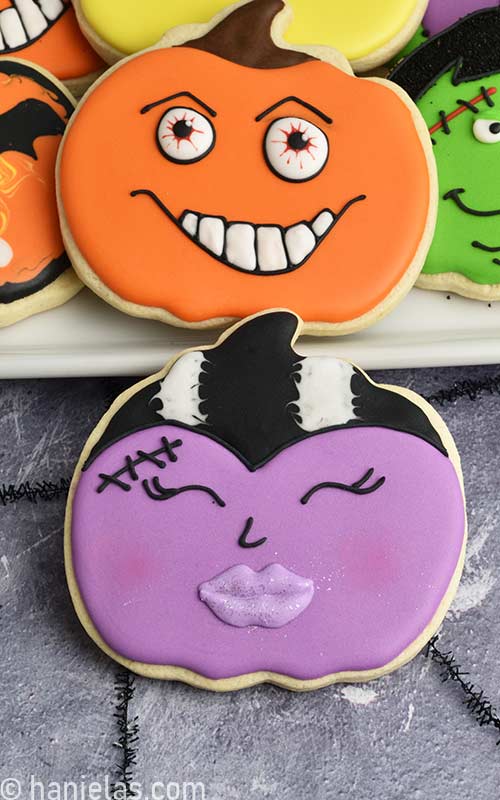
This Frankenstein design along with a Bride of Frankenstein design is a perfect addition to 10 Halloween Pumpkin Decorated Cookies project.
Both of these designs are super popular during Halloween. They are not scary but super cute, perfect for little trick-or-treaters.
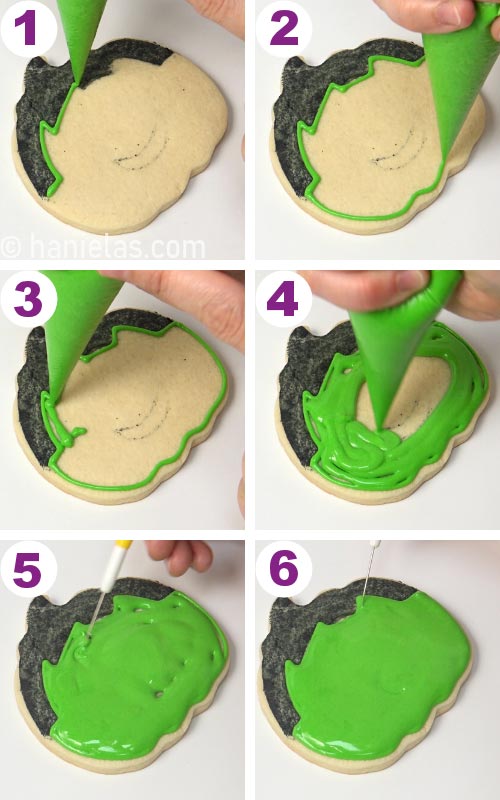
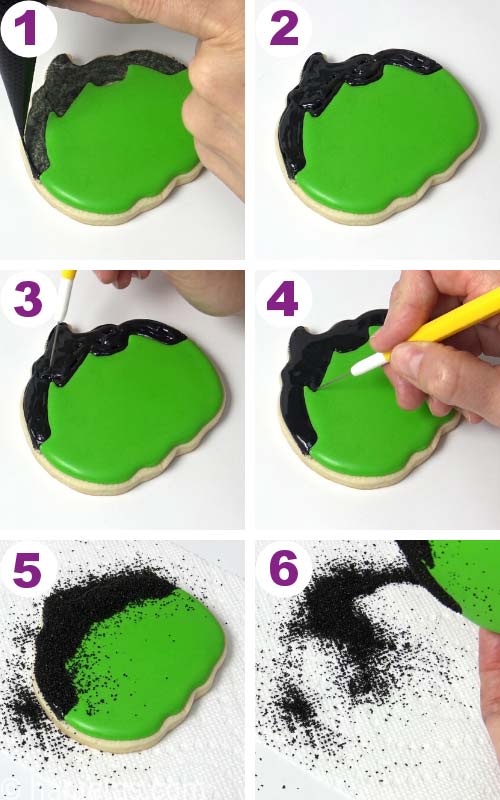
First draw the hair outline on a cookie with edible marker. Outline and flood the bottom part of the cookie with green royal icing (15 second consistency). Allow icing to crust for 20 minutes.
Then, outline and flood the top with black icing, 15 second consistency, (steps 1-2). Immediately use a needle to tool shape icing while wet, (steps 3-4), Now, immediately dust wet black icing with black sanding sugar. Pour sanding sugar over the wet icing and then gently shake off excess, (steps 5-6).
Now, I’m going to add facial features. With red icing (piping consistency) pipe red line just above an eye area, (step 1-2). To make the eyes I first made small marks into the icing with a scribe needle tool, (step 3). And then I piped eyes over the marks with white icing 25 second consistency, (steps 4-5). Immediately pipe black dots onto wet white dots. And gently flatten any spikes with a needle tool, (steps 6-8).

Pipe the mouth with black icing, piping consistency icing, (steps 1-4). Now pipe stitches with black icing over crusted red line, (step 5). To make eyelids pipe about 20 to 25 second consistency green icing over ½ of the eye. Use a needle tool to shape the icing while wet. Allow to dry completely before packaging or storing in an airtight container.

BRIDE OF FRANKENSTEIN COOKIE
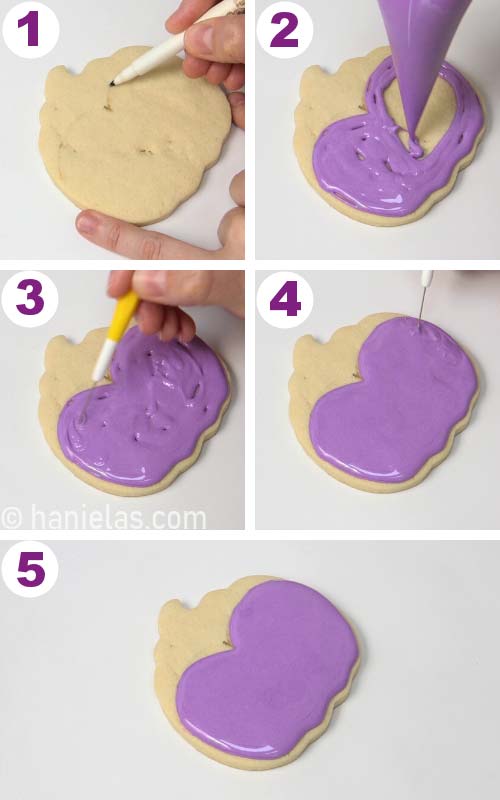
To make bride of Frankenstein cookies I started by drawing an outline guide for the hair. Then flood the bottom section with purple icing 15 second consistency. Use a scribe needle tool to distribute the icing evenly, concentrate your focus on the edges (steps 1-5). Allow icing to crust well (approximately 1 hour) before moving onto the next step.
TIP : How to make purple icing? I used Regal Purple by Americolor to color icing. If you don’t have regal purple you can use pink and sky blue or electric pink and sky blue/electric blue.
In this next step, to make the hair, I’m going to use wet-on-wet royal icing decorating technique.
First, outline the top section with black icing (15 second consistency) and immediately pipe thick white lines across wet black icing, (steps 4-5). Then use a needle tool to drag white icing into the black, shaping it into a partial swirl, (steps 6-8).

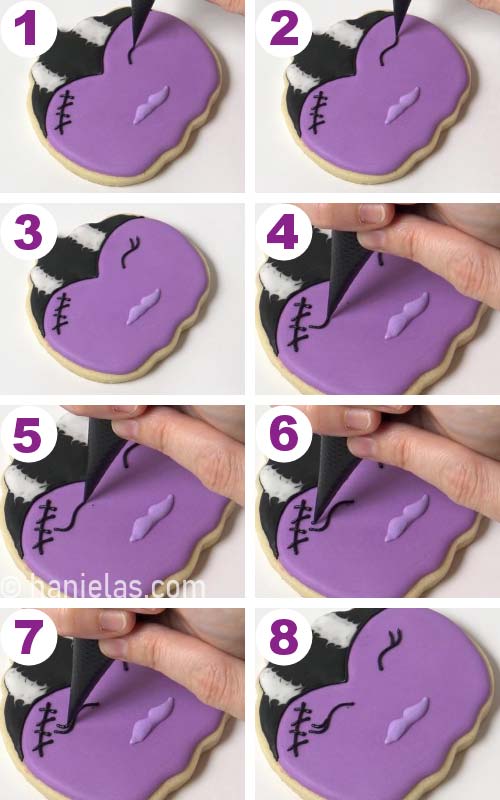
If you are not sure where to start piping the mouth you can either draw on dry icing with an edible marker or you can use a needle tool to make a simple guideline. I like to scratch surface of dry icing with a needle tool to create a guide, (step 1).
To pipe a mouth use 20 to 25 second light purple royal icing. Shape icing with a needle tool, (steps 2-4). Pipe a black scar line above the eye with piping consistency icing.
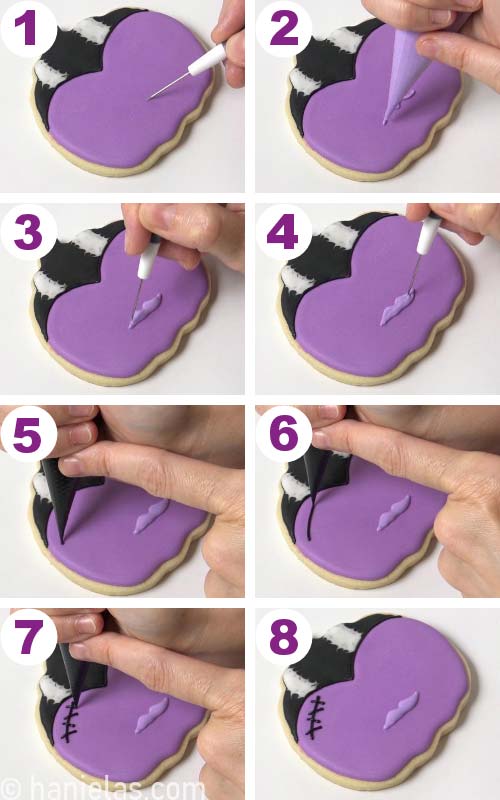
With the same black icing pipe eyelashes, (steps 1-8).
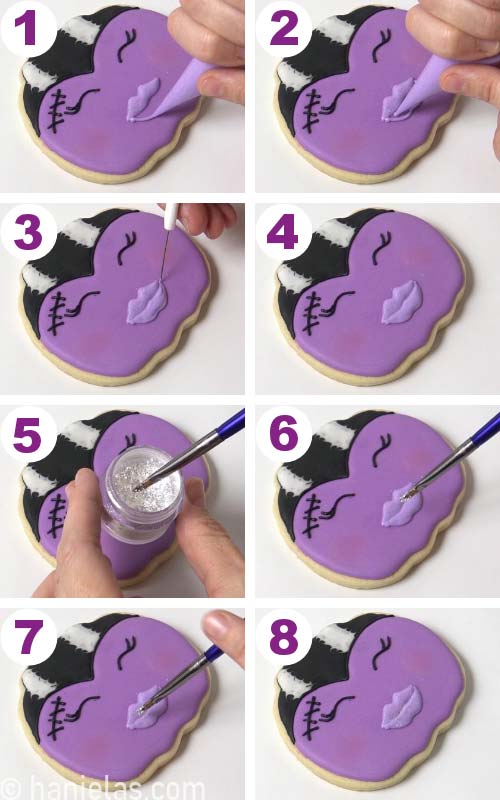
I didn’t like how the mouth looked and so while it was still wet I scrapped it off with a 1-in-2 decorating tool. And then I piped the mouth again, (steps 1-6). To making icing shimmer I dusted wet icing with White Jewel Dust. Dip dry food only paint brush in edible jewel dust and place it over a freshly piped mouth and gently tap the brush handle, letting edible dust fall onto wet icing. ( steps 7-8).

To color cheeks you can use dry pink edible dust. Dip dry food paint brush in the dry dust and gently shake off excess, (steps 1-2). Then with a circular motion apply dust onto the cheeks, (steps 3-4). Allow icing crust before piping bottom lip.

Crusting of the top lip can take anywhere from 10-15 minutes. After it’s crusted you can pipe the bottom lip (20-25 second consistency).
CANDY CORN PUMPKINS
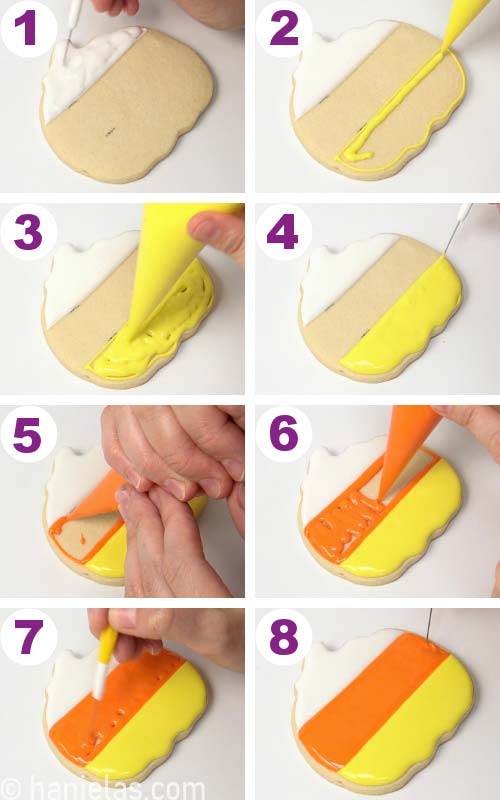
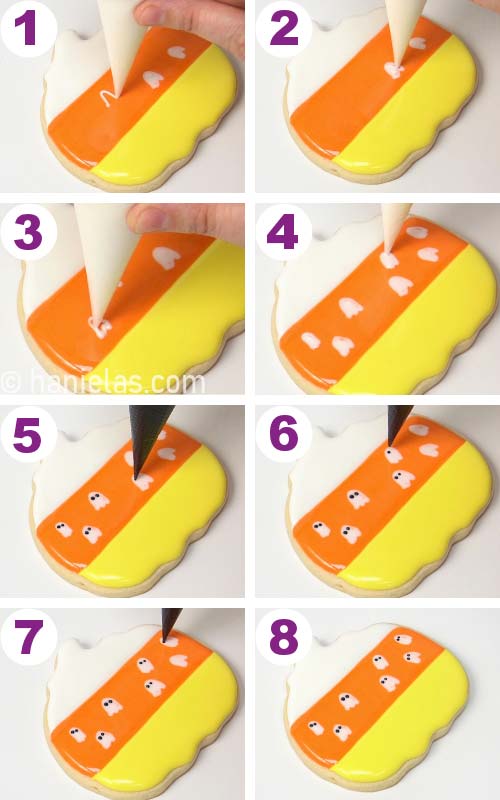
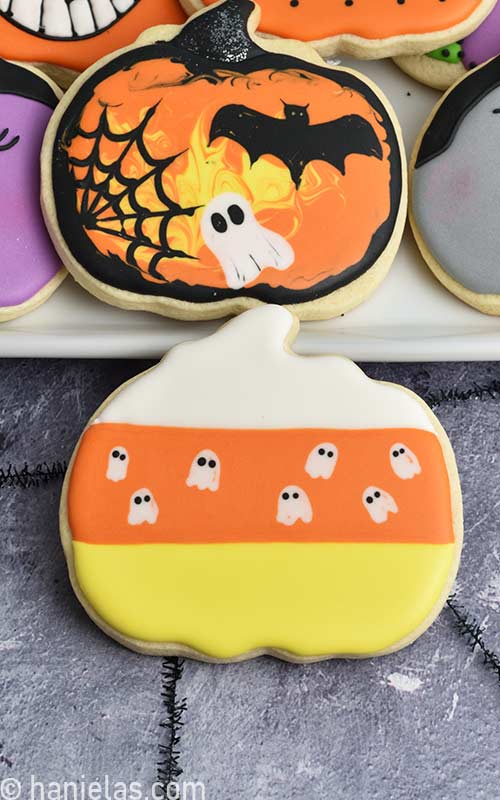
I created this cute candy corn pumpkin designs with ghosts using wet-on-wet royal icing technique.
First, divide cookie surface with an edible marker into 3 sections. Flood top section with white, bottom with yellow and allow icing to crust, (step 1-4). Then flood middle section with orange. Use a scribe needle tool to shape the icing while wet. Don’t allow orange icing to crust, immediately continue with the next step, (steps 5-8).
Immediately pipe white ghosts into orange icing with white icing using 15 second consistency royal icing. Then immediately pipe black eyes with black icing, also with 15 second consistency royal icing.
TIP : I’m using disposable piping bag to pipe the ghosts. Make a small opening on the piping bag so you can easily control amount of icing coming of the piping bag. Larger the opening more icing will come out and harder it is to pipe the ghosts. Make an opening equivalent to a piping tip #1.
SCARY AND FUN PUMPKINS
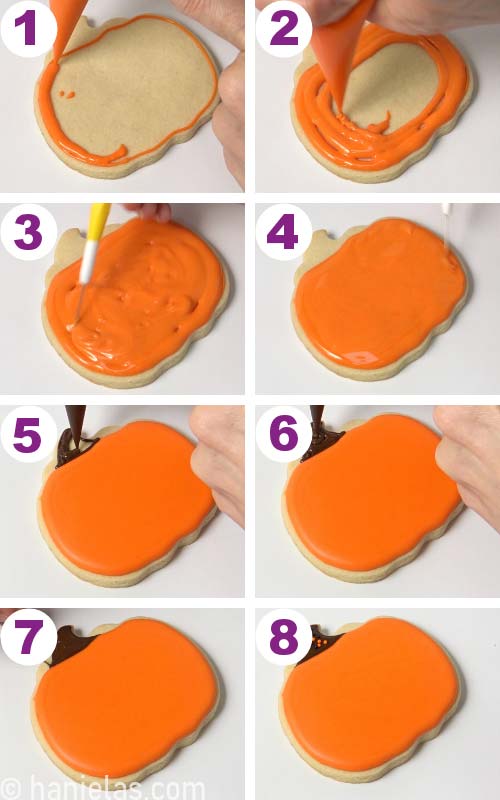
This evergreen scary and at the same time fun design was inspired by painted pumpkins that are popular around Halloween. It’s another must have in my Halloween Pumpkin Decorated Cookies set.
Outline and flood pumpkin cookie with orange icing (15 second consistency). Allow icing to crust, (steps 1-4). Then pipe the stem with brown icing (20 second consistency). Allow icing to crust well for 3-4 hours or let it dry overnight, (steps 5-8).
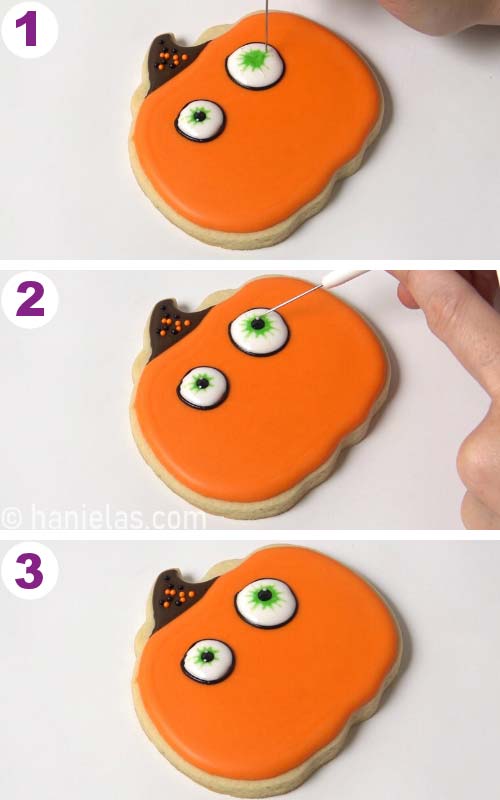
I created eyes with wet-on-wet royal icing technique.
To make eyes first pipe black outline with black icing of piping consistency, (step 1). Then fill the round with white icing (20-25 second consistency). Use a scribe needle tool to smooth white icing, (steps 2-3).
Immediately pipe a dot of bright green icing ( 20-25 second consistency) in the center of white round, (step 4). Now take a scribe needle tool and carefully drag green icing into the white, (step 5). And now take black icing and pipe a black dot in the center of green, (step 6). Last step is to create a white reflection. Use a needle tool to pick a tiny dot of white icing and then carefully place it onto wet icing, on the edge of black and green.

Repeat and make the right eye.
Now you can add rest of the facial features.
Pipe eyebrows, mouth and teeth outlines with black icing piping consistency, (steps 1-4). Allow teeth outlines to crust for 10 minutes. Then fill every other tooth with white icing (20-25 second consistency). Use a scribe needle tool to smooth icing. Let icing crust and then flood remaining teeth.
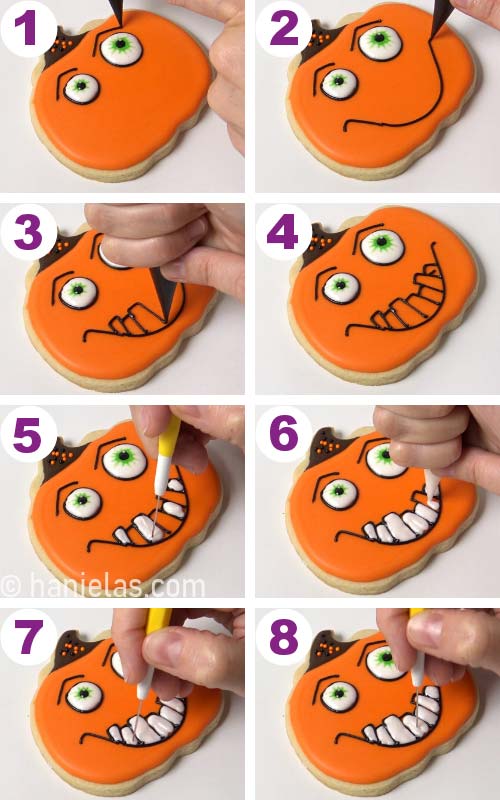
Get creative and make eyes different colors.

MORE HALLOWEEN TREATS
- Cute Halloween Cookies
- Halloween Spider Cupcake Cookies
- Owl Cookie for Halloween
- Slice and Bake Halloween Cookies
- Skull Cake Roll
- Monster Eye Surprise Cake
Here are all 10 Halloween Decorated Pumpkin Cookies. I’m sure there are plenty of Halloween designs we could use with a pumpkin cookie cutter. Let me know your ideas in the comments.
TO MAKE HALLOWEEN DECORATED PUMPKIN COOKIES YOU NEED
- RECIPES
- Sugar Cookies
- Gluten Free Sugar Cookies
- Vegan Sugar Cookies (super popular)
- Royal Icing : Meringue Royal Icing, Vegan Royal Icing, Fresh Lemon Royal Icing
- TOOLS
- Find all the tool in my Amazon Shop
- Pumpkin Cookie Cutter
- 2-in-1 Decorating Tool – large one
- Disposable Piping Bags
- Small Spreader to spread icing over stencil
- Halloween Stencils
- Food Colors – use concentrated gel colorings
- Edible White Jewel Dust
- Food Only Paint Brush
- Black Sanding Sugar
- Scribe Needle Tool
This post was originally published on October 1st, 2010. On August 29th, 2020 I updated this post with new photos and step by step picture tutorials.
This post containsThis post contains Amazon affiliate links that earn me a small commission, at no cost to you. I only recommend products that I use and love. Learn more about my affiliate policy here.




I love these! They'd look cute as spider webs with spiders, too!
Adorable! I like that you decorated this with other colors instead of the usual orange! and me too..i like the ghostly eyes!
These are great, Hani! Very creative…