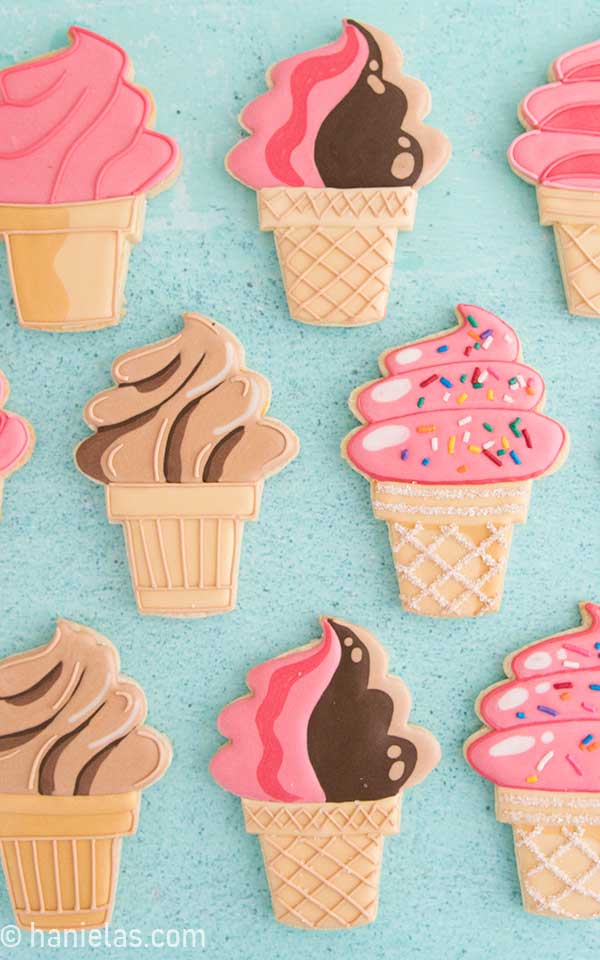
How To Decorate Ice Cream Cone Cookies
With these adorable decorated ice cream cone cookies, you are sure to put a smile on someone’s face. Today I’ll show you how to decorate ice cream cone cookies in four easy ways.
updated from 2010
HOW TO DECORATE SIMPLE ICE CREAM CONE COOKIES

ICE CREAM COOKIE CUTTER
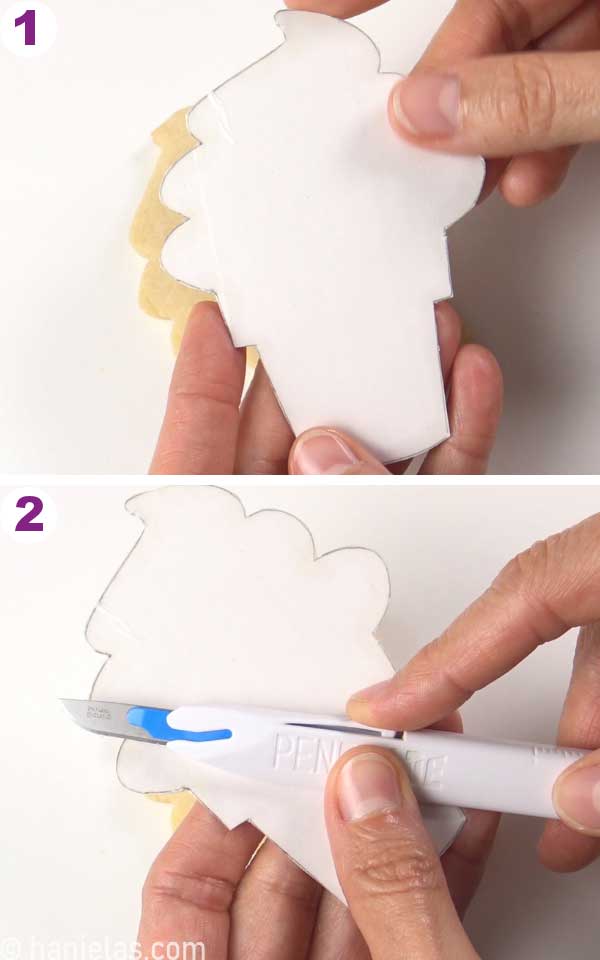
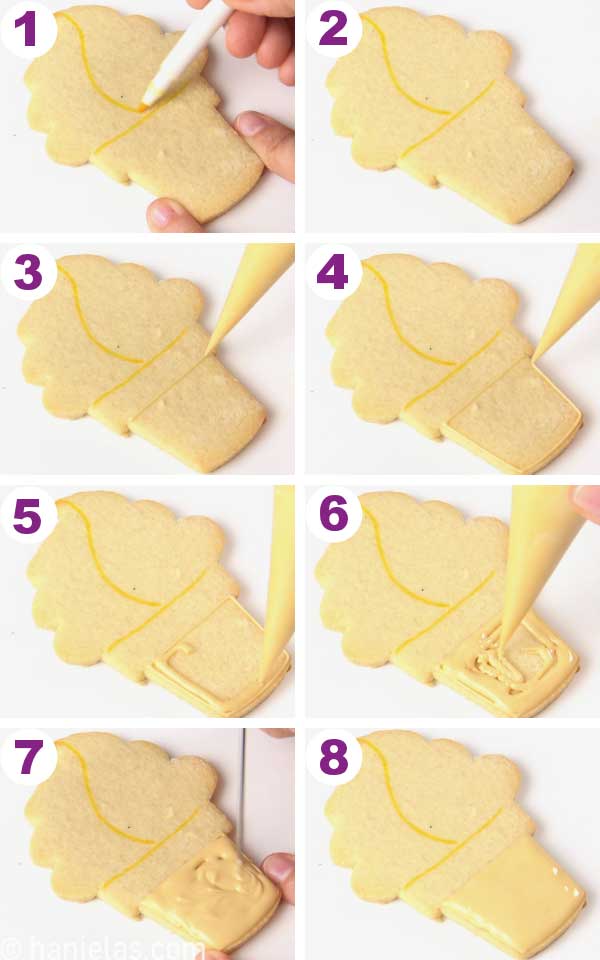
I used a cardstock cookie-cutter template and hand-cut sugar cookies using a pen blade knife. You can also use an Exacto knife (steps 1- 2). My ice cream cone cookie cutter template can be found in my template shop. Please refer to the tools and recipe section at the beginning of this post.
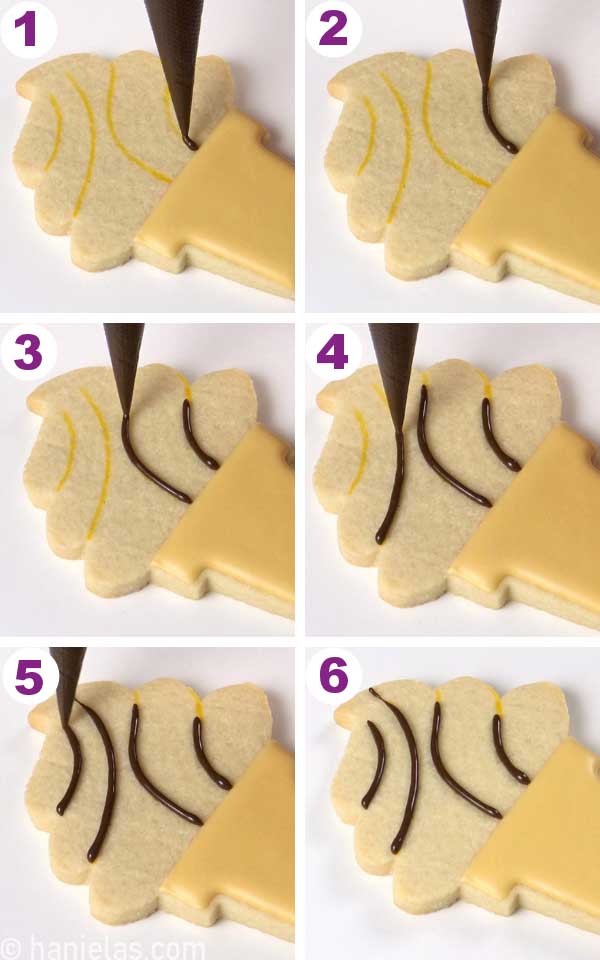
DECORATED SOFT SERVE ICE CREAM
Start by drawing guides with an edible marker (step 1). I recommend using yellow or light brown edible markers, if possible, avoid using dark edible markers like black.
Flood the swirl sections with about a 20-second consistency icing. Use a scribe to smooth the icing (steps 2-6).

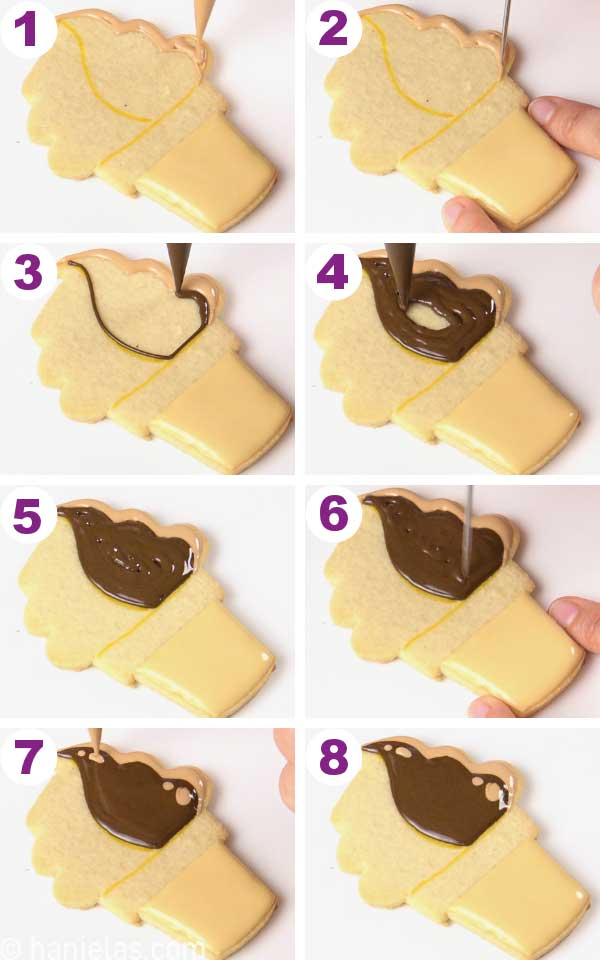
Continue outlining and flooding every other section with royal icing (steps 1-6). Let icing crust for 15 minutes before icing neighboring sections. This ensures there is dimension.

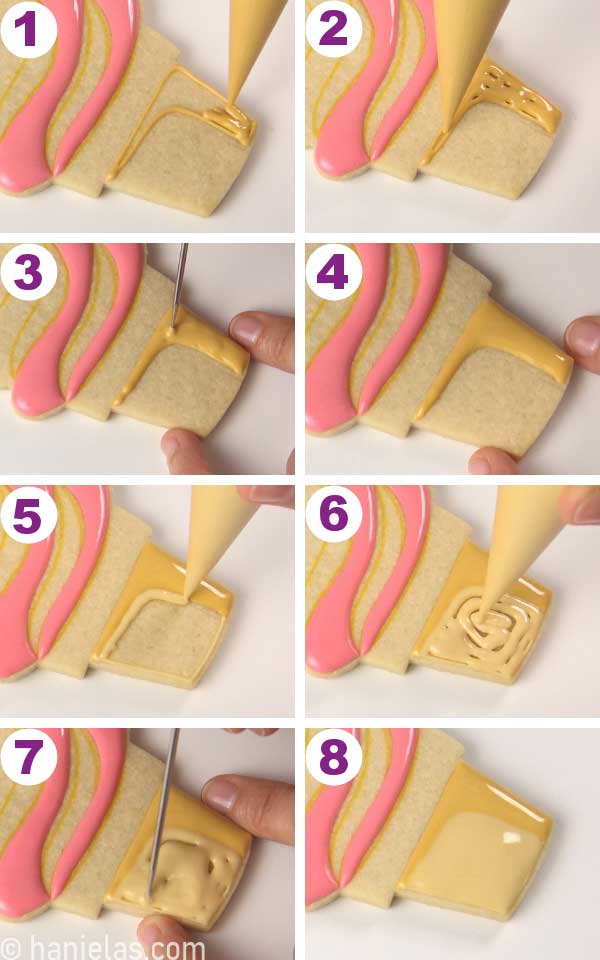
While pink icing is crusting, you can start decorating the cone section with two shades of ivory royal icing, about 15-20 second consistency.
First, flood with darker ivory icing (steps 1-4), then immediately flood another area with lighter ivory. Use a scribe tool to shape the icing while wet (steps 5-8). Let ivory icing crust for 20 minutes.
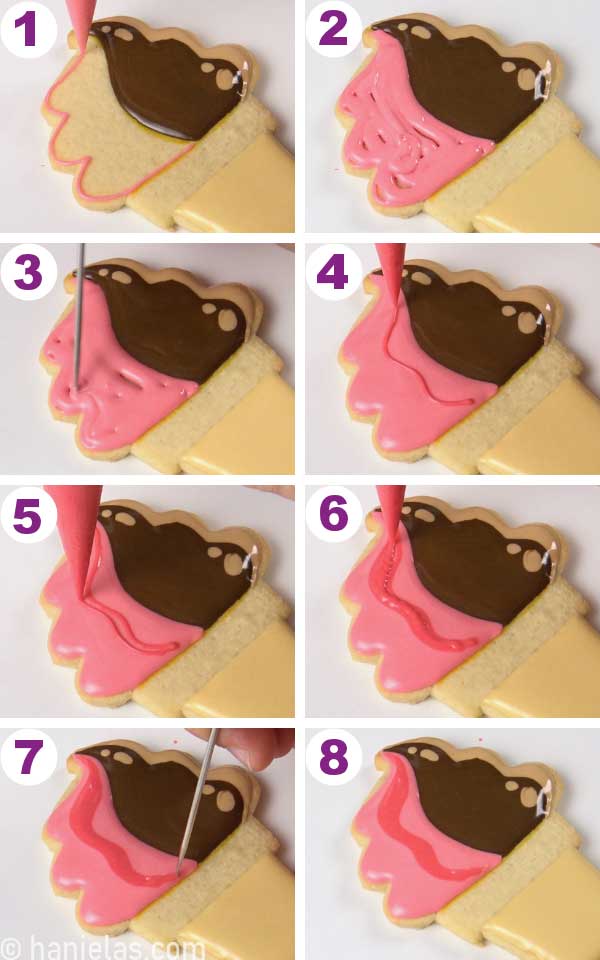
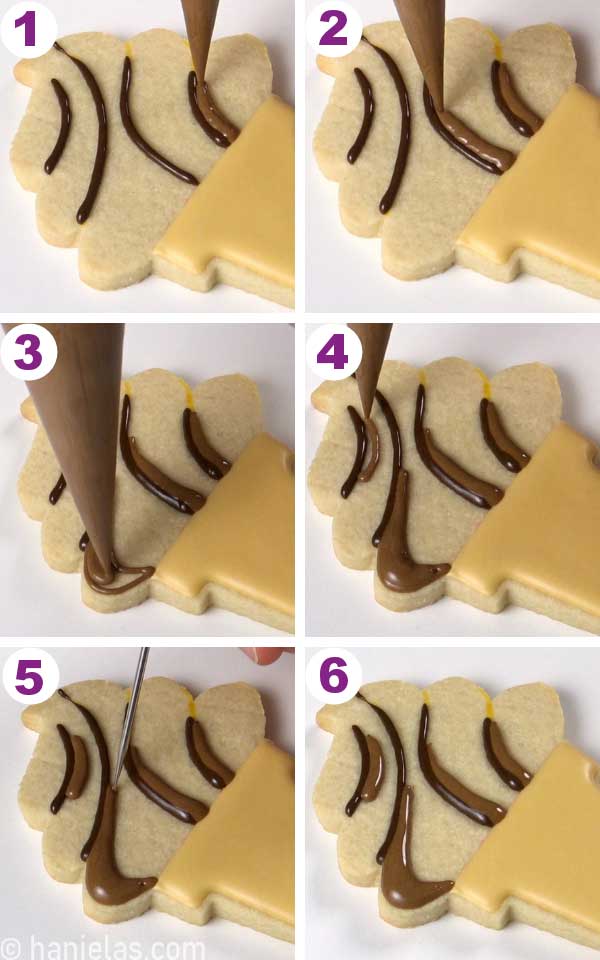
Now that the first layer of pink sections is crusted, we can add the last pink section. I didn’t want layers to blend where they are connecting. That’s why I waited for light pink to crust. Again, let icing crust for 10 minutes (steps 1-6).

Now, pipe the top cone section with light ivory icing (steps 1-6).

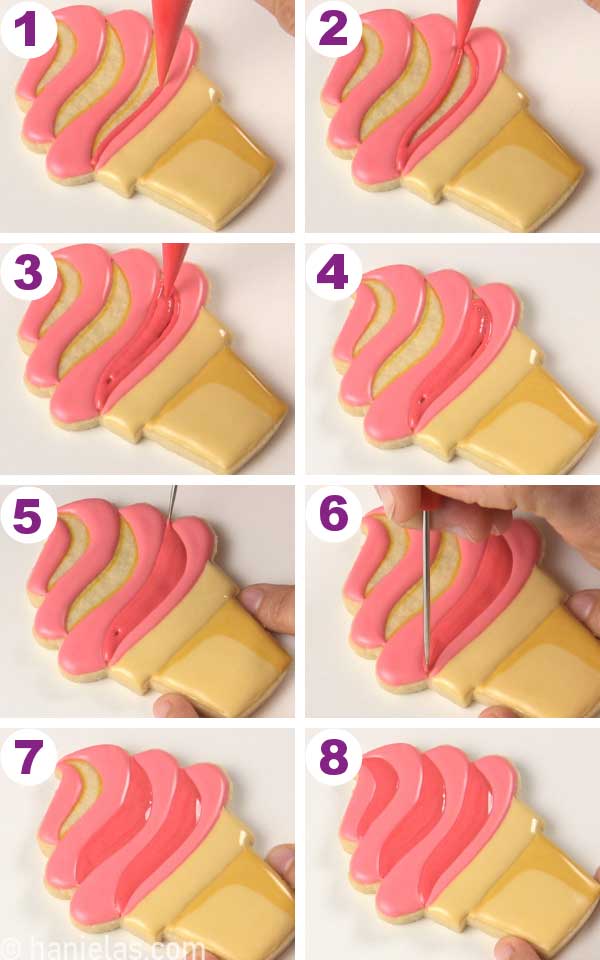
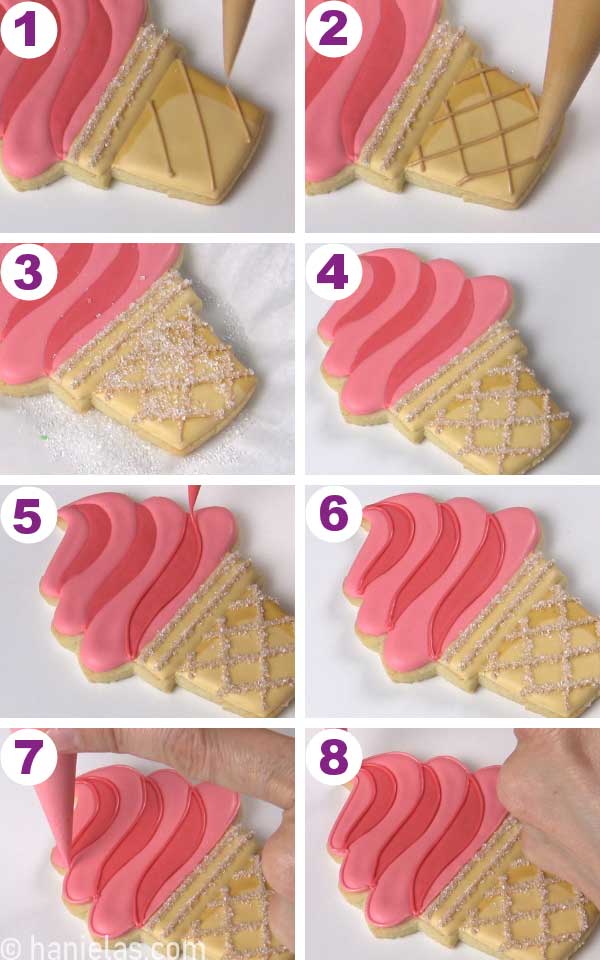
And now flood the sections between light pink areas with dark pink or another contrasting color. Use icing of 20-second consistency. With a scribe tool, shape the icing while wet, primarily concentrating on points (steps 1-8). Let the icing dry overnight.
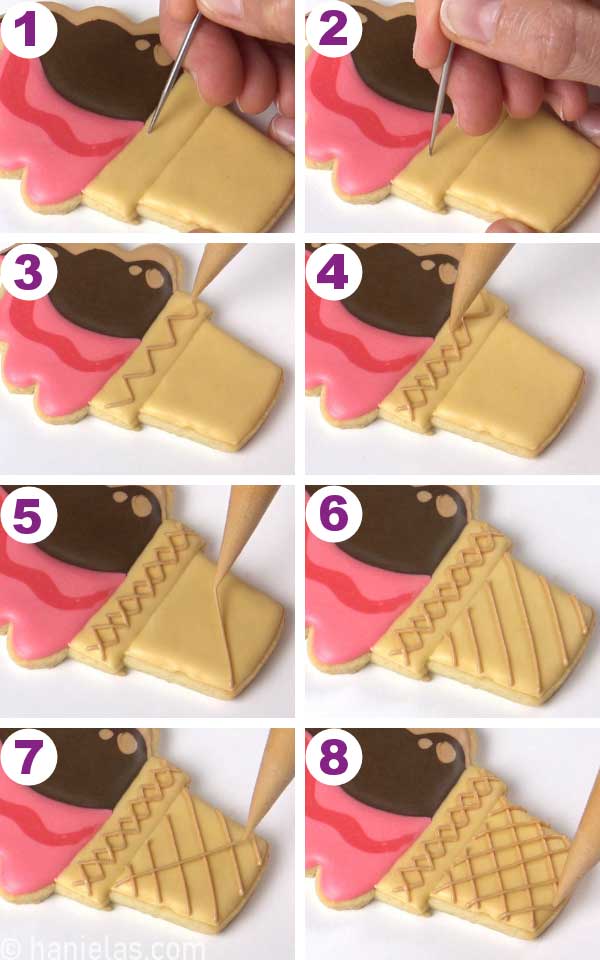
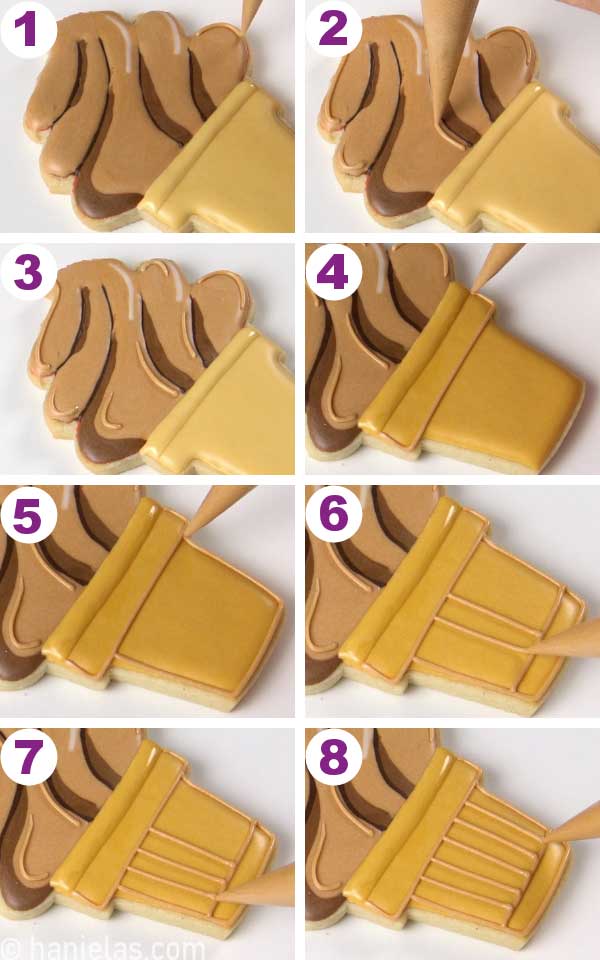
Finish decorating cone with piping consistency ivory or light brown icing. And then immediately dust icing with sanding sugar or, in this case, granulated sugar will work as well. Shake off excess sugar (steps 1-4). Lastly, outline sections with light pink and dark pink piping consistency icing.
Simple Ice Cream Cookies
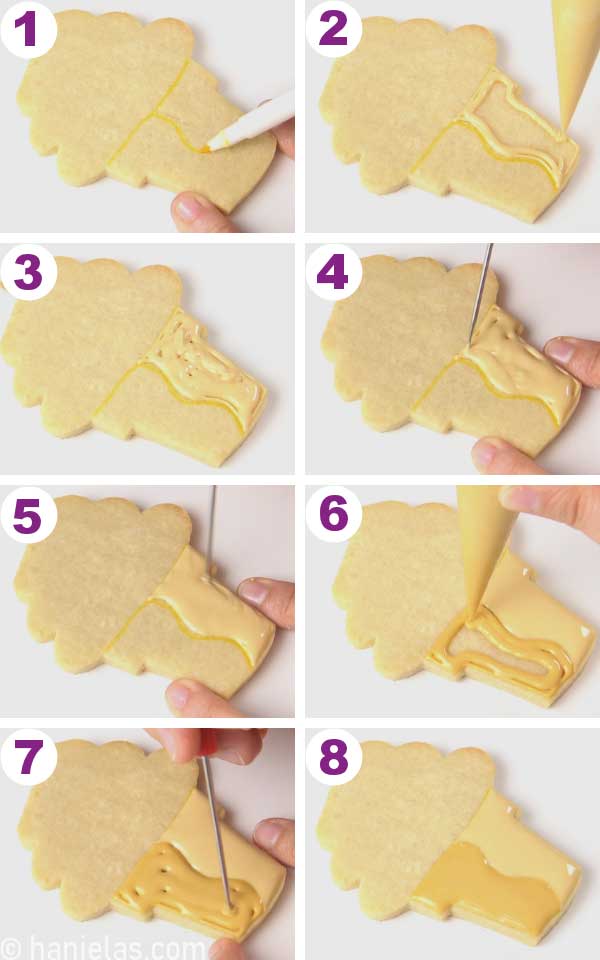
In this easy ice cream cone design, I started with the cone. Use a marker to draw a simple guide onto the cone section, if needed (step 1). Now outline and flood half of the cone with light ivory icing and immediately ice the area next to it with dark ivory icing. Use a scribe to smooth the icing and accentuate corners (steps 5-8). Let icing crust for 20 minutes.
Now outline and flood the entire swirl section with pink royal icing of 15-second consistency.
Use a scribe to distribute the icing evenly. Let dry overnight (steps 1-8).
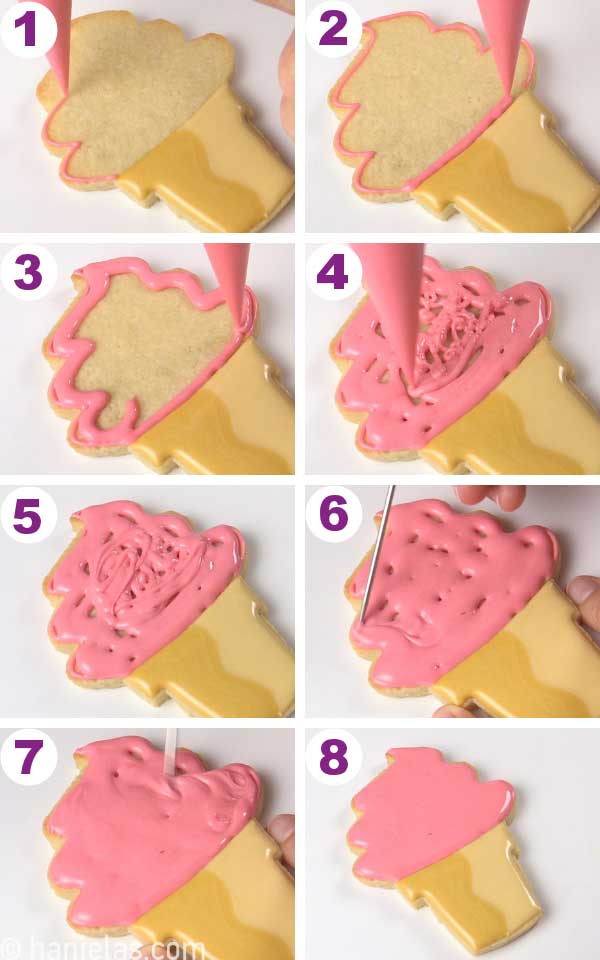
Finish this simple design by adding outlines with a piping consistency pink icing. I created piping guides by gently scratching the surface of the icing (steps 1-2). Outline and pipe details with piping consistency icing (steps 3-8).

Ice Cream Cookies with Sprinkles
With an edible marker, draw guides onto a cookie. I used a yellow edible marker (step 1). Then pipe swirl section outlines with piping consistency pink royal icing (steps 2-3). Now with dark ivory icing flood the section of the cone and immediately ice the area next to it with light ivory (steps 4-8). Let icing crust for 10 minutes.
Once dark pink outlines are crusted fill sections with light pink icing of 15 to 20-second consistency. I used the wet-on-wet royal icing decorating technique to create white shading. Take white icing of 15-second consistency, pipe an oval shape, and a small dot into the wet pink icing (steps 5-6). Carefully drop rainbow sprinkles onto the wet pink icing (steps 7-8).
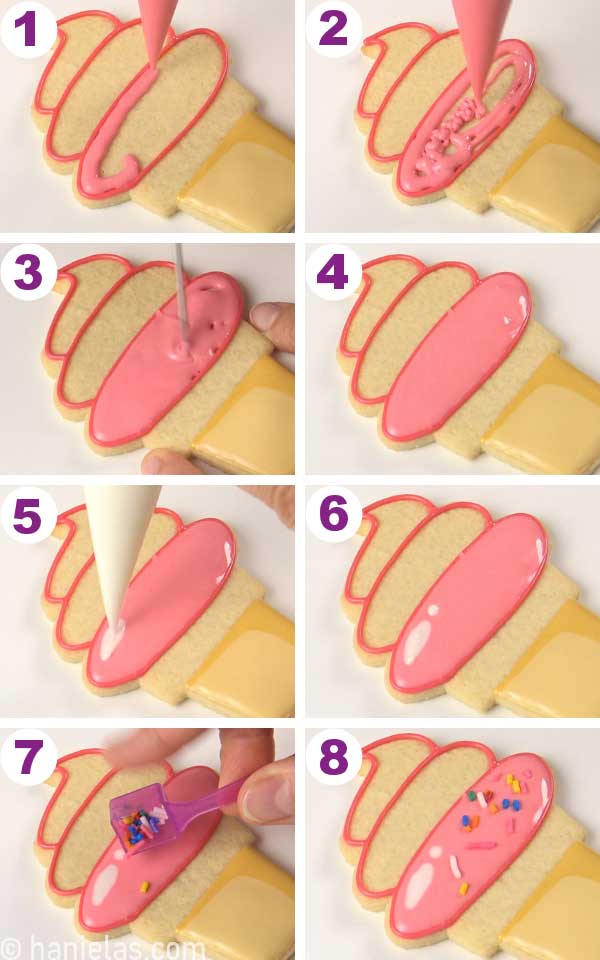
Repeat with the top section and let it crust (steps 1-4). Then flood the middle area (step 5).
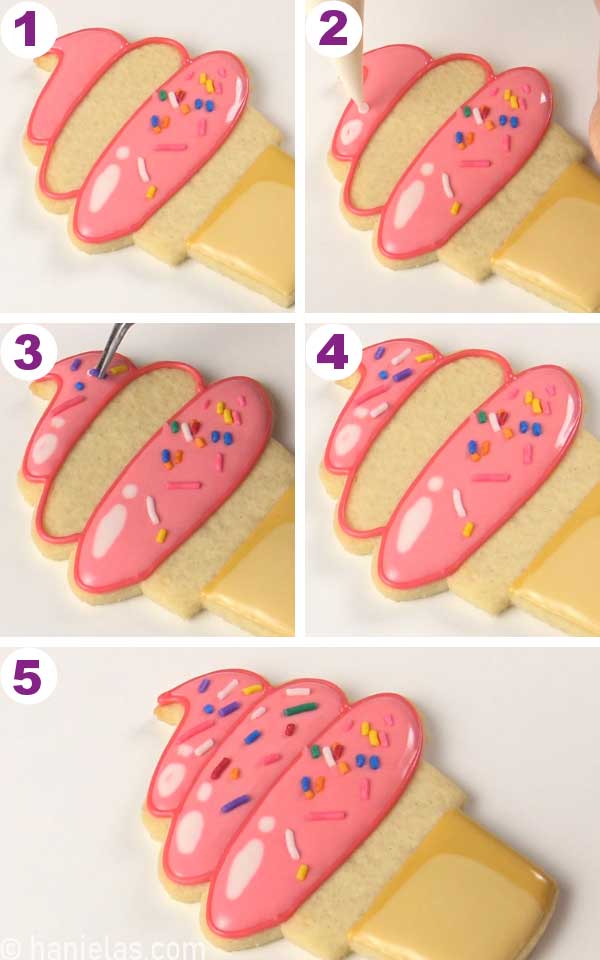
Outline and flood the top cone section with light ivory icing. Use a scribe to smooth and distribute the icing. Let dry overnight.
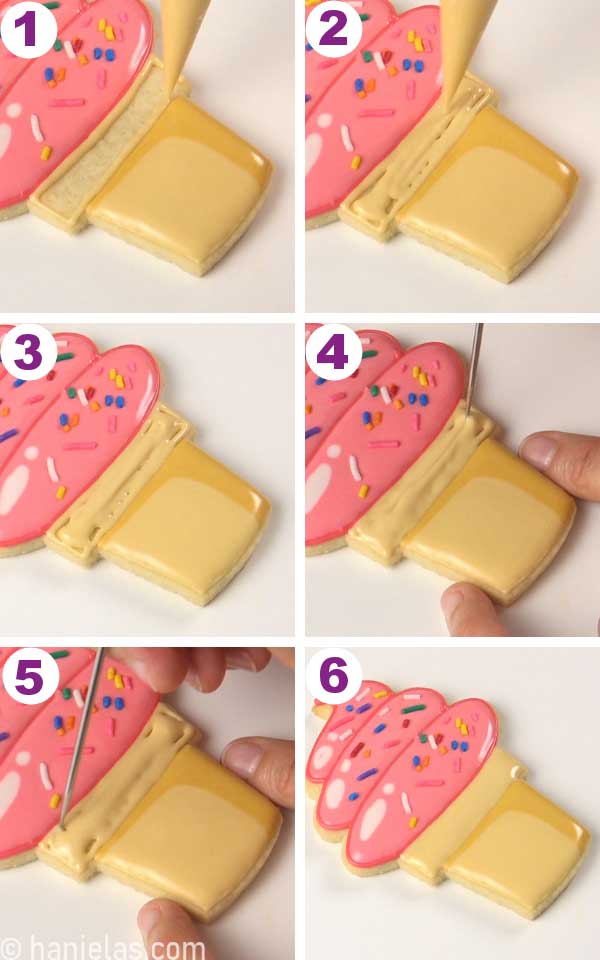
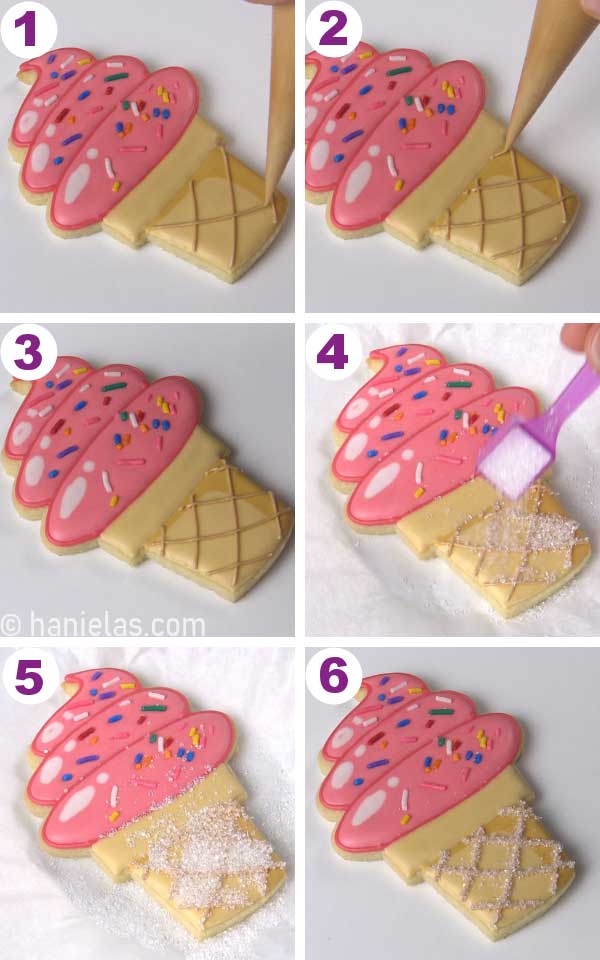
Use light brown or dark ivory icing of piping consistency and pipe the lattice pattern onto the bottom of the ice cream cone. Immediately dust icing with white sanding sugar, or in this case, you can also use granulated sugar. Shake off excess (steps 1-6).
Vector Ice Cream Cookies
Using two colors, I decorated swirl vertically in this vector-inspired ice-cream cone design.
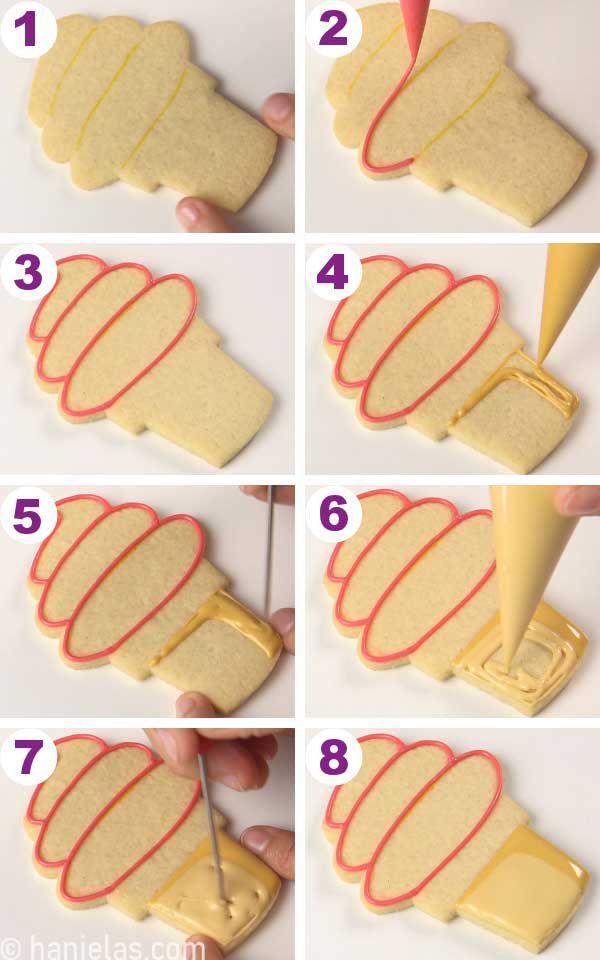
With a marker, I draw the guide onto the cookie (steps 1-2). Now decorate the bottom of the ice cream cone with light ivory icing of 15 to 20-second consistency. Smooth icing with a scribe (steps 3-8).
To decorate the swirl portion, first I iced the right edge with light brown and then immediately I flooded the half of the swirl with brown icing of 15-second consistency (steps 3-6). While wet, add small dots at the bottom and top of the brown section (steps 7-8).
With 15-20 second consistency pink icing flood the left half of the swirl (steps 1-3). Using dark pink 15-20 second consistency pipe a wavy line across the pink section, vertically (steps 5-8). Let crust and ice the top cone section with light ivory icing. Let dry.
To create an even zic zac pattern, I used a scribe tool to make small, evenly spaced out dots in dry icing. These small dots act as guides (steps 1-2). With a piping consistency of light brown icing pipe zic zac lines (steps 3-4). Lastly, pipe a lattice pattern with light brown icing on the bottom part of the cone (steps 5-8).
Wet-on-Wet Soft Serve Ice Cream Cookies
In this ice cream cone design, I used the wet-on-wet royal icing technique to decorate the swirl part.
Ice the cone with ivory royal icing and let crust for 30 minutes. With an edible marker draw piping guides (steps 1-5).

With dark brown icing of 15-second consistency pipe thick lines along the drawn lines (steps 1-6).
Immediately, with lighter shade brown pipe lines next to dark lines (steps 1-6).
Next, pipe sections with light brown icing (steps 1-4). To make highlights use white icing ( steps 5-7). Continue flooding with light brown icing (step 8). Let crust for 30 minutes.

With light ivory icing, about 20 to 25-second consistency pipe a thin strip at the top of the cone. Let crust (steps 1-5).

I used piping consistency light brown icing to pipe details, and outlines (steps 1-8).
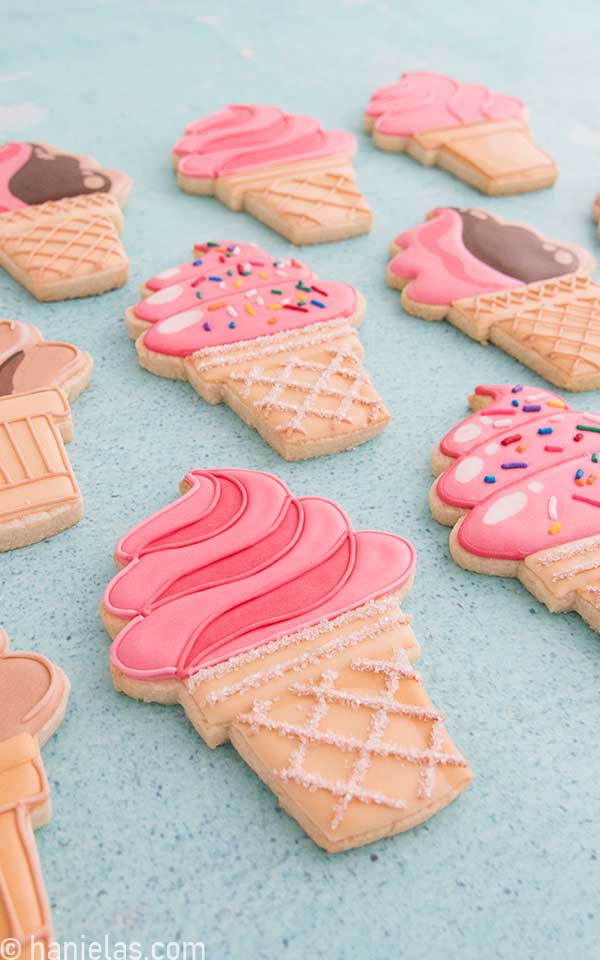
And here are all four ice cream cone designs I created. I really can’t pick a favorite but if you have a favorite, let me know in the comments.

COOKIE DECORATING TOOLBOX
- Beginner’s Guide To Cookie Decorating
- Ultimate Guide to Cut-Out Cookies (tips, tricks, troubleshooting)
- Royal Icing Recipe
- Small Batch Royal Icing Recipe
- Cookie Icing Recipes (includes vegan royal icing, glaze, fondant)
- Guide To Royal Icing Consistencies with Visual Help(what is stiff, flood icing, etc.)
- How To Freeze Royal Icing
- How To Make Royal Icing Transfers
- Royal Icing FAQ ( for example: how to make black icing, color bleeding, storage, and more)
- How To Make a Cookie Cutter Template
- Ultimate Guide To Cookie Decorating Tools
- RECIPES
- Sour Cream Soft Sugar Cookies
- Classic Sugar Cookies
- Fresh Lemon Royal Icing
- Vegan Sugar Cookies
- Vegan Royal Icing
- Gluten-Free Sugar Cookies
- TOOLS
- Shop all the tools in my Amazon Shop
- The Ice Cream Cone Cookie Cutter Template is available in my Template Shop
- Tipless Piping Bags
- Concentrated Gel Food Colors (I used Americolor brand)
- Metal Scribe Tool
MORE SUMMER RECIPES
- Ice Cream Sundae Cookies
- Watermelon Pinata Cookies
- Easy Mini Watermelon Cookies
- Watermelon Whoopie Pies
- S’mores Rice Krispie Treats via How To Make Cereal Treats
This post was originally published on July 19th, 2010. On May 18th, 2022 I updated this post with new step-by-step pictures and written instructions.

Hi, I’m Hani
Welcome!
Thank you for visiting Haniela’s. On my blog, you’ll find delicious sweet & savory recipes made with simple ingredients. Why not start a new adventure? Discover a world of cookie decorating with my step-by-step tutorials.

Hi, I’m Hani
Welcome!
Thank you for visiting Haniela’s. On my blog, you’ll find delicious sweet & savory recipes made with simple ingredients. Why not start a new adventure? Discover a world of cookie decorating with my step-by-step tutorials.
Excellent job on the cookies Hana!
Katie & Raider both look very cute…
You really captured their essence.
Joe
MrsKT, thanks for your comment, it could be smoother but overall I'm pretty happy with these.
Faithy, isn't he adorable, he was doing all kinds of maneuvers to get closer to the cookie.
Glad you like it. I too like the shading
June, sweetie thanks for stopping by. Pugalicious..lol that is one cool expression, Katie will love that.It was a fun day for sure.
xoxo
Sweet Things TO, thank you for your encouraging words.
Jenniffer, glad you like them. Too bad they are all gone now, all eaten.
OMG!! Those are just too cute!
They really do look so cool and refreshing. It's like a 3D cookie!
HEY! These cookies are soooo precious, Hani. They look especially wonderful with Katie modeling them – and Pugalicious too! How cute – he's laughing. Looks like a wonderful day everyone had – love the whole article.
xoxo, j.
I love these ice cream cookies too! Esp the swirls on top! You made it look so much like the real ice cream! So pretty!
Great photos too! I love the little pug dog wanting to taste it too! my sis use to have this breed of dog..they are so adorable!
Love these icecream cookies. You have done a great job on the icing, finishes them off nicely 🙂
Thank you ladies so much for your wonderful comments.I'm really happy how these turned out too.
Bea, I have tried different knives and exacto knife or a small paring knife work best for me. I struggle with the edges too, keeping the dough chilled really helps me to keep the edge tearing to minimum.
Hope this helps.
Adorable! I don't seem to get smooth edges when cutting with exacto knife… I must be doing something wrong…
I LOVE these ice cream cone cookies, the swirled ice cream on top is too cute…they are just precious and the colors are so sweet!