Decorated Vegetable Cookies
Inspired by our beautiful vegetable garden I made Decorated Vegetable Cookies.
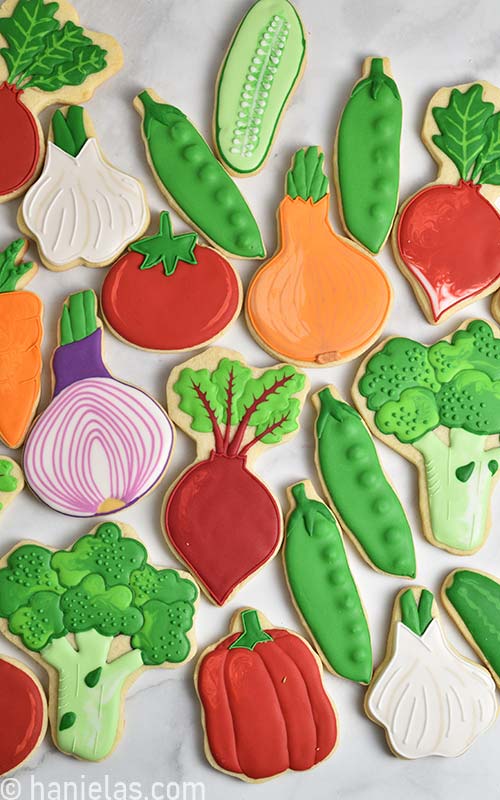
I decided to pick some of my favorite garden vegetables and turn them into delicious colorful vegetable cookies. Truth to be told I’ve been meaning to make decorated vegetable cookies for a really long time and so I’m super exited that I finally did it!
You see over the years we grew a wide range of vegetables in our raised bed vegetable garden. We harvested hundreds of pounds of tomatoes, cucumbers, zucchinis, yellow and sweet potatoes, peppers, onions, carrots, red beets, peas, broccoli, cauliflower, scallions, garlic, lettuce, radishes, kohlrabi, beans, butternut squash, spaghetti squash, gourmet squash and the list continues. And so making decorated vegetable cookies is my way of paying homage to our pride and joy, our one of a kind Vegetable Garden.
MAKE DECORATED VEGETABLE COOKIES
TABLE OF CONTENTS
- Vegetable Cookie Cutters
- How to Reshape Cookies Cutters
- Bake Sugar Cookies
- Royal Icing
- How to Cut a Tippless Piping Bag
- Broccoli Cookies
- Red Beet Cookies
- Red Onion Slice Cookies
- Yellow Onion Cookies
- Snap Pea Cookies
- Carrot Cookies
- Tomato Cookies
- Radish Cookies
- Cucumber Cookies
- Cucumber Slice Cookies
- Bell Pepper Cookies
- Garlic Cookies
- Recipes and Templates
- Collaboration with Cookielicious

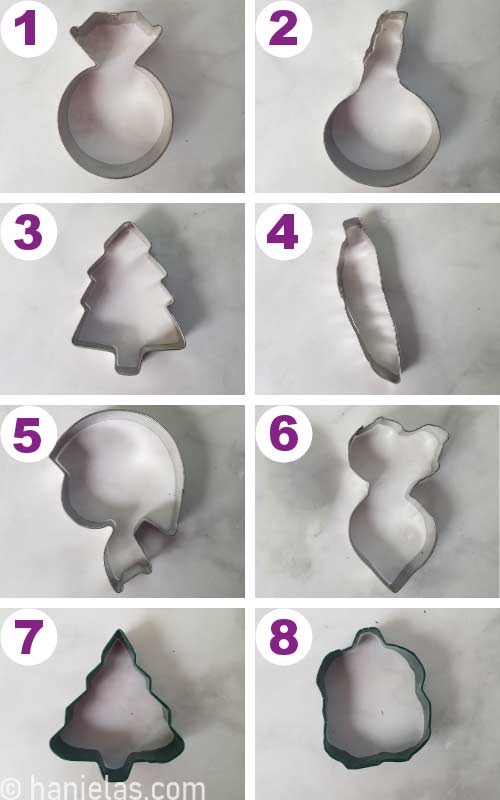
VEGETABLE COOKIE CUTTERS
I prepared my cookies dough and I started to look thru my cutters to cut out cookies so I could make my decorated vegetable cookies. Having been decorating cookies for over a decade I was surprised I only had few vegetable cutters. Instead of rushing to the store or ordering online the shapes I needed I decided to reclaim my spare metal cutters. I’ve already experimented with reshaping when I made a cutter for my Decorated S’mores Cookies, so let’s try it again, shall we?

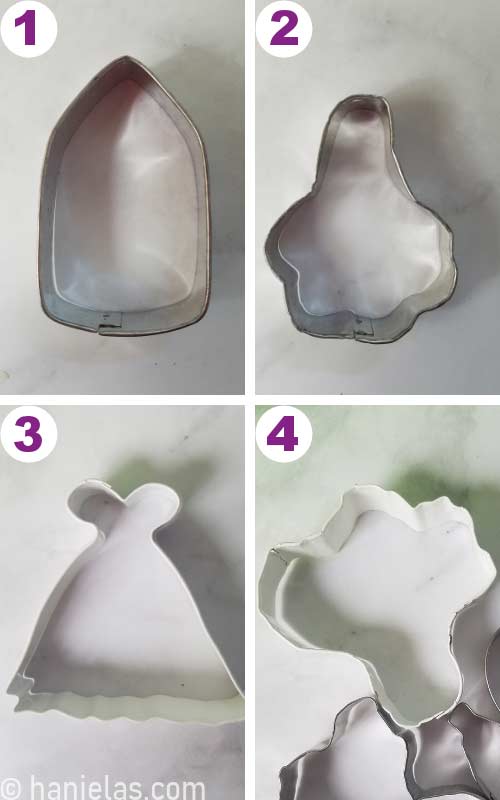
HOW TO MAKE A CUSTOM COOKIE CUTTER
To reshape my old metal cutters I used pliers. To bend the metal you can also utilize wooden utensils, for example rolling pin, spoon handle, meat thinner(metal part). Basically anything that will help you achieve the shape you want.

When choosing the cutters I also looked for familiarity in both shapes : old versus new. For example I used a diamond ring to make an onion because it was round. It eliminated an extra step of shaping a round. And I find shaping a round from a tree cutter would be rather difficult, (step 1-2).
Then to make the pea pod cutter I used a tree cutter, (step 3-4). This tree metal cutter wasn’t made from a super heavy metal so it was fairly easy to flatten. What attracted me to this tree cutter was the bottom tree trunk. It seemed like a good shape for the pea stem and calyx.
Although it seems unlikely football helmet cutter was a good size for the radish/red beets cutter, (step 6-7).
I used a tree cutter to shape a bed pepper cutter, (step 7-8). What made me decided to use this cutter? Again it was the tree trunk.
I should mention how I reshaped coated metal cutters. I have to say coated cutters are bit more difficult to work with. To protect the coating I used folded plastic wrap underneath the pliers when shaping the metal. And this seemed to do the trick and I didn’t damage the coating, in most part. However, this extra layer of coating makes the metal a bit more resistant and you have to use more force to bend it the way you want.
I used a pencil cutter to make a garlic cookie cutter, (step 1-2). You can use small cylindrical objects like wooden spoon handle to help with shaping of the rounded shapes.
Lastly, I used a wedding gown cutter to make a large broccoli cutter, (step 3-4). What caught my attention was the bustier section, it seemed like a good broccoli stalk.
TOMATO COOKIE CUTTER
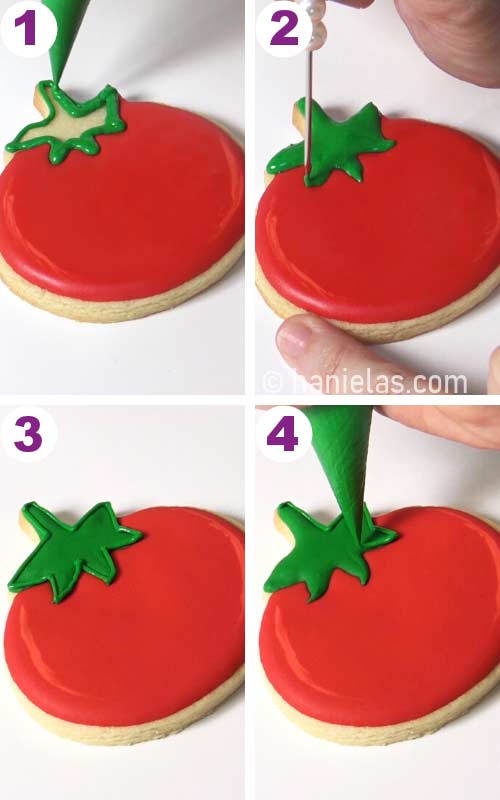
I constructed a tomato cookie shape using 2 cookie cutters. Red cutter is a pumpkin and my second cutter is a small fall leaf. Cut out the stem on the pumpkin cutter with a small leaf cutter, (step 1-2). And then replace it with a leaf shape cut out, (step 3). Bake as usual, (step 4).

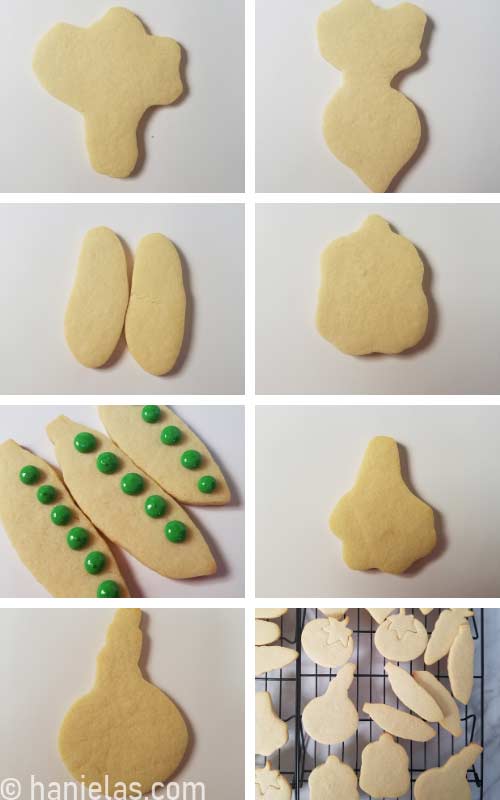
BAKE SUGAR COOKIES
To make the vegetable cookies I used my Sugar Cookie Dough Recipe. You can use number of delicious roll out cookie recipes.
ROYAL ICING
To decorate my garden vegetable cookies I prepared my Royal Icing Recipe. I colored the icing with gel food colors. I then thinned it down with water to different consistencies and I filled my disposable piping bags.

HOW TO CUT A TIPLESS PIPING BAG FOR COOKIE DECORATING
Let’s me show you how I like to cut my disposable piping bags for cookie decorating
- 1. Find a seam on a piping bag
- 2-5. Press the seam in the middle
- 6-7. Cut the tip straight across
- 8. Gently wiggle the cut section to shape it after it’s been flatten

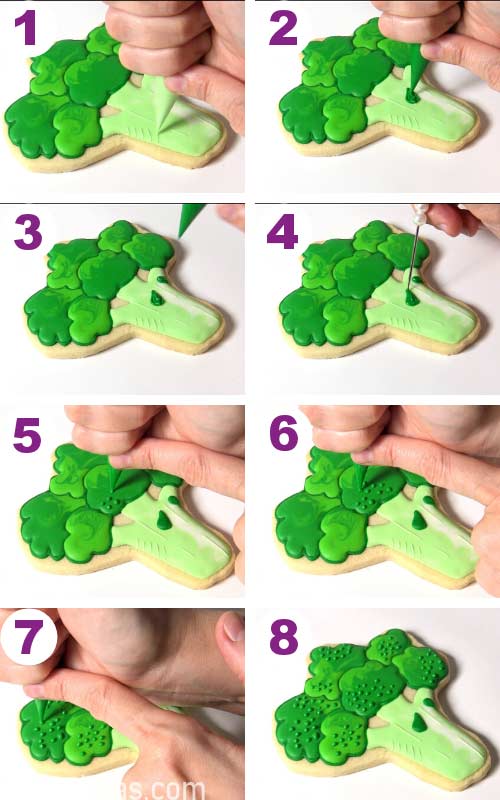
BROCCOLI COOKIES
Start by drawing the outlines with an edible marker. I used black marker. I generally prefer using brown marker to draw my outlines but for the tutorial purposes I used black so it’s clearly visible, (step 1-2).
With light green (15-20 second consistency) outline and flood the stalk. Smooth the icing with a scribe needle tool. Then pipe white icing (15-20 second consistency) onto the wet light green. Blend it into the green and allow to crust for 20 minutes, (step 3-7). After it’s crusted use dark green icing (20 second consistency) and pipe the florets’ outlines and let crust again for 5 minutes, (step 8).

Flood every other floret with a medium green and bright/electric green (20 second consistency). Taking care not to pipe over the outlines. Marble colors together while wet.

After that continue flooding every other floret and allow to crust for 15 minutes. Then flood remaining florets, taking care not to pipe icing on the dark green outlines, (step 1-2). Allow to crust well for 1 hour.

Now you can pipe small details on the stalk with light green icing piping consistency, (step 1). And make small leaves with dark green icing 20 second consistency, (step 2-4). Then you pipe dots onto the florets with a medium green icing (25 second).
RED BEETS COOKIES
To color my icing this beautiful deep red I use ProGel Claret Food Coloring.
First, flood the cookie with deep red icing (15 second consistency). Then distribute the icing with a needle tool and shape the top while the icing is wet, (step 1-4). Pipe light red on the side and blend it with a needle tool to create shading, (step 5-8). Allow icing to crust.
TIP : Dark red icing can take a little longer to dry. If possible use a small fan to promote air circulation and faster drying of icing. Learn more about royal icing – ROYAL ICING FAQ.

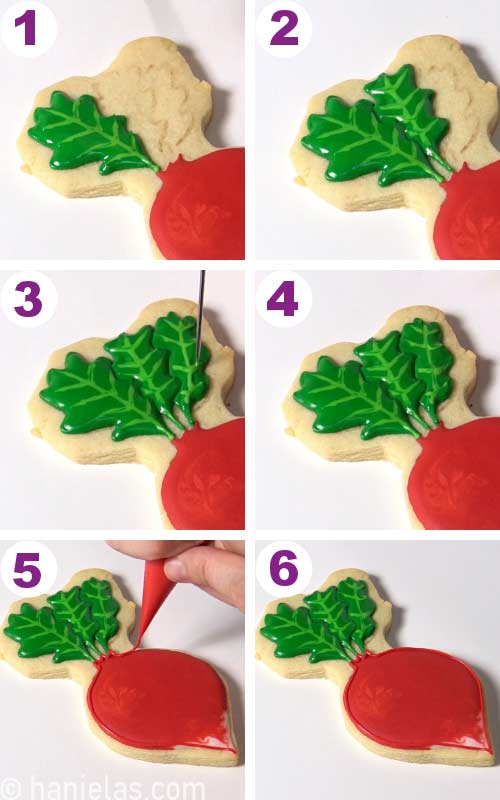
Pipe the leaves with bright/electric green royal icing (20 second consistency). Smooth the icing with a needle tool (step 1-3). Then immediately pipe a red stem (20 second consistency) from the top of the red beet and onto the middle of the leaf, (step 4). Use a tip of a needle tool to shape the end of the red line to the point, (step 5). And then pull red icing into the green creating small branches, (step 6-8).
TIP : If you don’t have an electric green food coloring make bright yellow royal icing and add a touch of leaf green to make a bright green.

Repeat the process and create 2nd leaf, (step 1-2). Then allow leaves to crust and make additional leaves between the 2 first leaves, (step 3). Let crust again for 5 minutes and then outline the bottom with piping consistency claret red royal icing, (step 4-6)

RED ONION SLICE COOKIES
To make the slice design I used my favorite wet on wet royal icing technique.
Start by drawing outlines onto the cookies. Use an edible marker. Then outline and flood the top part with a purple icing of 20 second consistency, (step 1-3). Now take ivory icing ( 20 second consistency) and a flood a small triangular shape at the bottom, (step 4). Flood the inside with white icing 15 second consistency, ( step 5- 8). Don’t allow icing to crust and move to the next step right away.
TIP : To make purple I used Regal Purple by Americolor. Don’t have purple? Use electric pink and sky blue gel colors instead.

Now we are going to pipe circles onto the wet white icing. I used light purple icing (15 second consistency). Start piping lines at the bottom. And use a small ivory triangular shape as your starting point, (step 1-4). Often more icing accumulates at the starting line, if this is the case use a needle tool to gently smooth the pointy section, (step 5). Allow icing to crust well, (step 6).
TIP : When piping wet on wet lines be sure make a small opening on the piping bag, equivalent to round piping tip #1 or even smaller.

Divide top section into 3 sections with an edible marker, (step 1). Then flood every other section with green icing (20 to 25 second consistency). Use a scribe tool to shape the icing while wet. Allow to crust for 10 minutes, (step 2-4). Then flood the middle section, (step 5). And let icing dry before packaging cookies, (step 6).

YELLOW ONION COOKIES
To make yellow onion cookies I used wet on wet design. And I used 2 shades of orange-brown icing and light brown-orange icing.
Start by drawing an outline with an edible marker. Then take dark orange-brown icing (15 second consistency) and outline the cookies, leaving a moon shape section on the left unfilled. Flood the moon shape section with light orange-brown icing (15 second consistency). Immediately start distributing icing with a needle tool. Smooth it out and blend the colors together creating shading. Don’t allow icing to crust, move on the next step right away.
TIP : To color orange-brown icing I first colored my icing with orange food color and then a I added a minuscule amount of brown until I was happy with the color.

Similarly like in the red onion design pipe curved lines with a light brown-orange icing (15 second consistency). Start at the middle bottom and use this point for the reference when piping the lines, (step 1-3). Immediately after you pipe the lines take a needle tool and run a tip of a needle tool thru the lines. Especially where they appear bulky, (4-5). Allow to crust well.
TIP : To color brown-orange icing I used light brown icing as my base and I added a tiny amount of orange to it. Make it more brown than orange.

Divide top of the cookie into sections, (step 1). Then flood every other section with green royal icing (20 to 25 second consistency). Use a scribe tool to shape the icing while wet. Allow to crust for 10 minutes, (step 2-5). Flood the remaining sections, allow to crust again. Outline cookie with a piping consistency orange-brown icing, (step 6). Then pipe a short zigzag line on the bottom middle of the cookie with brown-orange icing,(step 7-8).

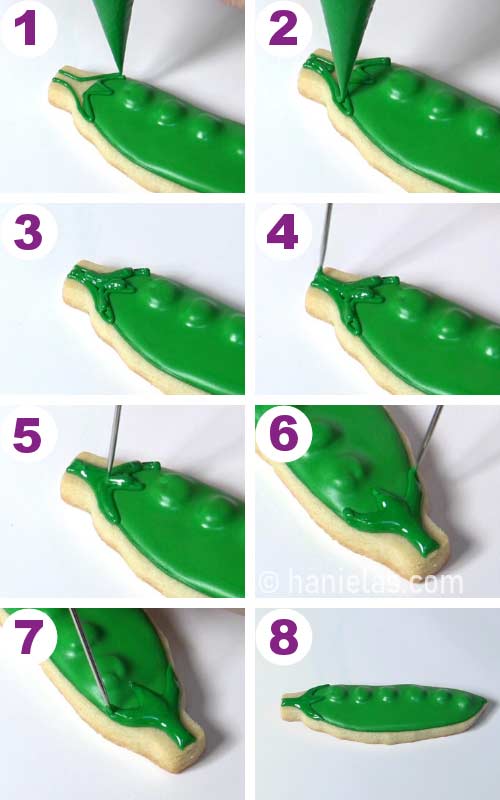
SNAP PEAS COOKIES
Start by piping large dots of green icing (25 second consistency). Pipe them closer to the flatter edge of the cookie, (step 1). Smooth the tops if needed and allow to crust well, (2-3).

Now outline cookie with a dark green 20 second consistency icing, (step 1-2). And immediately flood cookie with a medium green icing (20 second consistency). Pipe the icing on top of the crusted dots first, and then around the edges. Try not to overfill the cookie, (step 3-5). Use a food only paint brush to distribute the icing, (step 6). Tap the cookie on the surface to even out the icing and allow to crust well, (step 7-8).

Outline and flood the calyx with dark green icing (20 second consistency), (step 1-3). Use a needle tool to shape the icing, (step 4-7). Let dry, (step 8).
CARROT COOKIES
Outline and flood bottom of the cookie with dark orange icing (15 second consistency) then pipe a line of light orange icing (15 second consistency) on the side, (step 1-2). Marble 2 colors together to create shading. Use a needle tool to distribute the icing. Let icing crust, (step 3-6).

Outline and flood the top part with green icing (20 second consistency), allow to crust, (step 1-4). Then pipe the leaves with piping consistency green icing, (step 5-8).

TOMATO COOKIES
Draw the leaf outline onto a cookie with edible marker, (step 1). Outline and flood the cookie with red icing (15 second consistency). Smooth the icing, (step 2-3). And them pipe light red line on the sides. Blend into the dark red with a needle tool to create shading. Allow to crust, (4-6).

Outline and flood the leaf section. Shape the leaves with a needle tool. Allow to crust and then outline with green icing (piping consistency).
RADISHES COOKIES
Outline and flood the cookie with red and white icing. Distribute and blend the icing with a needle tool. Shape the top while icing is wet, (step 1-4). Pipe light red onto the left side and blend into dark red. Allow icing to crust, (step 5-8).

Draw the leaves outlines onto the cookie with a brown edible marker. Outline and flood the leaf with dark green icing (20 second consistency). Shape icing while wet. Immediately pipe bright green icing lines onto the wet dark green, (step 4-5). With a needle tool shape the bright green lines. Allow to crust and then continue with the second and then 3rd leaf.

Be sure to let leaf design crust before you pipe another leaf next to it. This ensures that icing won’t blend together and there will be a definition in the piped design. Allow to crust (1-4). Outline with red icing piping consistency, (step 5-6).
CUCUMBER COOKIES
Cucumber cookies are super easy. All you have to do is outline and flood the cookie with dark green icing (15 second consistency). Then pipe lighter green lines onto wet dark green. Use a needle tool and a zigzag motion to marble light green into dark green, (step 4-6). Immediately pipe a small rounded section with an ivory icing 20 second consistency, (step 7). Allow to fully dry.

CUCUMBER SLICE COOKIES
To make sliced cucumber cookies first pipe an outline with dark green icing, 20 second consistency, (step 1-2). Then flood the middle with light green icing (15 second consistency). Pipe a line across the middle with medium green icing, (step 4). Marble medium green with light green creating a marbled center, (step 4-6). Then pipe a white icing (15 second consistency) across. Allow icing to crust well.

Now you can pipe small white teardrop shapes for the seeds on both sides of white line (step 1-4)

BELL PEPPER COOKIES
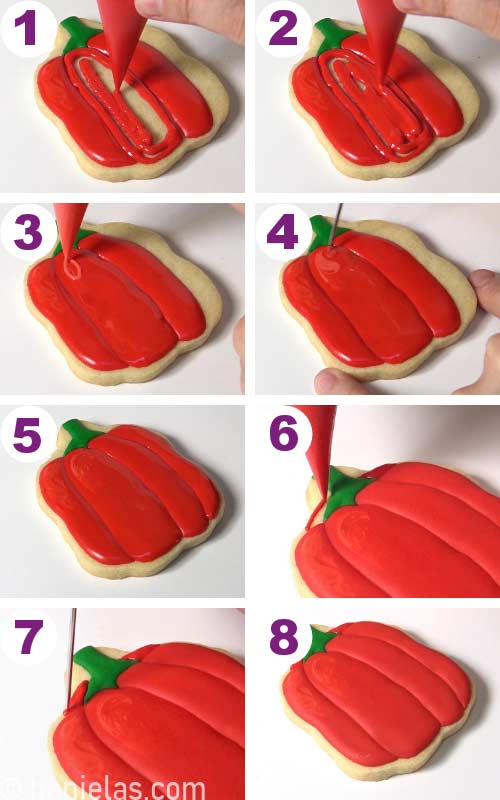
Draw the segments and a stem with an edible marker. Outline and flood the stem with green icing (20 second consistency). Shape with a needle tool. Allow to crust, (1-6)

Outline and flood every other segment with red icing (15 second consistency). Then pipe light red onto the wet dark red icing. Marble it to create shading. Allow to crust.

Outline and flood remaining segments. Allow to crust again, (step 1-5). Then flood small sections on the sides of the green stem with red icing (20 second consistency). Use a needle tool to shape the icing, (step 6-7). Allow to crust, (step 8).
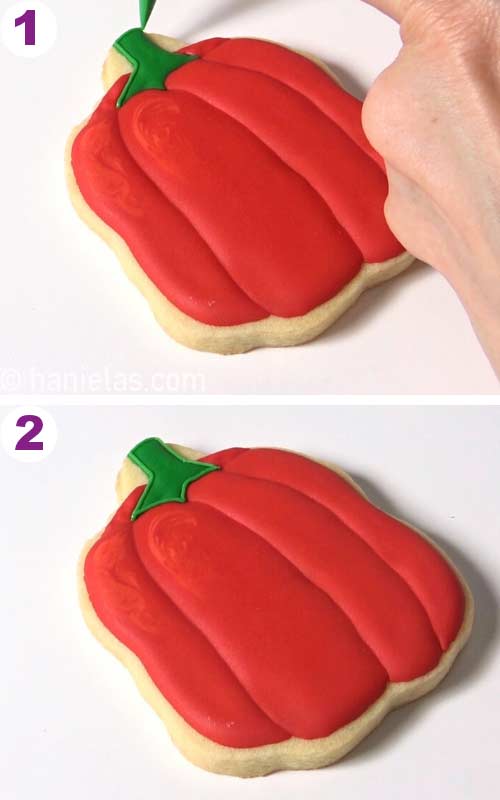
Outline the stem with green icing, piping consistency, (step 1-2).
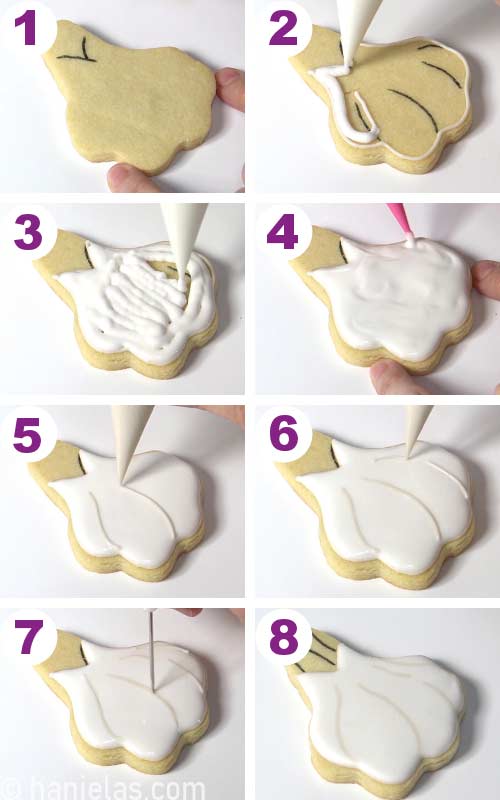
GARLIC COOKIES
When you turn this cutter upside down you can also use it make a small brocoli.
Draw the outlines onto a cookie with and edible marker, (step 1). Outline and flood with white icing ( 15-20 second consistency). Smooth the icing with a needle tool, (step 2-4). Then use light mushroom colored icing and pipe curved lines onto wet white icing. Lines will sink into the white base, (step 5-6). Lastly, carefully run a tip of a needle tool thru mushroom lines as to accentuate the ends. Allow to crust, (step 7-8).
TIP : To make mushroom color I colored white icing with a minuscule amount of black to get very light gray. Then I added a minuscule amount of brown. Stir well. To make color lighter add more white icing to it.
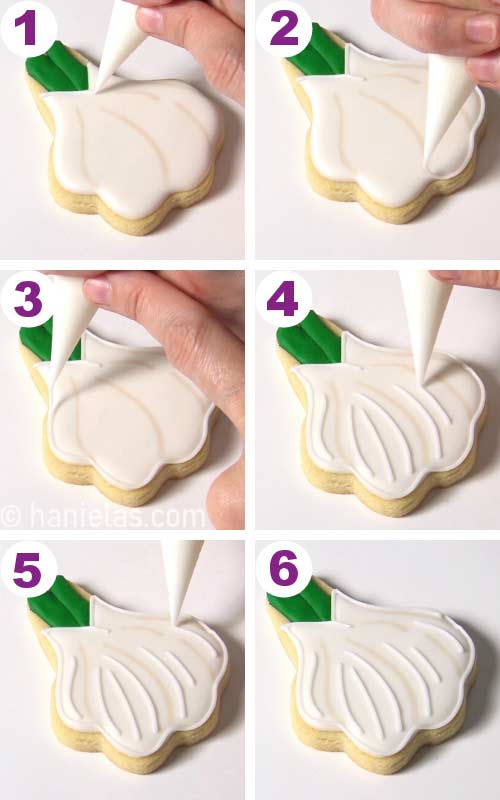
Divide top stem section with an edible marker (step 1). Outline and flood one section with dark green (20 second consistency). Shape icing while wet. Allow to crust, (step 2 -6). Then flood the second stem, (step 7-8).

Outline cookie with white icing piping consistency, (step 1 -6).
I had so much fun making these decorated vegetable cookies.

TO MAKE DECORATED VEGETABLE COOKIES YOU NEED
- RECIPES
- Cut Out Sugar Cookies
- Royal Icing
- RELATED TUTORIALS
- Decorated Vegetable Cookies step by step video with narration
- Royal Icing Consistencies
- TOOLS
- Decorated Vegetable Cookies Templates
- Find all the tools in my Amazon Shop
- Food Gel Colors
- Piping Bags
- 2-in-1 Decorating Tool (boo-boo stick, these come in 2 sizes)
- Scribe Needle Tool
- Edible Marker – I used black (Bakerpan Brand) and brown (FooDoodlers)
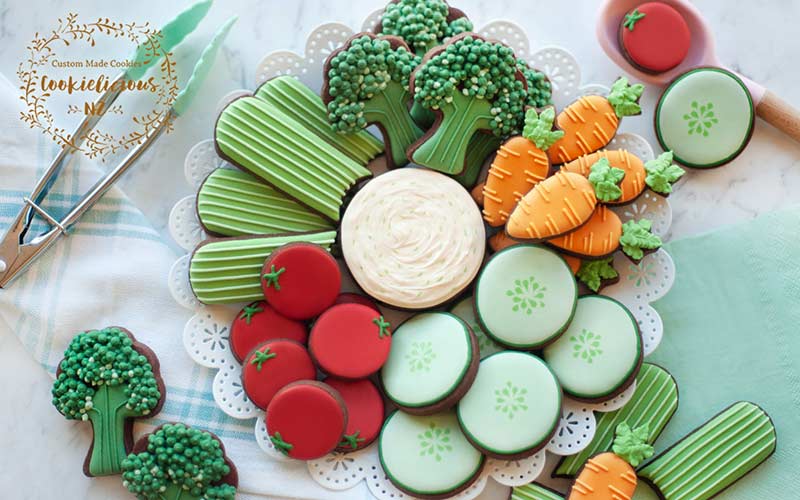
COLLABORATION WITH COOKIELICIOUS
Today I’m collaborating with Natalia from Cookielicious. We both made decorated vegetable cookies. Natalia made mini and super cute Vegetable Cookie Platter for our collaboration. And you can check out more adorable cookies on her YouTube Channel.
MORE DECORATED COOKIE IDEAS :
- Tomato Cookies
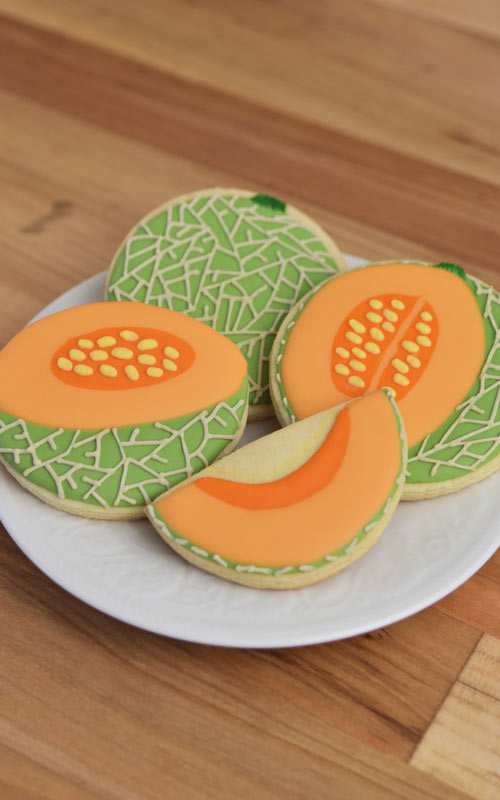
- Cantaloupe Cookies
- Summer Flower Cookies
- Sushi Cookies
- Citrus Slice Cookies
- Decorated S’more Cookies
- Hamburger Cookies
- Shrimp Pasta Salad Cookies

This post contains Amazon affiliate links that earn me a small commission, at no cost to you. I only recommend products that I use and love. Learn more about my affiliate policy here.

Hi, I’m Hani
Welcome!
Thank you for visiting Haniela’s. On my blog, you’ll find delicious sweet & savory recipes made with simple ingredients. Why not start a new adventure? Discover a world of cookie decorating with my step-by-step tutorials.

Hi, I’m Hani
Welcome!
Thank you for visiting Haniela’s. On my blog, you’ll find delicious sweet & savory recipes made with simple ingredients. Why not start a new adventure? Discover a world of cookie decorating with my step-by-step tutorials.