How to Make Homemade Pumpkin Puree
Every fall, I fall in love with making homemade pumpkin purée. If you’ve never tried making homemade pumpkin purée, you’re seriously missing out. It has a richer flavor, natural sweetness, and unsurpassed taste compared to store-bought versions.

BEST PUMPKINS FOR PUREE
Don’t be tempted to use decorative pumpkins like Howden Biggie or Connecticut Field pumpkins for pumpkin purée. While they may look beautiful, they tend to be watery, stringy, and flavorless.
For the tasty homemade pumpkin purée, use sugar pie pumpkins, often labeled as pie pumpkins or sugar pumpkins. These pumpkins are naturally sweeter and have a smooth, dense texture that works wonderfully for cooking and baking. They’re usually small, round, medium to dark orange, and feel heavy for their size. Compared to large carving pumpkins (jack-o-lanterns), sugar pumpkins are less fibrous and produce a richer, smoother purée.
If you can’t find sugar pumpkins, don’t worry, there are other excellent eating varieties you can use. I picked up a beautiful Muscat pumpkin at a local market, and it worked wonderfully.

ROASTING VERSUS STEAMING
Our last house had a pumpkin farm right across the street, and every fall I’d head over to pick up pumpkins for homemade pumpkin purée. I used it in everything from pound cakes and cheesecakes to smoothies and soups.
The best part? You only need one ingredient: an eating pumpkin. No oil, no seasoning, and usually no salt. I like to keep the flavor pure and unadulterated, so the natural sweetness and earthy pumpkin flavor really shine through.
Why I Always Roast Pumpkin for Purée – While you can steam pumpkin, I strongly prefer roasting it. Roasting brings out a deeper, more concentrated flavor with subtle caramelized notes that steaming simply can’t achieve. It also helps excess moisture evaporate, resulting in a thicker, richer purée. Steaming, on the other hand, can add extra water and produce a milder flavor. Baking is incredibly simple and, in my opinion, gives homemade pumpkin purée a far superior taste and texture. This method isn’t limited to pumpkins, either. You can easily use butternut squash or acorn squash instead. I once made an acorn squash cake with homemade purée, and it was absolutely delicious.
ROAST PUMPKIN
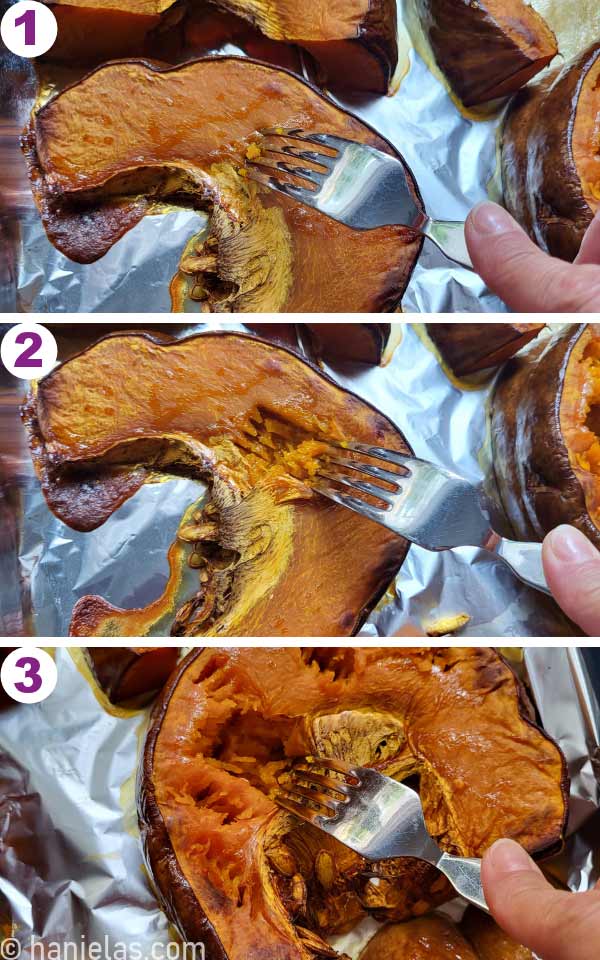
Process is simple: wash, slice, bake. First, I wash the pumpkin, and I slice it into thick, more manageable pieces (step 1). You can line the baking sheet with parchment for an easy cleanup. Bake the pumpkin at 400°F (200°C) until the flesh is very soft, not just fork-tender (step 2).

Keep baking the pumpkin until you can easily, with much effort, tear the flesh with the fork (steps 1-3). It takes about an hour.
DISCARD SEEDS AND SKIN
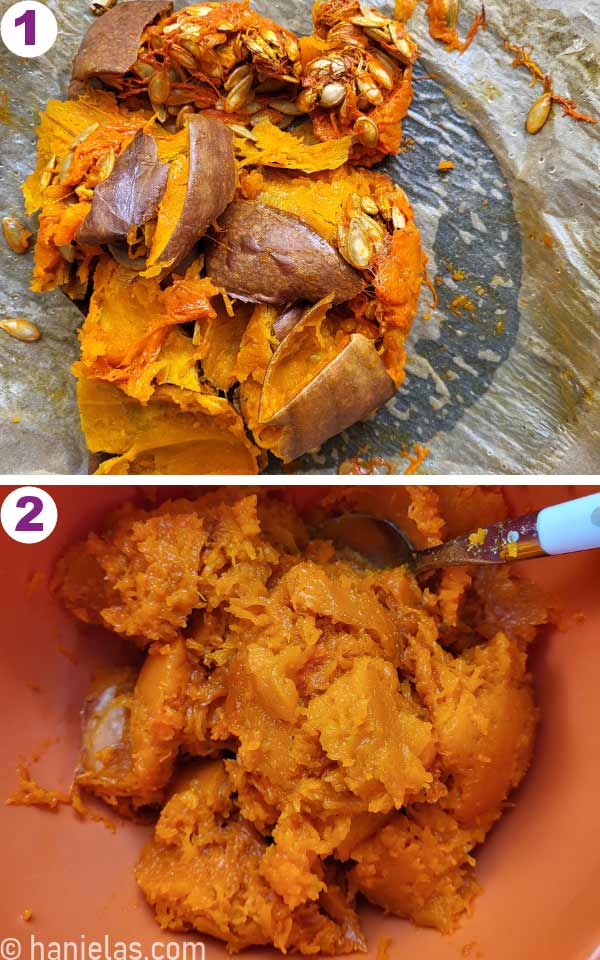
With a spoon, discard the seeds. Remove pumpkin flesh from the skin (image 1). Place pumpkin flesh into a bowl (image 2).
PUREE PUMPKIN FLESH
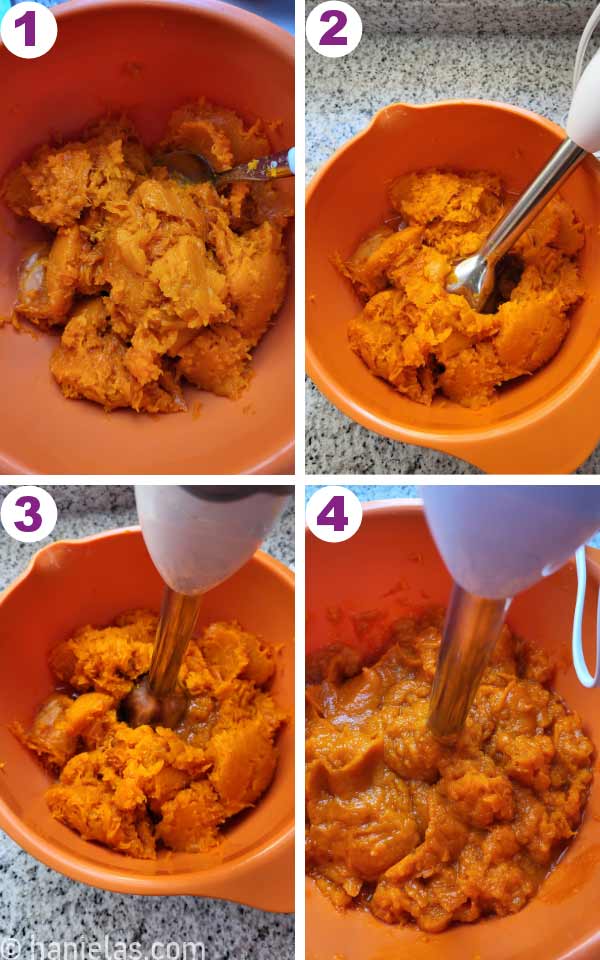
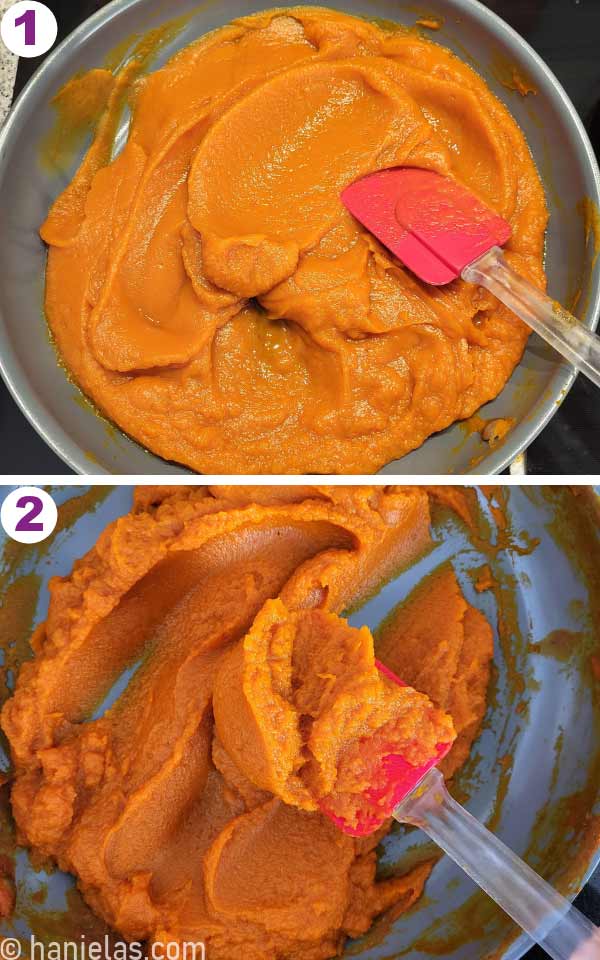
An immersion blender works great for pureeing soft pumpkin flesh into a smooth, delicious puree (steps 1-4). When working with larger quantities, you can bring in the boss – the food processor and blend away until smooth.
DIFFERENT PUMPKINS, DIFFERENT PUREES
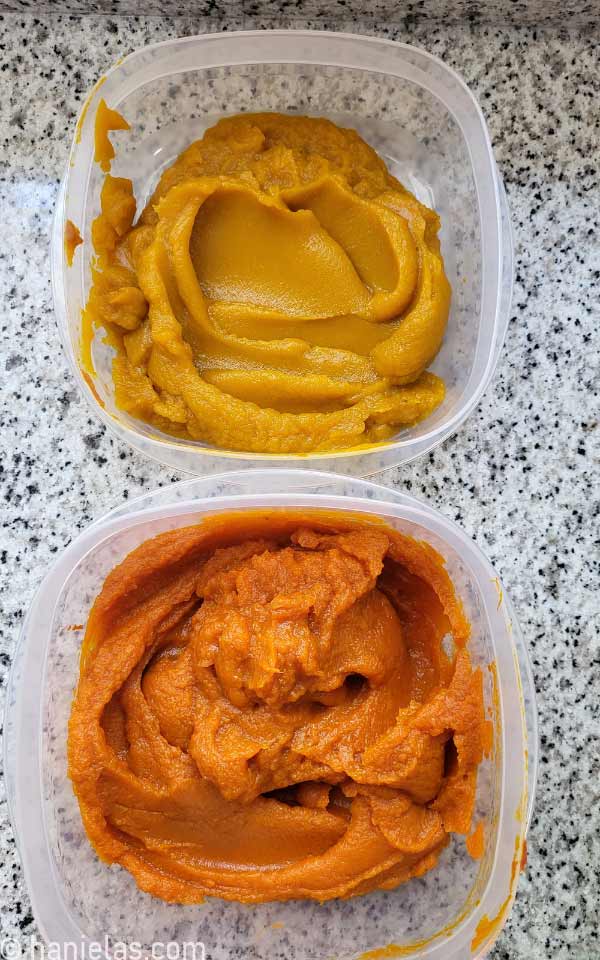
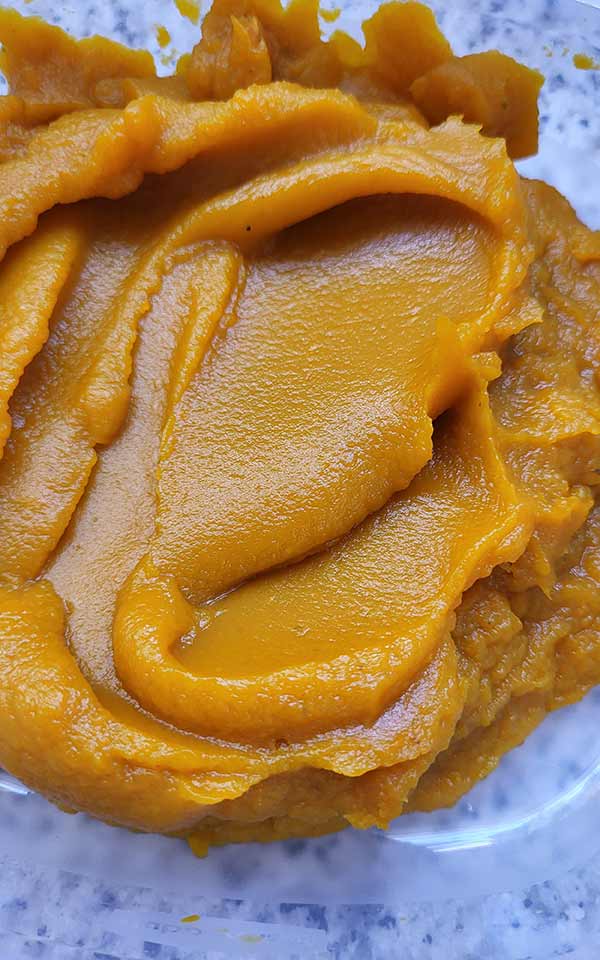
Remember, no two pumpkin varieties are the same. Two pumpkin varieties will produce two different pumpkin purees. You can see in the image below that the top puree is mustard-colored, and the bottom is deep orange. Each variety will also vary in taste, sweetness, and consistency; some are more watery than others. The bottom, the deep orange puree, was super sweet, and the top one was mildly sweet with a lovely earthy flavor.
HOW TO THICKEN WATERY PUMPKIN PUREE
If your fresh pumpkin purée turns out too watery, don’t worry, it’s an easy fix. Simply pour it into a wide skillet and bring it to a gentle simmer. Cook it down, stirring frequently to prevent it from scorching, until the excess moisture evaporates and the purée thickens to your desired consistency. Alternatively, you can spread the purée on a rimmed baking sheet and bake it at 300°F (150°C). Stir every 10–15 minutes until it reduces and thickens.
FAQ AND HOW TO USE PUMPKIN PUREE
Fresh pumpkin puree will last for up to a week in the fridge. Store it in an airtight container.
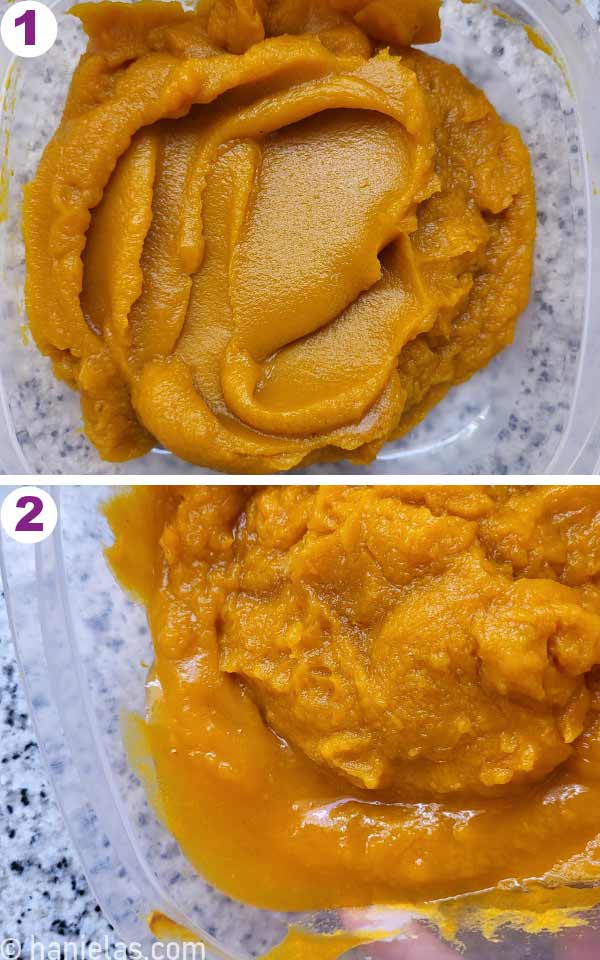
Yes, you can freeze the puree in Ziploc bags or freezer-safe containers for up to 6 months (step 1). Freeze Ziploc bags filled with puree flat on a tray, and then once frozen, you can easily stack them.
However, the frozen puree will contain about 9% more water after thawing (step 2). This is normal due to the water expansion when frozen. If the puree is too watery, follow the steps to remove excess water.
Make a pasta sauce.
Pumpkin pancakes are divine – recipe is on my YouTube channel
Use it as ravioli filling – combine it with cheese and herbs for tasty pasta filling.
Make pumpkin spaetzle (flour dumplings)
Have you tried it in the soup?
Cheesecake is always a good idea.
Mash it into mashed potatoes.
Everyone’s favorite – Pumpkin bread

TRY THESE PUMPKIN RECIPES
- Pumpkin Spice Cut-Out Cookies with Maple Frosting
- Delicious Pumpkin Pie Brownies via The Cookie Rookie
- Pumpkin Chocolate Chip Cookies
- Pumpkin Spice Sponge Cake
Homemade Pumpkin Puree
Equipment
- 1 Immersion Blender or Food Processor
Ingredients
HOMEMADE PUMPKIN PUREE
- 1 fresh pumpkin, 4-6 pounds (1.8kg -2.7kg)
- 1 tsp salt (optional)
Instructions
HOMEMADE PUMPKIN PUREE
- Preheat oven to 400F
- Rinse the pumpkin. Cut in half and slice it into thick pieces.Line a baking sheet with parchment.Arrange pumpkin pieces on a baking sheet in one layer. Sprinkle with salt if using.
Bake
- Bake pumpkin for about an hour; or until the flesh is very soft. Not just fork tender. The flesh should easily tear when you use a fork.Remove baked soft pumpkin from the oven, and allow to cool for a couple of hours.
Remove Flesh
- Use a spoon to remove the seeds.Into a mixing bowl spoon all the soft pumpkin flesh. Discard the skin.
Puree
- Puree pumpkin flesh with an immersion blender or use a food processor, pulse until smooth.
Cooking Down Water Puree
- If the puree is too watery, pour it into a wide skillet and cook it down to evaporate the excess water and make it thicker.
Notes

Hi, I’m Hani
Welcome!
Thank you for visiting Haniela’s. On my blog, you’ll find delicious sweet & savory recipes made with simple ingredients. Why not start a new adventure? Discover a world of cookie decorating with my step-by-step tutorials.

Hi, I’m Hani
Welcome!
Thank you for visiting Haniela’s. On my blog, you’ll find delicious sweet & savory recipes made with simple ingredients. Why not start a new adventure? Discover a world of cookie decorating with my step-by-step tutorials.


Hi Hani. In Australia we regularly get bright orange Kent , or butternut pumpkins which are pale. Love making pumpkin pies and individual tarts but find them way too watery. By heating the puree will it make it too dark and lose that vibrant colour? Thanks for your great cookie and cake tutorials. 👏🏼👏🏾😍🧡
Hi Ruby,
Thank you for sharing Ruby.
You can also try letting it strain thru a cheesecloth or a fine mesh sieve. I would let it sit overnight and see if it helps resolving the water issue.
I haven’t noticed any dramatic color change when cooking the puree down to evaporate water.
This brings back fond memories of my mother making pumpkin pies. She refused to use canned pumpkin! My mother used neck pumpkins. The taste really is better than canned. I hope to find sugar pumpkins this fall.
Hi June,
I think our grandmothers were alike. Mine, refused to ever use store-bought pasta. There are so many varieties that can be use to make the puree. If you can’t find any
sugar pumpkins you can use any eating pumpkin. Have a great rest of the summer, June.♥