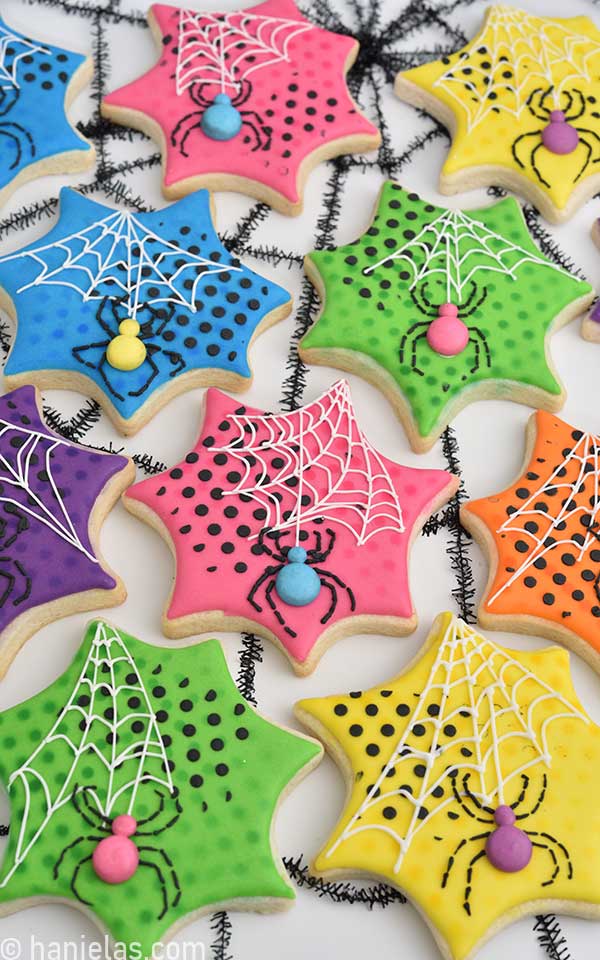
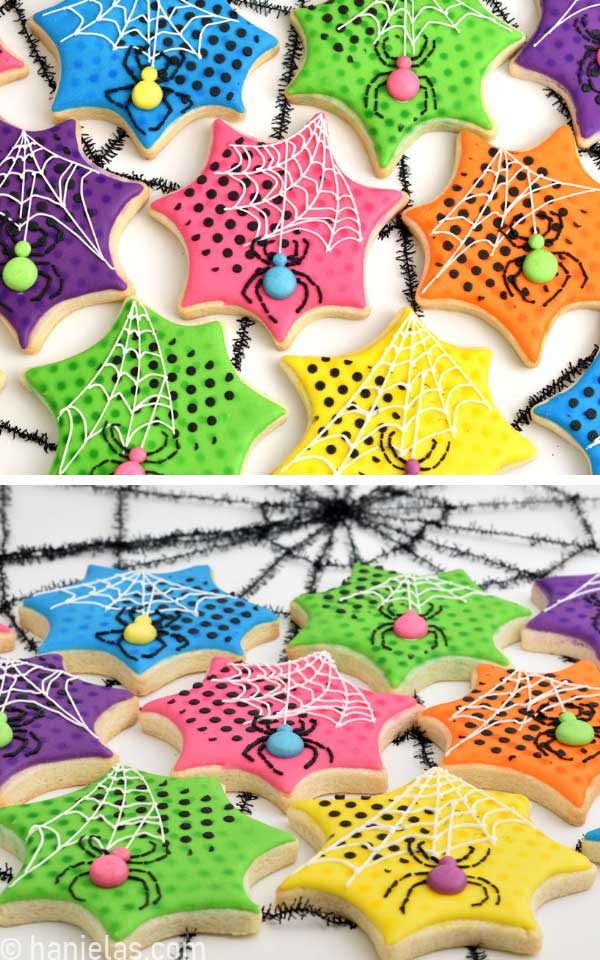
Pop Art Spider Cookies
Today I’m going show you how to make colorful Pop Art Spider Cookies for Halloween. This design is inspired by renowned pop art artist Andy Warhol.
HOW TO DECORATE POP ART SPIDER COOKIES FOR HALLOWEEN
Pop art inspiration just keeps on giving. These fun, colorful designs are so inspiring. I’ve already created several desserts in the past like my Pug Cake or Saint Patrick’s Day Cupcakes and Cookies. And I’m sure you are going to love today’s project, too.
For today’s project I used Sugar Cookies and Royal Icing to decorate.
I was really excited to work on this colorful Halloween project. It’s different from my usual decorating style and I really enjoyed working with an airbrush and layered with royal icing. But let’s not forget all those bright colored spiders, too! They are a nice change from all the black royal icing spiders I’ve been making for Halloween.
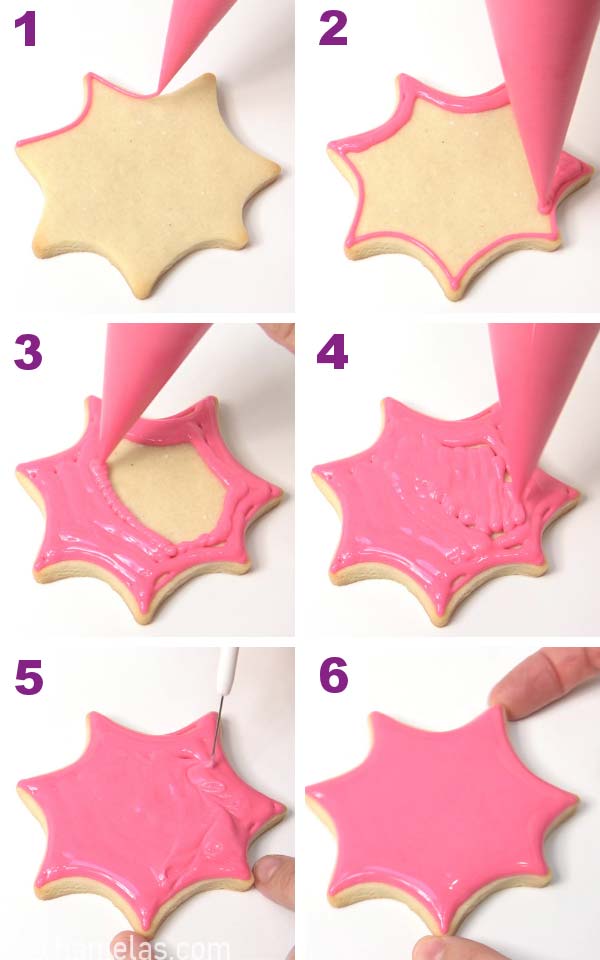
FLOOD COOKIES WITH ROYAL ICING
Use bright gel colors to color royal icing. Electric food gel colors are a great option. As for the cookie cutter I used a spider web cookie cutter. If you don’t have one you can use a round cutter and trim the sides to create original spider web cookie shapes.
Outline and flood the cookies with 15 second consistency icing of different colors. Allow icing to dry overnight, (steps 1-6).
TIP : What is 15 second consistency royal icing? It’s a consistency of icing that has been thinned down with water. When you run a spatula thru icing, separation line disappears in about 15 seconds.
GUIDE TO ROYAL ICING CONSISTENCY
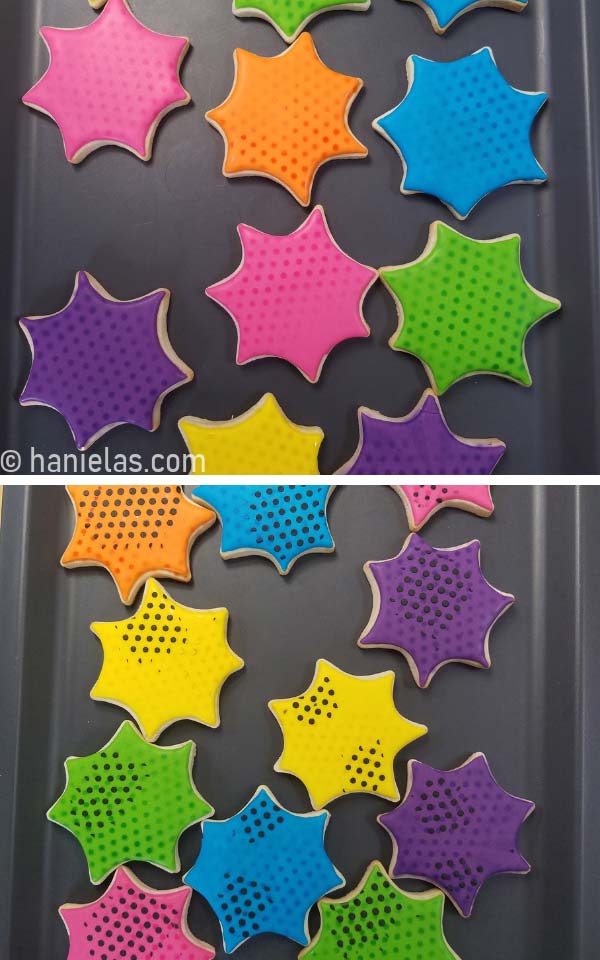
POP ART BACKGROUND
To create the popular pop art background I utilized a mini polka dot stencil. There are special pop art stencils available online but I didn’t have one so I used the former instead.
I layered pop art background design on the cookies using 2 decorating techniques. First, I airbrushed polka dot pattern onto the cookies using the matching airbrush color to the royal icing color used. And then I stenciled over it with a black royal icing for more depth.
AIRBRUSH WITH A STENCIL
To airbrush I tried to use matching colors. For example, airbrush pink cookies with pink color, orange with orange airbrush color, etc. (step 1).
Secure micro polka dot stencil into a stencil holder. Place stencil holder over the iced cookie. Then airbrush. You can experiment little with the airbrushing. Airbrush the whole surface of the cookie or just a small section. Get creative, (steps 3-8). Allow to dry for 10 minutes.

ROYAL ICING STENCILING
Wash the stencil after airbrushing. Pat it dry between 2 paper towels.
Pipe black icing of piping consistency or thicker on a spreader, (step 1). Spread icing over a stencil, stenciling just a section of the cookie. If there is any excess icing on the side of the cookie use a 2-in-1 cookie decorating tool to scrape the icing off. Allow icing to dry for an hour. (steps 2-8)
TIP : If possible color black icing ahead of time. I helps letting icing rest to achieve deep color without the use of excessive amount of food coloring.

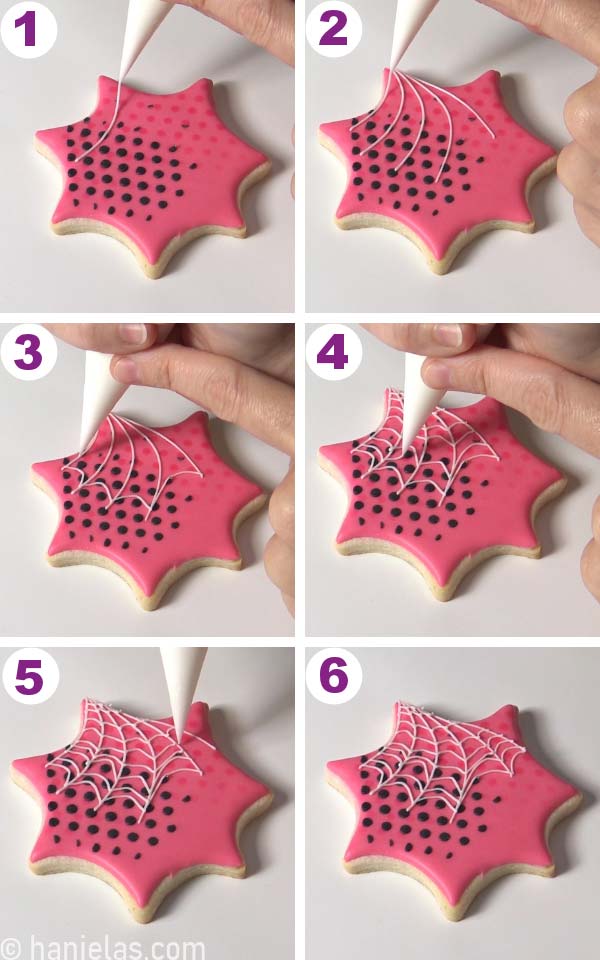
HOW TO PIPE SPIDER WEB WITH ROYAL ICING
To pipe spider webs use white icing, piping consistency, (steps 1-6).
TIP : It’s helpful to look at spider web drawings online. Find clipart and pictures to get an idea what shapes of cob webs you can create with royal icing. Don’t aim for perfection, spider webs can be broken, they can have lines missing. It adds more character to the overall design.
ROYAL ICING SPIDERS
Decorating cookies with royal icing spiders is a 2 step process :
- Prepare spider bodies as royal icing transfers – these can be made ahead of time.
- Then when the time comes to decorated cookie you can attach spider body decoration and pipe the spider legs.
Place a template on a flat surface such as cardboard, tray or a baking sheet works well, too. Layer a piece of wax paper/parchment paper over your template. Secure it with a tape.
TIP : Today I used a simple linear template (1/2 inch/1.3cm spacing for large dots and about 3/16 inch/0.5cm spacing for smaller dots). If you prefer a circle template you can print it from my Halloween Spider Gingerbread House tutorial.
To make the spider bodies I also utilized a simple method created by Corianne’s Custom Cookies that helps prevent cratering in royal icing (often called royal icing cratering, cave-ins).
Start piping with 25 second consistency pink, green, blue, yellow icing and pipe small dots in the middle. Let these crust for 10 minutes, (steps 1-2). Then with the same colored icing pipe large dots over the small crusted dots. Bottom crusted dot acts like a support beam, not letting the top layer of icing sink in the middle, (steps 3-4). Use a scribe tool to smooth the icing,(step 5). Then allow to crust well, for an hour or so, (step 6).
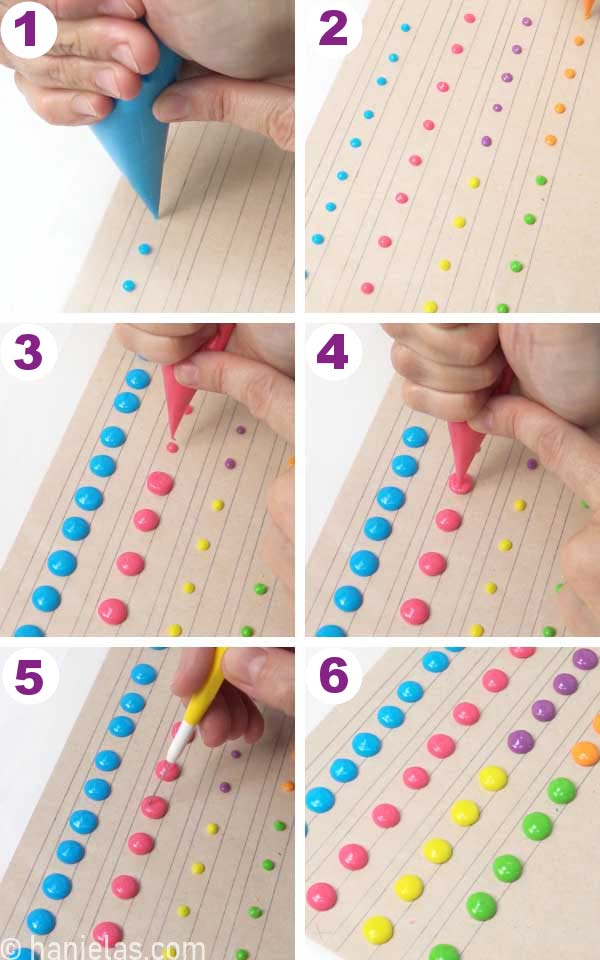
Now you can finish off spider bodies with piping a smaller dots on the edge of a larger dots, (steps 1-5). Allow icing to dry overnight.

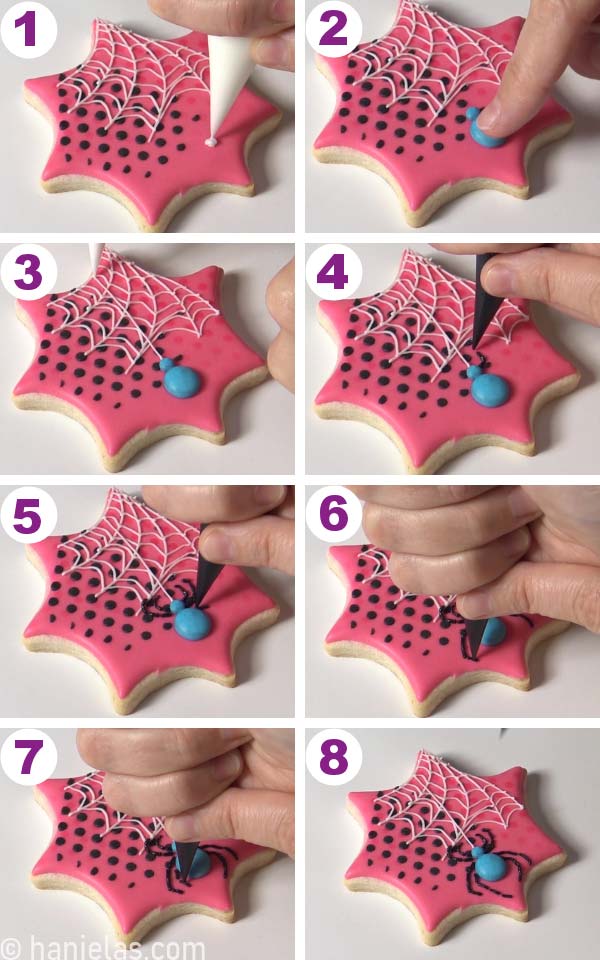
SHADING WITH PETAL DUST
Next, I decided to shade sides of dry spider bodies (step 1) with dark petal dust. I used Roxy & Rich Gray Petal Dust or you can also use brown, (steps 2-3). To apply dry petal dust onto the dry royal icing spider bodies I used a medium detail paint brush from Borderlands Bakery, (step 4).
Dip tip of the brush in a petal dust, gently shake off excess. Brush the edges to shade icing, (steps 5-8).
TIP : If you don’t have a petal dust you can use a brown edible marker instead. Paint the bottom edge of the spider bodies. Then dampen a food only paint brush and blend the brown a bit. Don’t saturate brush with water too much, use a very lightly damp brush.

Gently remove dry spider bodies from the wax paper, (steps 1-2).

ATTACH SPIDERS ONTO COOKIES
Before you finish creating spiders you can practice piping spider’s legs onto a wax paper.

Pipe a small dot of icing onto a cookie. Glue the spider body onto a cookie, (steps 1-3). Pipe black legs with a piping consistency royal icing. I decided to pipe legs in segments.
Continue adding details onto Pop Art Spider Cookies till you are done with all the white spider webs and royal icing spiders.

Have you used any of my tutorials or recipes? I’d love to see your pictures. Share your pictures with me on Instagram, tag me on instagram using #hanielas
TO MAKE POP ART SPIDER COOKIES YOU NEED
- RECIPES
- Sugar Cookies,
- Fresh Lemon Royal Icing
- TOOLS
- Find all the supplies you need for Pop Art Spider Cookies in my Amazon Shop
- Linear Template : Today I used a simple linear template – 1/2 inch/1.3cm spacing for large dots and about 3/16 inch/0.5cm spacing for smaller dots.
- Circle Spider Body Template
- Scribe Needle Tool
- Paint Brush
- Gray Petal Dust
- Piping Bags
- Spider Web Cookie Cutter
- Food Gel Colors
- Micro Polka Dot Stencil
- Airbrush
- Airbrush Colors
- Stencil Holder
- Small Icing Spreader or a Small Spatula
- STEP BY STEP VIDEO TUTORIAL on Haniela’s YouTube Channel
MORE HALLOWEEN DESSERT IDEAS
- Monster Eye Surprise Cake
- Candy Corn Marshmallows
- Poison Apple Pinata Cookies
- Witch Finger Cookies
- Hocus Pocus Gingerbread House
- Ghost Haunted Gingerbread House
This post contains Amazon affiliate links that earn me a small commission, at no cost to you. I only recommend products that I use and love. Learn more about my affiliate policy here.

Hi, I’m Hani
Welcome!
Thank you for visiting Haniela’s. On my blog, you’ll find delicious sweet & savory recipes made with simple ingredients. Why not start a new adventure? Discover a world of cookie decorating with my step-by-step tutorials.

Hi, I’m Hani
Welcome!
Thank you for visiting Haniela’s. On my blog, you’ll find delicious sweet & savory recipes made with simple ingredients. Why not start a new adventure? Discover a world of cookie decorating with my step-by-step tutorials.


Love the use of bright colors! These are so different which is what I like about them!
Thank you so much June. I also love the bright colors!