
Construction Gingerbread Dough | A Complete Guide to Gingerbread Houses
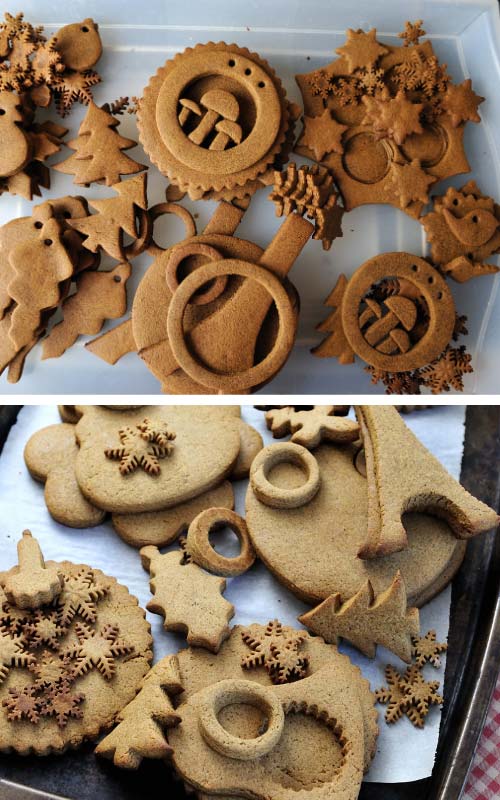
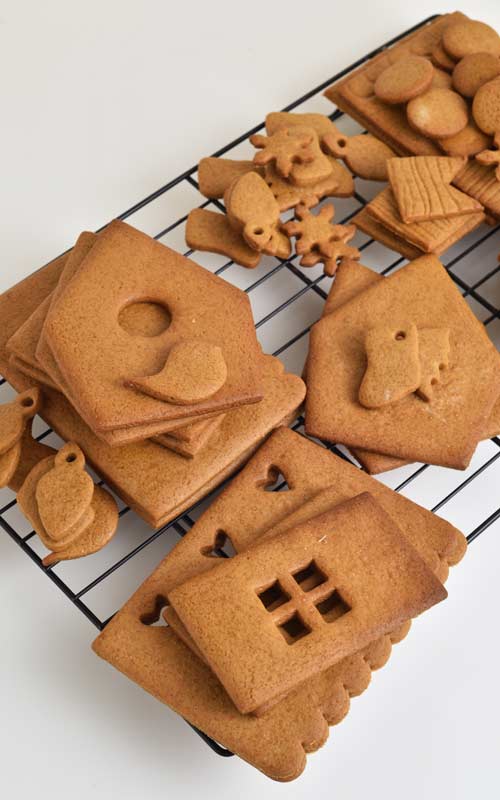
This Construction Gingerbread Cookie Dough is perfect for making sturdy gingerbread cookies/panels for gingerbread houses and long-term display gingerbread decorations. Use this recipe to make all your 3D houses and molded pieces.

WHY I USE THIS CONSTRUCTION GINGERBREAD
- What makes construction gingerbread different?
- Construction gingerbread has a higher flour-to-fat ratio that creates a sturdier dough.
- Dough with less /butter/shortening/margarine is also less likely to spread. This recipe uses a ratio of about 1:4 (fat: flour).
- Don’t expect tender cookies; this dough produces edible but hard cookies. For tender and super tasty cookies, use my gingerbread cut-out cookie recipe
- Sturdy gingerbread: This recipe gives you sturdy, stable, precision gingerbread pieces that are easy to build with and suitable for long-term display.
- Molded gingerbread designs: Use a silicone mold to shape the dough and bake it into beautiful swirls, florals, skulls, wood grain texture, and more.
- Holiday displays: I make lots of festive gingerbread centerpieces, and I use this recipe to make centerpieces to display at our house and as gifts for friends and family.
- Wonderful festive aroma: Besides being super structurally stable, it also exudes an exuberant scent that transports me to the holiday season, any time of the year.
- Molasses, Corn Syrup, Honey – I use all three interchangeably, but corn syrup and molasses aren’t always available everywhere, so you can also use honey.
- Molasses – adds a beautiful color and aroma. It can make the cookie a bit more brittle after cooling.
- Corn Syrup – you can use light or dark corn syrup. It keeps the dough more pliable after baking, making it easier to re-cut the shapes or cut them after baking while hot.
- Honey – I love using honey for its color profile, and I always have it on hand. Use honey with a viscosity similar to molasses.
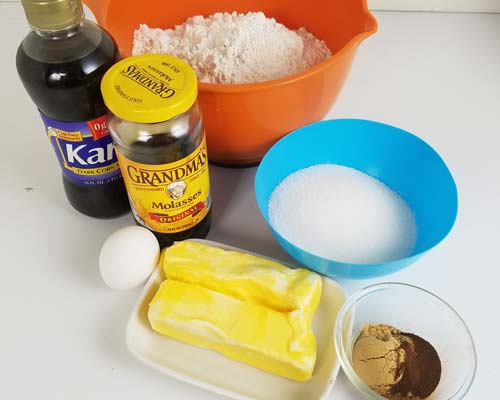
INGREDIENTS
This fragrant cookie dough has no leavening agents and doesn’t spread during baking. It’s especially important when making gingerbread houses or other complex structures that require precision.
- All-purpose flour or a combination of all-purpose and bread flour. Bread flour produces stronger dough. Let the dough rest after mixing to help relax the gluten.
- Ground Spices: cinnamon, ginger, cloves, pepper, ground chili flakes(optional)
- Sugar: white granulated sugar works best
- Molasses|Corn Syrup|Honey: you can use any one of these to make this gingerbread dough
- Large Egg
- Margarine or Vegetable Shortening: I don’t use butter as it’s expensive, and for gingerbread decoration that is not meant to be eaten, I prefer to use cheaper alternatives such as margarine or vegetable shortening
- Cocoa powder: optional; if you are in need of dark gingerbread, you can use 2-3 tablespoons per this recipe
FLOUR AND SPICES
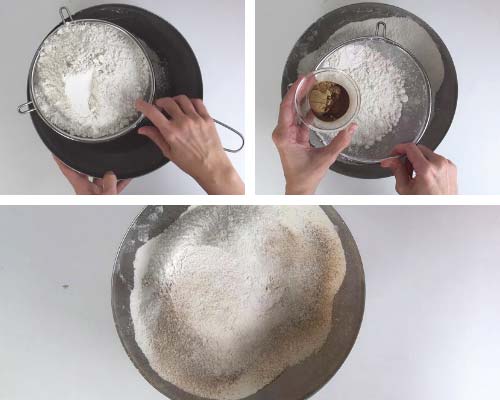
I love the lingering aroma of gingerbread during the holidays. Adding spices like cinnamon, ginger, cloves, and even a little white pepper makes the cookies wonderfully fragrant and fills the house with that cozy, festive feeling. Combine flour and spices before adding the dry ingredients to the butter mixture. This helps ensure even flavor and color distribution and prevents stray pockets of spices in the dough.
PREPARE COOKIE DOUGH
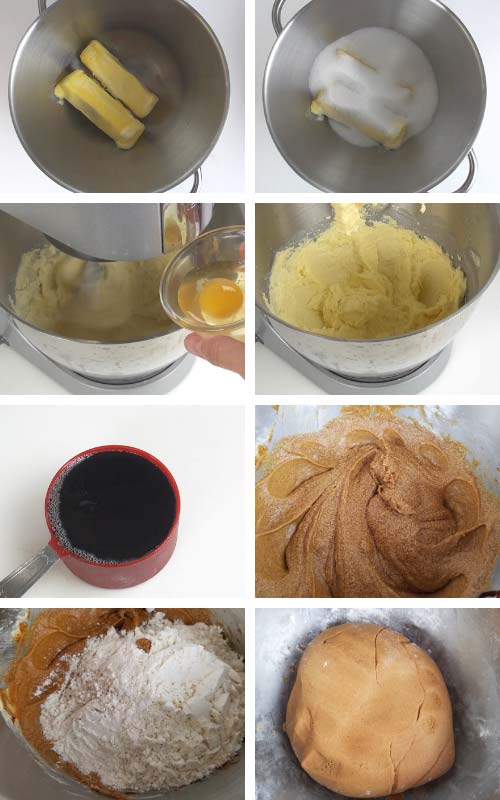
Start with room-temperature margarine and cream it with sugar on medium-high speed until creamy and fluffy, about 5 minutes. Then beat in the room-temperature egg for 30 seconds, scrape down the bowl, and continue beating until smooth, about 30 more seconds.
Lower the speed to medium-low and gradually pour in molasses, corn syrup, or honey. Pour it down the side, not on the beaters. Beat well until thoroughly combined with the butter mixture, about a minute.
Lastly, on low speed, gradually beat in the spiced flour mixture in 3 additions.
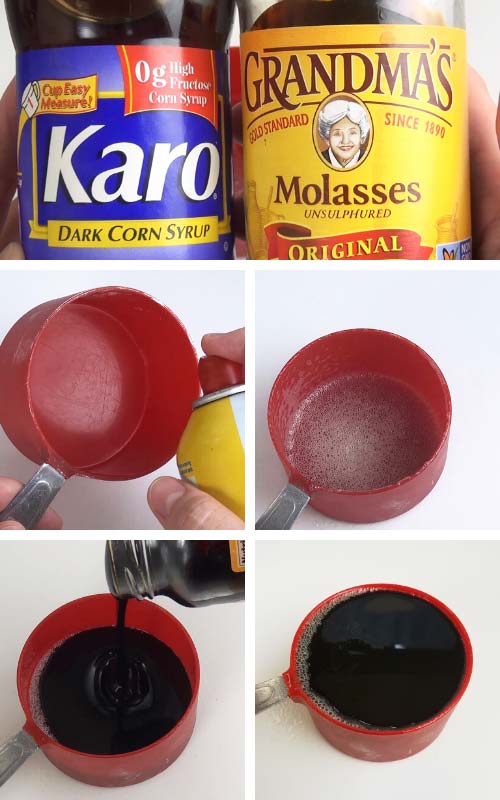
If you don’t own a kitchen scale, measuring sticky substances such as molasses or honey can be tricky.
You might be familiar with this kitchen hack, but it is worth mentioning in case you forgot: Spray a measuring cup with nonstick spray or lightly grease it with oil. Pour in the molasses to measure, and then pour it out slowly to beat with the butter. A lightly greasy surface helps release sticky molasses from the cup.
SHAPE THE DOUGH AND CHILL

Dump the fresh dough onto a lightly floured work surface and knead it by hand for about 30 seconds, until it comes together into a ball.
If it appears too sticky, sprinkle up to ¼ cup of flour over it and gently knead it in. Shape the dough into a disk.
If you’re making the full batch, you may want to divide the dough in half to make it easier to handle.
Chill the dough before cutting out shapes. Chilling solidifies the fat, hydrates the flour, and makes teh dough easier to work with.
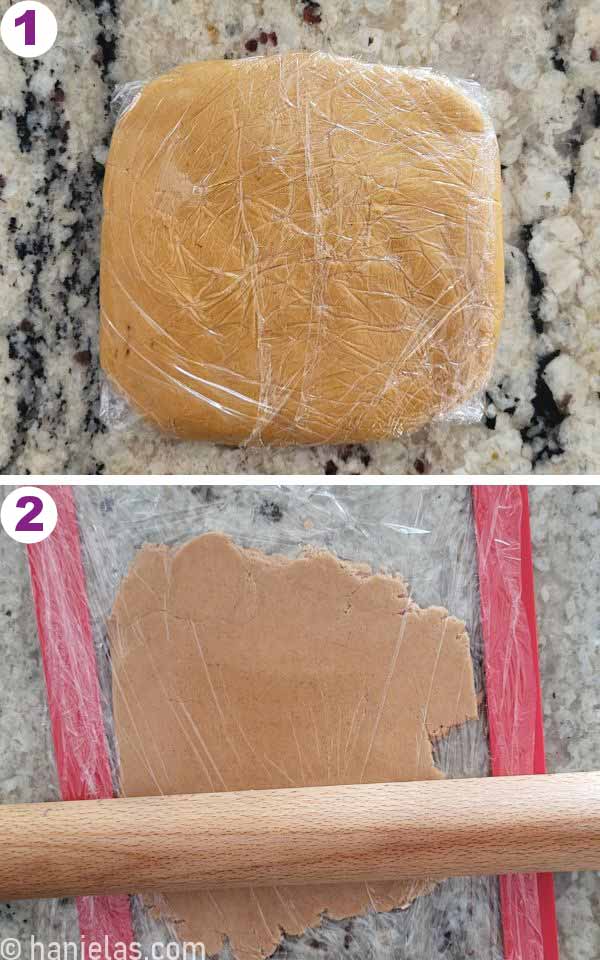
Ways to chill: You can roll the dough out immediately, cover it well, and let it rest for about 10 minutes to relax the gluten. Then chill the rolled dough, well covered, for 4-6 hours or up to overnight before cutting your shapes.
Alternatively, shape the dough into disks, wrap them well, and refrigerate until ready to use (up to 5 days).
Freeze: For longer storage, freeze the dough well wrapped, either as a disk or rolled out into sheets. Keep in mind that the dough gradually dries out with prolonged refrigeration, so for the best results, use refrigerated dough within a few days. For more tips, see my guide on how to freeze cookie dough.
HOW TO ROLL OUT COOKIE DOUGH
- Rolling guides: I use 1/4-inch (6mm) rolling guides to roll out dough for the house panels.
- For small structures or individual cut-out cookie shapes, I try to maximize dough yield and use 1/8-inch (3mm) guides. This highly depends on the project.
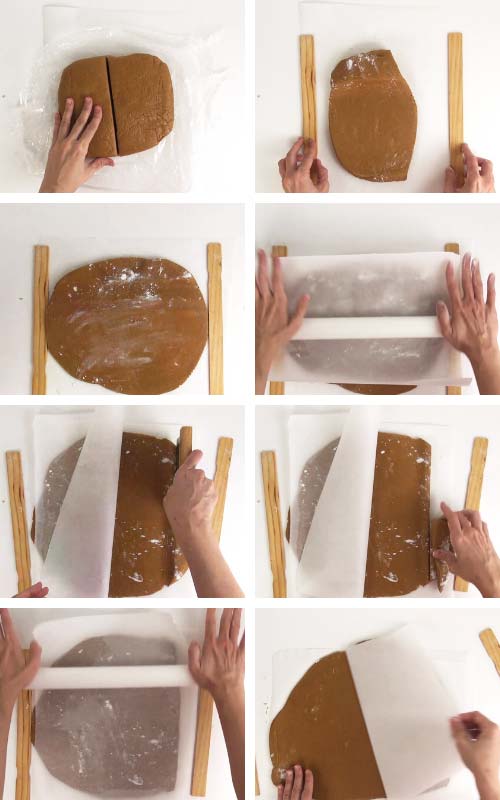
- Portion cookie dough: Depending on the size of the house you’re working on, you might want to cut the cookie dough disk in half and work with one half at a time.
- Easy dough-rolling: Roll the cookie dough between 2 sheets of parchment or silicone baking mats. Be sure to cut the parchment to fit the baking sheet you will be using.
- Prevent sticking: Lightly dust the surface with flour to prevent the cookie dough from sticking.
- Setting up rolling guides: Place a rolling guide on each side of the parchment sheet.
- Why I use a large rolling pin: I like to use a large rolling pin (20 inches long). This lets me roll out a long, wide piece of cookie dough at once. It also allows me to cut more house panels from a single piece of cookie dough.
PREPARE CUTTERS AND TEMPLATES
- Cutters and templates: To make gingerbread house panels, you need cookie cutters or templates.
- You can make templates from cardboard, paper, or cardstock.
- How to make cookie-cutter templates.
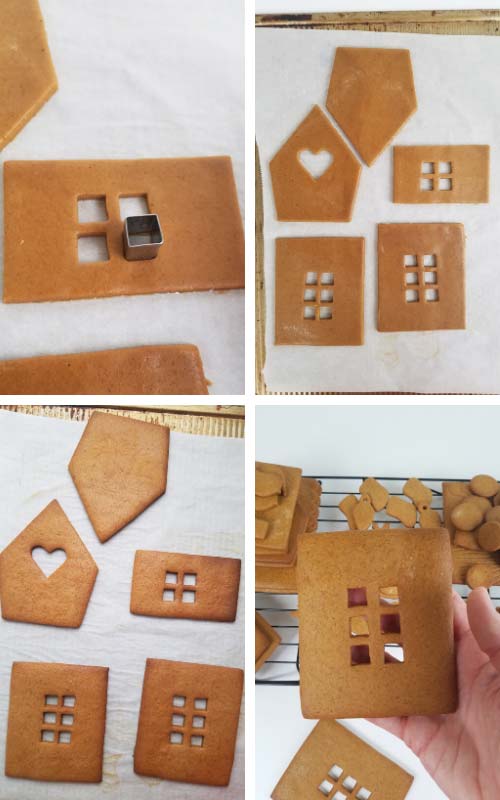
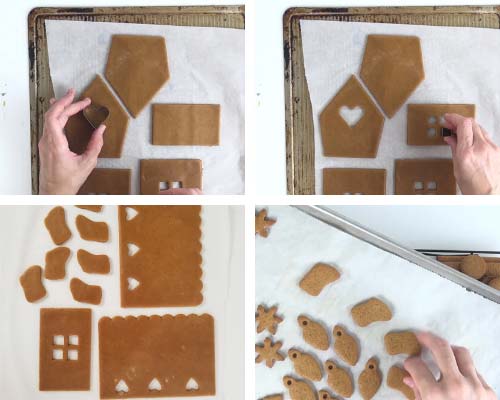
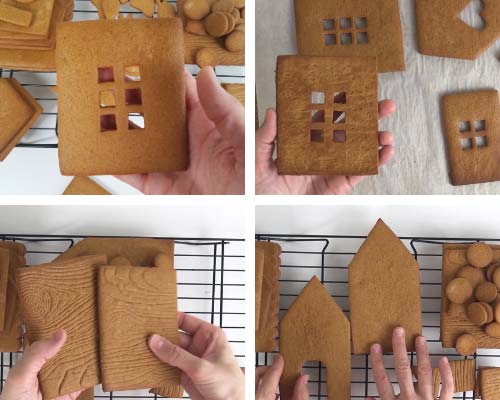
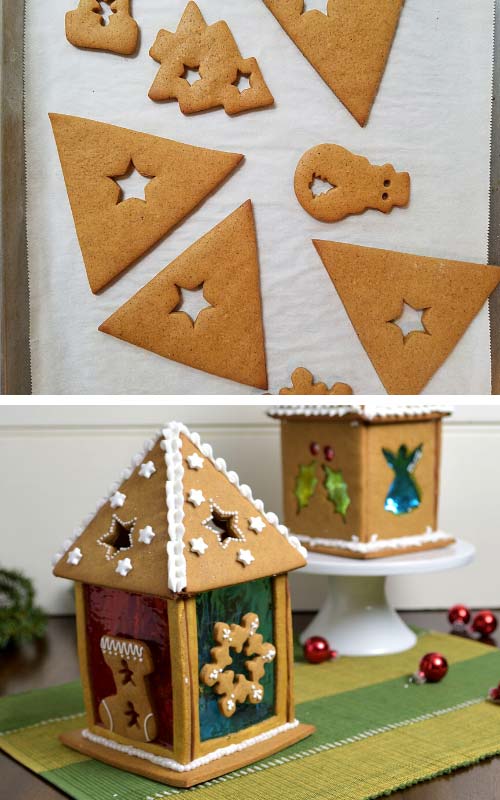
- Using small cutters for details: In addition to the house-shaped cutters/templates, small geometric cutters can be very useful. Use them to create windows or make extra cookies to decorate the outside of the house.
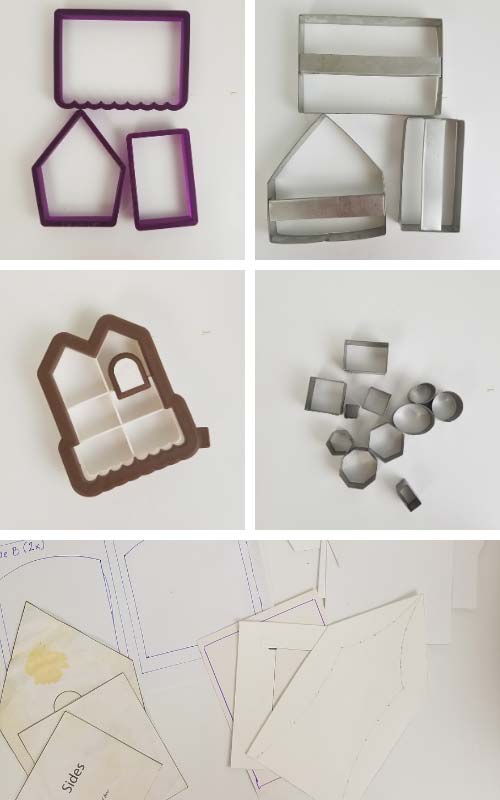
- Use a small square cutter to cut out window panes, doors, or other shapes as desired
- Get creative, use rounds, hearts, stars, and rectangles.
- It’s a gingerbread house; who says it can’t have star-shaped windows?
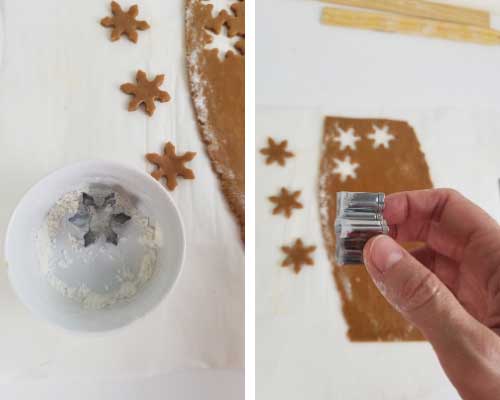
- For easier cutting, dust cutters with a little bit of flour.
PREPARING GINGERBREAD FOR BAKING
- Avoid stretching when transferring: To eliminate the ‘stretch’ and mishaping cookies when transferring onto a baking sheet, it’s best to cut the cookie shape, especially the large and more intricate ones, on the surface you’ll be using to bake them on and then just slide the parchment onto a baking sheet.
- Choose your baking Surface: Bake the gingerbread on parchment paper or a perforated baking mat. You can roll the dough directly on parchment and bake it on the same sheet, or carefully turn the rolled dough onto a perforated mat before cutting and baking.
- I don’t recommend rolling the dough directly on a perforated mat, as the dough can press into the holes and make it difficult to achieve clean, even shapes.
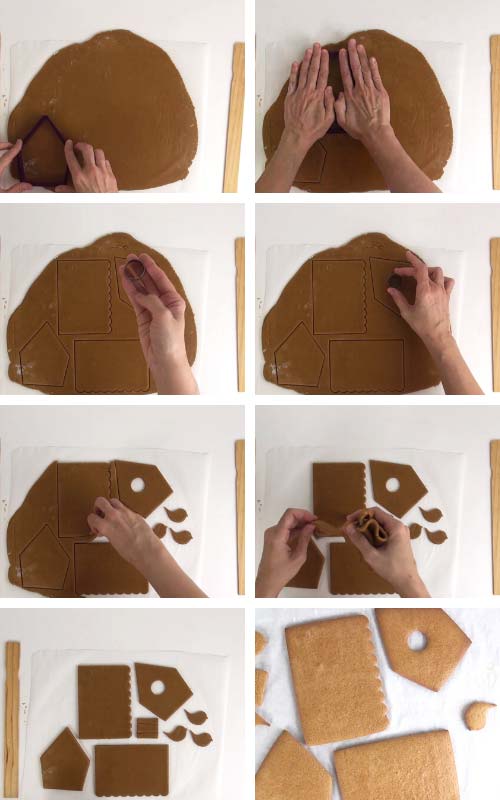
Remove the top sheet of parchment, leaving the dough on the bottom sheet. Use a pastry brush to gently remove excess flour from the dough’s surface.
Cut out the large house panels first: the front and back walls, side walls, and roof panels. Leave about ½ inch between the pieces to allow even baking and airflow.
Remove the excess dough around the cutouts, then slide the parchment directly onto a baking sheet.
Don’t move the large cutouts. Keeping them on the parchment prevents the dough from stretching or becoming misshapen during transfer.
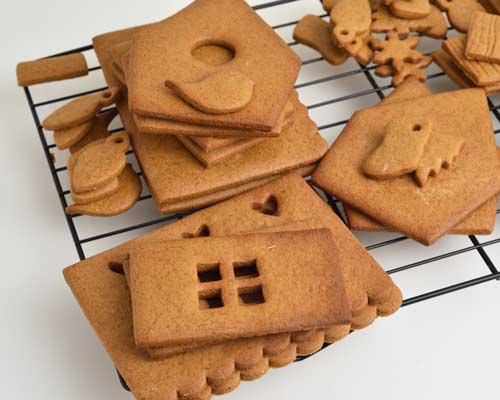
Let the baked cookies cool on the baking sheet completely before handling them.
Bake large pieces and small pieces on separate baking sheets.
Bench scraper for straight edges
Use a bench scraper or a small ruler to cut out house panels with long, straight edges. Dust the bench scraper’s edge with a little flour to prevent sticking.
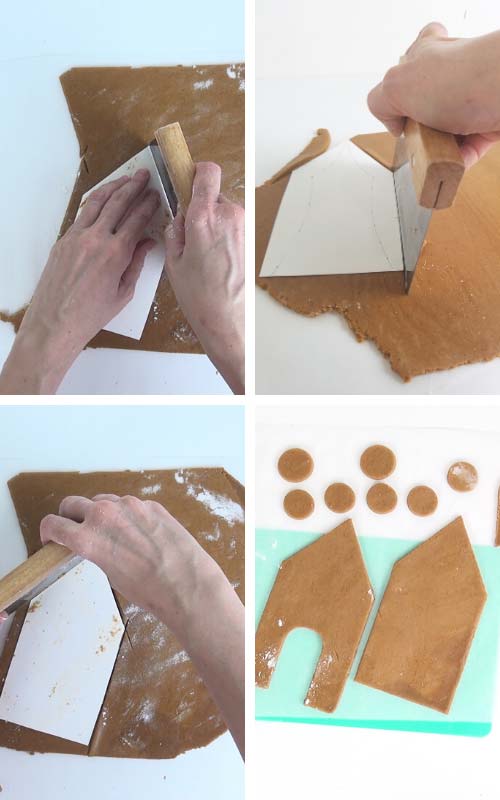
Hand-cutting using a template
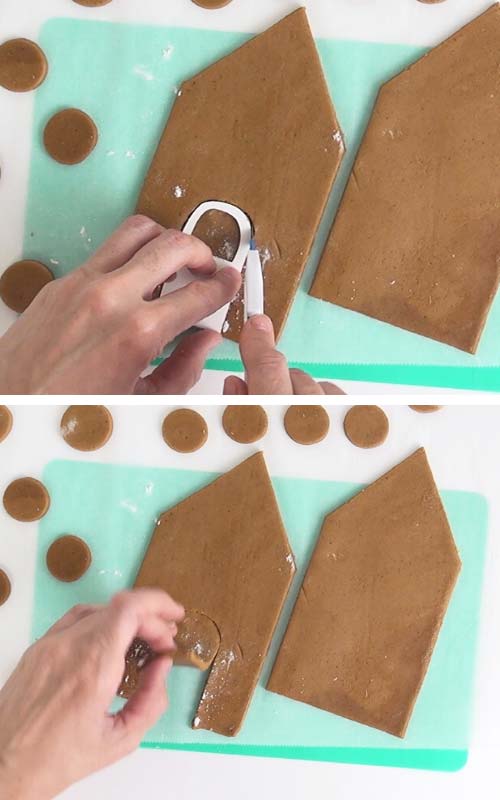
- Use a knife for detailed shapes: To cut out more complex shapes without a cutter, use a knife, an exacto knife, or a pen blade.
- Protect your work surface: When cutting cookie dough with a sharp blade, I like to slide a plastic sheet (the green sheet in the picture below) underneath the parchment to protect my work surface/baking sheet.
- Tips for hand-cutting shapes
- Chill the dough for 10-15 minutes. Chilled dough is easier to cut with a knife/pen blade.
- Set the template on top and cut along the edges with a sharp knife.
- Use a straight-up-and-down cutting motion rather than dragging, as dragging can pull and distort the dough.
- If the template sticks, dust it with flour.
- Smooth rough edges with your finger.
BAKING TIPS
- Temperature: I bake construction gingerbread at 350°F (175-180°C). Bake the cookies until the centers are no longer shiny and the edges are golden brown.
- Use 325°F (165°C) if your oven bakes hot.
- If you live in a humid area, I recommend drying out cookie panels a bit more. After their 1st bake, continue baking panels at 175F-200°F (80-95°C) for 15-20 minutes.
- Separate by size: Bake large cookies separately from smaller ones.
- Baking times: This depends on the size of the panels.
- Larger panels (up to 7-8 inches) take about 16-20 minutes.
- Small cookies/panels take about 10-12 minutes.
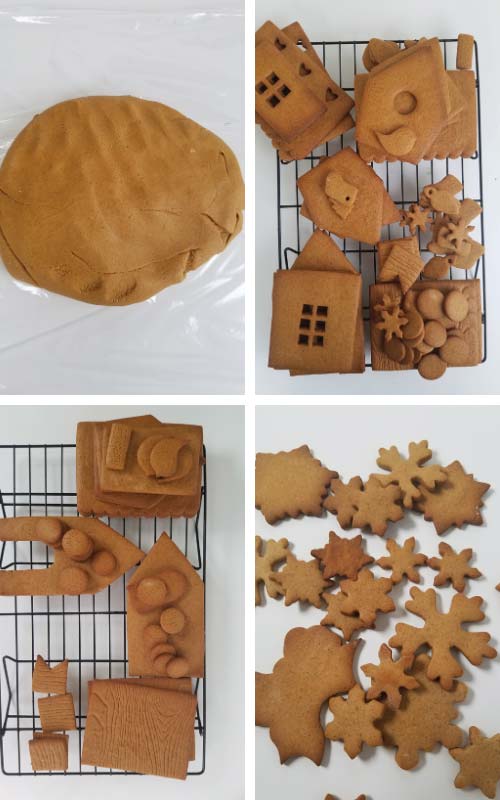
- Molded pieces can be baked just like flat pieces. Let molded pieces cool completely before handling.
GINGERBREAD HOUSE GLUE
Royal Icing Glue
- My preferred glue for Gingerbread houses and decorations is Royal Icing.
- Royal icing glue recipe: batch of Fresh Lemon Royal Icing Recipe.
- How to make royal icing stronger:
- Consistency: Use thick royal icing to glue gingerbread house panels.
- Icing should be stiff but not too stiff.
- If you use icing that is too stiff, it won’t adhere to the cookie properly; after drying, it will separate from the cookie, lose its bond, and the house will collapse.
- Glue Icing should be medium-stiff, not overly stiff.
- Working Time for Royal Icing – Royal icing doesn’t harden immediately; it takes time to dry. This gives you extra time to adjust the panels and their angles as needed.
- Drying Time – Royal icing takes 6-8 hours to fully dry, and up to 12 hours. A thicker application of icing will take longer to dry.
MELTED SUGAR | CARAMEL | ISOMALT
I’ve tried using melted sugar on several occasions. It bonds house panels instantly. However, for gingerbread houses or displays that need to last, I prefer royal icing. Melted sugar can be somewhat unpredictable, so I only use it for projects that don’t require long-term display.
- Melted sugar/caramel creates a strong bond instantly: I find this method very effective for certain projects, but it does have drawbacks. Since the bond sets almost instantly, there’s virtually no room for error when aligning the panels.
- Humidity: In a humid climate, melted sugar glue can start to weep over time.
- Prepare Melted Sugar Glue: Pour 3-4 cups of granulated sugar into a heavy stainless steel pot. Heat on medium heat until the sugar is completely melted. Watch it closely, as it will caramelize quickly.
- Using Melted Sugar | Caramel: Dip the edge of the house panel into melted sugar. Immediately pick up the connecting house panel and connect it to the edge of the house panel dipped in melted sugar. Keep in mind to keep 90-degree angles between wall panels. Sugar hardens almost instantly, so you need to work fast. And with precision.
- Adult supervision required: Be careful when working with melted sugar. Melted sugar is hot. Don’t burn yourself.
HOW TO BUILD A GINGERBREAD HOUSE
If you’ve never made a gingerbread house, you have 2 options for putting a house together. Below, I’ll cover both options, and you can choose what suits you best.
Decorate and Assemble
- I usually decorate house panels and then assemble the house.
- Why do I decorate panels first?
- Flat pieces are easier to decorate with icing. Especially when flooding panels with icing.
- Icing dries evenly with no sliding or sagging.
- Decorating a horizontal surface is easier than decorating a vertical one.
- Lettering and fine details look cleaner on a horizontal surface.
- I can still add small piped details after assembling the house.
- Before you decorate: checklist
- Examine all the panels. If needed, fine-tune them.
- Use a microplane to shave off uneven edges.
- Shave the top edges of the roof to create approximately a 45-degree angle. This will help form a much cleaner, neater seam.

- Decorate panels with royal icing, fondant, and other decorations.
- Let the icing fully dry before assembling the house.

Assemble the four walls
- Assemble Base (4 walls: front, sides, and back)
- Line the assembly tray/baking sheet with a rubber liner, or any anti-slip liner.
- Start by assembling the house base: the front, back, and sides.
- Pipe a thick line of thick-consistency icing along the edges of the front panel (step 1).
- Pipe icing on the outer edge of the side panels. Glue and align side panels onto the front panel (steps 2-4).
- Add a line of icing on each end of a side panel (step 5).
- Pipe royal icing along the short edges of the back panel, then glue it to the 3-wall base, aligning it with the side panels (steps 6-8).
- Let the base dry for 3-4 hours.
- Chimney: If the house has a chimney, I usually assemble it first, then attach it to the roof, but this can vary by project.

- Support walls: Support the walls so they don’t lean out or in. Use small sprinkle bottles or bamboo sticks.
- Clean up the seams: scrape off excess icing if needed.
- Let the base dry for 3-4 hours before adding the roof.

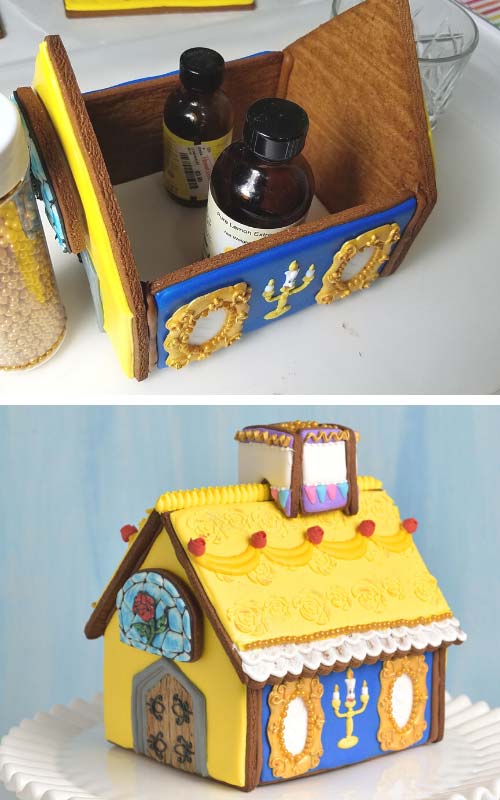
- Attach Roof Panels: You can decorate these before assembling, or after you assemble the house. This depends on the technique you use.
- Pipe icing on top of the front and back panel (step 1).
- Carefully align the roof panels on top of the house base.
- Push panels onto the base so they sit on the base and adhere to the icing (steps 2-3).
- Use small bottles or a bamboo stick to support the roof panel from the bottom.
- This helps prevent panels from sliding down as the icing dries (steps 4-6).
- Clean up the edges with a scribe tool as necessary (step 7).
- Let dry overnight (step 8).

In this project below, I decorated each panel with a different theme.
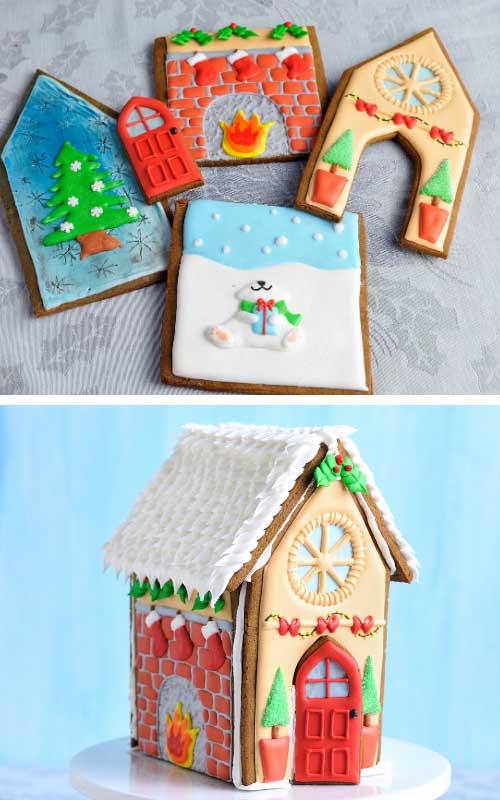
Assemble and decorate
- Great for Decorating Parties
- This approach is especially practical if you’re hosting a gingerbread-house decorating party, especially for kids.
- Because the house is already assembled, they don’t have to wait for anything to dry or set; they can jump straight into decorating with candies, sprinkles, and other treats.
- Use thick royal icing to glue the decorations onto the house.
- Here is an example: Edible Simple Gingerbread House.
- If you’d prefer a simple gingerbread house you can later enjoy eating, I recommend using my Honey-Gingerbread Cookie Dough instead of the construction gingerbread dough, which is edible but can be a bit hard to munch on.
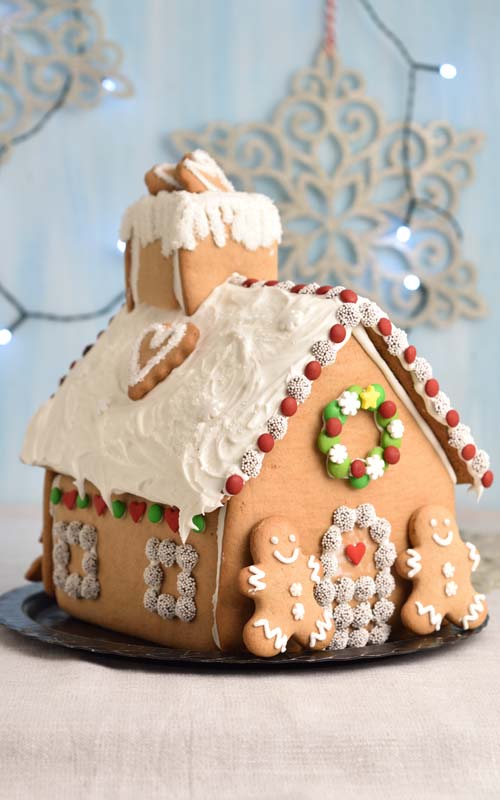
HOW TO DECORATE ROOF
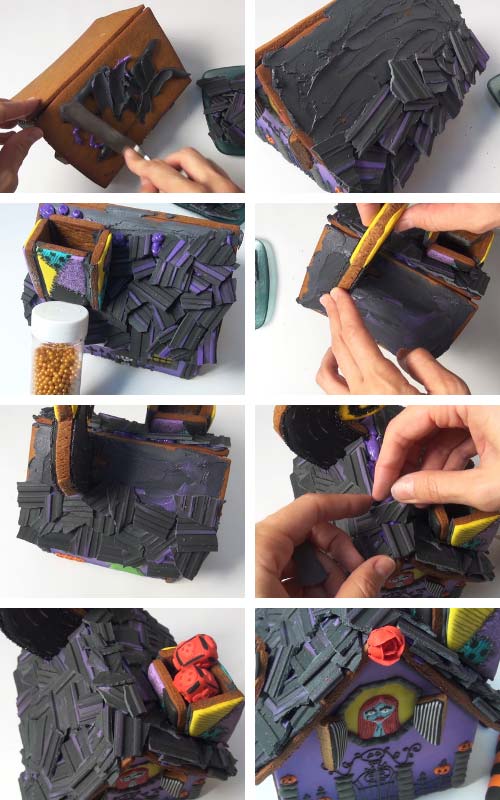
You can decorate the roof before assembling the house, after it’s built, or do a bit of both.
- Use Icing
- For a simple design, spread a thick layer of royal icing over the roof panels, then dust with sanding sugar or sprinkles, or leave them plain.
- Add piped details, such as scallops, for a clean, traditional look.
- Use piping tips – such as leaf, petal, or star tips- to add texture and detail.
- Make shingles with royal icing, let them dry, and attach them to the panels with icing.
- Add fondant details or royal icing transfers.
- Pipe royal icing icicles along the roof edges for a wintry charm
- Use stencils and icing; possibilities are endless.
- Sprinkle edible glitter or sanding sugar over icing for a sparkling “fresh snow” effect.
- Use Edible Accents
- Decorate the roof with candies, cereal, and chocolates.
- Use pretzel sticks or wafer cookies for a rustic, textured roof.
- Overlap round candies to create candy shingles
- Think candy canes or peppermint candies.
- How about popcorn or marshmallows? That could be fun, too.

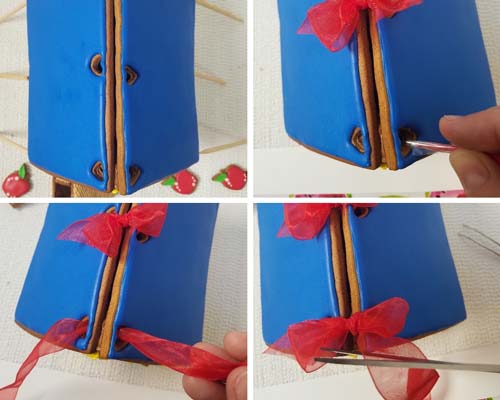
GINGERBREAD HOUSE WINDOWS | STAINED GLASS COOKIES
- Creating Glass-Like Windows
- Gelatin Sheets: Cut a gelatin sheet to the size of the window and glue it on the inside before you assemble the house.
- Isomalt: If you can get your hands on Isomalt, you can use it instead of crushed candies or melted sugar.
- Isomalt melts at a lower temperature than regular sugar.
- It doesn’t caramelize/darken in color like regular granulated sugar. Isomalt will stay clear.
- You can get colored Isomalt if you’d like to make stained glass using different colors.
- If the Isomalt becomes slightly cloudy, you can carefully use a blowtorch to clear it.
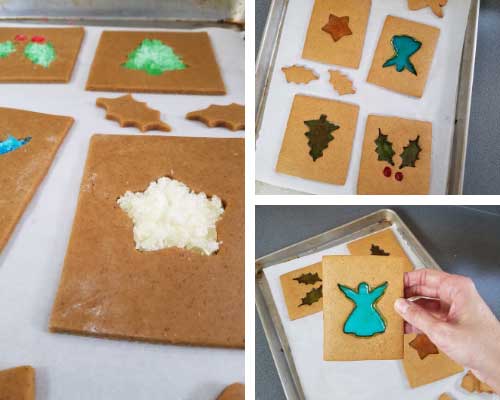
- Melted Sugar/Caramel: Melt the sugar and let it caramelize to your liking. Pour onto parchment. Let harden. Peel off and glue on the inside of the house with royal icing. Or place baked cookies onto parchment and pour it inside the windows. Let harden.
- Crushed Hard Candies: I like to pre-bake my gingerbread panels before filling the open areas with candy.
- Let the cookies cool completely before adding the crushed candy
- Bake at 350°F (180°C) for about 7 minutes, until the candy is melted.
- Allow the cookies to cool completely before removing them from the parchment-lined baking sheet.
- To prevent isomalt or melted sugar from weeping, spray windows with edible glaze.
CONSTRUCTION GINGERBREAD FAQ
- why is my cookie dough crumbly?
- dough cracks while rolling or cutting
- why does my gingerbread spread?
- how do I know when it’s baked?
- can I re-bake gingerbread panels?
- why did my pieces warp?
- my panels shrink in the oven
- a baked cookie has cracks or bubbles
- how to keep panels flat?
- how thick should I roll the dough for the panels?
- my large panel broke in half; what should I do?
- how should I store baked gingerbread?
- preventing soft cookies in humid climates
- can I eat this gingerbread dough?
- what icing should I use to build the house?
- how long should I wait before adding the roof?
- why does my house collapse while the icing dries?
- will gingerbread soften over time?
Why is my cookie dough crumbly?
This dough should be dry, and adding more flour won’t make it stronger. Your cookie dough is crumbly because you used too much flour or not enough moisture. If your cookie dough is crumbly, gently knead in 1 teaspoon of water at a time until it comes together. Dough should be firm but flexible to roll.
Dough cracks while rolling or cutting
Not enough moisture. Mist the dough with water, cover for 5 minutes, and gently knead it together. Let it rest before rolling it out.
Why does my gingerbread spread?
Most likely, margarine or shortening was too soft when creamed with butter. Use cool, room-temperature margarine and chill the cookie dough for several hours before baking. Don’t use any leavening agents in this dough to ensure precise panels and eliminate spreading
How do I know when it’s baked?
Check the center texture; if it looks soft and wet, bake longer until fully set and golden around the edges. Once cooled, panels should be completely firm. If they aren’t, return to the oven at 325F and bake for 5-10 minutes longer to harden.
Can I re-bake gingerbread panels?
Yes, absolutely. If the pieces are still soft after cooling, return them to the oven and bake them at 325F until firm.
Why did my pieces warp?
- Don’t overmix dough: Knead gently; don’t overmix. Overworked dough will cause cookies to retract, and shapes get misshapen. If you notice the cookie dough retracting as you roll it, stop, cover it well, and let it rest so the gluten can relax.
- Trim while hot: To fix warped pieces, use a sharp knife to trim them while warm.
My panels shrink in the oven
Excessive kneading can lead to too much gluten development. Dough with a tight gluten network resists stretching, causing the cookies to shrink in the oven. Let the dough rest to help the gluten relax.
A baked cookie has cracks or bubbles
When you knead the dough, try not to incorporate too much air. These air pockets expand in the oven, causing cookies to crack or have bubbles.
Flatten the tops of the cookies while they’re hot with a flat spatula.
Place a piece of parchment on the top and weigh the panels down with a flat baking sheet.
How to keep panels flat?
- Roll the dough evenly, using rolling guides.
- Bake on a flat baking sheet.
- Another neat trick is to weight large panels with a flat baking sheet. As soon as the panels are baked, while hot, layer a sheet of parchment on top, place a flat baking sheet on top, and let the panels cool.
How thick should I roll the dough for the panels?
I’ve done both. 1/4 inch (recommended thickness) and 1/8 inch (3 mm). Both work fine, but 1/4 inch ( 6 mm) gives you a little more volume, and it can be a little easier to glue large panels. 1/8-inch panels can also become a bit too brittle when baked too long.
My large panel broke in half; what should I do?
- If a large piece breaks after baking, it can be due to several things:
- Overworked dough has too much gluten, which creates too much internal tension; after baking, as the dough cools, it can snap and break. If you suspect the dough is overworked, put the unbaked dough on a baking sheet in the fridge and let it chill and rest for 10-15 minutes before baking.
- Dough that has too much flour can become too brittle and break.
- A sudden thermal shock: Exposing a freshly baked, hot gingerbread panel to a cold room can cause hairline cracks.
- How to fix a broken panel: If you’re in a pinch and need an instant fix, use melted sugar to glue the broken panel together. This is especially useful if you’re not covering the panel with a layer of icing, as the melted sugar layer is very thin and hardly noticeable. You can also use icing to glue the panels together. If you use icing, color it with food gel to match the gingerbread so it’s less obvious.
How should I store baked gingerbread?
Store baked and cooled cookies flat in an airtight container at room temperature, separating each layer with parchment.
For large panels, place them on flat trays, layer them with parchment, and weigh them down with a flat sheet or books to prevent warping.
Preventing soft cookies in humid climates
If you live in a humid climate, you’ve probably noticed that sugar and humidity don’t get along. Baked gingerbread can absorb moisture from the air, which often makes the cookies soft.
- Here are a few ways to prevent this:
- Dry the cookies in the oven: After baking, lower the oven to its lowest setting. Place the cookies on a baking sheet and bake them for 30 minutes to an hour.
- Protect the house walls: Before assembling the gingerbread house, brush the inner walls with royal icing to create a humidity barrier.
- Absorb excess moisture: Place a small container of rice inside the assembled house to help control humidity, or use food-grade silica gel packets.
Can I eat this gingerbread dough?
Even though this dough is fully edible, I wouldn’t recommend munching on it. However, I get emails from people who say they love to eat this dough, too. Just be aware, cookies are rather hard and spicy.
For tastier gingerbread for simple houses that don’t bake so hard, use my Edible Gingerbread Cookie Dough.
What icing should I use to build the house?
Use thick royal icing. To strengthen the icing, add an extra tablespoon of meringue powder and, even better, make royal icing with fresh egg whites.
How long should I wait before adding the roof?
For the basic house, start with 4 walls and let them dry for a couple of hours before attaching the roof. For more complex pieces, build gradually, allowing enough drying time before adding each structural piece.
Why does my house collapse while the icing dries?
- Don’t rush the process; royal icing takes time to dry.
- Let the base structure dry before adding more pieces.
- Support the panels with small bottles or bamboo sticks.
- Build the house on an anti-slip surface liner; it helps a great deal.
- If the icing is too stiff, it doesn’t have a chance to adhere properly to the gingerbread wall. Instead, it sits on top of the gingerbread panel, and once it dries, the panels separate and fall apart. Use icing that is thick but not too stiff.
Will gingerbread soften over time?
This can be a real concern if you live in a humid area. I have a couple of suggestions.
- First, bake the cookies a little longer so they start out dry.
- Brush the inside of the panels with a thin layer of royal icing to help create a moisture barrier.
- Don’t store panels in a damp room. If the panels become soft, bake them again at a low temperature so they harden before assembling the house.
- Place a small bowl of raw rice inside the house to help absorb excess moisture or use silica gel packets.
GINGERBREAD INSPIRATION

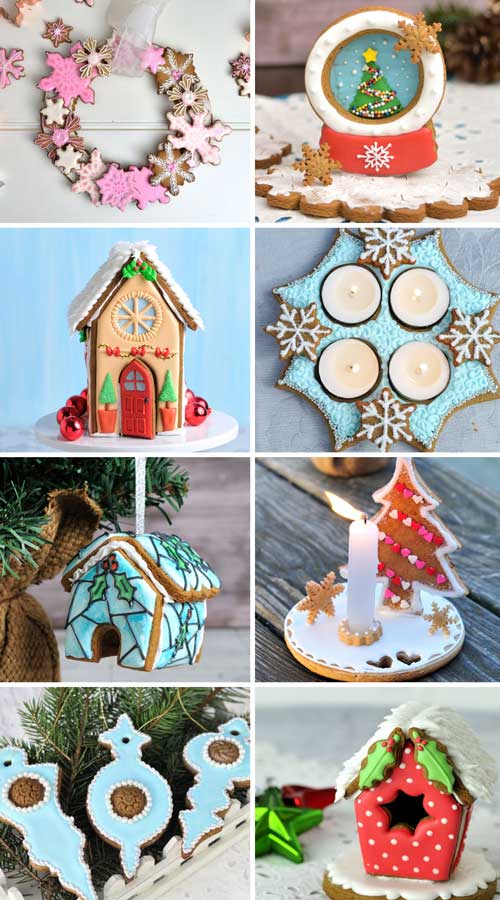
MORE GINGERBREAD COOKIE DECORATING IDEAS
- Beauty and the Beast Gingerbread House
- Harry Potter Gingerbread House
- Addams Family Gingerbread House
- Cute 3D Sleigh Cookies
- Nightmare Before Christmas Gingerbread House
- Mermaid Gingerbread House
- Valentine’s Day Gingerbread House
- Hocus Pocus Gingerbread House
- Haunted Halloween Gingerbread House
- Christmas Gingerbread House
- Holiday Bird House

Construction Gingerbread Recipe
Ingredients
Construction Gingerbread Dough for Sturdy Centerpieces
- 1 cup granulated sugar 200 grams
- 1 cup margarine 226 grams
- 2 room temperature eggs
- 1 cup molasses (340 grams) 340 grams | Substitutes: corn syrup, honey.
- 6½ cups all-purpose flour, plus more if needed for rolling 930 grams
- 2 tbsp ground ginger
- 2 tbsp cinnamon
- 2 tsp cloves
- 1 tbsp dark cocoa powder (optional), Use cocoa powder if you are using honey or corn syrup and you'd like the dough to be a bit darker.
Instructions
Gingerbread Dough
- In a medium bowl, whisk together all-purpose flour (6½ cups,930 grams), ground ginger (2 tablespoons), ground cinnamon (2 tablespoons), and ground cloves (1 teaspoon).TIP: If you plan to display your gingerbread house for an extended time (a year or so), I suggest adding white pepper (1 teaspoon) along with the other spices. Spices deter small insects from biting into your beautiful gingerbread house.
- Cream margarine (1 cup, 226 grams) with granulated sugar (1cup, 200 grams) until light and fluffy, about 2-3 minutes.Add eggs (2 large eggs, at room temperature), one egg at a time, and beat well. Then gradually beat in molasses (1 cup, 340 grams) and beat until smooth, about a minute.TIP: You can substitute molasses with corn syrup (light or dark) or honey. Or use a combination of molasses and corn syrup or honey.
- At low speed, gradually add the flour mixture to the wet mixture in 3 additions.Turn the dough out onto a work surface and knead for 30seconds to a minute, until it comes together into a large ball. If the dough appears too crumbly, add 1tsp water.
How To Roll Out Gingerbread Dough
- I like to roll my cookie dough between 2 silicone mats or parchment sheets to 1/8 to 1/4 inch thick. I often lightly dust my work surface with flour.Once I have all the cookie dough rolled out, I like to chill it for about 40 minutes.TIP: If you are not making house panels right away, I recommend tightly wrapping freshly made gingerbread dough in food wrap and storing it in the fridge for up to 3-4 days. Let it soften a little before rolling it out.
- It's best to cut the house pieces on the material you are using to bake them on, so you don't have to pick them up after they are cut.
Molded Gingerbread
- Use this recipe to make molded gingerbread pieces. Dust texture mats with a little bit of flour before using. For deeper molds, such as skulls, I like to use non-stick spray, freeze the mold with cookie dough, then unmold.
How to Bake Construction Gingerbread
- Bake construction gingerbread at 350F (180C) for 12-15minutes, or longer depending on cookie size. I like to bake house panels until they are golden brown around the edges.I often bake larger pieces for 16-20 minutes.While baking, sometimes little bubbles can form on top of the cookies. While still hot, use a toothpick to poke a pinhole where the bubble appears to be forming to deflate it. You can also flatten the cookie with a wide spatula while it's still hot.When baking small pieces for your gingerbread centerpieces, watch them carefully; they will be done faster.The thicker the cookie, the longer it takes to bake. Bake small pieces on one baking sheet and large pieces on another.
- Cool the cookies completely before decorating.
Video
Notes
- How many gingerbread houses does this recipe make?
- This is a large batch of gingerbread dough, and it makes 3 standard medium-size gingerbread houses.
- Can I use honey in place of molasses? Yes, you can swap molasses with honey.
- I want to make half of this recipe. Will it work? Yes, this recipe can be halved.
- Do I have to use ground ginger? You can skip ground ginger and use cinnamon instead if you prefer.
This post was originally published on November 23rd, 2012. I updated this post on November 12th, 2019, with new step-by-step photos, written text, and a video tutorial.
This post contains Amazon affiliate links that earn me a small commission, at no cost to you. I only recommend products that I use and love. Learn more about my affiliate policy here.

Hi, I’m Hani
Welcome!
Thank you for visiting Haniela’s. On my blog, you’ll find delicious sweet & savory recipes made with simple ingredients. Why not start a new adventure? Discover a world of cookie decorating with my step-by-step tutorials.

Hi, I’m Hani
Welcome!
Thank you for visiting Haniela’s. On my blog, you’ll find delicious sweet & savory recipes made with simple ingredients. Why not start a new adventure? Discover a world of cookie decorating with my step-by-step tutorials.




Hello! Your recipe sounds just what I’ve been looking for! I love my gingerbread hard, crispy and spicy! I have a question for you. I have a cast iron house shaping mold, and would love to use it for baking. Would you recommend changing anything for baking in cast iron? Thanks!
Hi Cami,
While I haven’t tried it with cast iron mold. I think I’d let it rest in the fridge for 20 minutes before baking, just to ensure the gluten is well relaxed, in case the dough was handled too much in the molding process. Have you used this mold before? I would also greased it before pressing the dough in.
Just made this recipe into gingerbread men and woman using corn syrup. I also replaced the ginger with nutmeg (personal fragrance preference). Super easy to work with. Last batch in the oven now. I plan to have my grands decorate them with puff paint. I hope they hold up throughout the season! Thanks much!
Hello!
That’s awesome. Sounds like lot of fun for the grandkids. Happy Holidays!
Hello Hani,
Getting ready to make at least 12+ houses for a Culinary class for kids. I have your recipe dated 12/15/20 and it says 7 cups of flour 1 1/2 cups of molasses. Should I use your updated recipe 2025 or use the recipe dated 2020? Other ingredients are basically the same, except you have 2 eggs instead of 1 egg and 1 cup of molasses instead of 1 1/2 cup.
Hi Connie,
I’m using a new version or the recipe now. Thank you.
What a fun activity for the kids. They will love you!