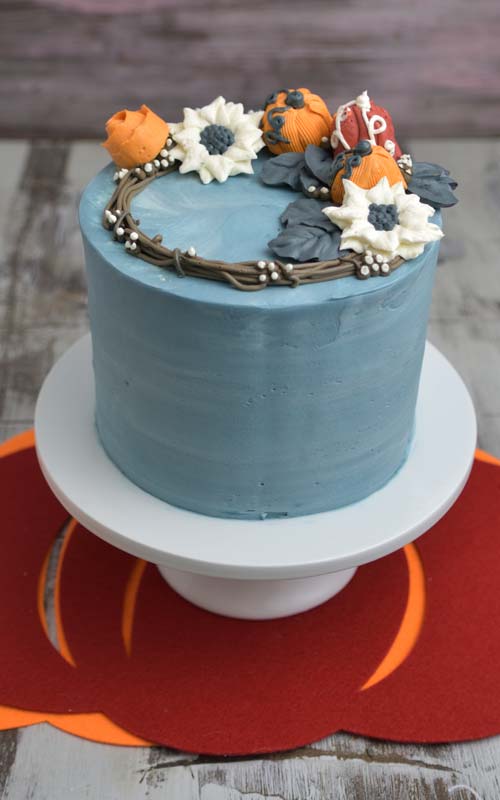
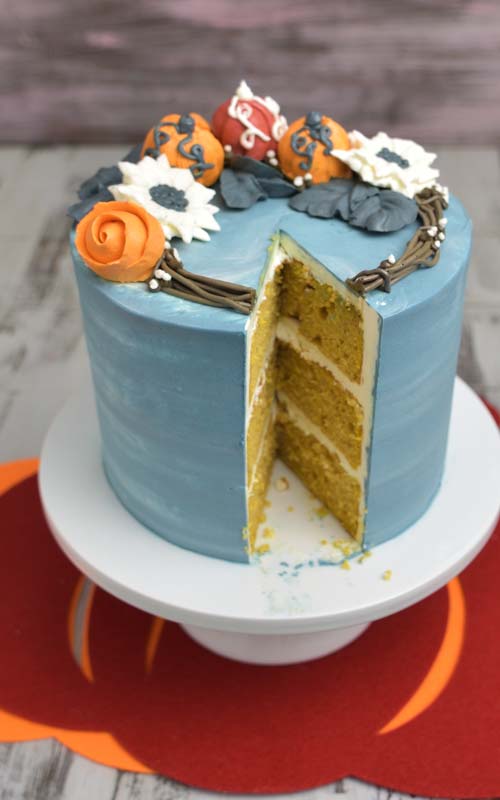
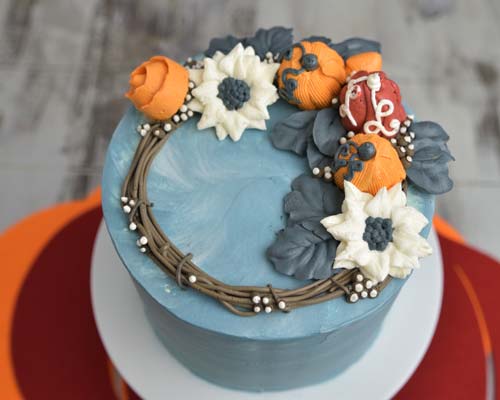
Buttercream Fall Wreath Cake
This Buttercream Fall Wreath Cake is packed with delicious fall flavors and pretty colors, rom pumpkin spice sponge cake to delicious maple buttercream. Adorned with beautiful piped buttercream pumpkins, flowers, and leaves. And now I’ll show you how to make it.
HOW TO MAKE BUTTERCREAM FALL WREATH CAKE
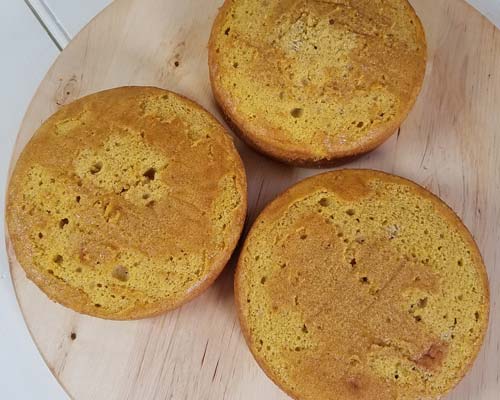
PUMPKIN SPONGE CAKE
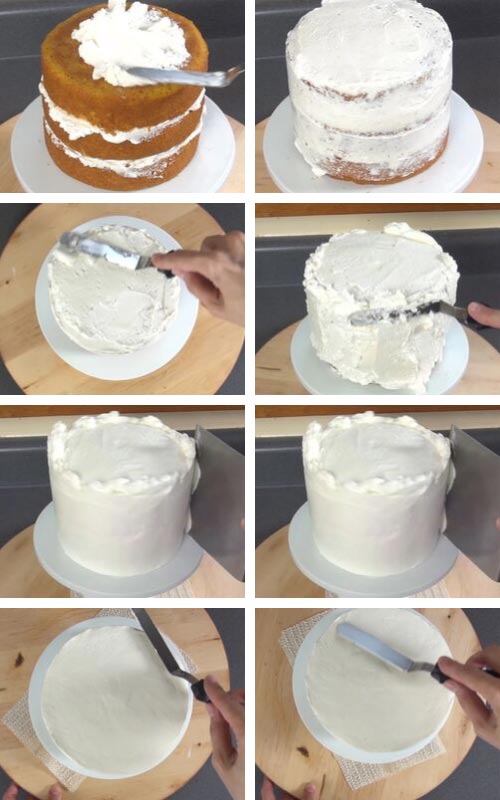
I baked 3 – 6 inch Pumpkin Sponge Cakes. I let the cakes cool completely before filling and decorating. Cakes can also be frozen for up to 3 months.
FILL AND FROST THE CAKE
To fill and frost the cake I used Swiss Meringue Buttercream flavored with Maple Flavoring. This buttercream is easy to work with and it pipes beautifully onto the cakes and cupcakes.
Fill the with maple buttercream and crumb coat it. Chill for an hour.
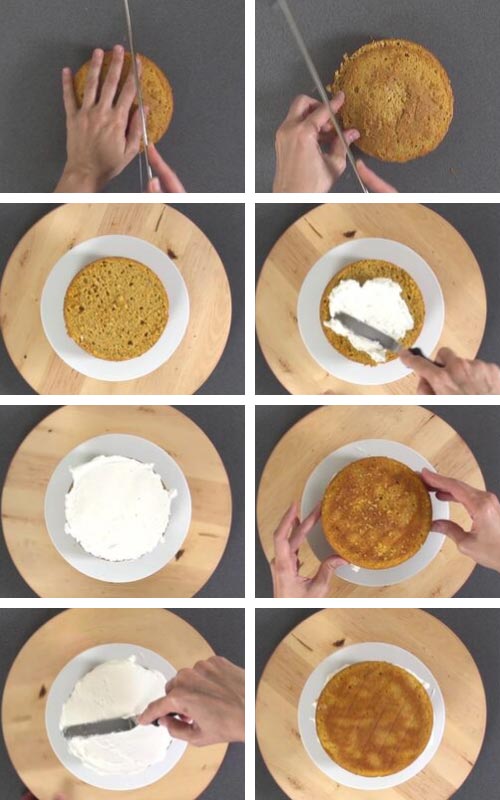
Then frost the outside of the cake. Smooth buttercream with a spatula or a bench scrapper.
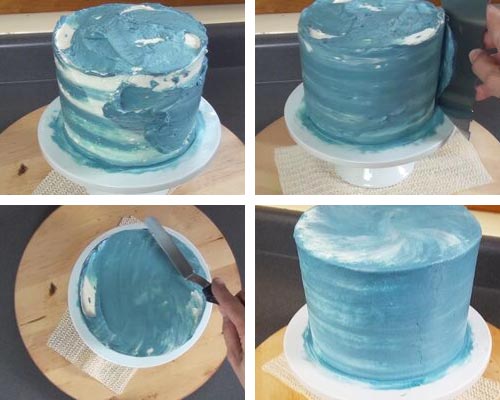
WATERCOLOR BUTTERCREAM EFFECT
- Grayish Blue – I used royal blue gel color with a touch of black color
Spread a thin layer of colored buttercream onto the white frosted cake.
BUTTERCREAM PUMPKINS AND FLOWERS
Swiss Buttercream is a perfect medium for making piped cake decorations. It freezes well, and decorations hold up nicely on the cake. I used it to make cute piped buttercream pumpkins, leaves, flowers, and wreath branches.
To color Swiss Buttercream I used gel food colors. If you haven’t colored Swiss Buttercream before, follow my tutorial on How to Color Swiss Buttercream. It will help you achieve deep, rich colors.
TO MAKE BUTTERCREAM DECORATIONS YOU NEED
- Parchment Squares
- Flower Nail
- Piping Bags
- Piping Tips (#12 #98, #61, #104, #103, #2, #3, #352 #125)
- Find all the tool you need in my Amazon Shop

BUTTERCREAM PUMPKINS
- COLORS
- Orange – I used orange gel color and I added a touch of ivory food color to mute it down slightly
- Brown – stems
- Terra Cotta – I used red and brown get colors to create this shade
- White – stems
- PIPING TIPS
- Round Piping Tip #12 – to pipe a mount of buttercream onto flower nail
- Piping Tip #98 ( I used this tip with orange pumpkins)
- Piping Tip # 61 ( I used this tip with terra cotta pumpkins)
- Round Piping Tip #2 – to pipe stems
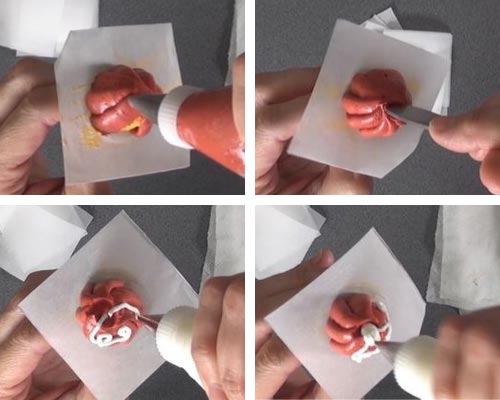
Pipe a small amount of orange buttercream onto a flower nail using piping tip #12. Secure a parchment square onto the flower nail. Then pipe a small mount of orange buttercream onto a parchment square. Freeze for 20 minutes.
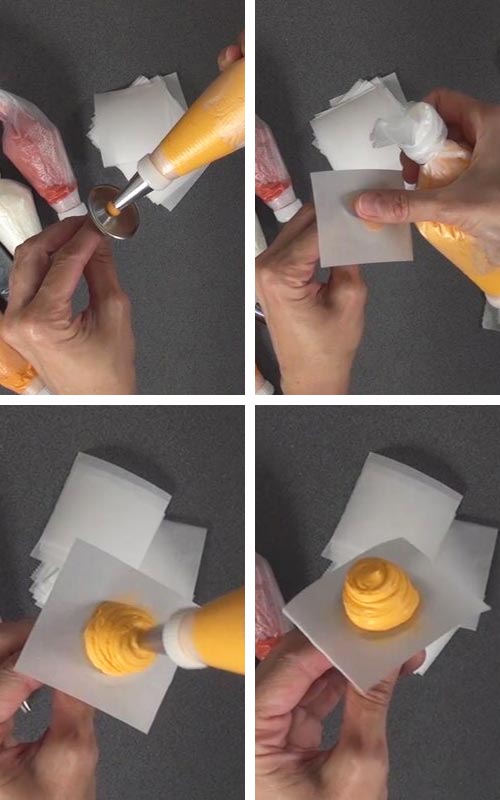
Now with orange buttercream and piping tip #98, pipe vertical lines from the base of the buttercream mount to the top, overlapping lines slightly. Clean up the top with a spoon handle. Then pipe the stem and vines with brown buttercream and piping tip #2.

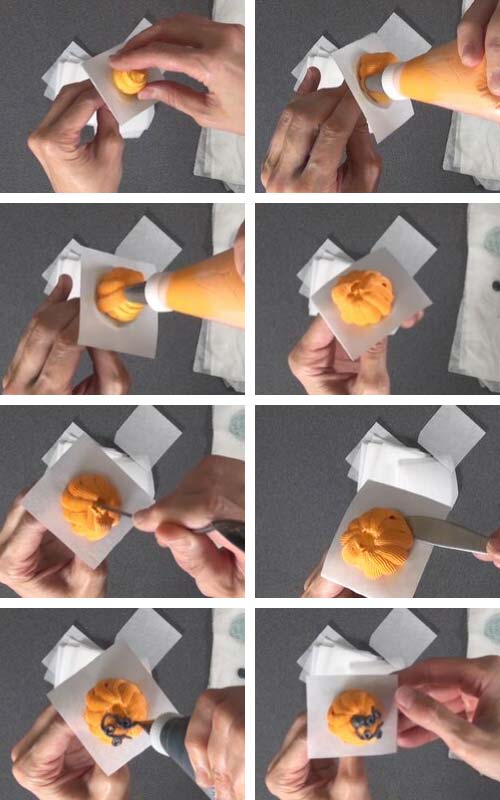
Repeat the process with terra cotta buttercream; use piping tip #61 instead of #98. Freeze pumpkins on a freezer safe tray for an hour.
BUTTERCREAM LEAVES
- COLORS
- Gray – I used left over grayish blue buttercream and I just added a bit more black gel color to it
- PIPING TIPS
- Petal Tips #104 or #103
Pipe leaves onto a parchment square, with a petal tip narrow part fascing out. Freeze for an hour, or until firm.

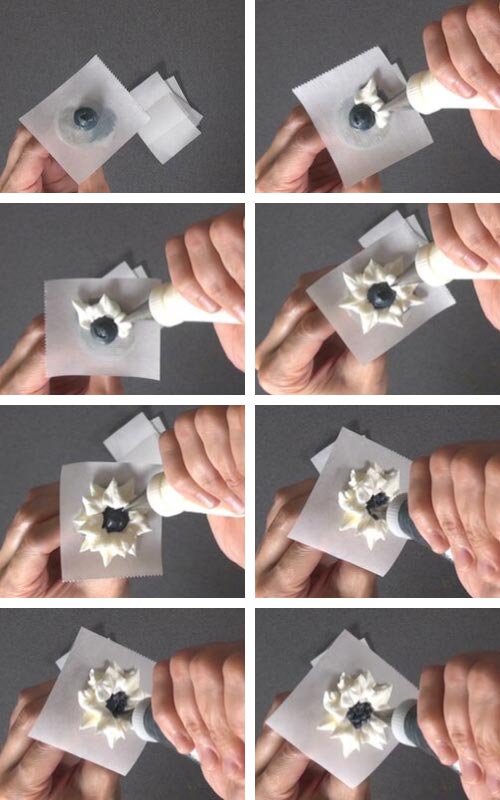
WHITE DAISY FLOWERS
- COLORS
- White
- Gray – I used same buttercream I used to make the leaves
- PIPING TIPS
- Leaf Tip #352
- Round Piping Tip #2
Pipe a small mount of gray buttercream onto the parchment square. Then with a leaf tip and white buttercream pipe flower petals around in 2 layers. Finish by piping small dainty dots of gray buttercream in the center of the flower. Freeze for 1 hour, or until firm.
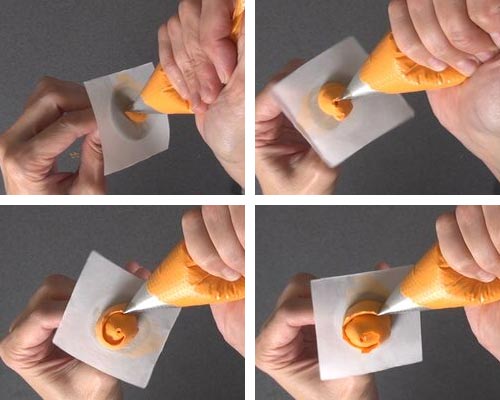
BUTTERCREAM RIBBON ROSES
- COLORS
- Orange
- PIPING TIPS
- Petal Tip #125
With the piping tip narrow end further away from you and facing the center of the flower nail start piping. As soon as you starr piping turn the piping bag towards you so narrow part of the piping tip is facing up. And wide part of the piping tip is facing down. Turn the flower nail as you continue piping buttercream. Freeze for an hour or until firm.
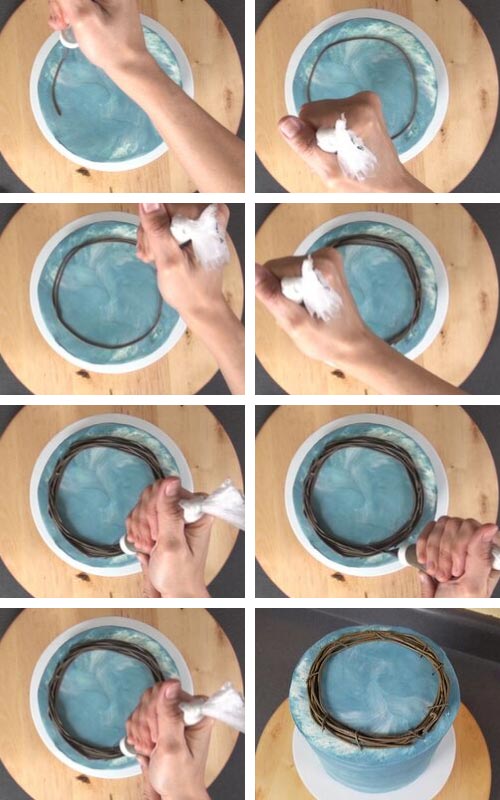
WREATH BRANCH BASE
- COLORS
- Dark Brown – I used brown gel color and added just a touch of black coloring
- PIPING TIPS
- Round Piping Tip #3 or #4 will work as well
- Round Piping Tip #2 for smaller lines that go across
With dark brown buttercream and a piping bag fitted with a round piping tip #3 pipe the branches around. Then swap out #3 piping tip for smaller #2 tip and pipe short branches across the large branches. Chill the cake for 30 minutes, until wreath branches are firm.
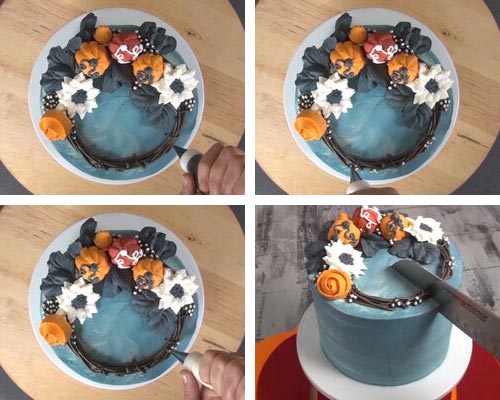
FALL WREATH CAKE ASSEMBLY
Glue frozen pumpkins, flowers and leaves onto the cake. Use small amounts of buttercream to glue frozen buttercream decorations onto the cake.
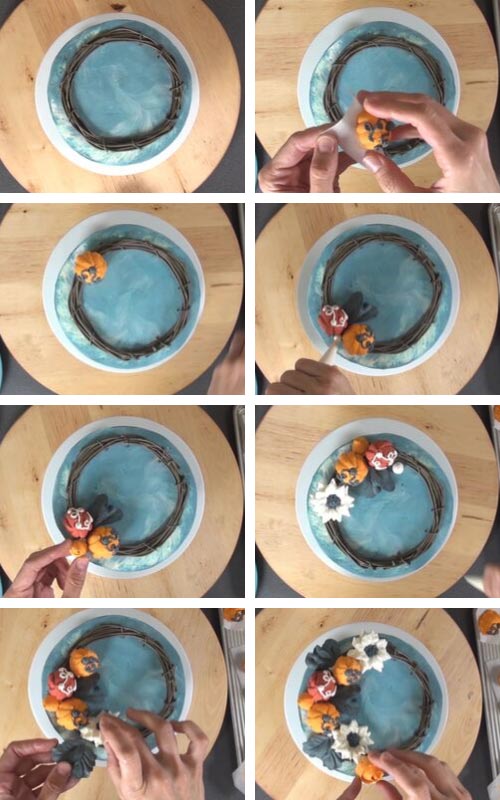
With brown buttercream and a small round piping tip #3 pipe small mounts of icing onto the branches. Then with white buttercream #2 pipe white into the center of brown mounts.
MORE FALL INSPIRED RECIPES
- Starbucks Pumpkin Spice Latte Cake
- Mini Pumpkin Chocolate Cheesecakes
- Pumpkin Orange Hand Pies
- Deep Dish Pecan Pie
- Pumpkin Meringue Cookies
TO MAKE BUTTERCREAM FALL WREATH CAKE YOU NEED
- RECIPES
- Pumpkin Sponge Cake or use Brown Sugar Pound Cake or Pumpkin Pound cake
- Swiss Buttercream ( 1 1/2 batches)
- TOOLS
- Find all the tools in my Amazon Shop
- Parchment Squares
- Flower Nail
- Piping tips :
- #12 (round tip)
- #98 (orange pumpkin)
- #61 (terra cotta pumpkin)
- #104 (leaves) #103 (leaves)
- #2 (pumpkin stems and wreath branches and white dots on a wreath)
- #3(wreath branches and small dots on the wreath)
- #352 (white daisy flower petals)
- #125 (ribbon rose)
- 6 inch Baking Pans
- Piping Bags
- Couplers
- Spatula
- Bench Scrapper, Buttercream Smoother
- Food Colorings : orange, ivory, black, red, brown
- RELATED TUTORIALS
- How to color Swiss Buttercream
Pumpkin Sponge Cake
Ingredients
Pumpkin Spice Sponge Cake
- 4 egg whites
- 4 egg yolks
- 3/4 cup pumpkin puree
- 200 grams sugar
- 4 tbsp oil vegetable, coconut
- 4 tbsp warm water
- 200 grams all purpose flour
- 1 1/2 tsp baking powder
- 1/2 tsp salt
- 1/2 tsp vanilla extract
- 1 tsp ground cinnamon
- 1/4 tsp ground nutmeg
- 1/4 tsp ginger
- 1/8 tsp ground cloves
Maple Swiss Buttercream
- 2 batches Swiss Buttercream (recipe in notes)
- Maple Flavoring
Instructions
Pumpkin Spice Sponge Cake
- Preheat oven 350F.
- Butter and flour your baking pans, line the bottom with parchment.
- In a medium bowl sift together flour (200grams), cinnamon(1tsp), nutmeg(1/4tsp), ginger(1/4tsp), cloves(1/8tsp), salt(1/2tsp) and baking powder (1 tsp and 1/2tsp). Set aside.
- In a clean bowl, whip egg whites (4), once soft peaks are formed, gradually add 1/2 of the sugar (100grams). Beat until shiny and stiff peaks are formed. Don’t whip it too long though, you want the egg whites to retain moisture. Turn the mixer off at once when stiff peaks are formed.
- Scrape the meringue into another bowl. Set aside. Put all the egg yolks (4) into the mixing bowl you just used for making the meringue. It is okay, it doesn’t have to be spotless. Add remaining sugar (100 grams) to the egg yolks. Using same wire whip attachment mix the egg yolks with sugar. First at medium speed and then at high speed. Once your egg yolks have doubled in volume and became pale in color (ribbon stage) add pumpkin puree. Beat till well blended together. Then gradually add oil (4tbsp), by tablespoon, mixing well after each addition.then add warm water (4tbsp), by tablespoon, mixing well after each addition. Add vanilla extract (1/2tsp) and beat until combined. Turn off the mixer.
- Using fine mesh strainer sift about 1/3 of flour mixture into the egg yolk pumpkin mixture and carefully fold the flour in with a spatula, then add about 1/3 of meringue and fold iit in. Continue with rest of the flour and meringue until no flour streaks are visible. Be gentle and don’t over mix. You are looking for a light and airy batter.
- Fill your buttered and floured pans and bake until tooth pick inserted in the center comes out clean, about 25-30 minutes. Let cool slightly, remove from the baking pans, and cool completely before filling and decorating.
Swiss Meringue Buttercream
- Make 2 batches of Swiss Buttercream (link to the recipe in the post and in recipe notes).Flavor buttercream with Maple Flavoring. Use only several drops, start with 10 drops. Blend in and taste. Add more flavoring if desired. Buttercream can be prepared ahead of time. Store it in the fridge. Let it come to room temperature before using. If necessary whip it again for couple of minutes.Buttercream can also be frozen for up to 3 months.
Notes
This post was originally published in 2018. On October 31st. 2019 I updated this post with new photos, written text and a video.
This post contains Amazon affiliate links that earn me a small commission, at no cost to you. I only recommend products that I use and love. Learn more about my affiliate policy here.

Hi, I’m Hani
Welcome!
Thank you for visiting Haniela’s. On my blog, you’ll find delicious sweet & savory recipes made with simple ingredients. Why not start a new adventure? Discover a world of cookie decorating with my step-by-step tutorials.

Hi, I’m Hani
Welcome!
Thank you for visiting Haniela’s. On my blog, you’ll find delicious sweet & savory recipes made with simple ingredients. Why not start a new adventure? Discover a world of cookie decorating with my step-by-step tutorials.


What color gel food coloring did you use for the base buttercream on the cake?
Alyssa,
I used royal blue with a minuscule amount of black.
Hani
I love your creative ideas and posts! Keep up the beautiful work😍
Thank you Kim. Happy Fall.