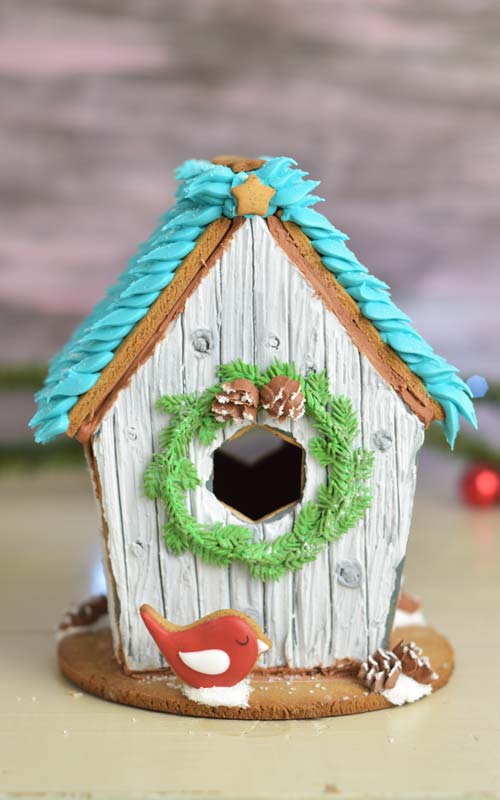
Holiday Gingerbread Birdhouse
I’m kicking off holiday gingerbread season with this pretty royal icing decorated Holiday Gingerbread Birdhouse centerpiece. In this diy cookie decorating tutorial I’ll show you how to make realistic wood grain texture with royal icing. And we’ll also make super pretty sugar pine wreath decoration and piped pines cones. Let’s get started.
HOW TO MAKE HOLIDAY GINGERBREAD BIRDHOUSE
- TABLE OF CONTENTS
- Wood grain texture with royal icing
- Royal icing pine wreath
- How to make royal icing pine cones
- Bird Cookies
- How to build a holiday gingerbread birdhouse
- Decorate roof
- Decorate with pine cones and birds
- Recipes, tools and templates
GINGERBREAD BIRDHOUSE PANELS
To make the cookies I used my Gingerbread Cookie Dough Recipe for houses and centerpieces. I use this recipe for all my long term display pieces. Or when I need sturdy construction gingerbread cookies that don’t spread.
If you rather make a gingerbread house that you can eat you can use my Honey-Gingerbread Cookie Dough for houses. This dough has a small amount of baking soda and it’s more aerated than construction gingerbread. And it’s very tasty, too
To cut out cookies I used templates. Scroll down to print your templates.
CREATE WOOD GRAIN ROYAL ICING TEXTURE
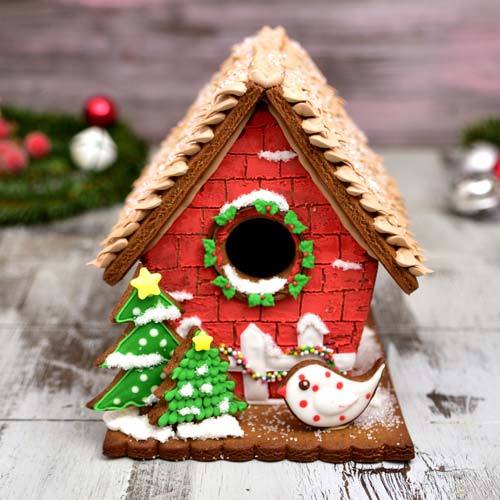
Wood grain texture is super easy to make. You can use the same technique to create brick texture (picture below), textured leaves etc.
ROYAL ICING COLORS AND CONSISTENCIES :
- Dark Gray – 10 to 15 second consistency
- Light, Medium and Dark Gray – thick consistency
DECORATING STEPS :
Apply a thin layer of dark gray royal (10sec to 15 sec) icing onto all birdhouse wall cookies (front, back and sides). Spread icing with a spatula or brush it on with a food only paint brush. Allow icing to dry.

Spread a thick layer of light gray icing (thick consistency) over the cookies, covering dark gray layer.

Then pipe medium and dark icing dots onto the light icing. Marble in medium and dark gray royal icing. Spread icing with a small spatula or a palette knife.
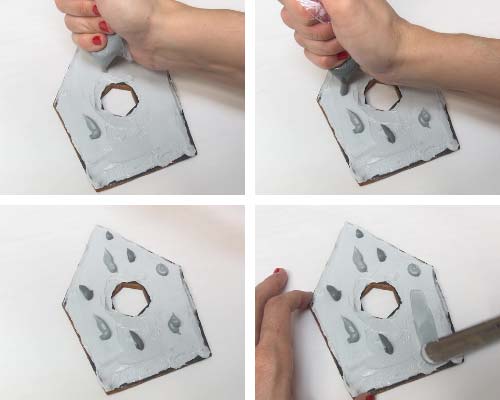
Don’t allow icing to crust. With a small decorating comb, fork or a clean decorating toothbrush create ridges in the icing. Run the tool thru icing in one direction.
Then take a small spatula and create wood planks. Wipe a residue royal icing off the blade into a paper towel.

To create knots in the wood planks pipe small dots of medium dark royal icing onto the cookies. Then with a needle tool or a toothpick swirl the icing to create a knot like appearance. Clean up the edges and allow icing to dry.

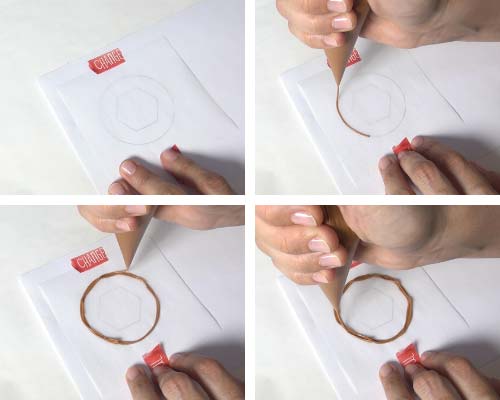
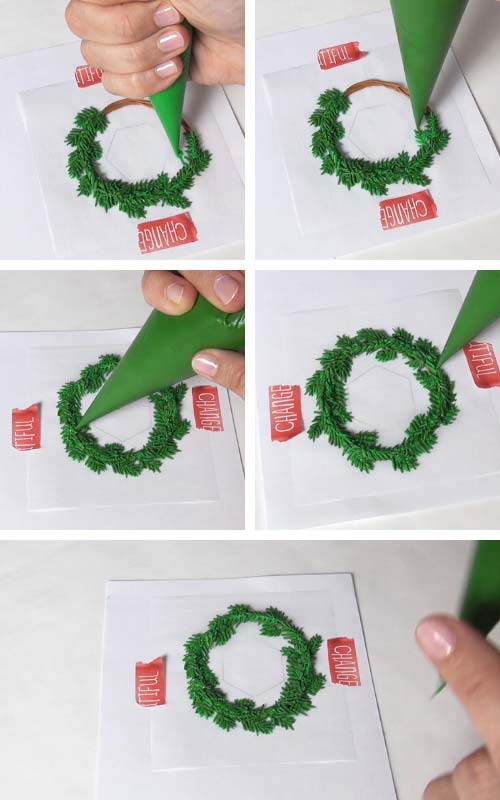
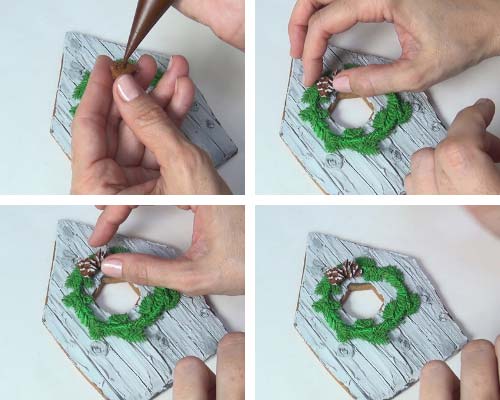
ROYAL ICING PINE WREATH
To decorate the front of my holiday gingerbread birdhouse I decided to create a wreath. I made a pretty green pine wreath as royal icing transfer. Learn more about Royal Icing Transfers.
1st determine the size of the wreath by looking at the opening hole on your birdhouse. Make the wreath larger than the opening. To make an even round use a round cookie cutter, drinking glass and trace the outline onto a piece of paper.
Secure a piece of wax paper or parchment over your template.
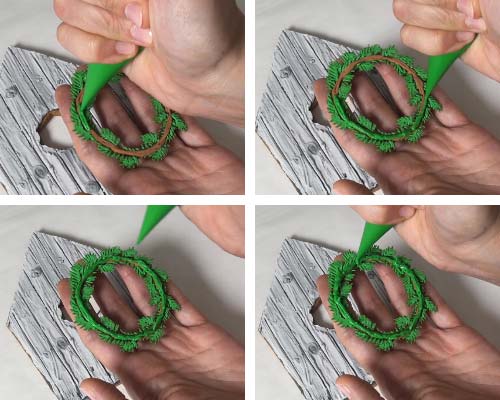
ROYAL ICING COLORS AND CONSISTENCIES :
- Brown, Light Green, Dark Moss Green – piping consistency
DECORATING STEPS :
Start by piping brown branches, overlapping them to create a realistic round base for the wreath.
Then starting with light green icing (piping consistency) pipe the 1st layer of pine needles.
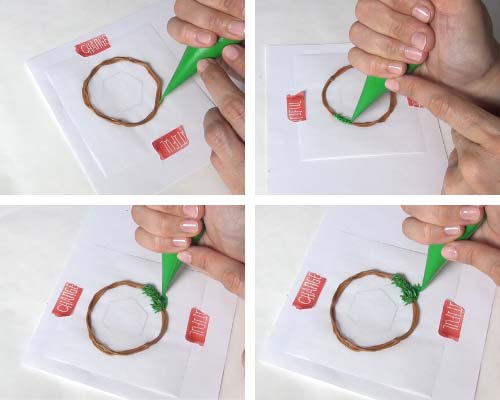
Continue piping second layer of pine needles and branches with darker green icing. Using 2 shades of green helps to achieve realistic dimension in the design. Allow pine wreath to dry completely.
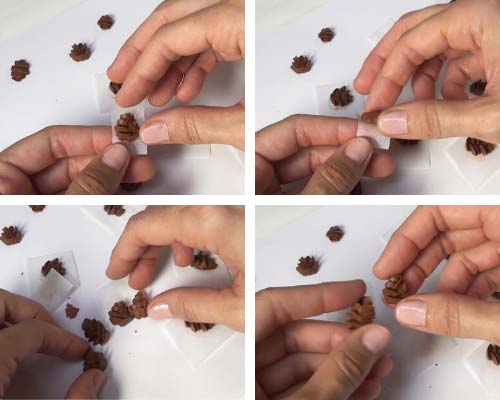
HOW TO MAKE ROYAL ICING PINE CONES
To make small sugar pine cone decorations I used a small petal tip #101 and stiff royal icing. This same piping tip can also used to create royal icing roses, succulents, leaves, flower petals and ruffles.
ROYAL ICING COLORS AND CONSISTENCIES :
- Brown – stiff consistency
- White – piping consistency to 20 second consistency
DECORATING STEPS :
Fit a piping bag with a petal piping tip #101. Fill the bag with brown icing(stiff). Pipe a small amount of icing onto the flower nail. Then attach a small wax paper square.
Start piping small petals, having the narrow part of the tip facing out and wider part of the tip facing down
Layer petals to form a small pine cone. Let the cones dry.

Once royal icing pine cones are dry simply peel off the wax paper.
To imitate snow I used sugar. I felt like my sanding sugar was too coarse to use on my tiny little pine cones. So to make it more snow like I powderized it with my mortar and pestle.
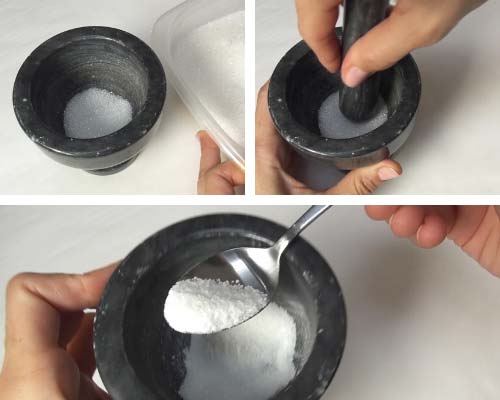
Pipe lines with white icing (piping to 20sec) on the edges of each piped petal. Then dip the pine cones into fine sanding sugar. If needed clean up the edges on pine cones with a needle tool.

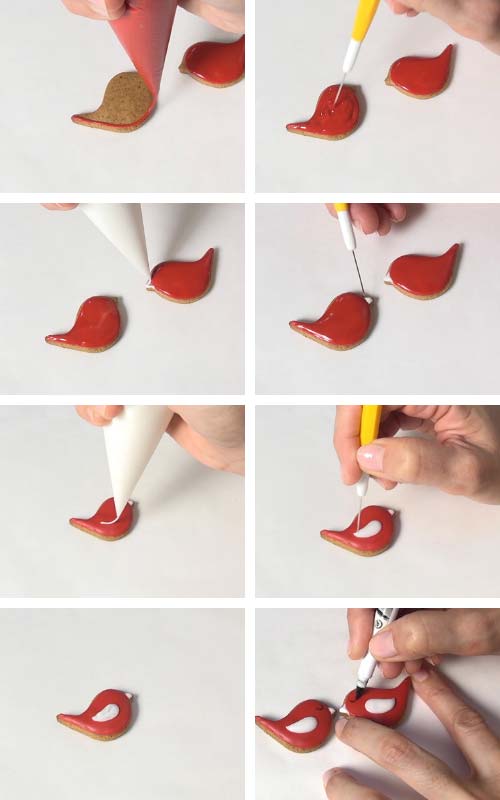
CUTE BIRD COOKIES
ROYAL ICING COLORS AND CONSISTENCIES :
- Red, White – 15 second to 20 second consistency
DECORATING STEPS:
Flood small bird cookies with red icing (15sec). Allow icing to crust for 15 minutes. Then pipe the beak with white icing (15sec). Then pipe a white wing with white icing. Allow icing to dry. Lastly, draw the eye with black edible marker.
GINGERBREAD BIRDHOUSE ASSEMBLY
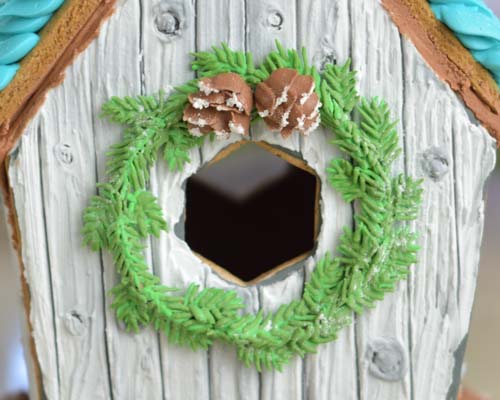
Carefully peel off the backing wax paper/parchment paper away from royal icing wreath decoration.
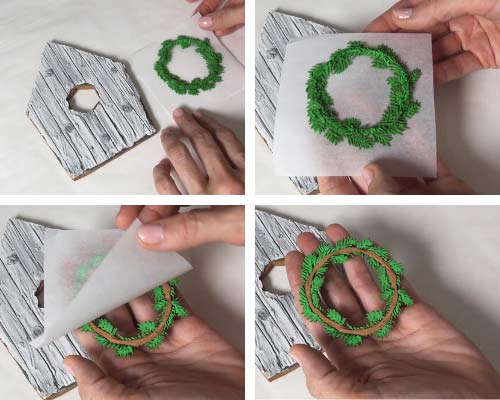
Pipe green royal icing on the underside of the wreath.
Carefully glue the wreath onto the front of the birdhouse panel. Use light shifting motion to secure wreath in place.
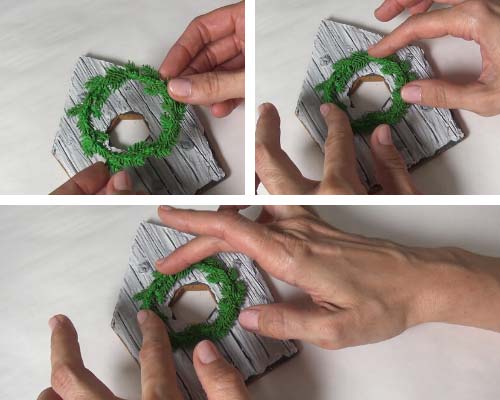
Then glue 2 pine cones on the wreath. Allow icing to dry.
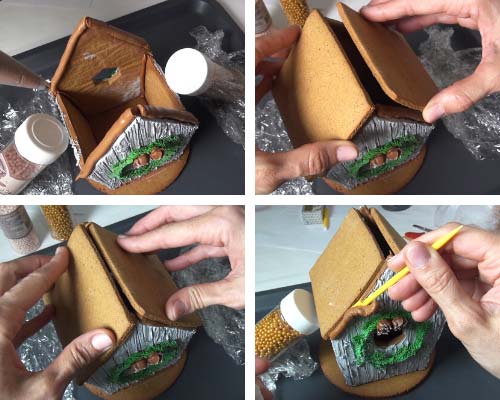
GLUE GINGERBREAD BIRDHOUSE
Pipe thick royal icing on the bottom of the front panel. Glue it onto the base cookie. Pipe thick icing onto the side panels and secure them onto the front panel. And lastly attach back panel.
Use small bottles or skewers to keep panels from sliding one way or another. Especially with birdhouses where 2 side panels are angled it’s important to keep cookies from shifting while icing is drying. Allow base of the house to dry for 4 hours.

While icing is still fresh, if needed clean up the edges.

ATTACH THE ROOF
Now you can attach the roof. Pipe stiff icing on the edges. Then place roof panels on the top. Notice my roof panels were slightly smaller than I would have liked. It can happen. So to remedy this issue I left a gap between 2 panels at the top. And I’m going to use royal icing to hide the gap. Don’t worry templates that you can print out are amended so you shouldn’t have this issue.
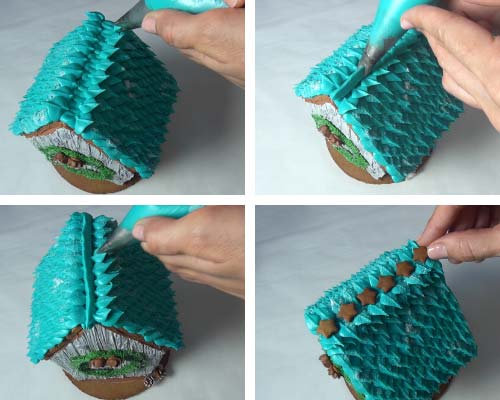
HOW TO DECORATE GINGERBREAD BIRDHOUSE ROOF
ROYAL ICING COLOR AND CONSISTENCIES:
- Teal – medium stiff, with leaf tip it’s best to use thick consistency but not too stiff. If icing is too stiff often piped leaf can break off as you pull away with the piping bag.
DECORATING STEPS :
Fit a piping bag with a large leaf tip #352. Fill the bag with teal royal icing (thick consistency) Start piping leaves at the bottom of each roof panel. Piping rows of leaves next to each other. Dust each roof panel with white sanding sugar.
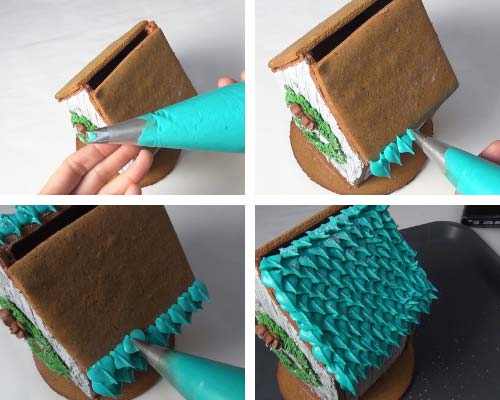
Use a large round piping tip and teal icing to pipe a zic zac line to fill in the gap between 2 roof panels.

Pipe additional 2 or more rows of leaves and finish decorating top of the roof with small star cookies.
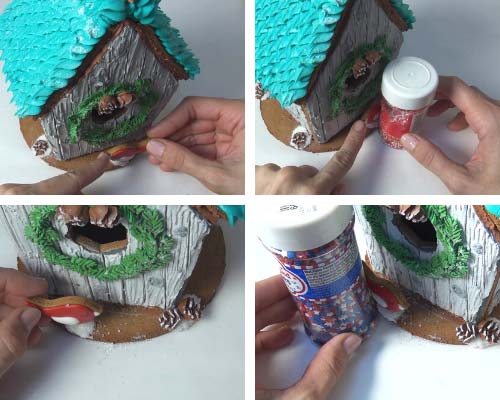
DECORATE BASE COOKIE
Decorate the base cookie of your holiday gingerbread birdhouse with white icing and sanding sugar and attach more royal icing pine cones.

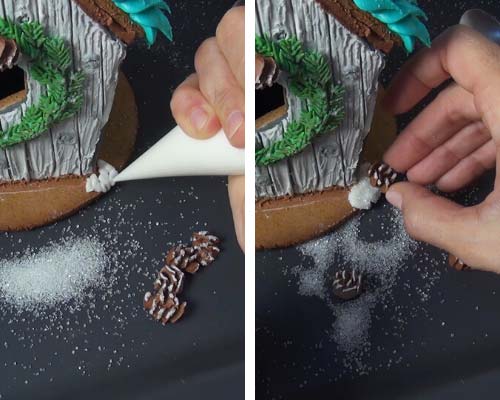
Don’t forget to glue small red birds onto the base. I used small bottles to keep them from falling while icing was drying.
TO MAKE HOLIDAY GINGERBREAD CENTERPIECE YOU NEED
- RECIPES
- Construction Gingerbread Cookie Dough for Centerpieces (long term display)
- Edible Gingerbread House Cookie Dough (tasty gingerbread that can be used to build simple house and decorations, good to eat within 3 weeks)
- Royal Icing
- TOOLS
- Birdhouse Templates – templates are for a slightly larger house than I created. Resize them to 90% – 80% to make smaller house.
- Get all the tools in my Amazon Shop
- Small Star Cookie Cutter
- Needle Tool
- Food Colors : black, red, moss green, leaf green, brown
- Black Edible Marker
- Small Bird Cutter(similar to the one used)
- Leaf Piping Tip #352
- Flower nail
- Wax Paper Squares
- Petal Piping Tip #101
- Small Icing Comb
- White Sanding Sugar
- Small Spatula
- Disposable Piping Bags
- Clean, food only tooth brush
- Paper towel
MORE HOLIDAY TREAT IDEAS :
- Christmas Gingerbread House
- Santa’s House
- Fun Snowman Pretzels
- Gingerbread Birdhouse Village
- Gingerbread Holiday Pastry Shop
- Christmas Gingerbread Doll House
- Mini Gingerbread House
- Christmas Gingerbread Log House
- Christmas Lace Gingerbread House

This post was originally published on November 25th, 2017. On November 14th, 2019 I updated this post with new photos and written text.
This post contains Amazon affiliate links that earn me a small commission, at no cost to you. I only recommend products that I use and love. Learn more about my affiliate policy here.

Hi, I’m Hani
Welcome!
Thank you for visiting Haniela’s. On my blog, you’ll find delicious sweet & savory recipes made with simple ingredients. Why not start a new adventure? Discover a world of cookie decorating with my step-by-step tutorials.

Hi, I’m Hani
Welcome!
Thank you for visiting Haniela’s. On my blog, you’ll find delicious sweet & savory recipes made with simple ingredients. Why not start a new adventure? Discover a world of cookie decorating with my step-by-step tutorials.

I love this! The template won’t open to the right size to print. Do you have another link?
Hi Stephanie, you can try it now. I’ve updated the template. It’s slightly bigger than house in the tutorial but it can be resized to 90% to make it slightly smaller if you prefer.