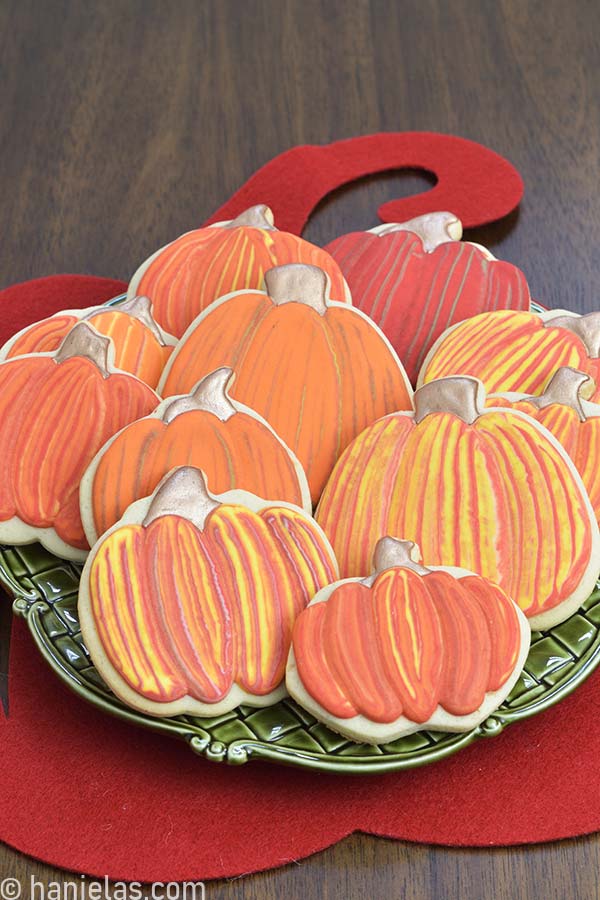
Decorated Marbled Pumpkin Cookies
Inspired by magical glass blown pumpkins I created this set of decorated Marbled Pumpkin Cookies.
HOW TO MAKE DECORATED MARBLED PUMPKIN COOKIES

- Beginner’s Guide To Cookie Decorating
- Ultimate Guide to Cut-Out Cookies (tips, tricks, troubleshooting)
- Royal Icing Recipe
- Small Batch Royal Icing Recipe
- Cookie Icing Recipes (includes vegan royal icing, glaze, fondant)
- Guide To Royal Icing Consistencies with Visual Help(what is stiff, flood icing, etc.)
- How To Freeze Royal Icing
- How To Make Royal Icing Transfers
- Royal Icing FAQ ( for example: how to make black icing, color bleeding, storage, and more)
- How To Make a Cookie Cutter Template
- Ultimate Guide To Cookie Decorating Tools
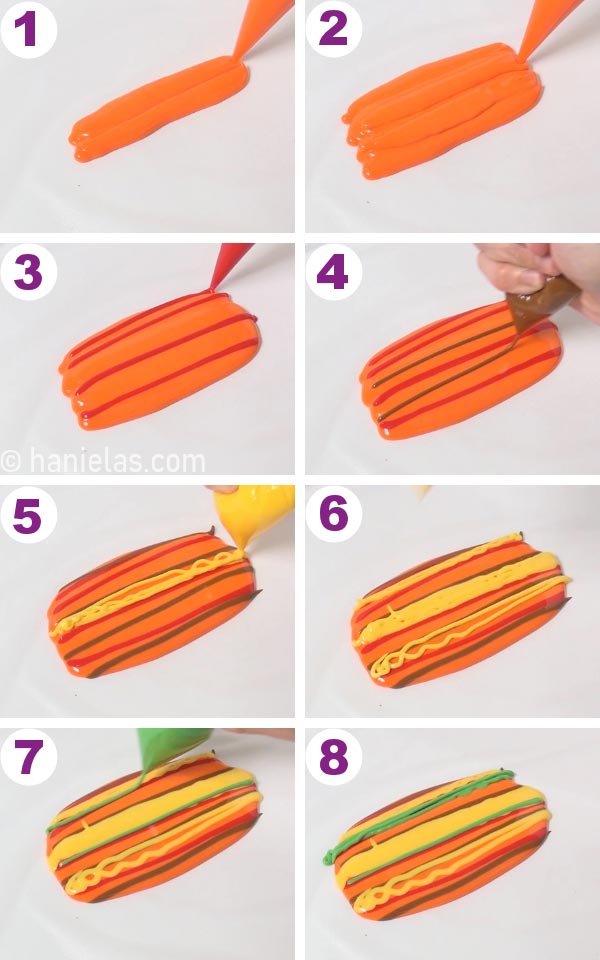
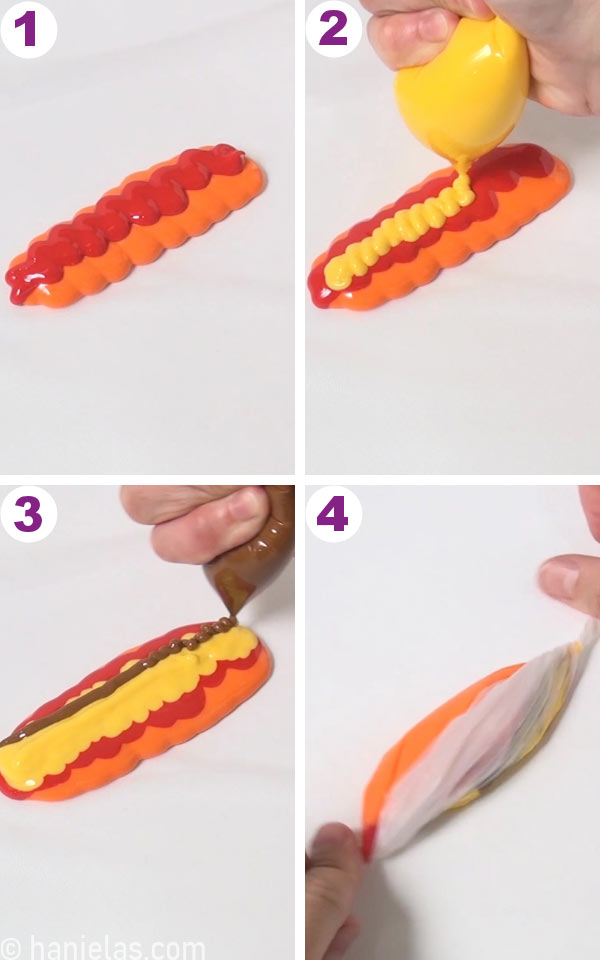
LAYER ROYAL ICING
- This marbling decorating technique is really fun and gives instant results. It’s perfect for making marbled pumpkin cookies.
- What’s also great, is that you only need one consistency of royal icing.
- Color and thin royal icing to 10-15 second consistency.
- Onto a piece of food wrap or cling wrap pipe layers of royal icing (steps 1-8).
What colors to use? Well, this is entirely up to you. As you can see bellow I used several colors: orange, red, brown, yellow and green. To get inspired, look up glass pumpkins on the internet. You’ll get an idea what colors go well together. You can use 2 or 3 colors for a different look.
CREATE ROYAL ICING BAG/BULLET
Few people told me that layers of icing look like a taco. What do you think?
I’ve used this royal icing bullet technique before, to make Royal Icing Succulents. The difference is when making royal icing succulents you use thicker icing and so it’s not spreading. Here as you can see, due to the flood consistency icing spreads fast.
Quickly pick up two opposite ends of the food wrap and twist the ends to close (steps 1-4). Tie a knot on one end, so the icing doesn’t ooze out (step 5). Trim the other end and quickly insert it into a tipless piping bag (steps 6-8).
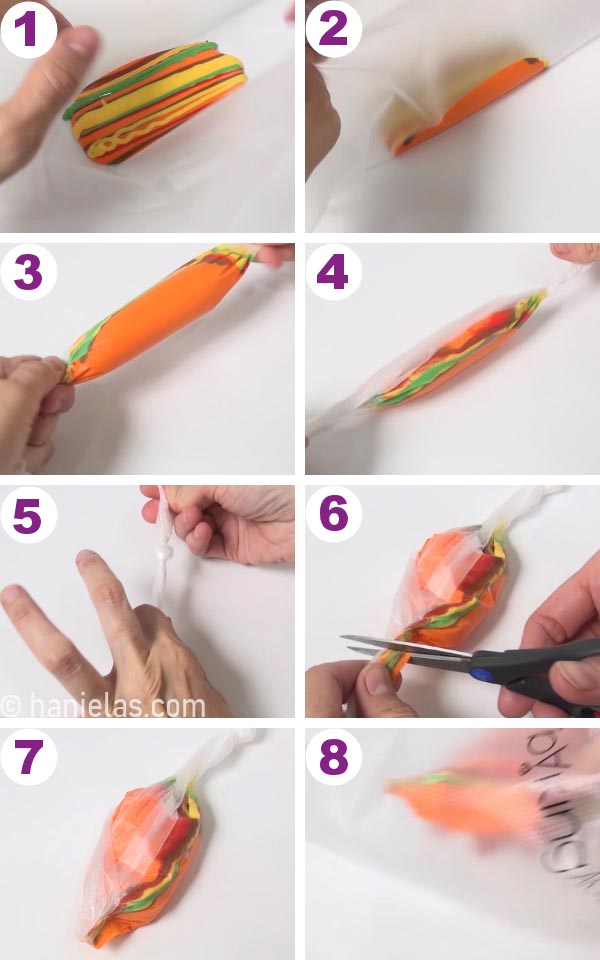
Here are few color layering ideas.
For the best results, use contrasting colors.
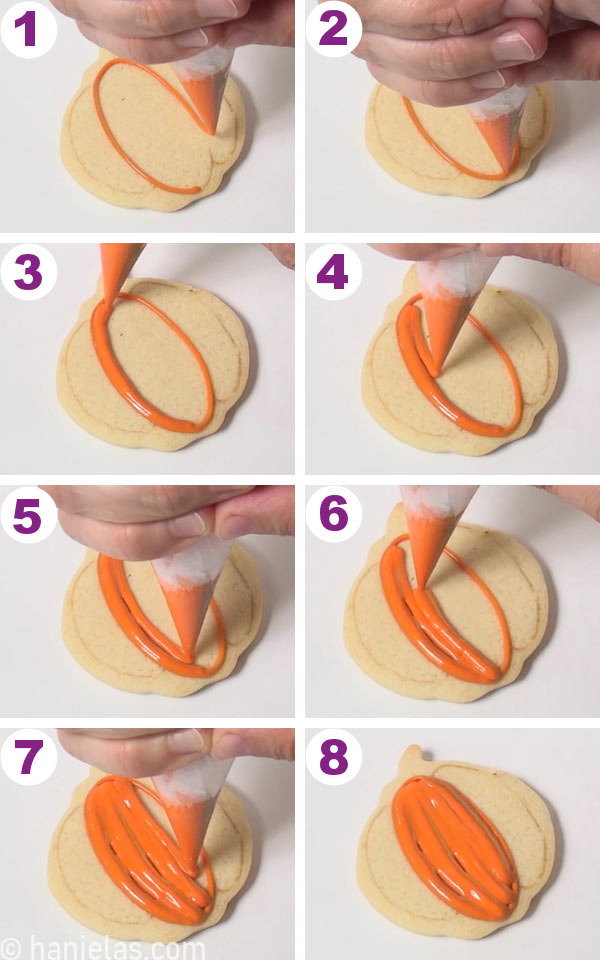
HOW TO CUT A TIPLESS PIPING BAG
Once you insert the royal icing pouch/bullet into a tipless piping bag, tie the piping bag and cut the tip of the piping bag so you can start decorating (step 1)
First, find a seam on a tipless piping bag, press it down the middle, and cut straight across (steps 2). With this marbling technique, you’ll need to push out some of the icing until the multicolored line of icing comes out.

COOKIE DECORATING GUIDES
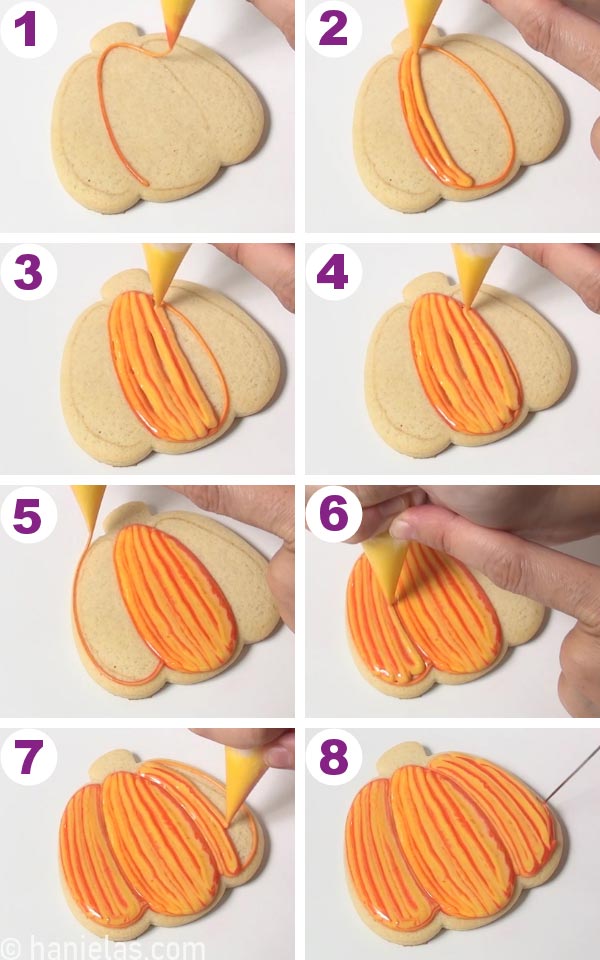
Take a brown edible marker and draw the pumpkin segments onto the cookies. As you can see, I used several different shapes of pumpkins. If you only have one shape, that’s fine. But if you have several of the same pumpkin cutters, you can squeeze them or gently compress them vertically to make them wider, and you’ll have more shapes.
TIP: I used pliers to re-shape cutters for Decorated Vegetable Cookies.

DECORATE WITH MARBLED ROYAL ICING
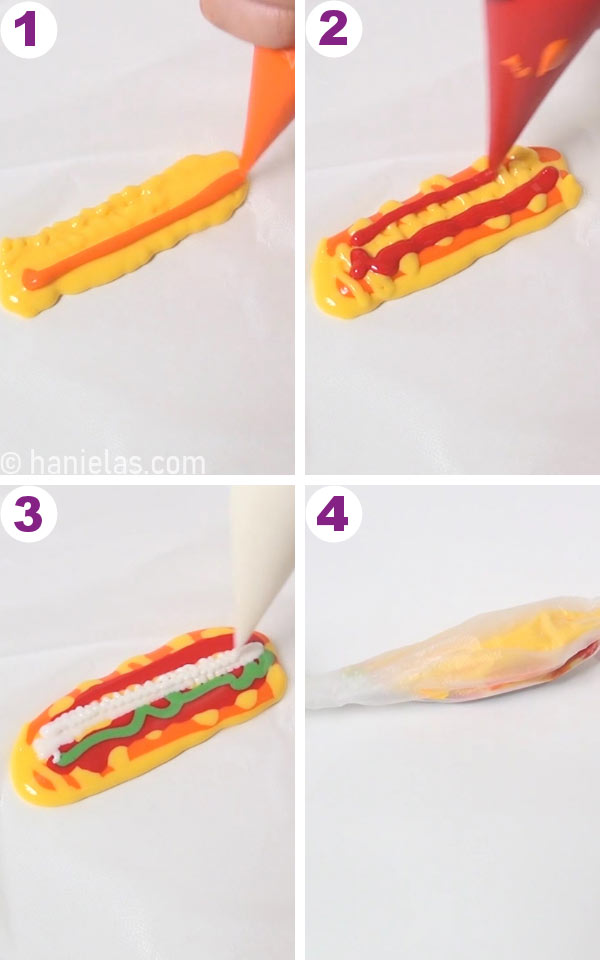
Follow the drawn guides and pipe an outer outline (steps 1-2). Then immediately pipe lines of icing next to each other. Pipe back and forth from the bottom to the top until you fill the whole pumpkin segment (steps 3-8).
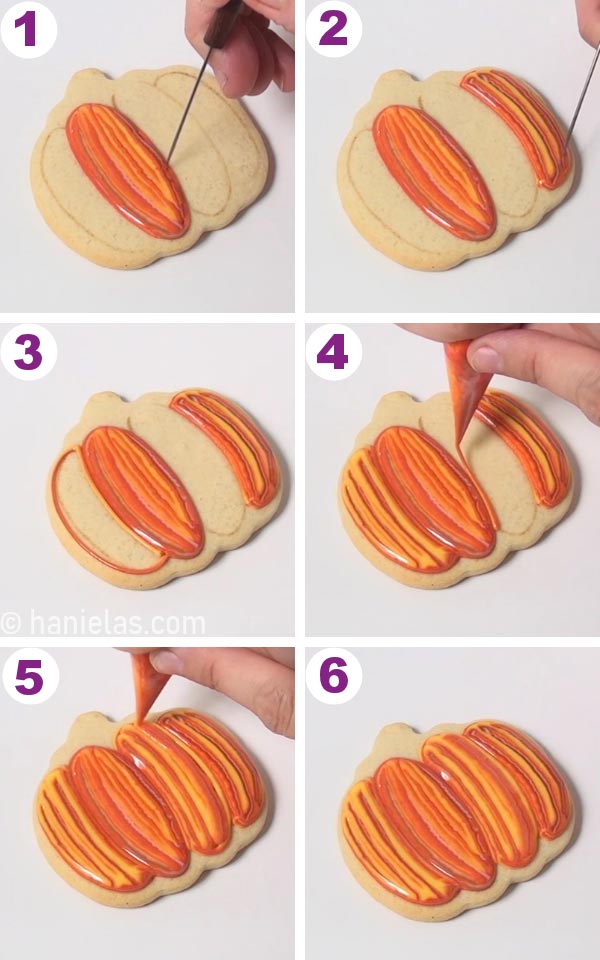
Ideally, you want to pipe the lines together without any gaps. If you happen to have a few gaps here and there, use a scribe tool and carefully move the icing in a vertical direction until it fills the gap area (steps 1-2).
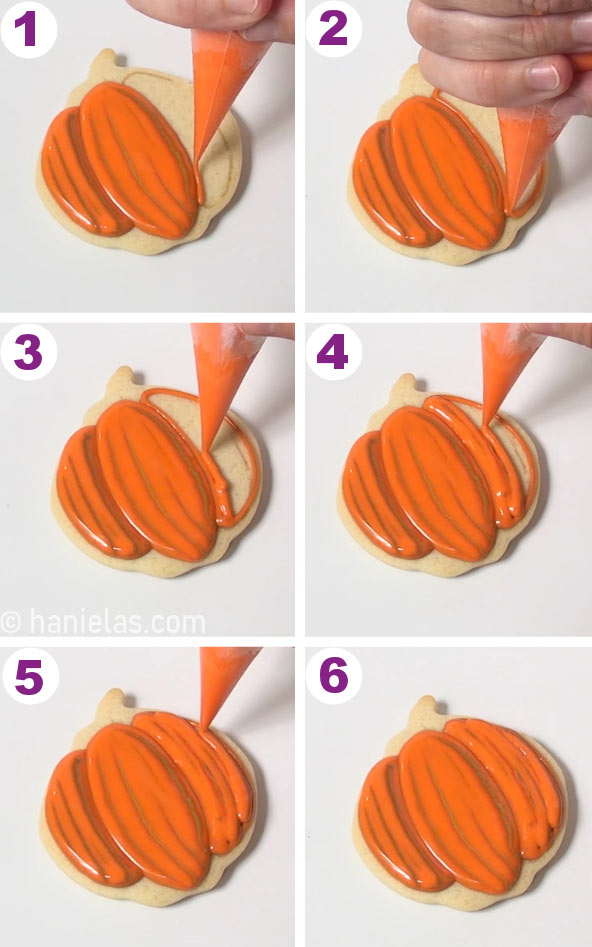
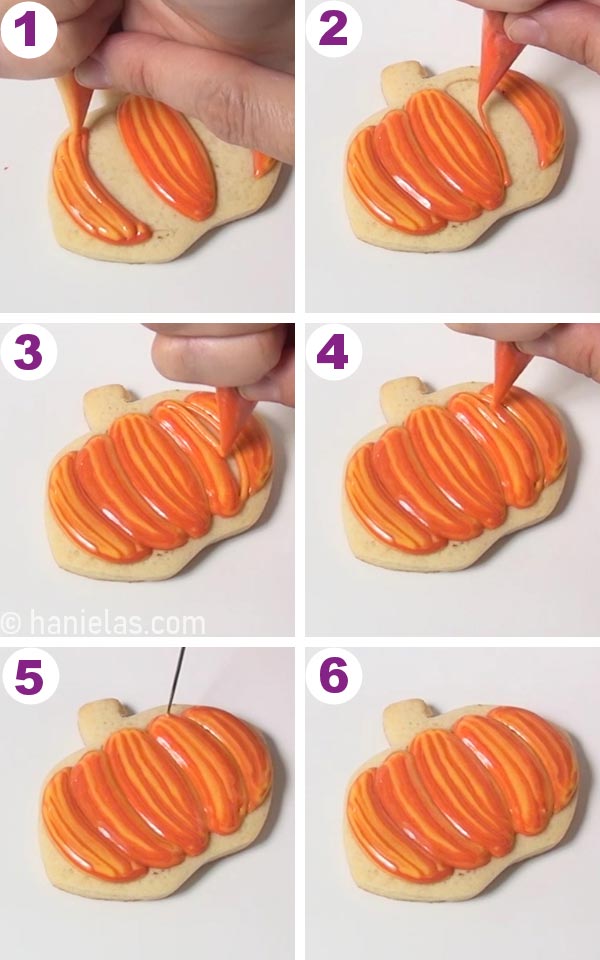
Continue to outline and fill the left segment, just like you did the first one. Pipe vertical lines back and forth.
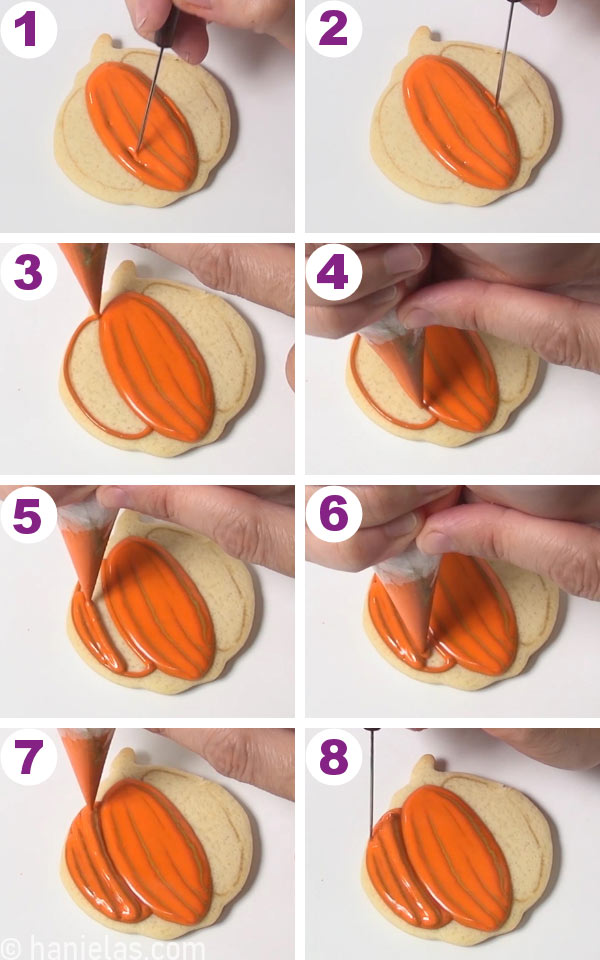
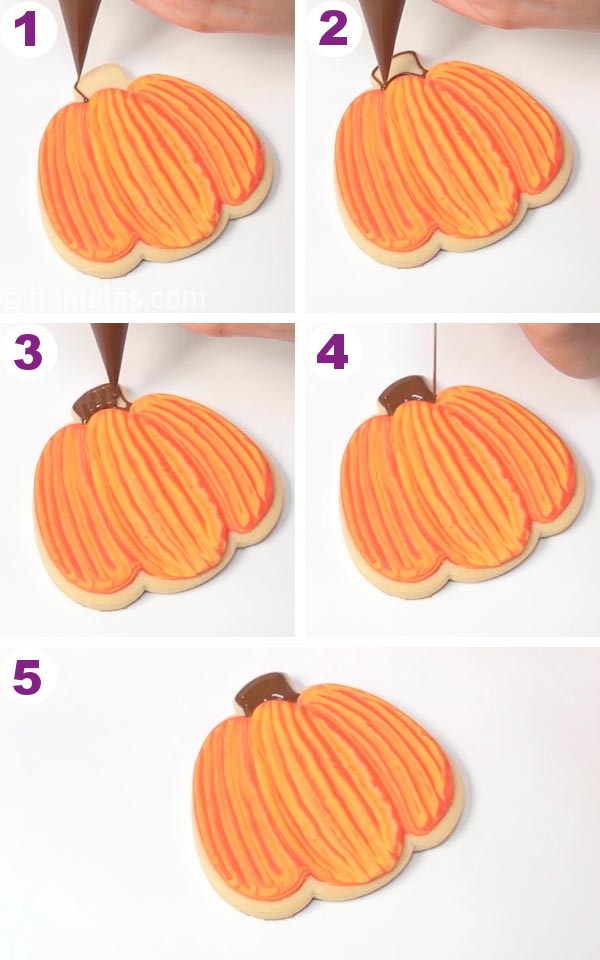
And after, repeat on the right side. Let the icing crust for about 30 minutes before piping the stem.
Below you’ll find several pumpkin shapes I decorated using the same marbling technique. This cutter, I’m using below, it’s a cutter from Sweet Sugarbelle’s Cookie Cutter Collection.
For the third design, I used a traditional pumpkin shape. I think it is the most available pumpkin shape out there. I used the same shape to decorate 10 Halloween Cookies.
This next shape it’s actually an apple cutter that I squeezed vertically to make a fat pumpkin.
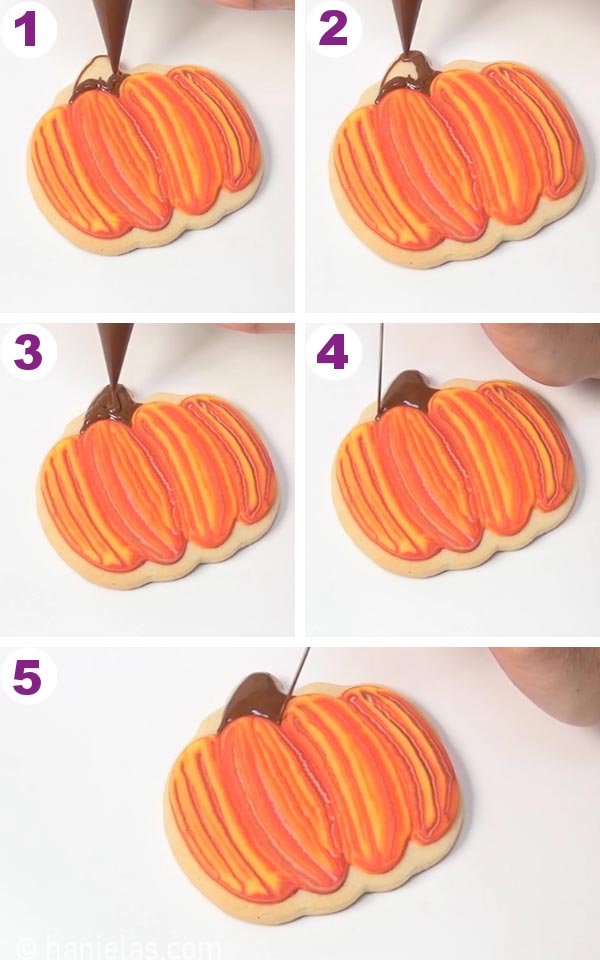
PUMPKIN STEM
Use 20-second brown icing to outline and flood the pumpkin stems on all the cookies. Let brown icing dry before the next step.
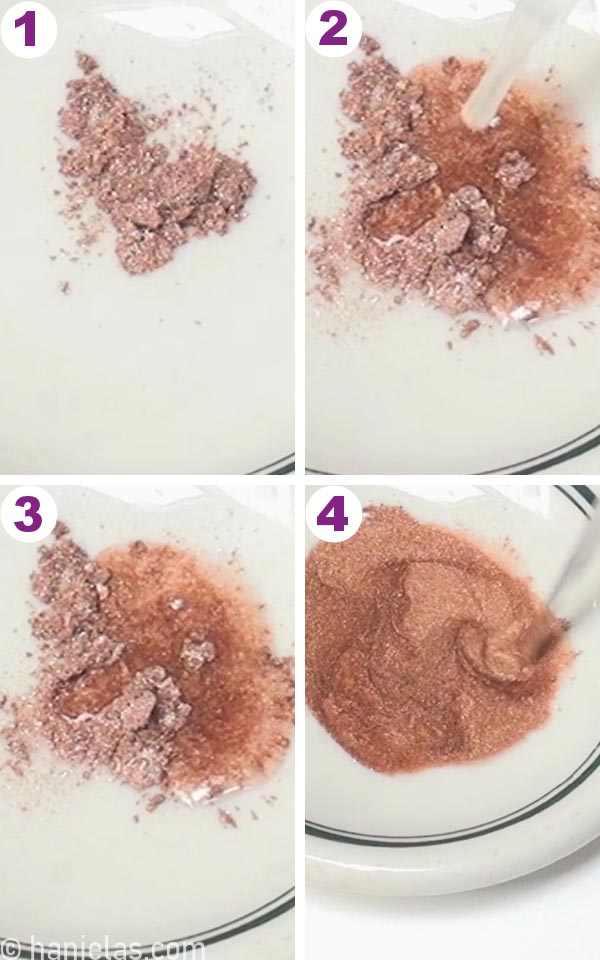
LUSTER DUST PAINT
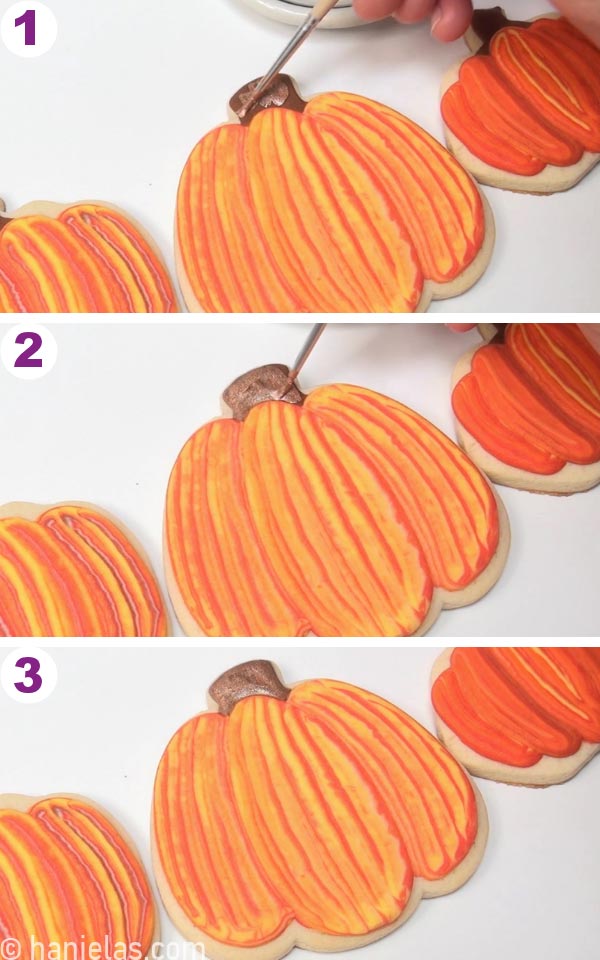
I decided to paint the brown stem on marbled pumpkin cookies with bronze luster dust paint.
- How to make edible luster dust paint
- Pour a little bit of dry edible luster dust into a palette (step 1).
- Load EverClear Alcohol or other high-content alcohol (clear Vodka or McCormick Lemon Extract) into a dropper and add a tiny amount of it to dry dust (steps 2-3).
- With a food-only paint brush mix together to make the paint.
- If you added too much liquid and paint it too runny, no worries. Let it sit for several minutes, alcohol will slowly evaporate and paint will thicken.
Use a food-only paint brush and paint the stems.
- MORE FALL COOKIE DECORATING IDEAS
- How to make Scarecrow Cookies via Semi Sweet
- 10 Halloween Pumpkin Cookies
- Simple Fall Decorated Cookies
- Marbled Leaf Cookies

TO MAKE MARBLED PUMPKIN COOKIES YOU NEED
- RECIPES
- Fresh Lemon Royal Icing
- Cut-Out Sugar Cookie Recipe
- Vegan Cookies
- Gluten Free Cookies
- Chocolate Sugar Cookies
- TOOLS
- Get all the tools in my Amazon Shop
- Pumpkin Cookie Cutters
- Tipless Piping Bags
- Scribe Tool
- Concentrated Gel Food Colors ( I used Americolor Brand and Chefmaster)
- Bronze Luster Dust
- Food-Only Paint Brush

Hi, I’m Hani
Welcome!
Thank you for visiting Haniela’s. On my blog, you’ll find delicious sweet & savory recipes made with simple ingredients. Why not start a new adventure? Discover a world of cookie decorating with my step-by-step tutorials.

Hi, I’m Hani
Welcome!
Thank you for visiting Haniela’s. On my blog, you’ll find delicious sweet & savory recipes made with simple ingredients. Why not start a new adventure? Discover a world of cookie decorating with my step-by-step tutorials.