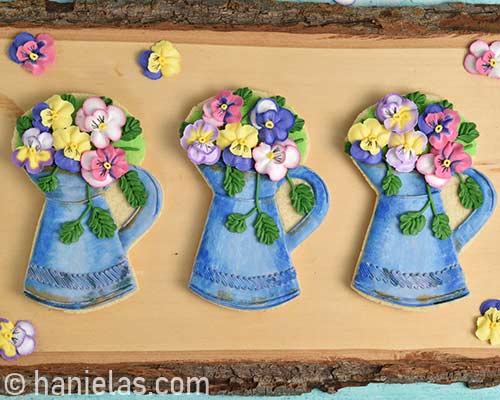
Pansy Cookies
These pretty decorated Pansy Cookies are just the treat you need to make for your mom this Mother’s Day.

HOW TO MAKE DECORATED PANSY COOKIES
Great news! Recently I connected with super talented Lisa from Bordelands Bakery. And we’ve decided to do a floral Mother’s Day Cookie collaboration. You can find beautiful flower cookies Lisa made when you scroll down to the bottom of the post.
To make my pansy vase/pitcher cookies I used my Sugar Cookie recipe. And to cut out cookies I used a cardstock cookie cutter template.
To decorate I’m using Royal Icing and pre-made edible Royal Icing Pansy Flowers. These edible flowers are really simple to make. Use my a step by step Royal Icing Pansy tutorial to make your flowers. Sugar flowers can be made ahead of time, days or weeks in advance. Store flowers away from the moisture and direct sunlight. Learn more about Royal Icing Transfers.
HOW TO HAND CUT SUGAR COOKIES
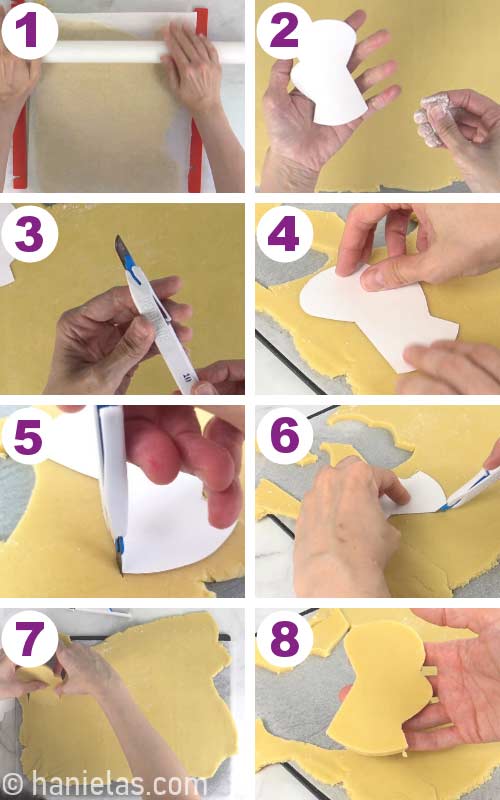
Prepare cookie dough and roll it out to about 1/4 inch thick. Chill the rolled out cookie dough until firm, about an hour or so, (step 1). Print a cookie cutter template (check the section at the bottom of the post for the list of tools).
Then take a cardstock cookie cutter template and dust it with a little bit of flour. This helps to prevent cardstock template from sticking to the cookie dough,(step 2).
Place template onto a chilled cookie dough. Use an exacto knife or a penblade to cut the shape out. Transfer cut out cookies onto a baking sheet lined with parchment. Bake at 375F for about 9-10 minutes, (step 3-8).
TIP: Be sure to protect your work surface when hand cutting cookies with a knife. Place a cutting board or a thick plastic sheet underneath a rolled out cookies dough.
HOW TO FLOOD COOKIES
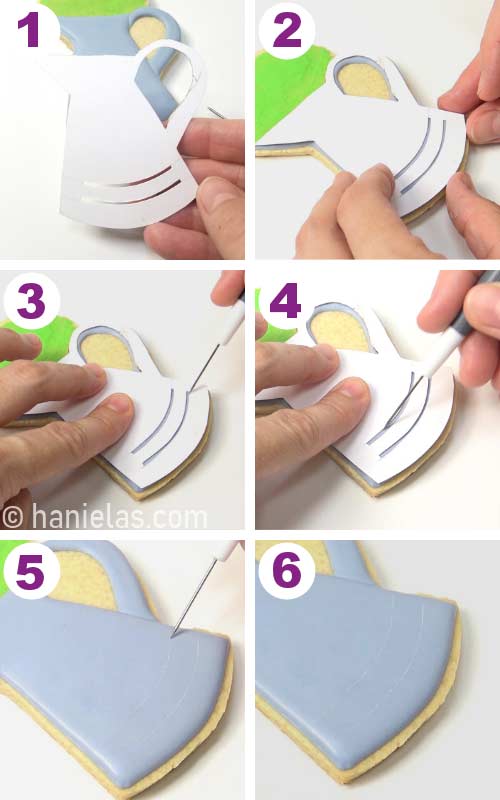
Use a decorating template and an edible marker to trace pitcher outlines onto a cookie, (step 1). Then outline and flood the pitcher with gray royal icing (15 second consistency). Allow icing to crust well, (step 2-8).

Then continue outlining and flooding the handle. Use a needle tool to shape the icing while icing is wet. Let crust well, (step 1-6).

BRUSH ROYAL ICING ONTO COOKIES
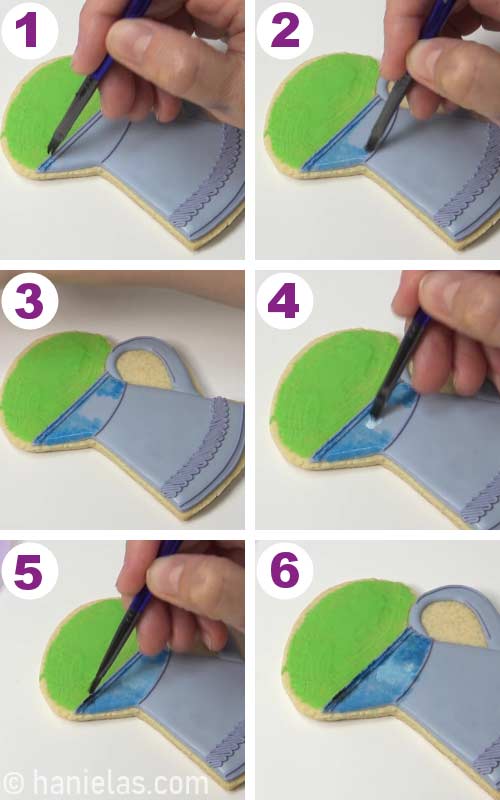
Pipe green icing (15 sec) on the cookie and brush it on in an even thin layer with a food only paint brush. Wipe off excess icing into a paper towel as needed. Allow icing to dry ,(step 1-6).

PIPE ZIC-ZAC DESIGN
Take a decorating template and trace the outline onto the icing. I used a needle tool and I gently scratched the surface of dry icing to make the guides for me to pipe, (step 1-6).
Fit the piping bag with a PME tip size #1.5 and fill a piping bag with a medium thick icing. Icing should be thick enough so it doesn’t blend together when lines are piped next to each other. Learn more about Royal Icing Consistency.
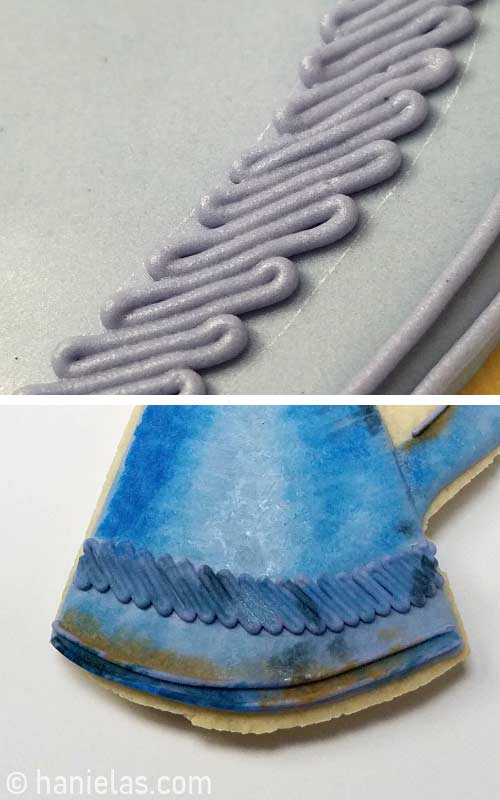
Pipe a tight zic-zac design in between 2 guides. If you need to break the piped line it’s okay. Continue piping at the exact spot where you stopped, (step 1-5).
Continue piping additional outlines, (step 6).

PREPARE EDIBLE PAINT
Into a paint palette add a drop of gel food color : white, black, royal blue and orange, (step 1). Then add clear alcohol ( I used Everclear/grain alcohol). Stir well with a food only paint brush, (step 2-3). You’ll notice a little bit of residue in the edible paint as you stir it. This is normal. Simply pick up residue with a paint brush and rinse if off in water, (step 4- 5).
Have a piece of dry paper towel on hand to absorb excess paint from the paint brush, (step 6).

PAINT COOKIES
Before you start painting be sure royal icing is fully dry. Royal icing can take 6-10 hour to fully dry.
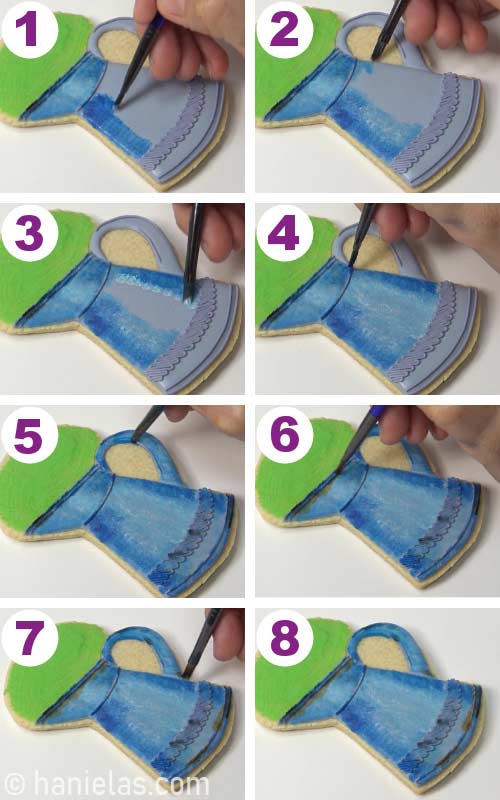
To paint icing use short strokes and dabbing technique. Start with royal blue edible paint. Dip brush into and edible paint and then dab it onto a dry paper towel to remove excess paint. Then paint the cookies.
Continue shading pitcher with white edible paint. Use black paint only sparingly at the top and bottom of the pitcher.
Paint the bottom of the pitcher and a handle. Use orange edible paint to make rusty sections at the very top, bottom and at the bottom of the handle.
Check out rusty sections below.
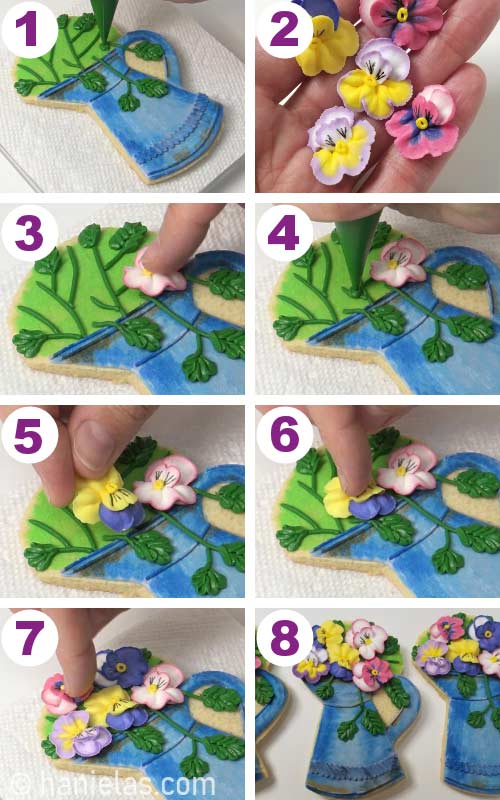
DECORATE COOKIES WITH EDIBLE ROYAL ICING PANSY FLOWERS
Prepare colorful Royal Icing Pansies with my step by step tutorial.
When creating new cookie designs I often do a dry run of the design. Especially when I’m not 100% sure where to pipe certain elements (wavy leaves) To test the design I like to use a piece of wax paper.
Place a piece of wax paper on top of a cookie. Then decorate the wax paper with piped leaves and pansy flowers. And after if you are happy with the result you can pipe directly onto a cookie.

With dark green royal icing (medium thick consistency – icing should hold its shape when lines are piped next to each other) pipe the stems.
Fit a piping bag with a piping tips #101s and pipe the wavy leaves on the ends of the stems.
TIP : To color dark green icing I used Forest Green and a touch of Leaf Green to brighten the color slightly.

Glue variety of colorful royal icing pansy flowers onto the prepared stem /leaves canvas.
COLLABORATION WITH BORDERLANDS BAKERY
For our Mother’s Day Collaboration Lisa from Borderlands Bakery made these Floral Cookies using chocolate flowers and royal icing.

MORE FLORAL COOKIE AND CAKE IDEAS :
- Rose Meringue Cookies
- Cherry Blossom Cake
- Mother’s Day Breakfast in Bed
- Rose Cookies
- Gingham Flower Cookies on a stick
- Hydrangea Meringue Cookies
- Mason Jar Cake

TO MAKE DECORATED PANSY COOKIES YOU NEED
- RECIPES
- Cut out Cookie Recipes
- Royal Icing
- TOOLS
- Get all the tools from my AMAZON SHOP
- Pansy Vase/Pitcher Cookie Cutter Template
- Scribe Needle Tool
- PME Piping Tip #1.5 – to pipe zic-zac designs
- Piping Tip 101s – to pipe wavy leaves
- Disposable Piping Bags from Borderlands Bakery
- Paint Palette from Borderlands Bakery
- Paint Brush – I used Filbert #4
- Everclear, or other high content clear alcohol
- Paper Towel
- Food Gel Colors : black, royal blue, white, orange, forest green, leaf green
- STEP BY STEP VIDEO TUTORIAL ON HOW TO MAKE PANSY FLOWER COOKIES
- Pre-Made Pansy Flower Cookies (step by step detailed tutorial)
This post contains Amazon affiliate links that earn me a small commission, at no cost to you. I only recommend products that I use and love. Learn more about my affiliate policy here.

Hi, I’m Hani
Welcome!
Thank you for visiting Haniela’s. On my blog, you’ll find delicious sweet & savory recipes made with simple ingredients. Why not start a new adventure? Discover a world of cookie decorating with my step-by-step tutorials.

Hi, I’m Hani
Welcome!
Thank you for visiting Haniela’s. On my blog, you’ll find delicious sweet & savory recipes made with simple ingredients. Why not start a new adventure? Discover a world of cookie decorating with my step-by-step tutorials.