Gingham Easter Bunny Cookies
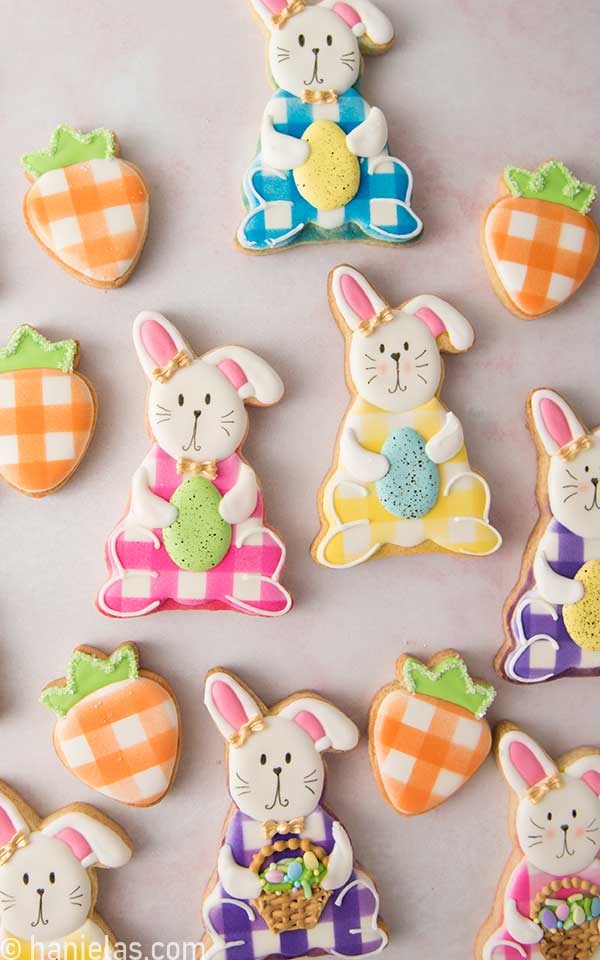
Let’s dress Easter cookies in gingham. These sweet royal icing decorated Gingham Easter Bunny Cookies are perfect for Easter gift-giving, or for setting up your festive table. And I’m including a super cute cookie bonus on how to make the cutest gingham carrot cookie using a strawberry cookie cutter.
updated post from 2014
HOW TO DECORATE GINGHAM EASTER BUNNY COOKIES WITH ROYAL ICING
Beginner’s Guide To Cookie Decorating
- Cookie Decorating Guide
- Beginner’s Guide To Cookie Decorating
- Ultimate Guide to Cut-Out Cookies (tips, tricks, troubleshooting)
- Royal Icing Recipe
- Small Batch Royal Icing Recipe
- Cookie Icing Recipes (includes vegan royal icing, glaze, fondant)
- Guide To Royal Icing Consistencies with Visual Help(what is stiff, flood icing, etc.)
- How To Freeze Royal Icing
- How To Make Royal Icing Transfers
- Royal Icing FAQ ( for example: how to make black icing, color bleeding, storage, and more)
- How To Make a Cookie Cutter Template
- Ultimate Guide To Cookie Decorating Tools
Easter Bunny Cookies Cutter and Decorating Template
I used a sitting bunny cookie cutter to cut shapes out of sugar cookie dough (step 1). After baking and cooling cookies, I first used a simple cardstock template to trace guides onto the cookies with a yellow edible marker (steps 2-6).

Flood Cookies with Icing
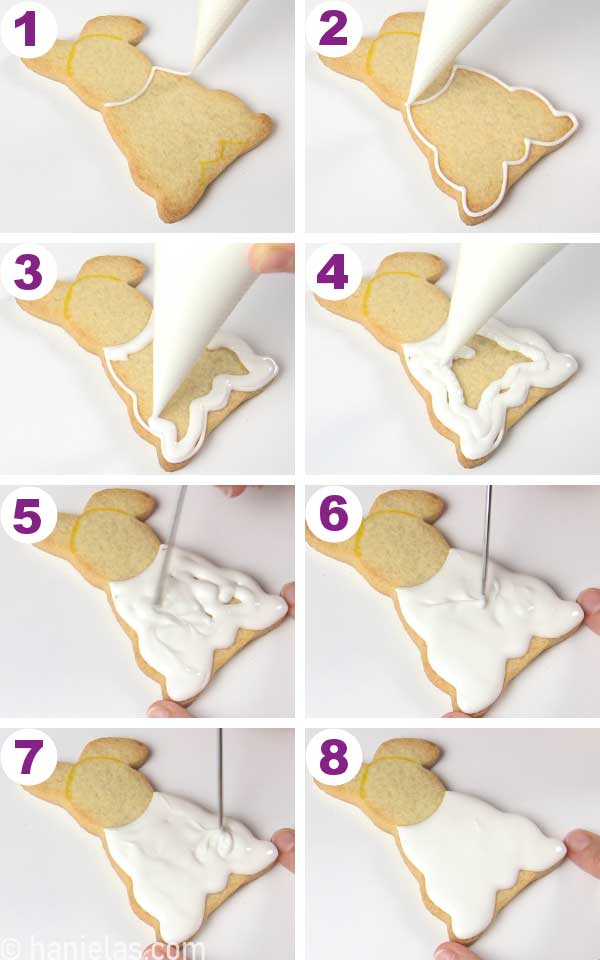
I outlined and flooded the body with a 15-second flood consistency white icing (steps 1-8). Let icing crust well or dry overnight before airbrushing.
Airbrushing Gingham Pattern
Creating a gingham pattern on cookies iced with royal icing is super easy. I used a stripe stencil and airbrush.
There are different size stripe stencils readily available. But if you are in a pinch, you can easily make one at home using my step-by-step DIY Stripe Stencil Tutorial.
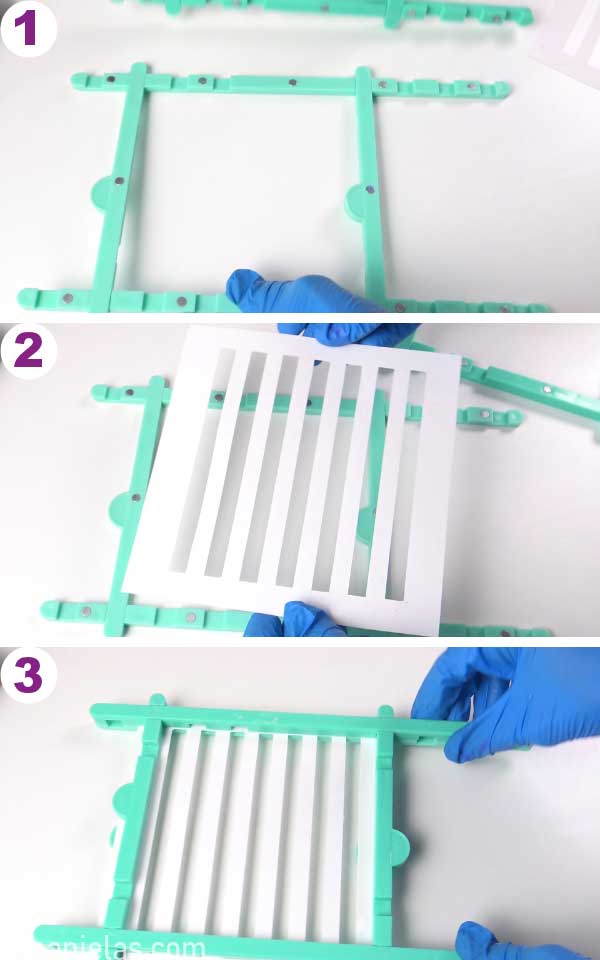
Place a stencil holder with a stencil over the bunny cookie. The stencil should snuggly fit on top of the iced cookie (steps 1-2). Any gaps between the stencil and a cookie are most likely to result in overspray.
Fill the airbrush cup with a few drops of airbrush food coloring. Hold the airbrush gun perpendicular to the cookie surface. Airbrush stripes onto the icing one by one. Focus on the edges first. Use a light hand on the trigger. It’s best to airbrush lightly and several times until you are happy with the coverage (steps 1-4). Carefully lift the stencil holder and turn it 90 degrees. Place it on top of the cookie and airbrush again (steps 5-8).
TIP: Don’t have an airbrush? You can paint a gingham pattern with a flat paintbrush and edible paint. Mix a few drops of food gel color with alcohol, and discard the thick mass that forms. Lightly dip the flat food-only paintbrush into the paint and blot it on a dry paper towel. Paint stripes in one direction, and then opposite, until you have a gingham pattern.

Outline and flood the face with 15-second consistency white icing. Use a scribe to smooth the icing. Let icing crust before the next step (steps 1-6).

Easter Bunny Ears
If needed, prior to icing the ears, make the guides. Use a yellow or light brown marker and draw the ear guides (steps 1-3).
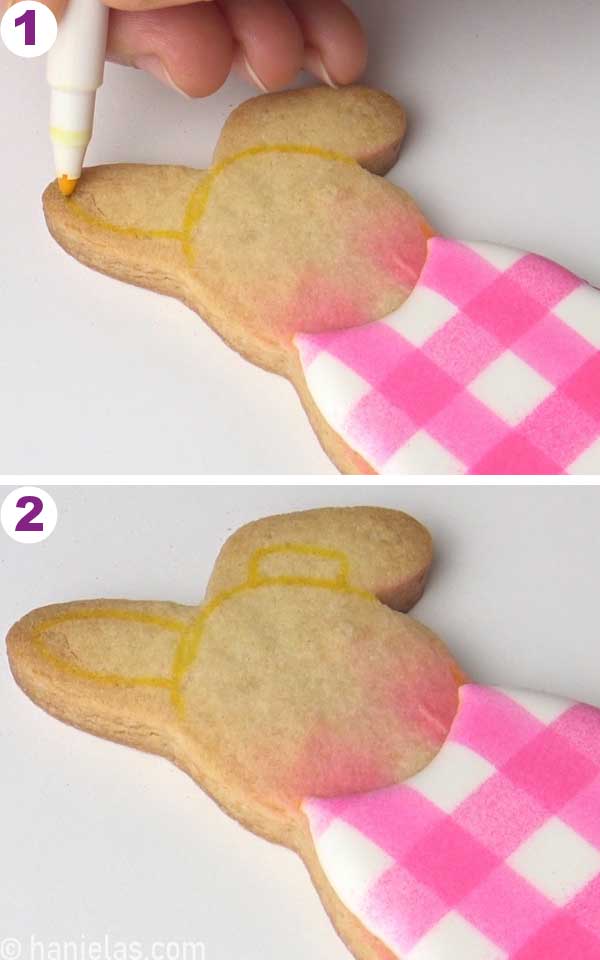
To decorate Easter bunny ears I used 25-second consistency icing.
Outline and flood the middle of the ears with pink royal icing (1-8). Let pink icing crust for 20 minutes.
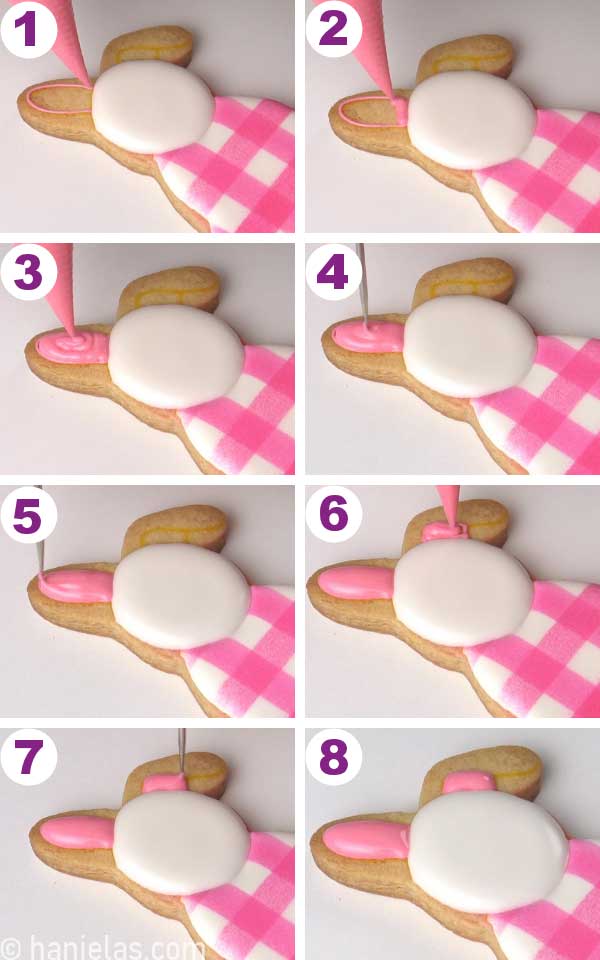
Now, with the white icing of 25-second consistency flood the sections around the pink icing. Let the white icing crust and then, on the folded ear pipe the small section at the bottom of pink icing (steps 7-8).

Speckled Easter Eggs Royal Icing Transfers
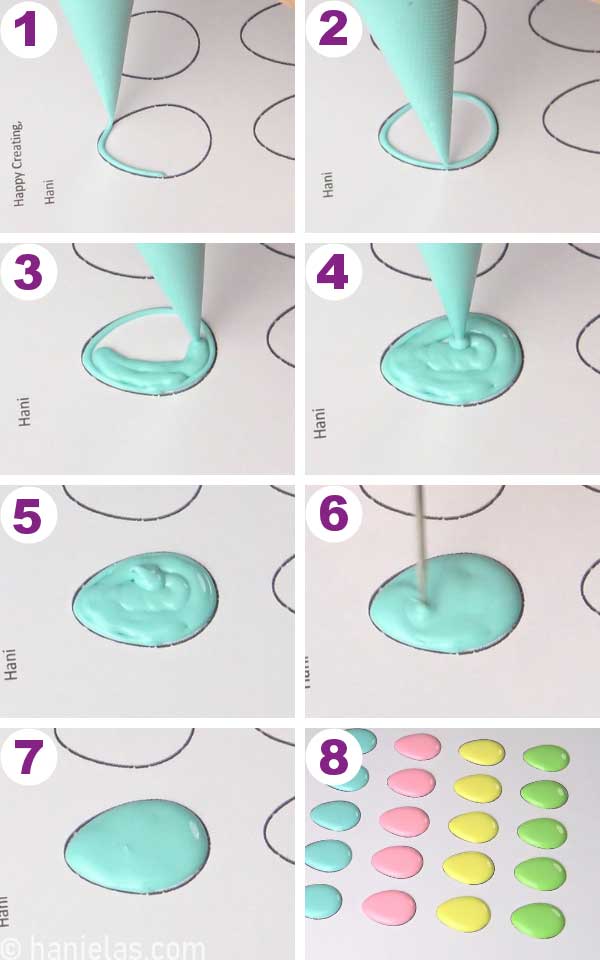
I often use Royal Icing Transfers to decorate cookies. They are easy to make and last pretty much forever. To embellish festive Easter gingham bunny cookies, I made speckled Easter egg royal icing transfers.
Slide the Easter egg transfer sheet into a protector sheet. Lay the sheet onto a flat surface such as a piece of cardstock, baking sheet, or a tray. Outline and flood each egg shape with a 20-second consistency icing. Set aside and let dry (steps 1-8).
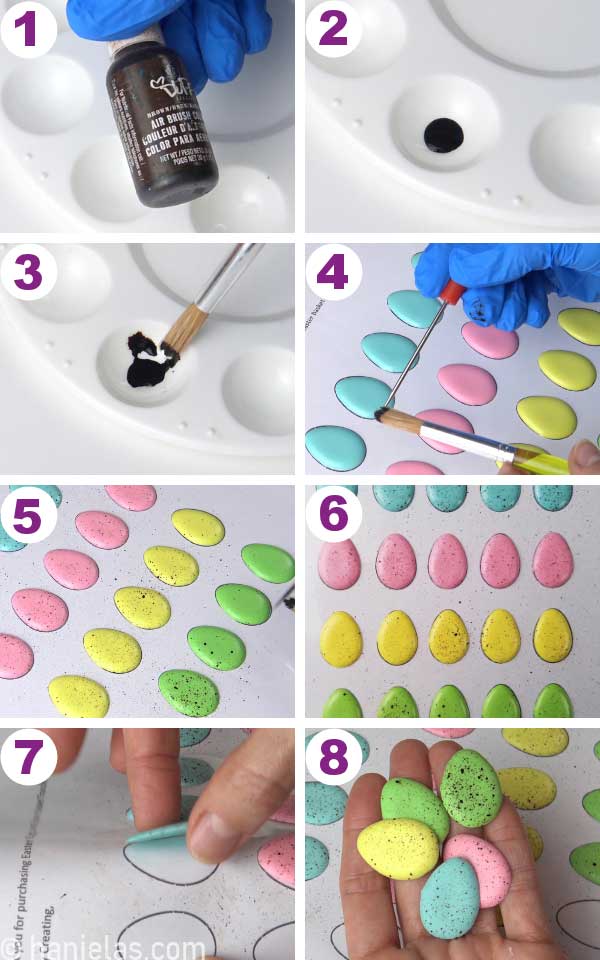
I used brown airbrush color to create a speckled pattern on Easter egg royal icing transfers (step 1). Pour a drop of airbrush color into a palette. Dip a food-only paintbrush into the brown airbrush color (steps 3 -4).
Hold the paintbrush over the sheet with piped and dry royal icing Easter eggs. Run a scribe tool or a toothpick thru the bristles. Repeat as many times as needed to create speckled eggs (steps 4-5). Let dry for 30 minutes. Carefully remove Easter egg royal icing transfers from the protector sheet. Store in an airtight container, away from direct sunlight and moisture.
TIP: Protect your work surface with a paper towel. It helps absorb any overspray. If you don’t have brown airbrush color. Mix a drop of brown food coloring with a couple of drops of alcohol (Everclear or clear Vodka).
Easter Basket Royal Icing Transfers
If you feel up for a challenge, you can make these cute Easter baskets with royal icing.
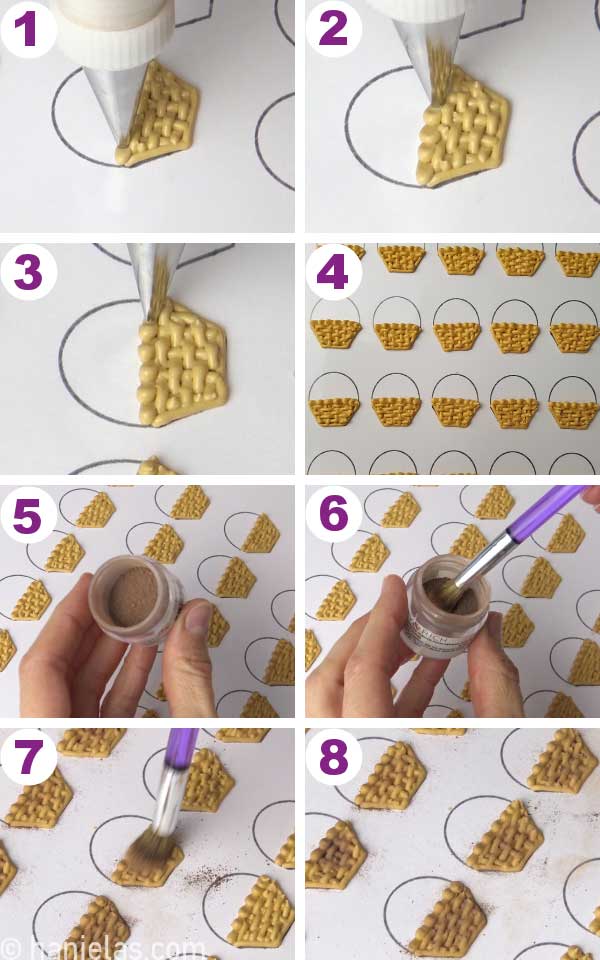
To make the baskets, I colored royal icing with ivory food coloring and I added a touch of purple to create a tan color. Pipe baskets using thicker piping consistency royal icing.
First, pipe the bottom basket line (step 1). Pipe a line perpendicular to the bottom line (step 2). Then pipe short lines across, keeping the gaps between the lines about the size of the line width (steps 3-4). Repeat until you fill the inside of the basket with a basket weave pattern (steps 5-8).
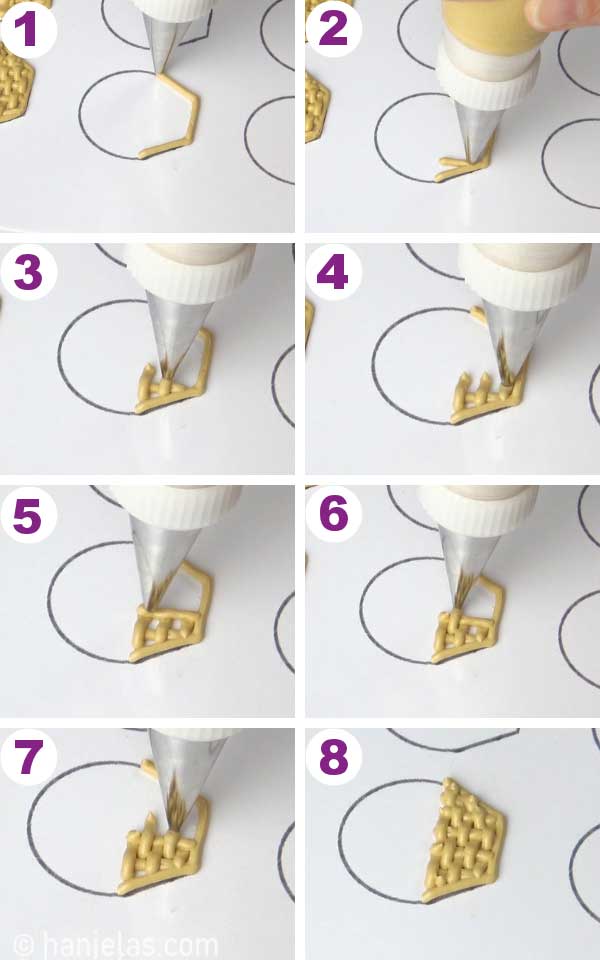
Continue piping the top of the basket with a beaded border. Let baskets dry overnight. Then dust-dry baskets with edible brown petal dust (FDA approved).
TIP: You can try using cocoa powder instead.
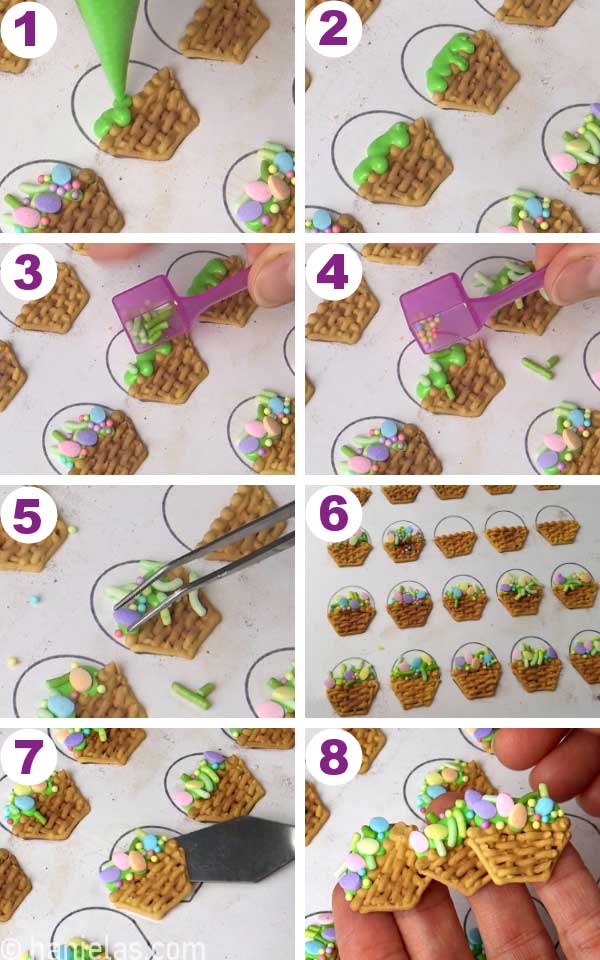
And lastly, pipe a green icing of 20-second consistency on the top edge of the basket, letting some green icing drip down. While green icing is wet, decorate it with spring sprinkles. Use tweezers if needed (steps 3-5). Let dry again for several hours. Carefully remove baskets from the protector sheets (steps 7-8).
Mini Royal Icing Bows with a Leaf Tip
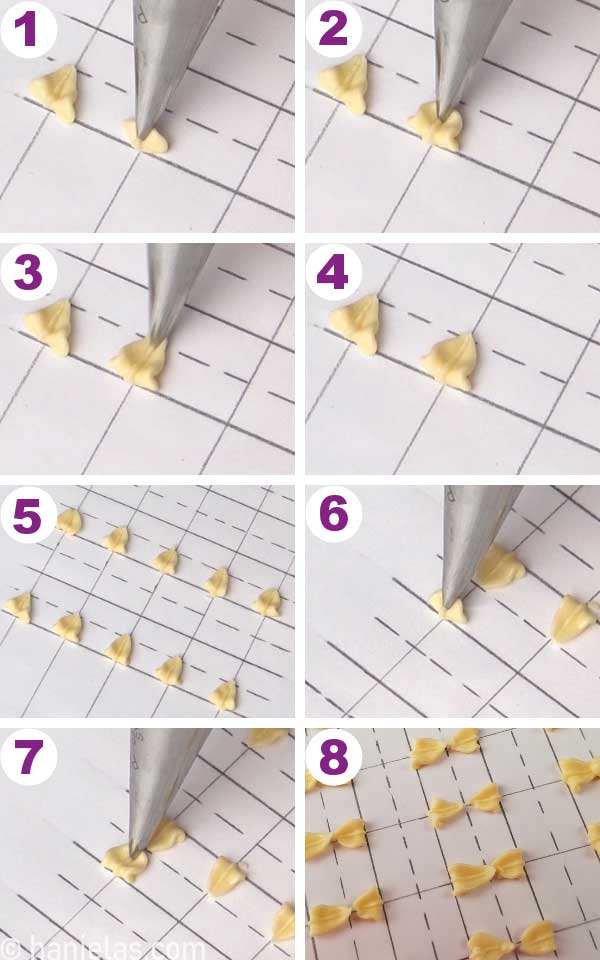
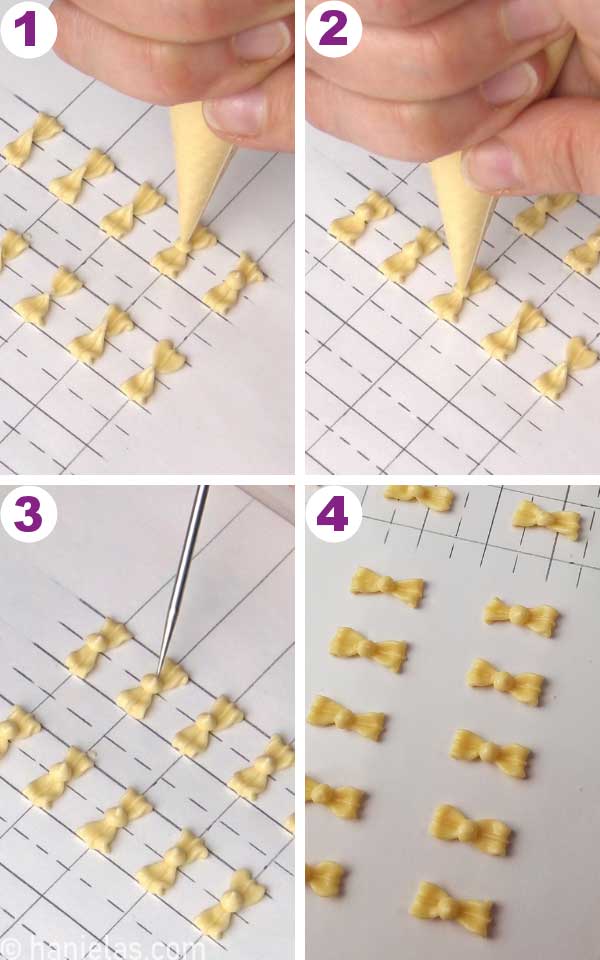
I used a leaf piping tip PME ST#50 to pipe tiny royal icing bows with thick ivory-colored royal icing.
First, I created a template to ensure that both bow loops would be the same length. The length of the bow I made is about 10/16 inches (about 16mm).
The dashed line in the template below marks the middle and solid lines on the sides mark where you pipe a fat side of the bow loops.
Pipe the first leaf, start piping by the solid line, and slightly tuck the fat end of the leaf. Pipe the leaf toward the center dashed line (steps 1-5). Repeat making leaves in the opposite direction, and let the pointed ends of the two leaves overlap slightly (steps 6-8).
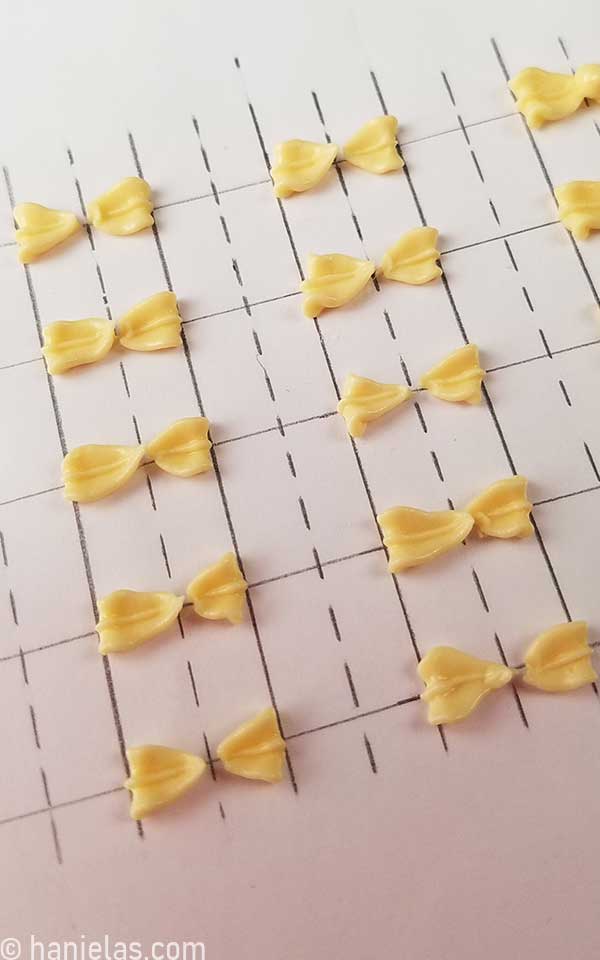
I used piping consistency icing to make a knot/dot on the dashed line to finish the bows, where 2 leaves/bow loops meet. Let dry for several hours (steps 1-4).
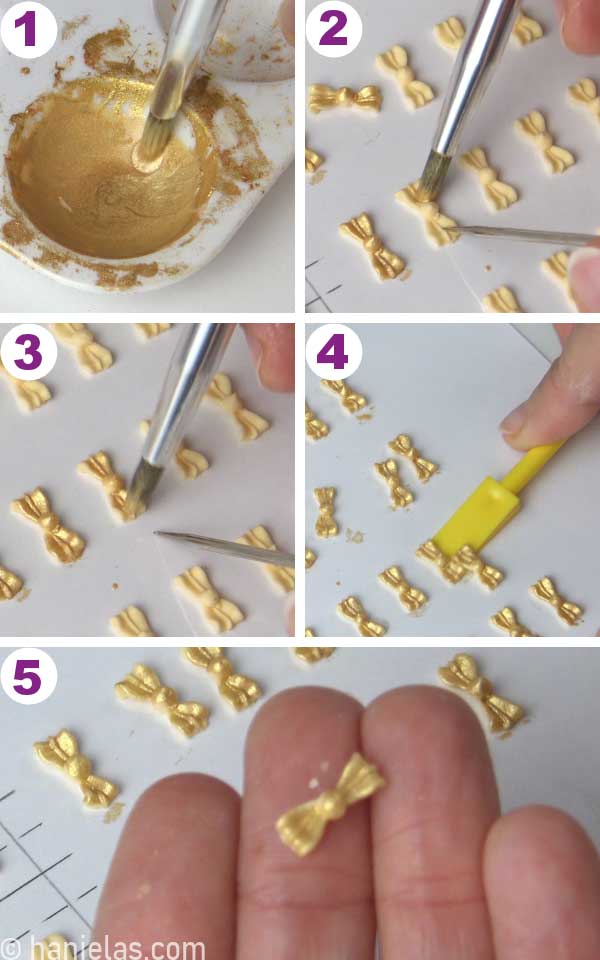
Once mini royal icing bows are dry, you can paint them with gold edible paint. Use dry gold luster dust and a few drops of high content alcohol (Everclear, Vodka, or McCorming Lemon Extract). Let dry for 15 minutes, and carefully remove bows from a protector sheet.
Decorate Easter Gingham Bunnies with Speckled Eggs
Now we can finish decorating cute gingham bunny cookies.
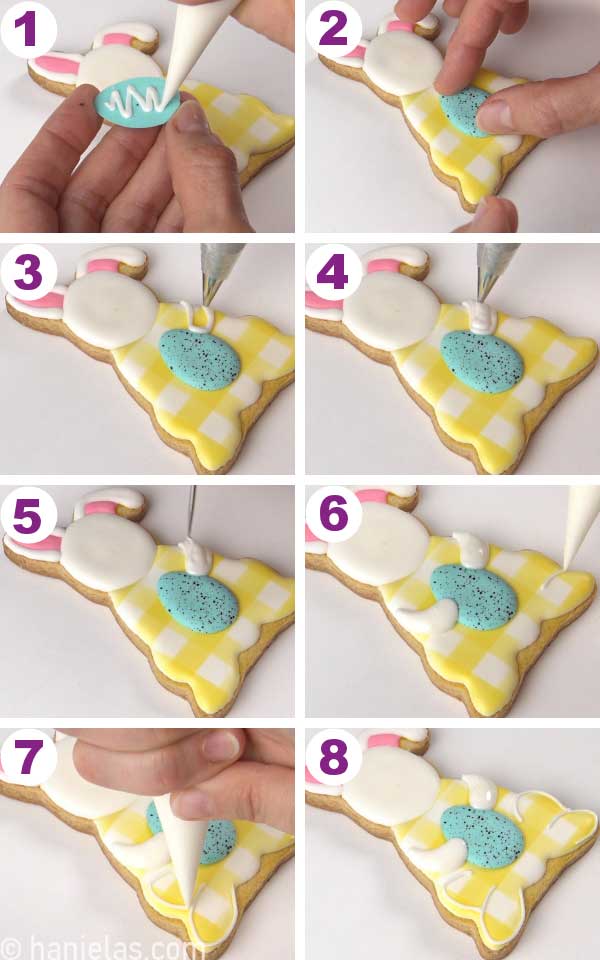
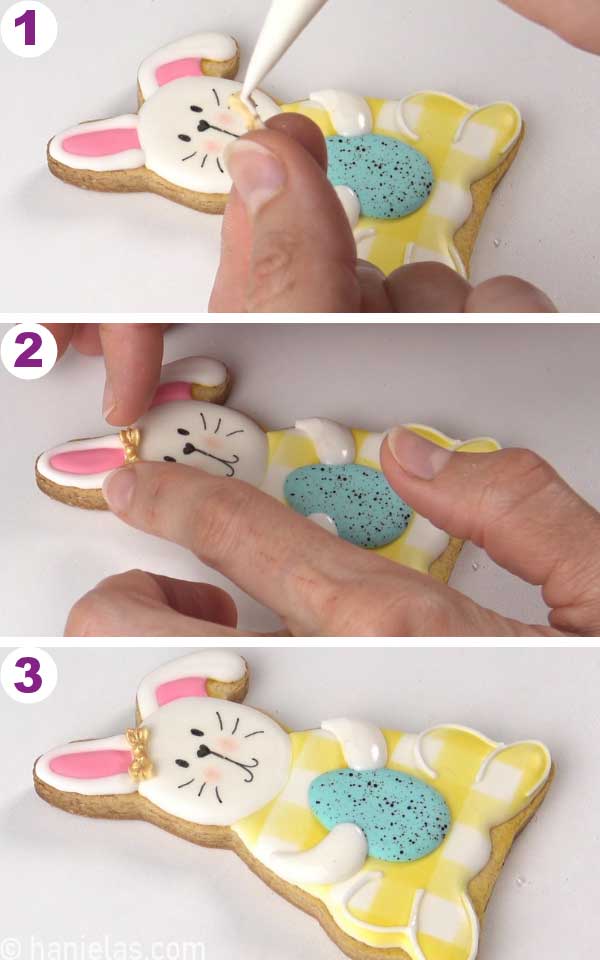
Pipe a small amount of royal icing on the back of the speckled egg royal icing transfer. Turn it over and glue it onto the bunny. Use a gently shifting motion to make it flush with icing (steps 1-2).
With a 25-second consistency of white icing pipe the bunny arms, use a scribe to smooth the icing (steps 4-5).
Repeat with the other arm. Use outline consistency to pipe the feet outlines (steps 6-8.)
Draw Bunny Face with Edible Marker
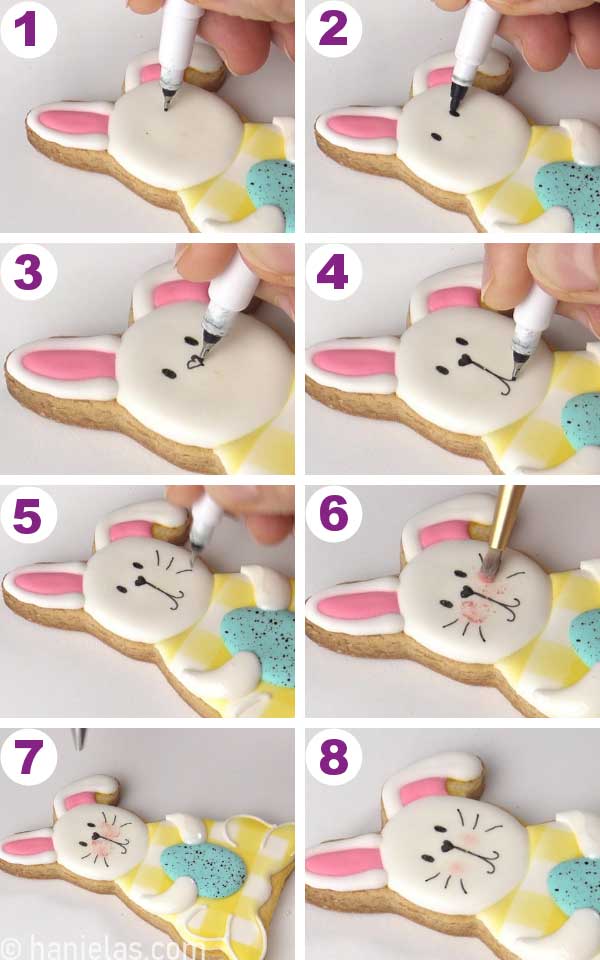
I used a black edible marker by Rainbow Dust to make the eyes, nose, mouth, and whiskers.
First, I used a fine tip marker to make small dots where I wanted the eyes to be. Then you can switch to a regular tip and draw oval-shaped eyes. Continue drawing a small heart, mouth, and whiskers (steps 1-5).
I used edible pink petal dust and a dry food-only paintbrush to make the blush on the cheeks. Dip the end bristles of the dry paintbrush into dry petal dust, and then gently, using a circular motion, apply it to the cheeks (step 6).
Use an empty decorating bottle to blow away excess petal dust (steps 7-8).
Let’s not forget the royal icing bow we made earlier. Use a little bit of icing to attach it to the bunny. Either by the ear or below the head.
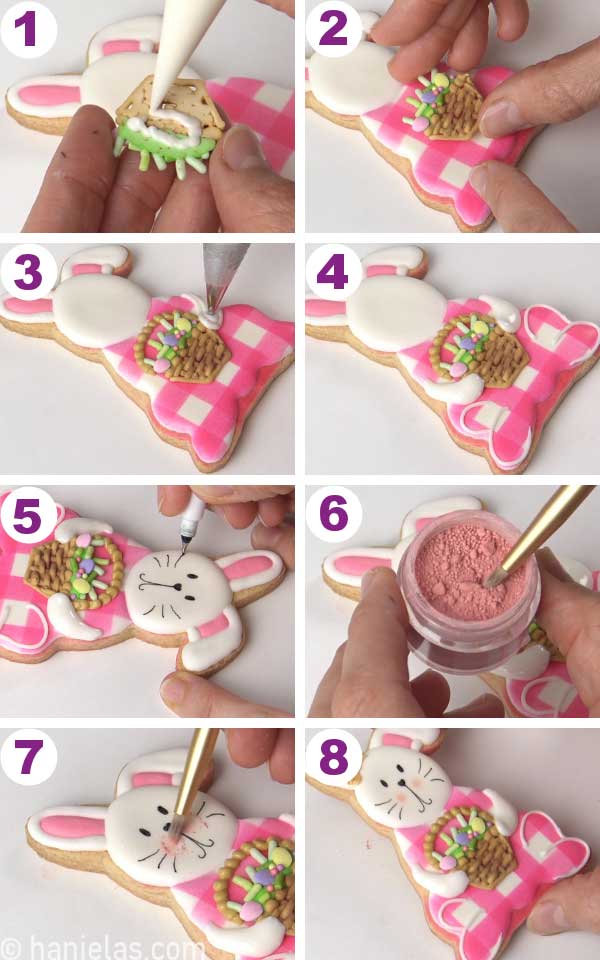
Decorate Easter Bunny Cookies with Easter Basket Royal Icing Transfer
If you also made the royal icing Easter baskets, you can use them to decorate the bunnies. Follow the same steps as in the previous instructions.
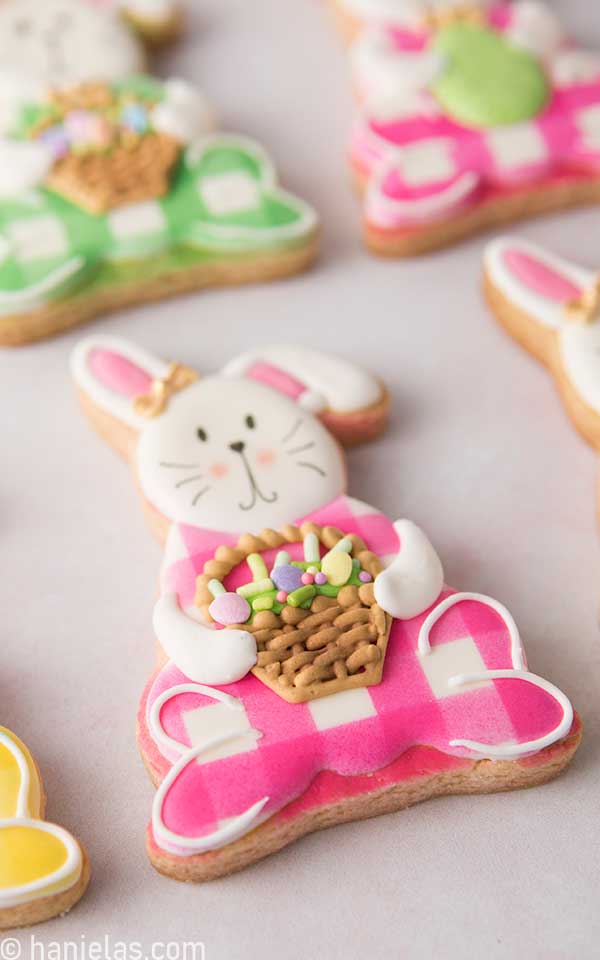
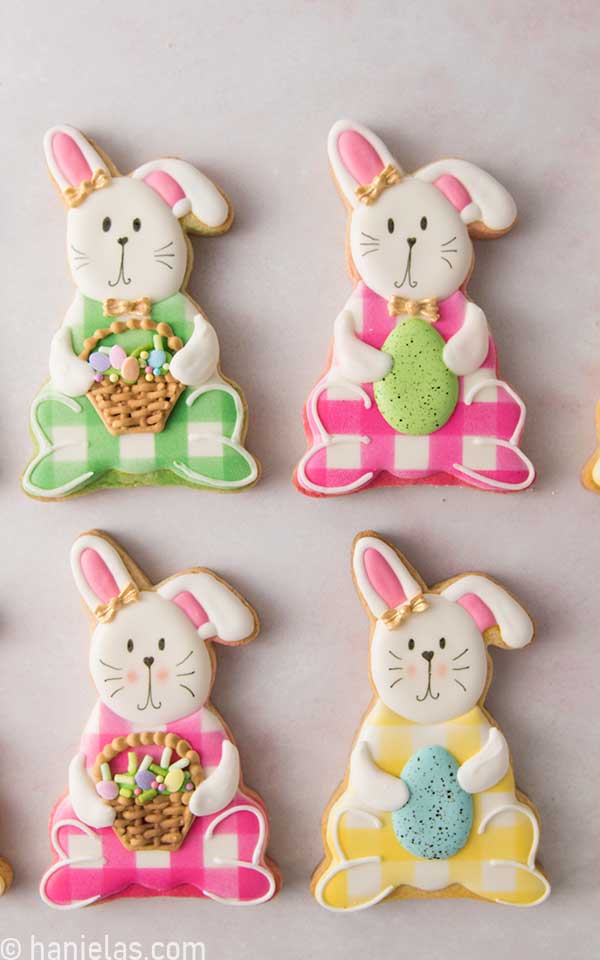
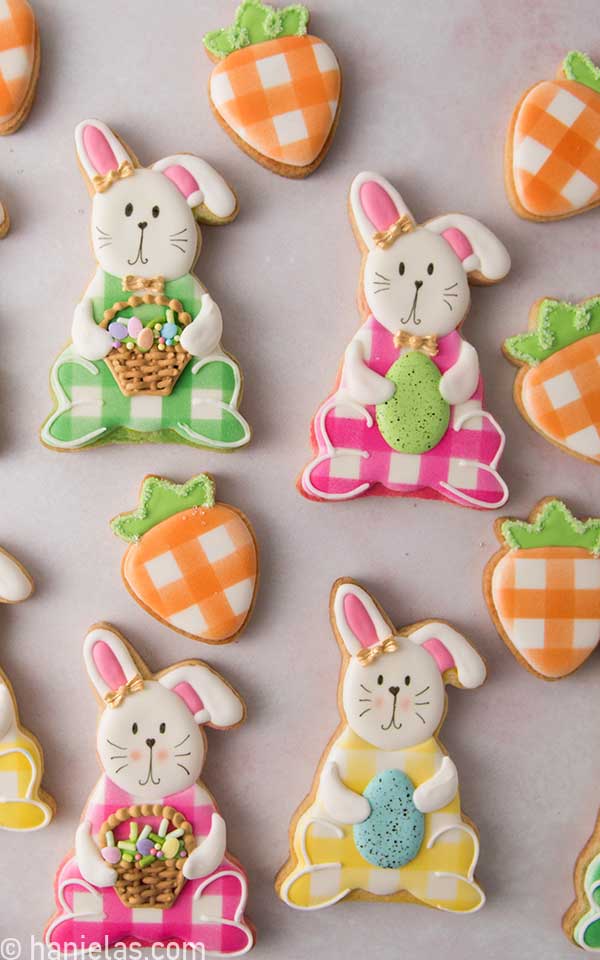
How cute are these decorated Gingham Easter Bunny Cookies!
Gingham Carrot Cookies
To make these cute carrots I used a strawberry cookie cutter. Guess what? This is not my first time using a strawberry cookie cutter for something other than a strawberry design. Have you seen my 30 cookie decorating ideas using a strawberry cookie cutter?
Outline and flood the bottom of the strawberry with white icing 15-second consistency. Let the icing dry (steps 1-6).

Airbrush Gingham Carrot Cookies
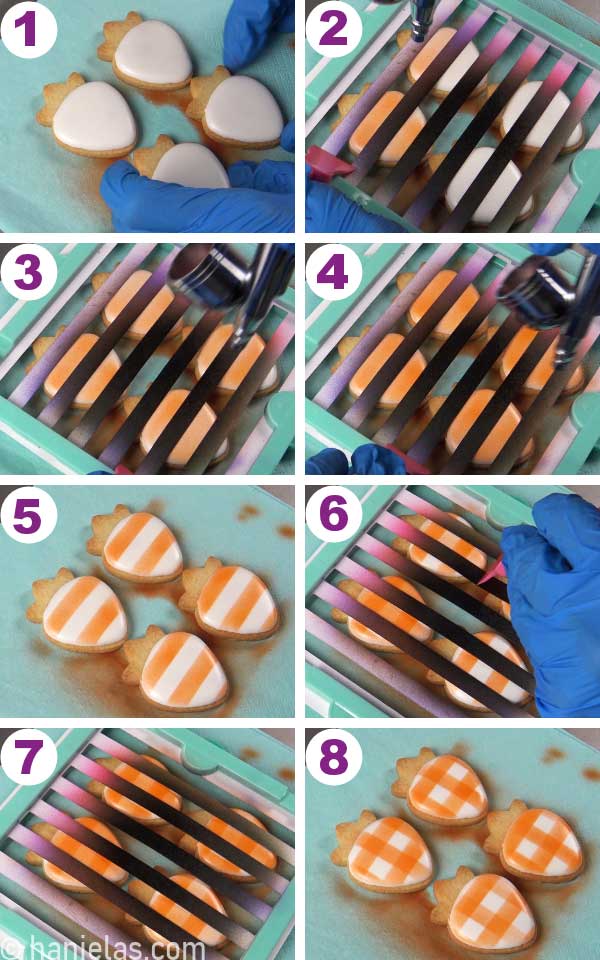
Look at that! I was able to airbrush four cookies at a time. Use an orange airbrush color or mix yellow and a little red to make the orange (steps 1-8).
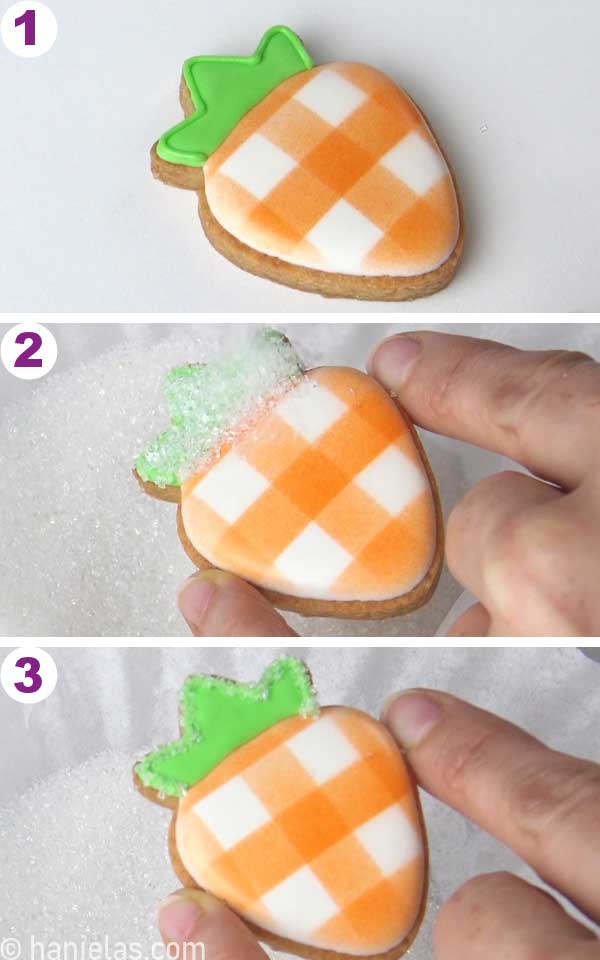
Outline and flood the top with green icing of 15-second consistency. Let dry (steps 1-6).

Decorate with Sanding Sugar
Lastly, this is an optional step. With a piping consistency green icing outline the top section and dust it with white sanding sugar.
To Make Gingham Easter Bunny and Carrot Cookies You Need
- RECIPES
- Classic Sugar Cookies
- Fresh Lemon Royal Icing
- Vegan Sugar Cookies
- Vegan Royal Icing
- Gluten-Free Sugar Cookies
- TOOLS
- Shop all the tools in my Amazon Shop
- Sitting Bunny Cookie Cutter
- Strawberry Cookie Cutter ( I used a cutter from a mini-set by Sweet Sugarbelle)
- Tipless Piping Bags
- Black Edible Marker by Rainbow Dust
- Concentrated Gel Food Colors (I used Americolor brand)
- Airbrush Colors: pink, blue, purple, yellow, green, orange, brown
- Airbrush
- Petal Dust: pink and brown
- Food-only Paintbrush
- PME ST#50 (small leaf tip)
- Gold Luster Dust or Gold Edible Paint
- Everclear, Vodka, or McCormick Lemon Extract
- Sanding Sugar
- Festive sprinkles
- Stencil Holder or Magnets
- Shop Easter Egg and Basket Transfer Sheets
- Stripe Stencil/Diy Stripe Stencil for Airbrushing
- MORE EASTER COOKIE DECORATING IDEAS
- Egg Pinata Cookies for Easter
- Easter Gingerbread House
- Buttercream Easter Cake
- 3 Easy Easter Cookies via Sweet Ambs
- Easter Lily and Cross Cookies
This post was originally published on April 17th, 2014. On April 6th, 2022 I updated this post with new step-by-step pictures and written text.



These are so cute! I especially love your creativity in making the bows with the leaf tip! I’m also a huge fan of gingham!
Thank you so much June.♥