How to Shape Easter Bunny Ear Rolls
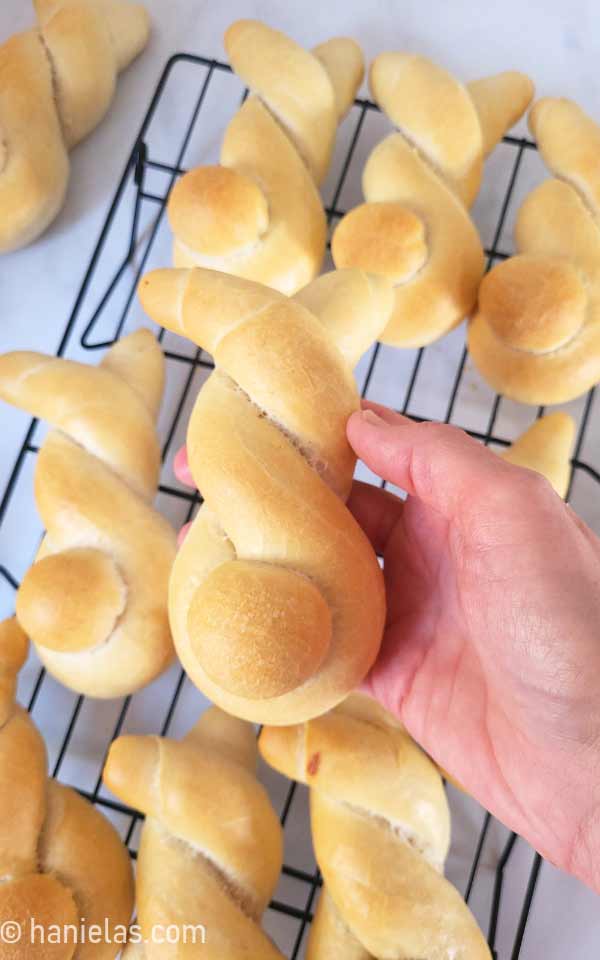
These easy-to-make Easter Bunny Ears Rolls are perfect for breakfast, brunch, dinner, or a quick snack to nibble on throughout the day. What are you waiting for? With my step-by-step recipe tutorial, you’ll bite into soft, warm bunny-shaped rolls in no time.
HOW TO MAKE BUNNY ROLLS OUT OF BREAD DOUGH
I use my yeasted bread dough recipe for homemade hot dog buns to make Easter bunny rolls. This bread dough is super easy to make; it doesn’t contain eggs, and you can use butter, lard, duck fat, or vegan butter to make vegan rolls, if you prefer. This bread dough contains: flour, salt, dry yeast, water, fat (butter, lard, duck fat, vegan butter).

BREAD RECIPE
Of course, you can use your favorite bread dough recipe or try the eggless bread dough that I use to make Best Hot Dog Buns. I often make a double batch of this recipe because it’s so good and easy to make. You can make rolls in advance; they freeze well for up to two months.

I don’t punch down this bread dough. Instead, I invert it onto a work surface. And I don’t use any additional flour on my work surface.

DIVIDE DOUGH
This step isn’t mandatory, but weighing the dough and dividing it evenly makes it easier to shape uniform bunny ears and tails.
Bunny Ears – I weighed 2.8 oz-3 oz (80-85 grams) of the dough for the ears. Reserve a piece of dough for the bunny tails, and calculate 0.4oz (11 grams) per tail.

- Shape the bunny ears dough pieces into balls.
- Cover the dough balls with a kitchen towel and let them rest for 5 minutes.
- This allows the gluten to relax, making the buns easier to roll out.

Bunny Tails – Shape each small piece 0.4oz (11grams) into a ball. Cover the dough balls with a kitchen towel while you work on the ear part of the bunny.

SHAPING BUNNY EAR ROLLS
- It’s best to roll out dough onto a surface that will make the dough cling to it slightly- a silicone mat, granite, or lay a piece of food wrap on your table/kitchen counter.
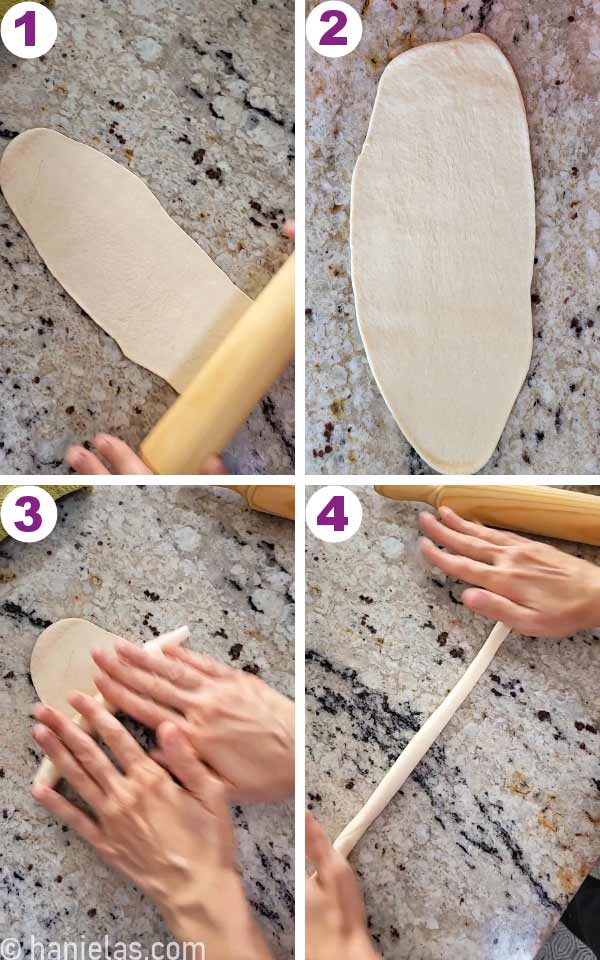
- Roll a larger ball (bunny ears without the tail piece) of dough into a prolonged oval shape (steps 1-2).
- Then, using both hands, tightly roll the dough into a “snake” shape and keep shaping it until it’s a little over 12 inches (30 cm) long (steps 3-4).
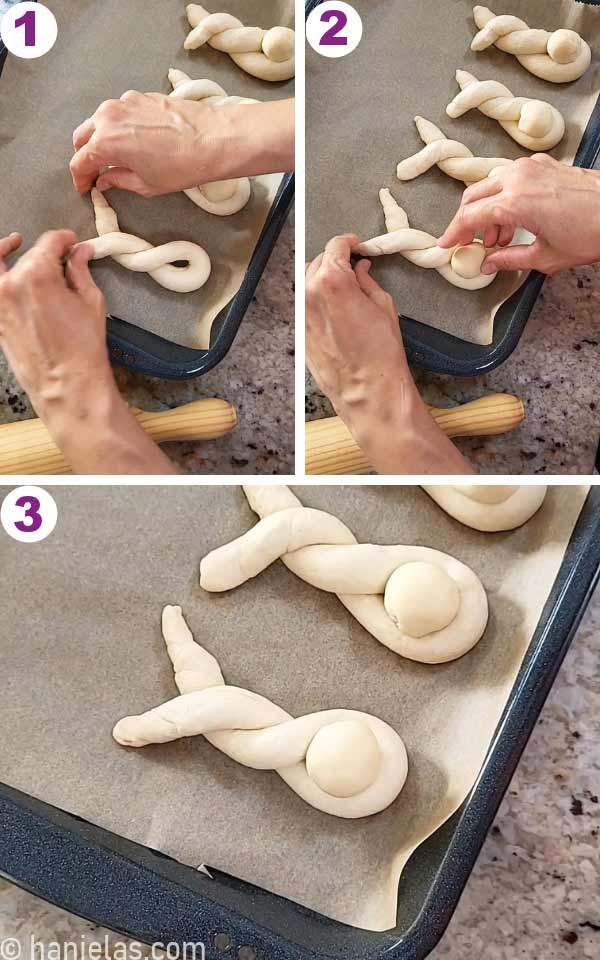
Fold the long rope in half (steps 1-2), twist it, keeping a small loop at the bottom (steps 3-4).

Transfer bunny ear-shaped dough onto a baking sheet lined with parchment (step 1). Take a small ball of the dough – bunny tail and gently press it into the loop section (steps 2-3).
SECOND PROOF
Space bunny ear rolls on a baking sheet about 2 inches apart. Cover a baking sheet with a kitchen towel and let rise in a draft-free spot for 40-45 minutes. I leave mine on the counter and place two kitchen towels underneath the baking sheet to help balance the cold granite.

BAKE AND HOW TO CREATE STEAM IN THE OVEN
To bake bunny rolls, I use a simple steam method that produces the best rolls around.
- Preheat the oven to 425°F (215-218 °C) with a shallow oven-safe dish on the bottom rack. Avoid using glass as it can shatter at high temperatures.
- Just before baking, mist the rolls generously with water. I bought a spray bottle just for this purpose.
- Right after you place your water-misted rolls into the oven, pour about 1/3 cup of water into the hot dish on the bottom rack, or add several ice cubes. Close the oven door immediately. This will produce steam in the oven.
- After the buns are baked, spray them again with room-temperature water as soon as you take them out of the oven.

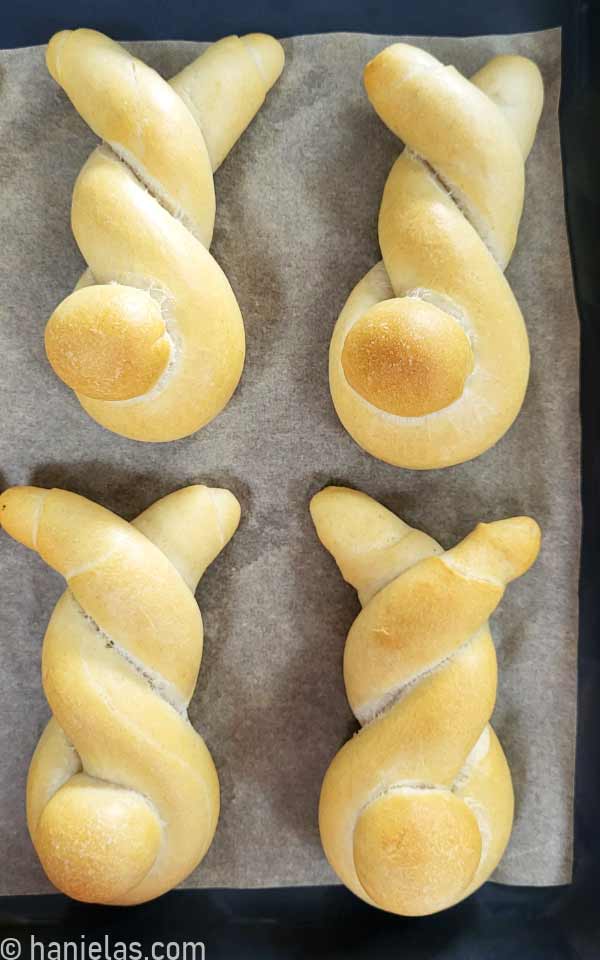
I bake bunny rolls for about 10-12 minutes, depending on the oven, just till they are golden brown.
BUNNY EARS ROLLS SUCCESS TIPS
Choose a dough that shapes well. I usually use the same yeasted dough I make for hot dog buns, but my Sweet Bread Recipe works just as well.
Use my tips for proofing yeast dough in a warm, draft-free spot.
In the 1st stage, let the shaped dough balls rest for several minutes. This relaxes the gluten, and the dough is easier to roll out. If the dough keeps retracting when rolling it out, give it a few more minutes to allow the gluten to relax.
Roll the dough on a silicone mat, or lay a piece of food wrap on your work surface and press it down so it sticks. The dough tends to cling to food wrap.
For best results, follow the steam method to bake the rolls. If you can not preheat a shallow dish in the oven. Make sure to spray the buns generously before baking.
Don’t place hot rolls on a cold granite surface to cool; condensation forms on the bottom, and they can get a little soggy. Transfer buns onto a cooling rack to cool before storing.
You can freeze bunny rolls for later. Let them cool completely, and then freeze them in freeze-safe bags or containers. They freeze well for up to 1-2 months.

WHAT TO SERVE WITH BUNNY ROLLS
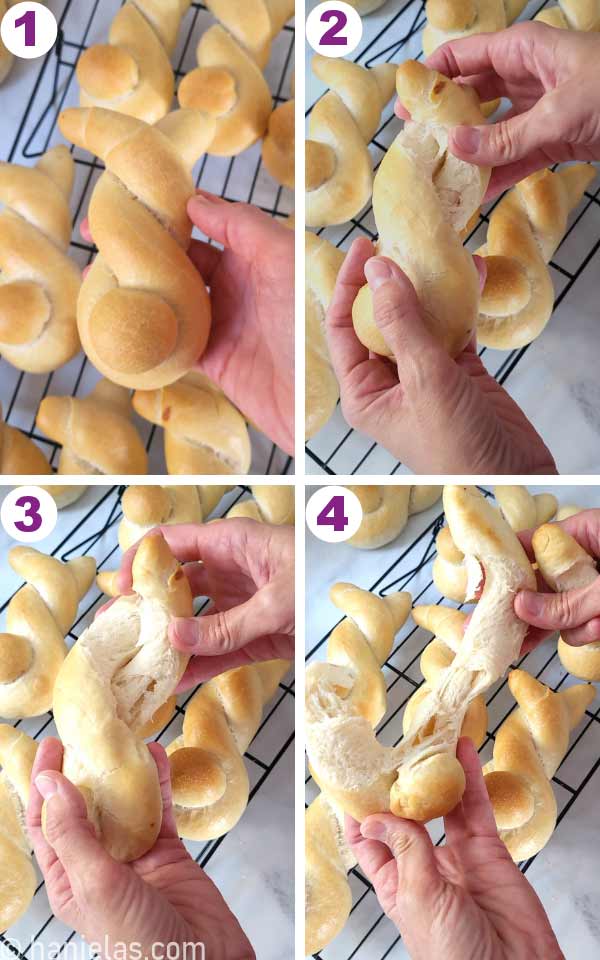
Aren’t they adorable!? Soft bunny rolls are a tasty twist on traditional dinner rolls; they can be served warm or at room temperature. They are an absolute favorite with kids and adults alike. They will be devoured before you know it; that’s why I always make a double batch.
- Serve them warm with a pat of butter or honey.
- Have you tried jam or marmalade? So delicious.
- Olive oil dip: whisk together olive oil, salt, pepper, and rosemary.
- Meat stews and soups: rolls make a perfect side dish.
- Serve bunny rolls along with cheese or meat platters.

Easy Homemade Hot Dog Buns
Equipment
- 1 A small, food-only spray bottle
- 1 A shallow oven-safe dish
Ingredients
- 1¼ cup warm water 300 grams/ml
- 1 tsp honey
- 2 1/2 tsp dry yeast
- 1 tbsp flour
- 3½ to 4 cups bread flour 500 grams
- 1 1/4 tsp salt
- 2 tbsp softened butter, lard, duck fat, vegan butter 30 grams
Instructions
Yeast Mixture
- In a small dish whisk together warm water (1cup + 1/4 cup warm water, 300 ml), honey (1 teaspoon), yeast (2 teaspoons+ 1/2 teaspoon), and flour (1 tablespoon). Let sit for 5 minutes until foamy. Tip: Don't use hot water. Hot water will kill the yeast.
Knead Soft Yeast Dough
- In a bowl of your mixer whisk together flour(3 ½ cups, 500 grams) and salt (1 ½ teaspoons).
- Pour the foamy yeast mixture and softened butter (2 tablespoons) into the bowl with the flour mix. Attach a hook attachment to your stand mixer. Knead until a smooth dough is formed. If the dough appears too dry, you can add 1 tablespoon of room temperature water. Alternatively, if it appears too wet, add 1-2 tablespoons of flour.TIP: Don't have a mixer with a hook attachment? You can make the dough by hand: see the blog post.
- Knead the dough with the dough hook for 5-10 minutes. The dough should be soft and elastic and may still cling to the hook. Turn it out onto a lightly floured work surface and knead it by hand for 1-2 minutes, shaping it into a smooth ball.
1st Proof
- Transfer the ball of dough into a lightly oiled bowl. Cover with a plastic wrap and let it rise in a warm, draft-free spot, for 30-45 minutes.
Shape the Hot Dot Buns
- Turn the risen dough out onto a clean work surface or silicone mat. Divide the dough into 3-3.5 oz (90-100 grams) portions, using a kitchen scale for the most even-sized buns.Shape each portion into a smooth ball, then cover with a kitchen towel and let the dough rest for 5 minutes. This short rest relaxes the gluten, making the dough easier to roll and shape into hot dog buns.Tip: Don't use additional flour on your work surface; it makes it harder to shape the buns.
- To shape the hot dog buns, first roll out each small piece of dough into a thin, long oval shape, about 1/8 inch (3mm) thick.Tip: A silicone mat helps the dough cling slightly to it so it doesn't retract as much, and it's easier to shape the rolls.
- Starting at the short side of the oval, use both hands to roll the dough into a log. Keep your hands close together at first, then gradually move them outward as you roll. Apply slightly more pressure to the ends than the center to gently taper them, creating an evenly shaped hot dog bun.Tip: Place the shaped hot dog buns seam side down on a baking sheet lined with parchment. Leave about 3 inches between the rolls.
2nd Rise
- Cover rolls on a baking sheet with a damp paper towel or a damp kitchen towel and let rise for 45 minutes in a warm, draft-free place.
Bake
- Halfway through the second rise, place a shallow metal dish on the bottom oven rack and preheat the oven to 425°F (220°C). Avoid using glass, as the sudden temperature change may cause it to crack.
- Once the buns have finished their second rise, remove the cover. Generously spray the tops with room-temperature water just before baking, then immediately transfer the baking sheet to the middle (2/3) oven rack of the preheated oven.
- Immediately pour ¼ to ⅓ cup of water into the hot shallow dish on the bottom oven rack. As soon as the water hits the hot dish, it will create steam. Quickly close the oven door to trap the steam insideTip: You can also use ice cubes in place of water, use about 4-5 medium-size ice cubes.
- Bake hot dog buns for 12-13 minutes. The buns are done when the tops turn a light golden brown. If they're still pale, bake them a little longer. Remove the buns from the oven and immediately spray the tops with room-temperature water. Let them cool on the baking sheet for 1–2 minutes, then transfer them to a wire rack. Since the buns are very soft while hot, use kitchen tongs to move them without pressing on the crust.
Video
FAVORITE HOMEMADE BREAD RECIPES
- Best Pizza Dough Recipe
- Garlic Breadsticks via Restless Chipotle
- Hot Cross Buns
- Cinnamon Rolls
- Homemade Bagels via Love and Lemons
Did you make this recipe? Tag @hanielas on Instagram and hashtag it #hanielas

Hi, I’m Hani
Welcome!
Thank you for visiting Haniela’s. On my blog, you’ll find delicious sweet & savory recipes made with simple ingredients. Why not start a new adventure? Discover a world of cookie decorating with my step-by-step tutorials.

Hi, I’m Hani
Welcome!
Thank you for visiting Haniela’s. On my blog, you’ll find delicious sweet & savory recipes made with simple ingredients. Why not start a new adventure? Discover a world of cookie decorating with my step-by-step tutorials.