Cute Nerdy Back to School Apple Cookies [Video]
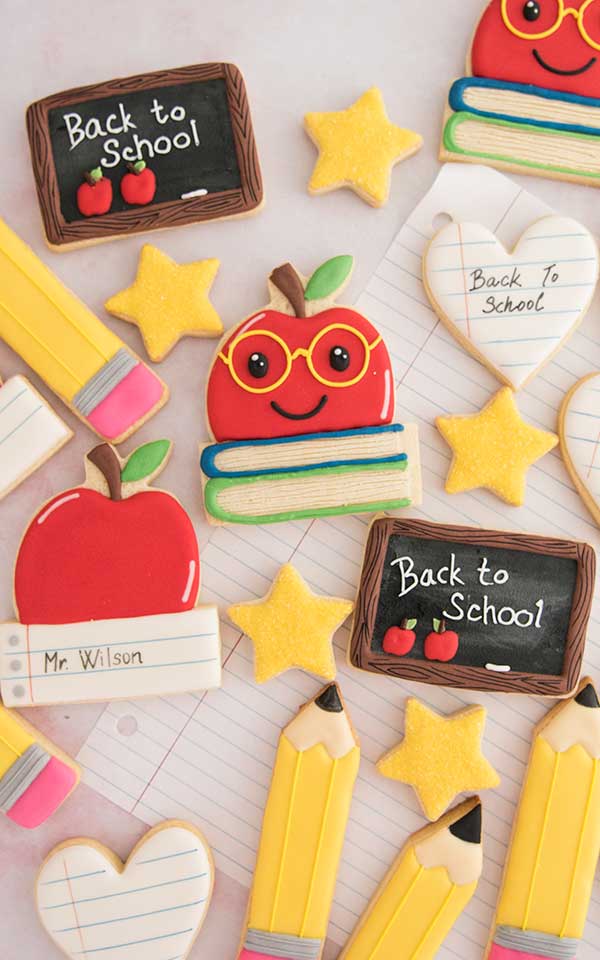
In this tutorial, we’ll decorate cheerful “nerdy” apple cookies, complete with glasses and a big smile, sitting proudly atop a stack of colorful books. It’s the perfect mix of sweet and scholarly — ideal for gifting to teachers, celebrating the first day back in school.

updated from 2017
DECORATED BACK TO SCHOOL NERDY APPLE COOKIES STEP-BY-STEP
I baked cookies using my tested sugar cut-out cookie recipe.

THINGS YOU NEED
- Get all the tools and supplies in Haniela’s Amazon Shop
- Apple Cookie Cutter, I used a 3.5 to 4-inch cutter
- Narrow Rectangular Cookie Cutter
- Gel Food Coloring: blue, green, red, black, brown
- Palette Knife, Spatula, or a Small Spreader (I used Ateco Spreader-listed in my Amazon Shop)
- Tipless Piping Bags
- Scribe Tool
- Star Tip #14 or #16
- PME 1.5 Piping Tip (optional, for the glasses)
- Edible marker (optional)
- Cardstock Template
This post contains Amazon affiliate links that earn me a small commission, at no cost to you. I only recommend products that I use and love. Learn more about my affiliate policy here.
PREPARE COOKIES
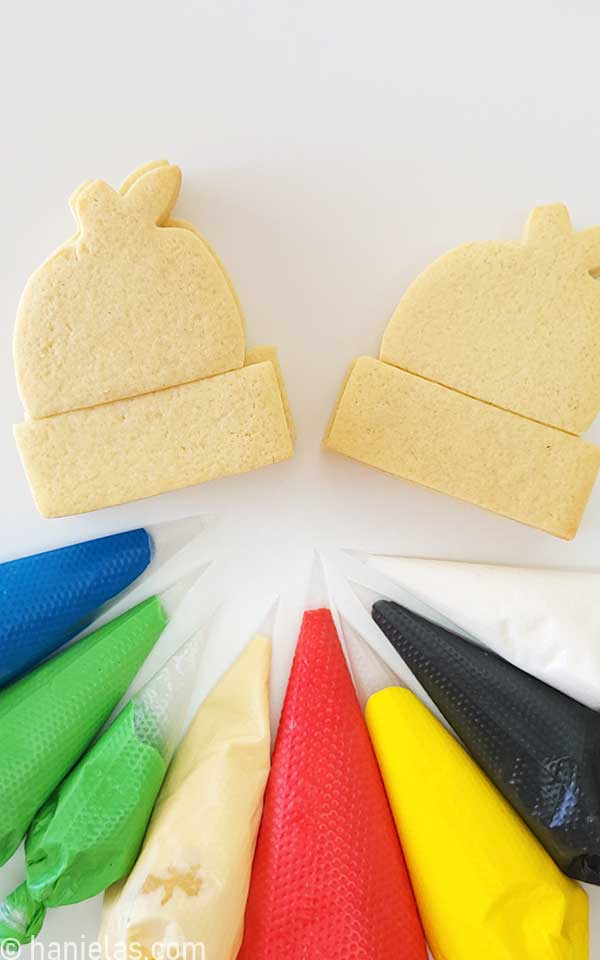
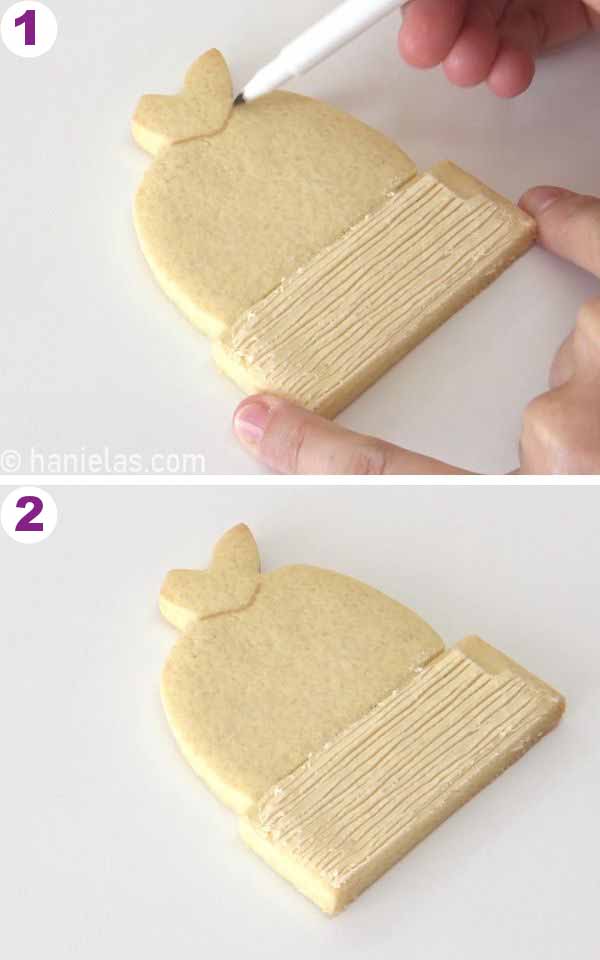
I don’t have an apple name tag cookie-cutter, so I implemented a simple technique of combining 2 shapes into one.
- Cut out an apple shape (step 1).
- Ideally, you’ll want to use a rectangular cutter that is a bit wider than your apple cutter, trim it if needed so it’s not too big (step 2).
- Trim the bottom of the apple cookie (step 3).
- Alight rectangular cutter with the bottom of the trimmed apple, and bake as usual (step 4).

ROYAL ICING COLORS AND CONSISTENCIES
I used royal icing to decorate cookies. You can use standard royal icing made with egg whites (there are 3 recipes using meringue, fresh egg whites, pasteurized egg whites in a carton recipe), vegan icing (using aquafaba), or glaze icing.
- Ivory Icing: thick consistency (book page base)
- Red icing: 15-second consistency (apple),
- Green Icing: soft-piping consistency (book cover, leaf)
- Royal Blue Icing: soft-piping consistency (book cover)
- Brown Icing: 20-second consistency (apple stem)
- Ivory Icing: stiff (decorated window border, piped swirls), 20-second consistency (window panel)
- Black Icing: 20 second-consistency (eyes), mouth (or use piping consistency for more defined look)
- White Icing: 15 to 20 second consistency (reflection on an apple and eyes)
- Yellow Icing: soft-piping to piping consistency (glasses-rims)
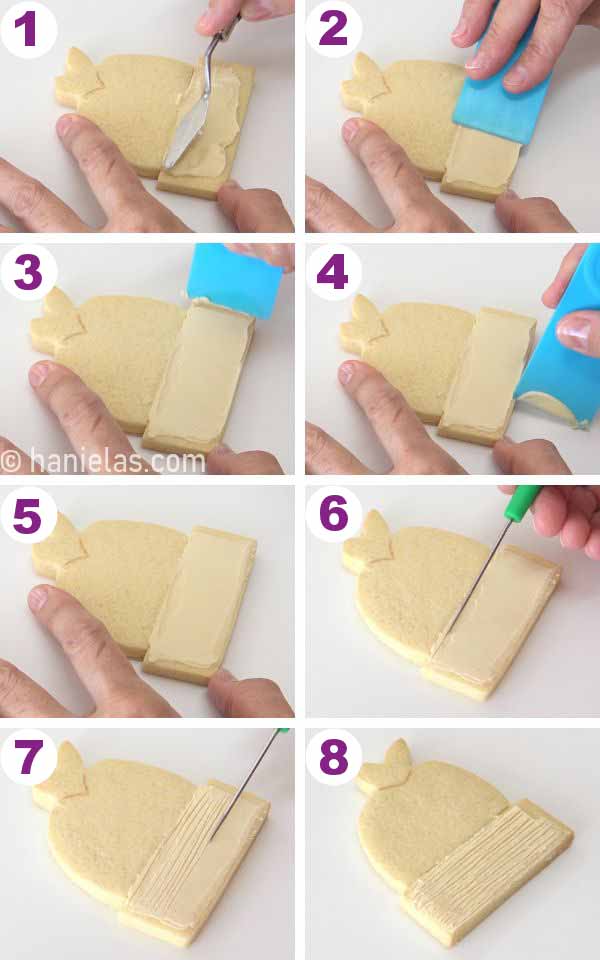
BOOK PAGES LAYER
- Spread a thin layer of thick ivory colored royal icing across the bottom of the cookie. You want to avoid spreading it all the way to the edge. If it gets too close to the edge, you can scrape it off with a palette knife or a plastic spreader (steps 1-5).
- Then immediately after, while the icing is still soft, use a scribe tool and run it through the icing, creating indentations in the icing that represent the book pages (steps 6-8).
- If needed, mark the top of the apple with an edible marker (steps 1-2).
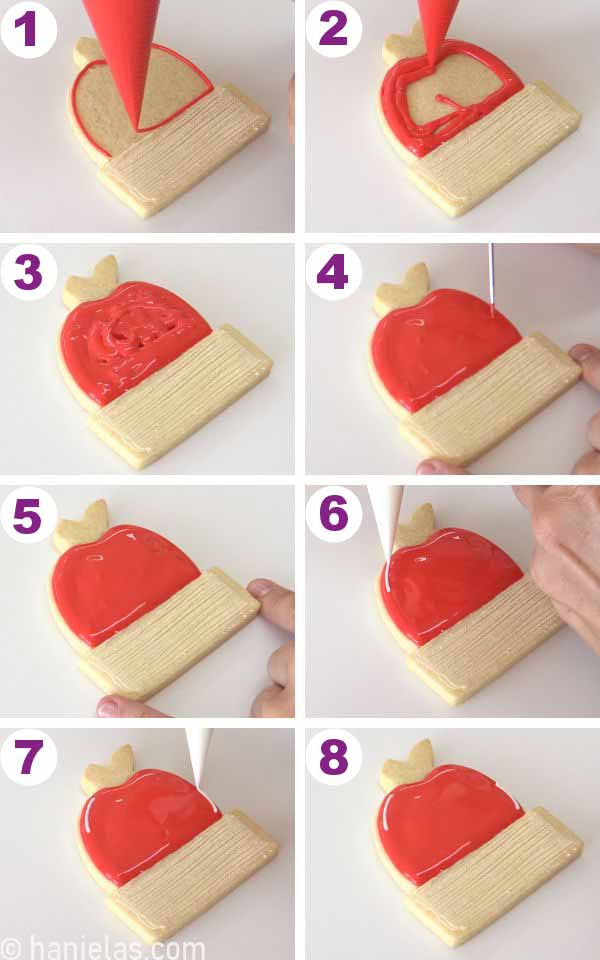
RED APPLE
- I used red royal icing of 15 second consistency to outline and flood the apple portion of the cookie (steps 1-3).
- Use a scribe tool to distribute the icing across the cookie evenly (steps 4-5).
- Immediately after flooding, take white icing and pipe short curved lines on each side to create a reflection (steps 6-8).
- Allow red icing to crust for 20 minutes before piping the stacked books, stem, and a leaf.
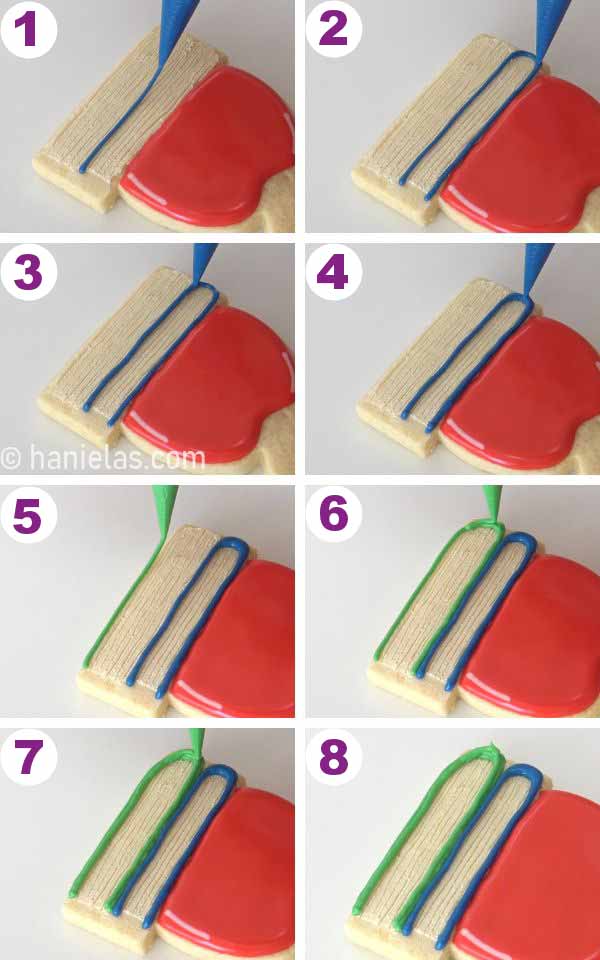
STACKED BOOKS DESIGN
- To make the stacked book design, you want to use soft piping consistency icing.
- Start with the top book cover and create a prolonged U-shape, making it slightly thicker at the curved end, and let it crust (steps 1-4).
- Then, repeat the process with green royal icing (steps 5-8).
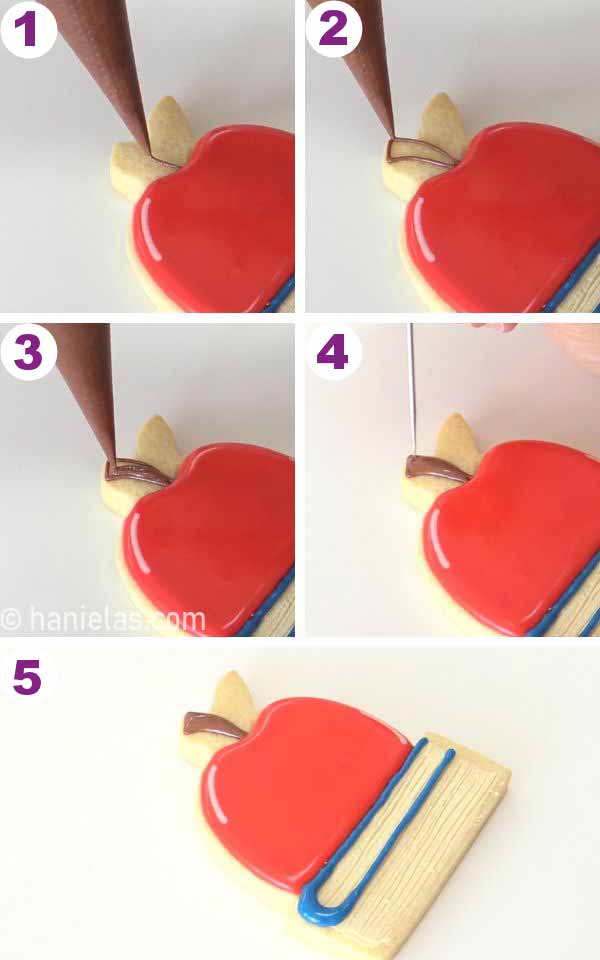
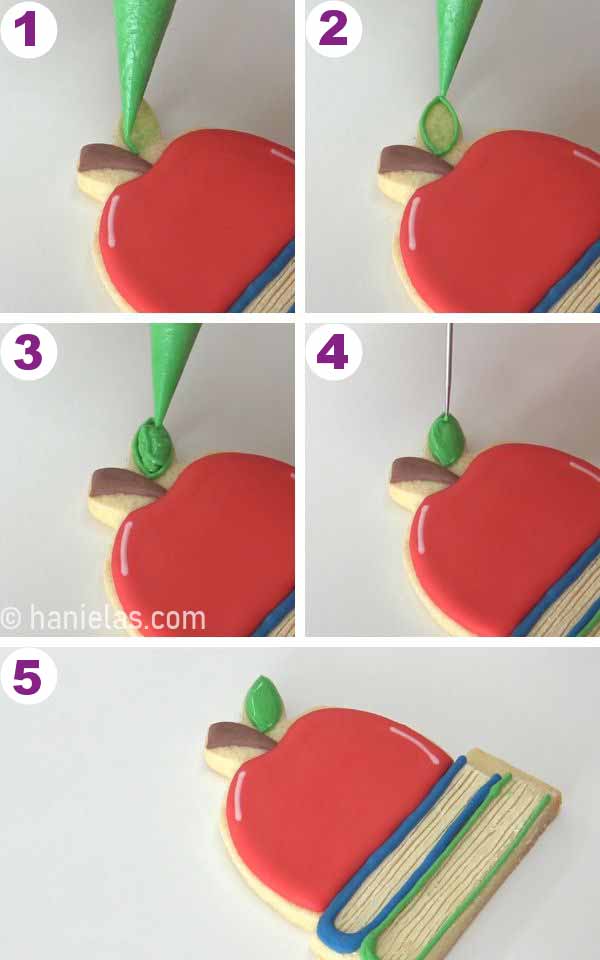
APPLE STEM AND LEAF
- To make a stem, use brown icing (20-second consistency).
- Create a triangular shape that is tapered towards the apple, and then fill it with icing (steps 1-3).
- Use your scribe tool to smooth the icing evenly (steps 4-5).
- Allow the icing to crust before adding the adjacent leaf.
- With green royal icing – you can use the same soft piping consistency icing you used to create the book cover, just make sure that you agitate the icing, and it’s going to smooth itself out.
- Outline the leaf and fill it with icing, and then use your scribe tool to shape the icing (steps 1-5).
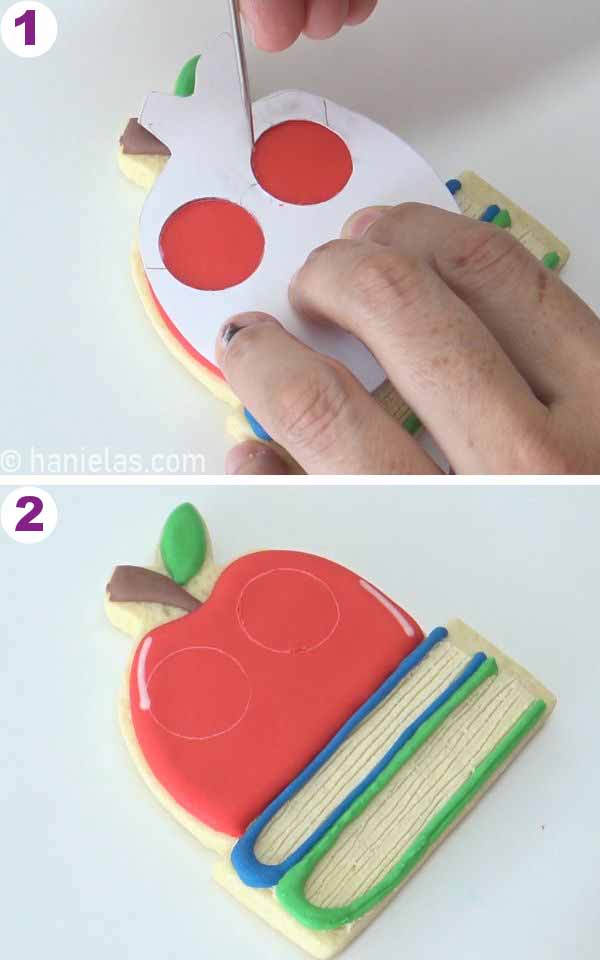
HOW TO PIPE GLASSES
- Before I piped the glasses, I used a simple cardstock template first to create a piping guide.
- Place the cardstock template on top of the dry icing. Use the scribe tool to lightly scratch the surface of the icing, creating a clear guide for you to use when you pipe (steps 1-2).
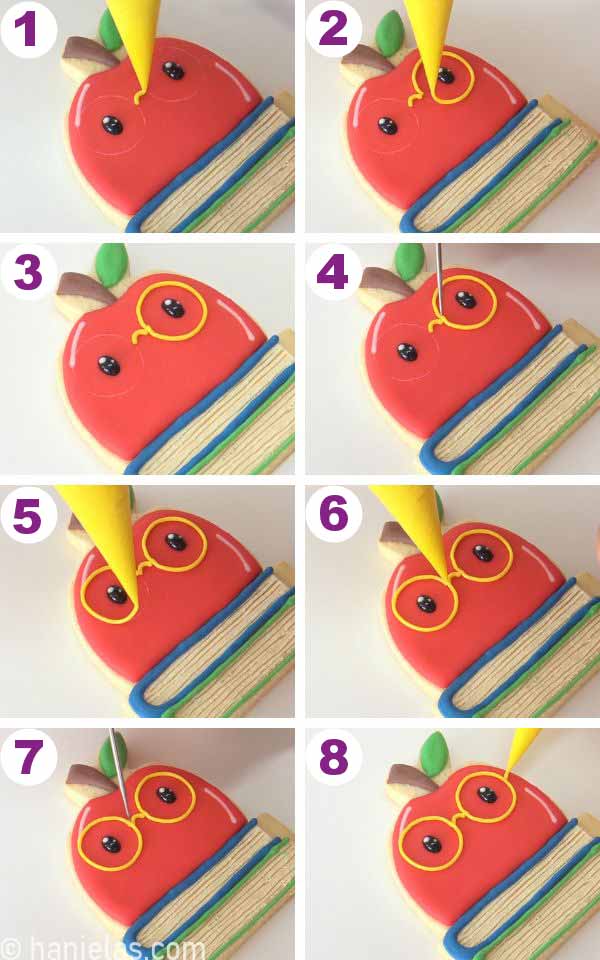
- You can pipe the glasses in three simple steps. I used soft-piping to piping consistency yellow icing to make the ‘nerdy’ glasses.
- Start by piping a slightly curved bridge in the middle (step 1).
- Then pipe a rim on the right and then on the left.
- After each time, make sure that the ends are smooth. Use a scribe tool to smooth the icing in the meeting points (steps 2-7).
- Don’t forget to pipe short lines to make temples on each side (steps 8).
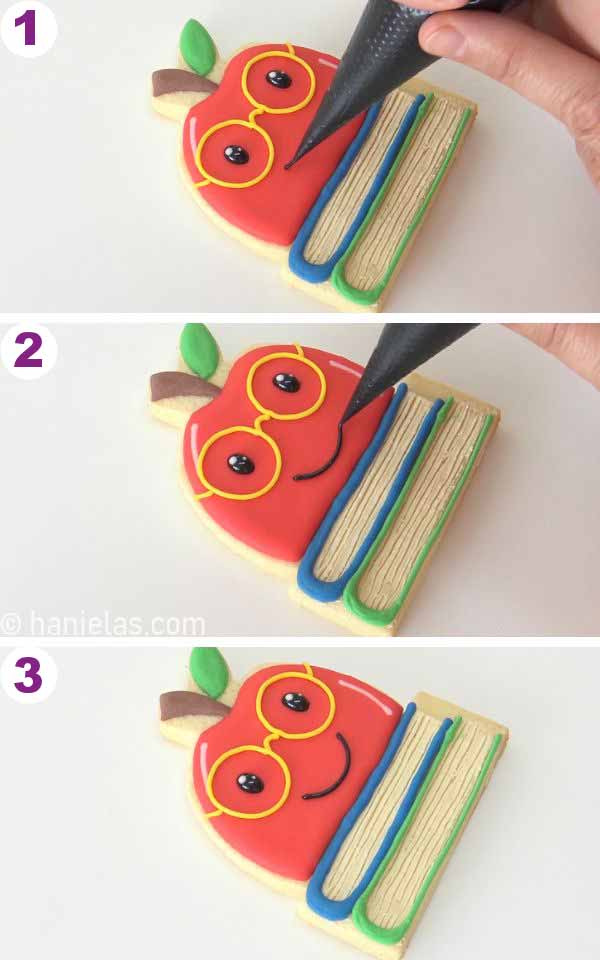
MOUTH
- And lastly, we’re going to create a happy face by piping a mouth with black icing.
- You can use 20 20-second consistency icing that you used to make the eyes. However, if you’d like to create a mouth that is more defined, use icing that is slightly thicker, like piping consistency.
- Squeeze the piping bag and allow a small dot of icing to come out, anchor it onto the icing, and immediately move the piping bag in the direction you want to pipe the line. (step 1).
- Once you want to end the line, stop squeezing the bag and slowly lay the line down and pull away (steps 2-3).
CUTE NERDY APPLE COOKIES VIDEO TUTORIAL
Do you want to stay updated about free cookie decorating tutorials, live events, classes, and products? Sign up for Hani’s Cookie Decorating Newsletter.
MORE BACK TO SCHOOL-INSPIRED RECIPES
- Cupcake Back To School Cake (step-by-step video on Haniela’s YouTube Channel)
- Icebox Colored Pencil Cookies
- Teacher Cookies
COOKIE DECORATING TOOLBOX
- Beginner’s Guide To Cookie Decorating
- Ultimate Guide to Cut-Out Cookies (tips, tricks, troubleshooting)
- Royal Icing Recipe
- Small Batch Royal Icing Recipe
- Cookie Icing Recipes (includes vegan royal icing, glaze, fondant)
- Guide To Royal Icing Consistencies with Visual Help(what is stiff, flood icing, etc.)
- How To Freeze Royal Icing
- How To Make Royal Icing Transfers
- Royal Icing FAQ ( for example: how to make black icing, color bleeding, storage, and more)
- How To Make a Cookie Cutter Template
- Ultimate Guide To Cookie Decorating Tools
This post was first published on August 30. 2017. On August 8, 2025, I updated this post with step-by-step process pictures and a video tutorial. Along with written instructions, a list of tools and recipes used in the project.

Hi, I’m Hani
Welcome!
Thank you for visiting Haniela’s. On my blog, you’ll find delicious sweet & savory recipes made with simple ingredients. Why not start a new adventure? Discover a world of cookie decorating with my step-by-step tutorials.

Hi, I’m Hani
Welcome!
Thank you for visiting Haniela’s. On my blog, you’ll find delicious sweet & savory recipes made with simple ingredients. Why not start a new adventure? Discover a world of cookie decorating with my step-by-step tutorials.