
How to Decorate Simple Christmas Cookies
This Christmas cookie decorating tutorial is a great place to start if you’re new to cookie decorating. I’ll show you how to create a collection of simple, festive Christmas cookies with royal icing. No advanced decorating skills required. These designs are easy to follow, fun to make, and super cute to boot.

HOW TO MAKE SIMPLE CHRISTMAS DECORATED COOKIES
To make Simple Christmas Decorated Cookies, I used 5 cookie cutters: Tree, Star, Mitten, Stockings/Boot, and a Bear
BAKE COOKIES
Prepare cookie dough and bake cut-out cookies. I used my delicious Honey Cookies, or you can use my popular Sugar Cookies instead. Let the cookies cool completely before decorating. Store in an airtight container if not using right away.
PREPARE ROYAL ICING
Prepare traditional meringue-based royal icing, or use Vegan Royal Icing.
TIP: Don’t use oil-based extracts to flavor royal icing.
ROYAL ICING CONSISTENCIES
To make these simple Christmas Cookies, you will need these consistencies and colors:
- 15 Second Consistency: Red, Light Green, Dark Green, Light Blue, White, Light Brown
- Piping Consistency: Red, White, Blue, Light Green, Dark Brown (dark brown is optional, you can also use a black edible marker to make the nose, mouth, and eyes)
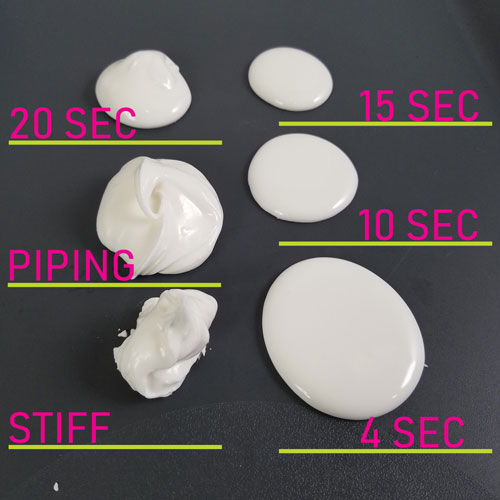
Royal Icing Consistency Guide
What is 15-second consistency?
To achieve flood consistency, add a few drops of water to stiff icing, stir, and gradually add more water until you reach 15-second consistency icing. To test if your icing is the correct consistency, run a spatula thru icing. Watch and count how long it takes for the separation line to disappear. It should take about 15 seconds.
What is piping consistency?
Add a few drops of tap water to stiff icing. Stir. When you pull it up with a spatula, the icing should form a peak that bends down but doesn’t blend with the rest of the icing.
HOW TO CUT A TIPLESS PIPING BAG
To cut a disposable piping bag, flatten the bag in the middle, where the seam is. Using your fingers, push the tip of the bag. Cut a small tip straight across. It’s better to cut a small opening and then cut again to make it bigger.

WATCH THE VIDEO TUTORIAL
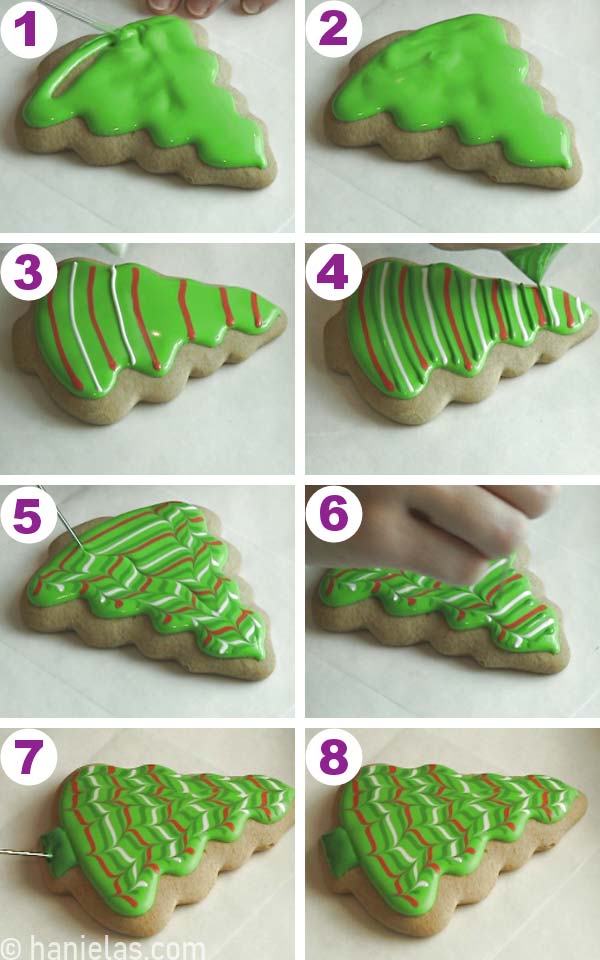
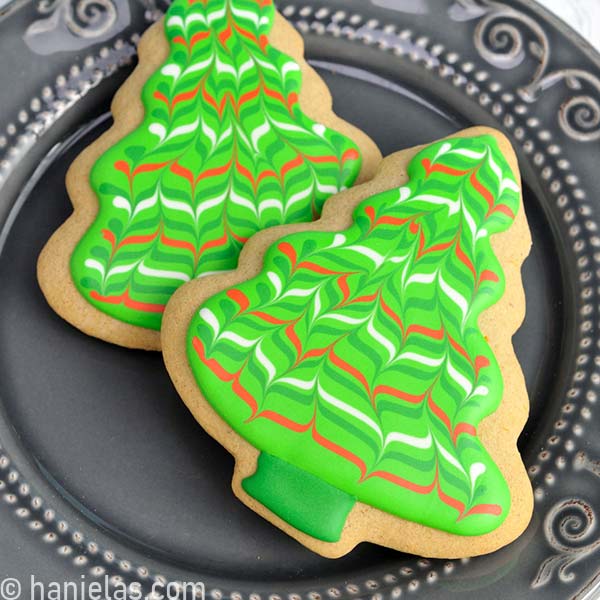
MARBLED TREE COOKIES
Outline and flood the cookie with green icing (15-second consistency). Immediately pipe lines across with red, white, and dark green icing of the same consistency (steps 1-4). Take a scribe or a toothpick and drag it thru the icing up and down (steps 5-6). Let icing crust and then decorate the trunk (steps 7-8).
This simple wet-on-wet technique is popular on Christmas Ornament Cookies, too.
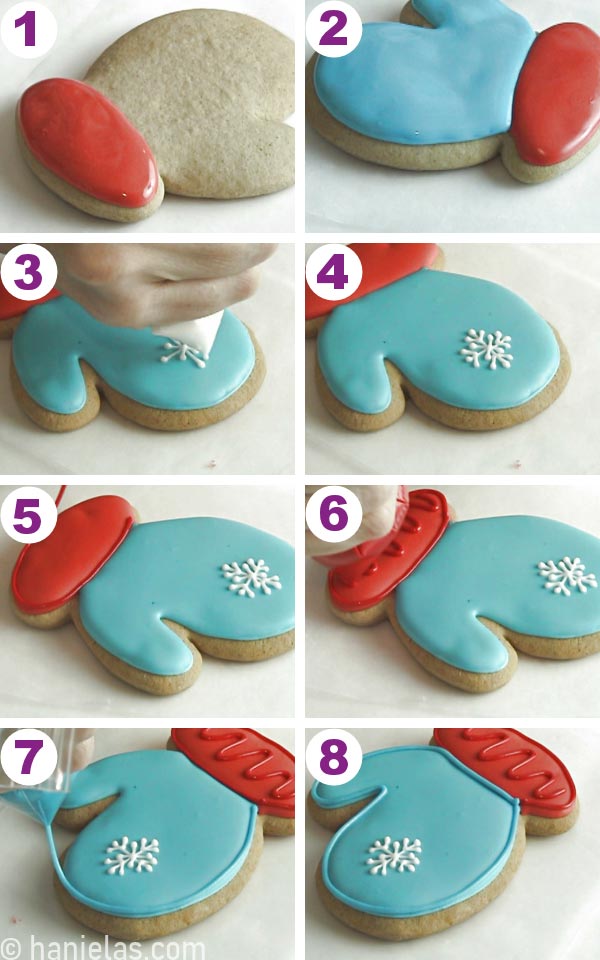
SNOWFLAKE MITTEN COOKIES
- Outline and flood the cuff of the mitten with red icing of 15-second consistency. Allow icing to crust for 20 minutes (step 1).
- Then outline and flood the top/hand section with blue icing of 15-second consistency; allow the icing to crust well, about an hour or so (step 2).
- With white icing piping consistency, pipe a pretty snowflake (steps 3-4).
- With red icing piping consistency, pipe an outline and wavy detail on the cuff section (steps 5-6).
- Lastly, with blue icing piping consistency, outline the hand section (steps 7-8).
Blue colors also look beautiful on Winter Gingerbread House.

CHRISTMAS STOCKING COOKIES
- Outline and flood the boot with 15-second consistency red icing. Allow red to crust for 20 minutes (step 1).
- Now flood the cuff with green 15-second consistency royal icing. Use a scribe tool to shape the icing (steps 2-3). Let the icing dry for 1 hour.
- Now, with a piping consistency, pipe green, white, and red details and outlines (steps 4-8).

This classic Christmas color combination shines on 3D Stocking Cookies.

GARLAND CHRISTMAS TREE COOKIES
- Outline and flood the cookie entirely with light green icing. Allow icing to dry completely overnight (steps 1-2).
- Then pipe a garland with a piping-consistency white icing. Immediately dust freshly piped white icing with sanding sugar (steps 3-5).
- Now take red icing of piping consistency and pipe small dots onto the garland (step 6).
- Finish by flooding the stem with green icing. Allow icing to dry (steps 7-8).
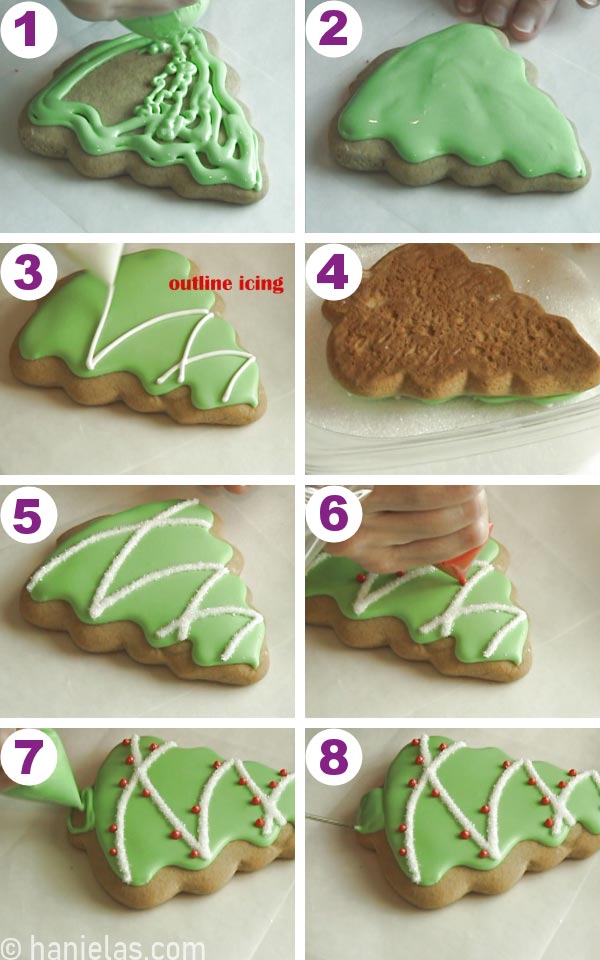
This popular garland design also looks great on an easy-to-make ice cream cone Christmas Tree.

CUTE BEAR COOKIES
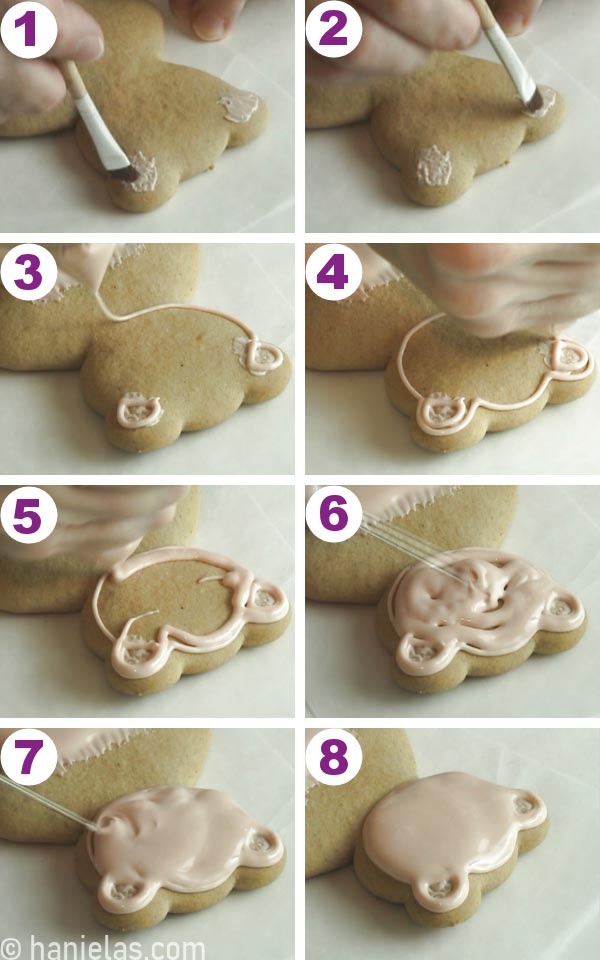
Outline and flood the legs with 15-second light brown icing (steps 1-5).

- Ears and head: If you don’t have a food-only paintbrush, use a crumpled piece of food wrap to apply a thin layer of light brown icing onto the ears.
- Pipe a dot of 15-second consistency light brown icing onto each ear, then use a crumpled piece of food wrap and a dabbing motion to apply icing to the ear sections (steps 1-2). Let it crust for 10 minutes.
- Outline and flood the head with light brown icing. Use a scribe tool to shape and distribute the icing evenly (steps 3-8). Let the icing crust for 20 minutes.
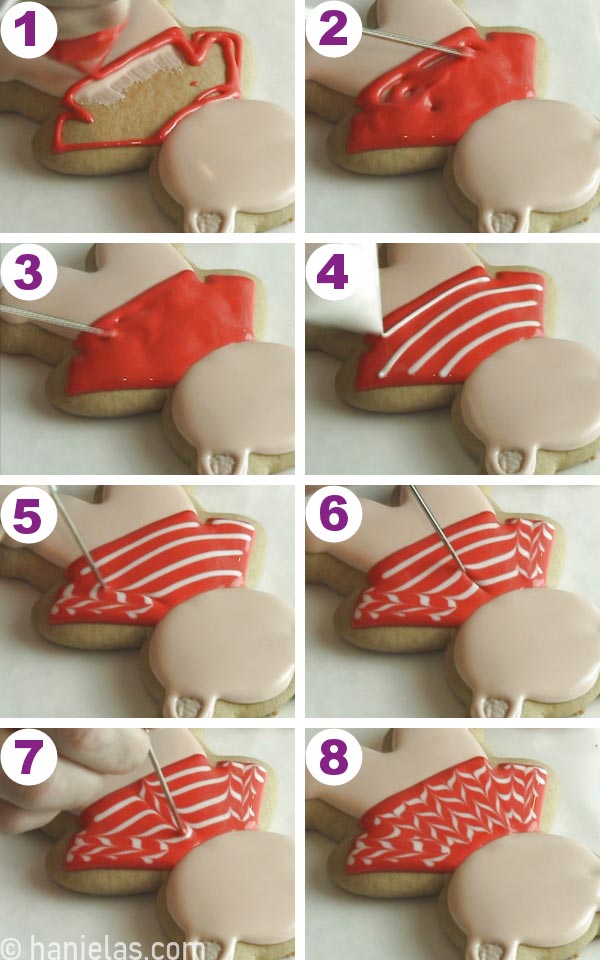
- Marbled sweater: Now, you can create a marbled sweater design. Outline and flood the middle of the cookie with red icing of 15-second consistency. Immediately pipe white lines across with 15-second consistency icing (steps 1-4).
- The marbled design method is called the wet-on-wet royal icing technique. Immediately take a scribe tool and drag it through the icing up and down to create a chevron/zigzag pattern (steps 5-8).
- Pipe the hands with light brown icing (steps 1-3).
- Now you can pipe a muzzle with light brown icing. Allow the muzzle to dry for 2-3 hours. Then, using an edible marker draw the eyes, nose, and mouth (steps 4-8).
- If you don’t have an edible marker, use dark, piping-consistency icing to pipe the facial features.
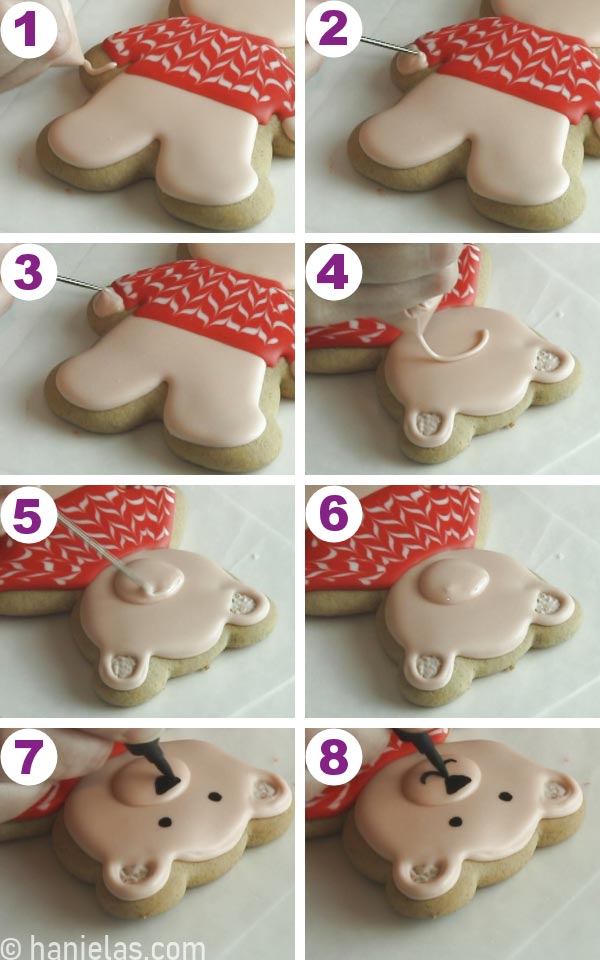
Bear cookies are so cute! I used an easy decorating texture technique to create these textured bear cookies.

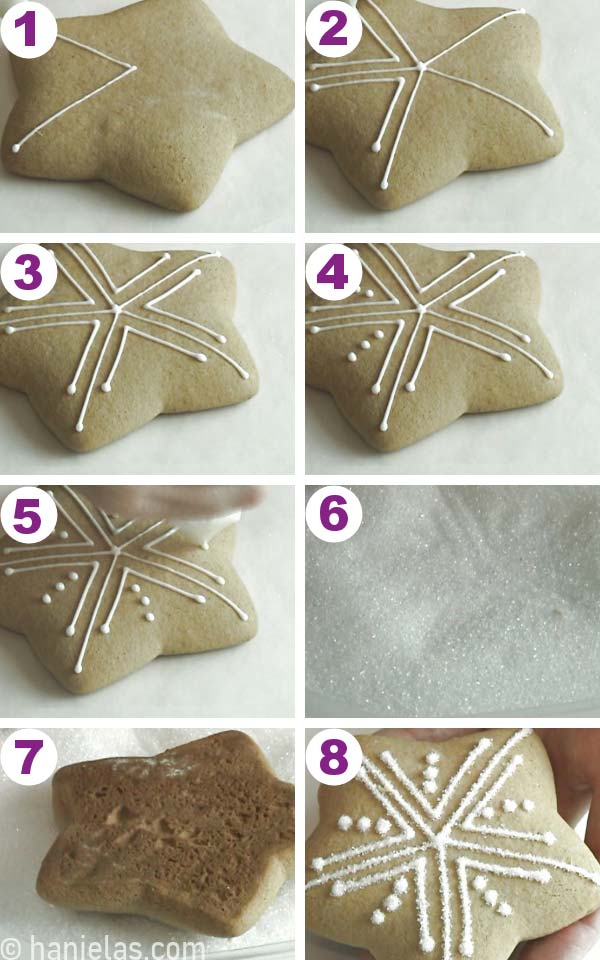
SIMPLE STAR COOKIES
With white icing of piping consistency, pipe a simple snowflake pattern onto the cookies (steps 1-5). Immediately dip cookies into white sanding sugar (steps 6-8).

Did you make these Decorated Cookies? Tag @hanielas on Instagram and hashtag it #hanielas
This post contains Amazon affiliate links that earn me a small commission, at no cost to you. I only recommend products that I use and love. Learn more about my affiliate policy here.
THINGS YOU NEED
- Honey Cookies
- Cut Out Cookie Recipes- Sugar Cookies, Vegan Cookies, Gluten Free Cookies, Classic Gingerbread Cookies
- Royal Icing Recipes: Fresh Lemon Royal Icing, Fresh Egg Royal Icing, or use Vegan Royal Icing
- Find all the tools in my Amazon Shop
- Cookie Cutters : Tree, Stockings/Boot, Bear, Mitten, Star
- Piping Bags
- Food Gel Colors : Leaf Green, Red, Sky Blue, Ivory/Brown
- Scribe Needle Tool
- White Sanding Sugar
- Edible Marker – optional to draw eye, nose, and mouth
This post was originally posted on December 20th, 2013. On November 8th, 2020, I updated this post with new step-by-step pictures, video, and written text.

Hi, I’m Hani
Welcome!
Thank you for visiting Haniela’s. On my blog, you’ll find delicious sweet & savory recipes made with simple ingredients. Why not start a new adventure? Discover a world of cookie decorating with my step-by-step tutorials.

Hi, I’m Hani
Welcome!
Thank you for visiting Haniela’s. On my blog, you’ll find delicious sweet & savory recipes made with simple ingredients. Why not start a new adventure? Discover a world of cookie decorating with my step-by-step tutorials.




All of these are perfect for Christmas!
Than you June!