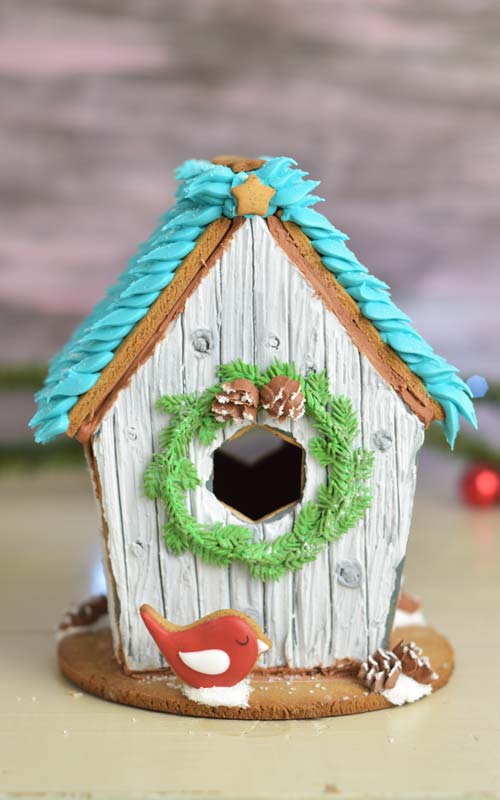
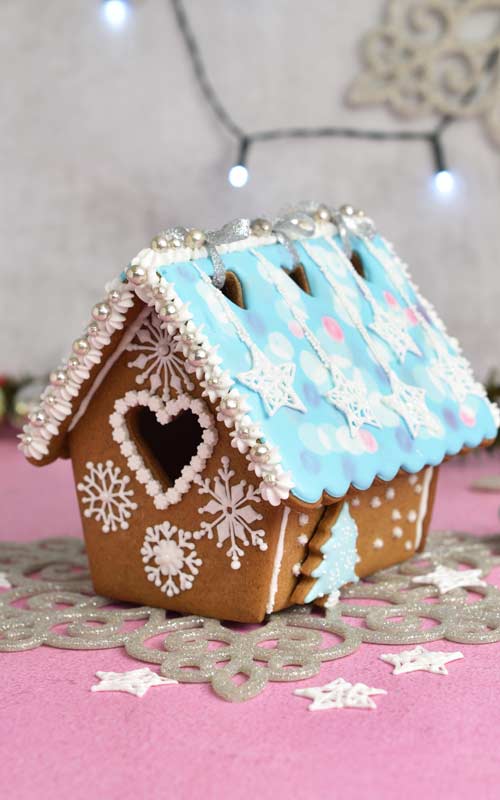
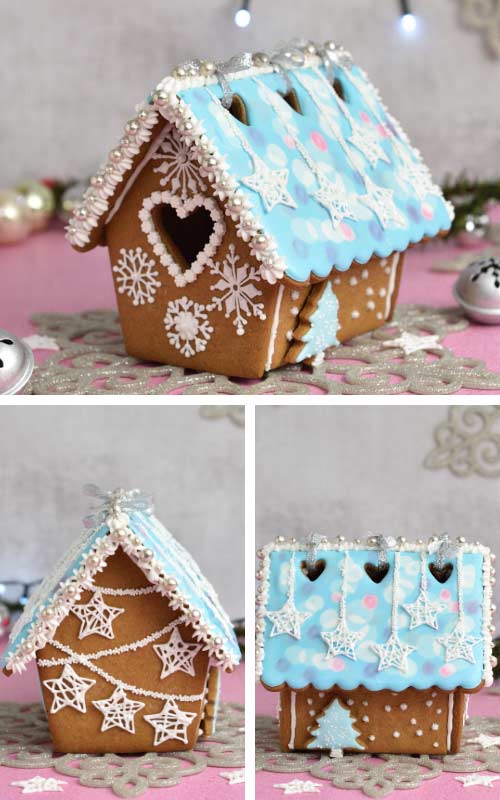
Winter Gingerbread House
Inspired by winter wonderland and blue bokeh background I created this dreamy blue Winter Gingerbread House.
HOW TO MAKE WINTER GINGERBREAD HOUSE
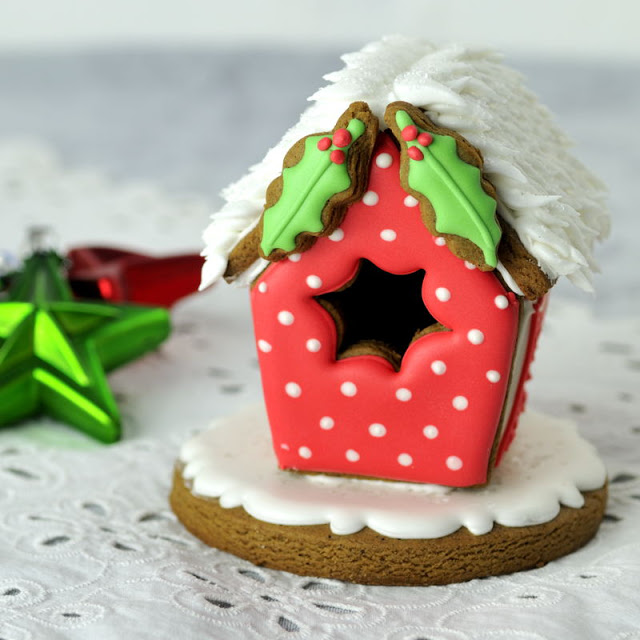
I love using gingerbread decorations to decorate the house for holidays. Every year I create new, unique decorations to deck the halls. Often times my gingerbread pieces revolve around a specific theme. May it be color combination, specific pattern, texture or style. Last year I made a beautiful Pink Gingerbread Snowflake Wreath.
- TABLE OF CONTENTS
- Gingerbread House Panels
- How to make Star Wire Christmas Ornaments
- Create Bokeh Background with royal icing
- Decorate with Star Ornaments
- Side House Panel
- Back House Panel
- Front House Panel
- Winter Gingerbread House Assembly
- Decorate with Silver Dragees and Ribbon
- Recipe and Tools
CONSTRUCTION GINGERBREAD COOKIES
To make my pretty blue gingerbread house I used my Construction Gingerbread. To cut the house panels I utilized cutters I bought online (check the tools sections). And to decorate and assemble the house I used Royal Icing.

STAR WIRE ORNAMENT DECORATIONS
Inspired by Christmas Star Wire Ornaments I made a star ornament decorations as Royal Icing Transfers.
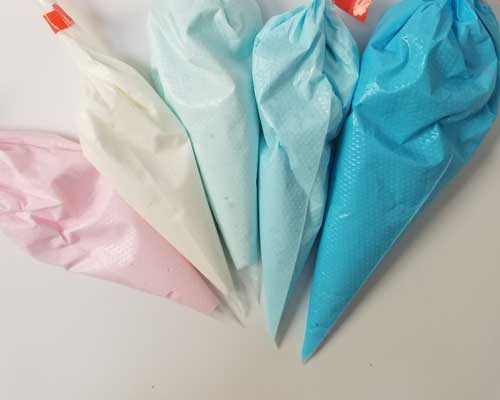
ROYAL ICING COLORS AND CONSISTENCIES :
- White – piping consistency
DECORATING STEPS :
Trace a star outline onto a piece of paper. Then layer a piece of parchment or wax paper over the template.
With white royal icing (piping consistency) pipe a star wire ornament onto the wax paper/parchment. Immediately and while icing is still soft dust the ornaments with edible Jewel Dust.
Dip a dry food only paint brush into the dust. Then move the brush over the freshly piped stars and tap onto the brush handle to sprinkle dust on the icing. Allow star ornaments to fully dry. Since they are not fully flooded it will take only about 1-2 hours.
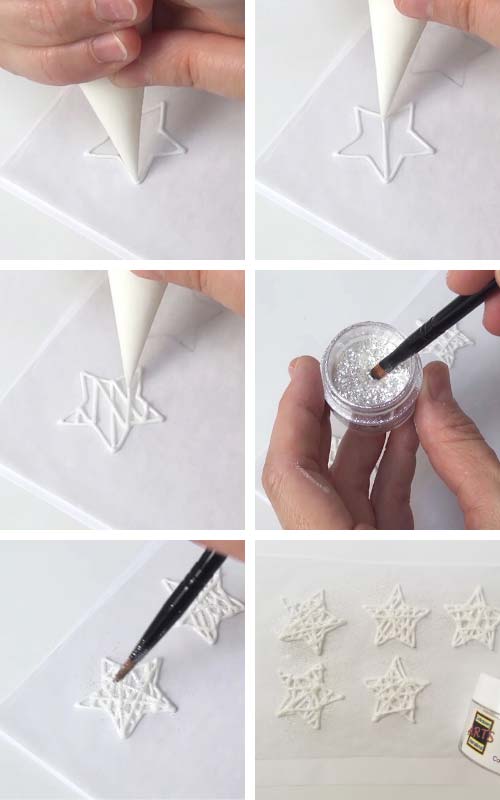
Once star ornaments are dry carefully remove them from parchment/wax paper. I attempted to remove one star before it was fully dry and it broke into pieces (see the picture below).

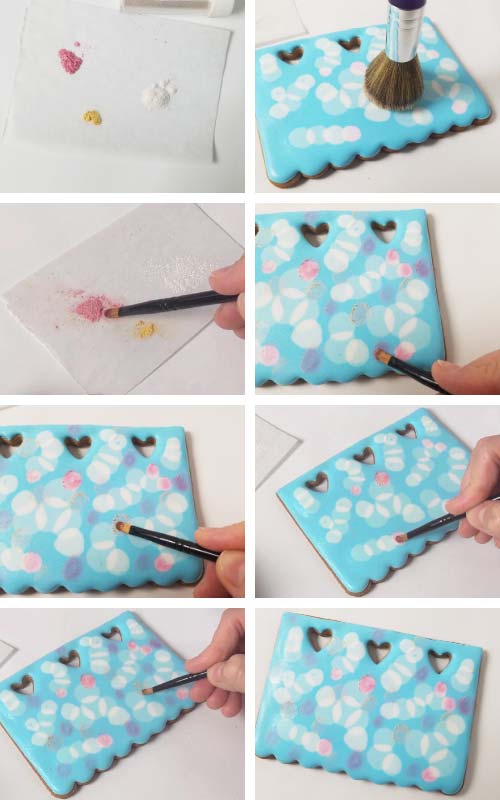
HOW TO CREATE BOKEH BACKGROUND WITH ROYAL ICING
To get started with my bokeh background I first watched a Bokeh Background Tutorial from SweetAmbs. You can find list of tools Amber used to create her beautiful Butterfly Cookies on her blog.

ROYAL ICING COLORS AND CONSISTENCIES :
- Medium Blue, Light Blue, Lightest Blue, Pink, White – 12 second consistency
- White – piping consistency (to make the strings)
DECORATING STEPS :
First I prepared my royal icing and I colored it with gel food colors. To color my base medium blue royal icing I used sky blue gel. Then using my medium blue icing I colored 2 other shaded of blue ( light pastel blue and the lightest blue).
I also used electric pink to make pretty pastel pink royal icing.

Start by outlining and flooding the roof panels, one at a time, with medium blue royal icing (12sec). Try not to add too much icing. We’ll be adding more icing with wet on wet technique and too much icing can cause your icing to overflow. Work quickly, you don’t want the icing to crust before you start working on the bokeh design.
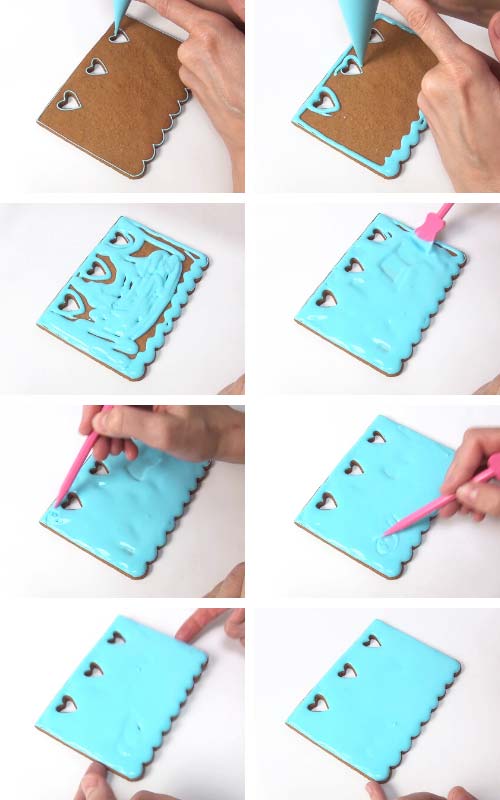
Now we are ready to start with the bokeh background.
Take light blue royal icing (12sec) and pipe small circles onto the wet medium blue icing. Create overlapping circles. Then take lightest blue royal icing and continue making circles and lastly make several circles with pink royal icing.
Once you have all the circles piped take white royal icing and flood all sections where circles are overlapping. This creates an illusion of see-through. Allow icing to dry overnight.

LUSTER DUST
To finish bokeh background I utilized 3 luster dusts :
- Pearl
- Pink
- Gold
Scoop out a small amount of each luster dust onto a wax paper.

First dip dry large dusting food only paint brush into the pearl luster dust. Then brush pearl luster dust over the dry icing. Then take a small dry food only paint brush and dip it into pink luster dust. Gently shake off excess and brush circles onto the royal icing. Repeat with gold luster dust.
DECORATE WITH STAR WIRE ORNAMENTS
First arrange star wire ornaments on the roof to determine the position of the strings. Then pipe straight lines with white royal icing (piping consistency). Carefully slide stars off the cookies and dip the whole cookie iced side down into the white nonpareils.
To attach white star wire ornaments pipe dots of royal icing on the underside of each star, into the corners. Carefully place stars on the cookie aligning the end of the string with one of the star’s points. Repeat.

SIDE HOUSE PANEL
ROYAL ICING COLORS AND CONSISTENCIES :
- Light blue – flood, use leftover icing from the bokeh roof
- White – piping consistency
DECORATING STEPS:
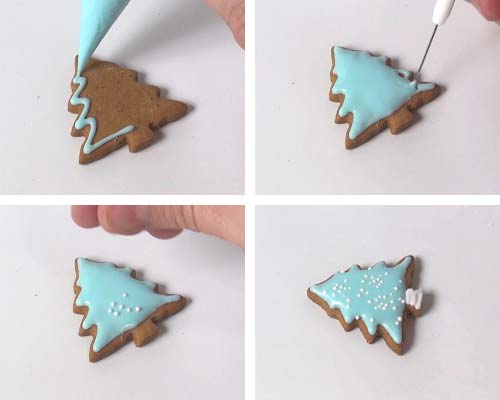
Outline small tree cookies with light blue royal icing. Immediately dust with white nonpareils. Allow icing to dry.
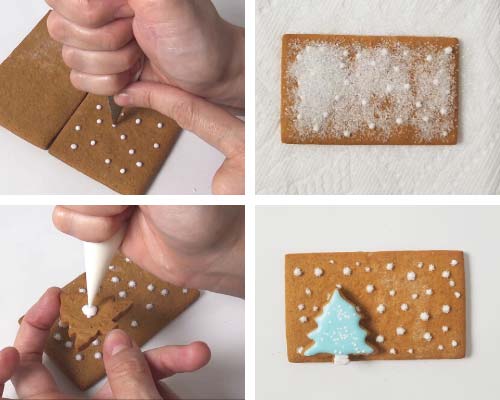
To decorate the side house panel first pipe white dots of different sizes onto the cookie. Then immediately dust cookie with white sanding sugar. And glue small blue tree onto the cookie with white royal icing.
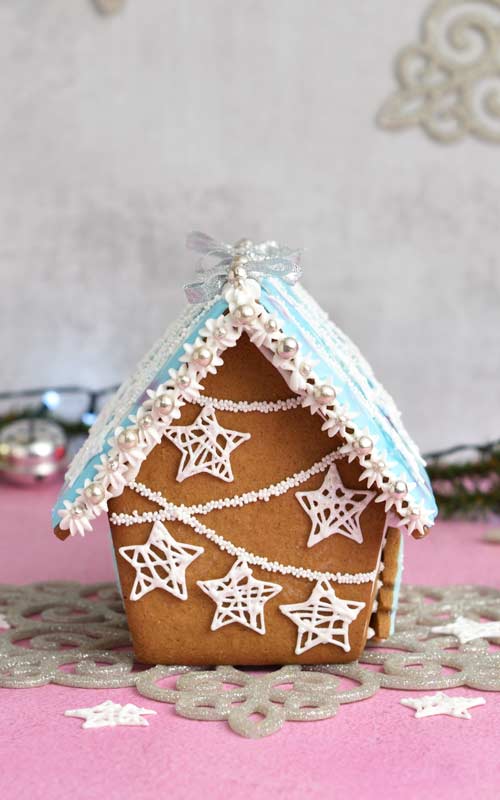
BACK HOUSE PANEL
Pipe the strings with white icing (piping consistency). Dip each string into white nonpareils. Then attach star wire ornaments onto the strings.

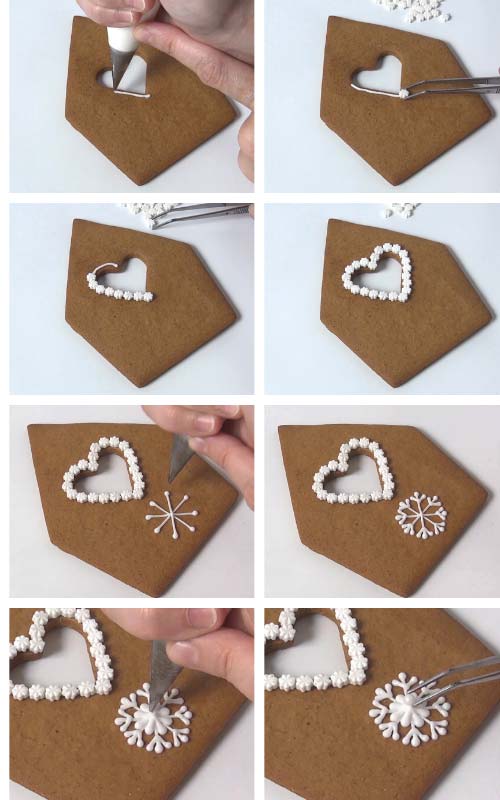
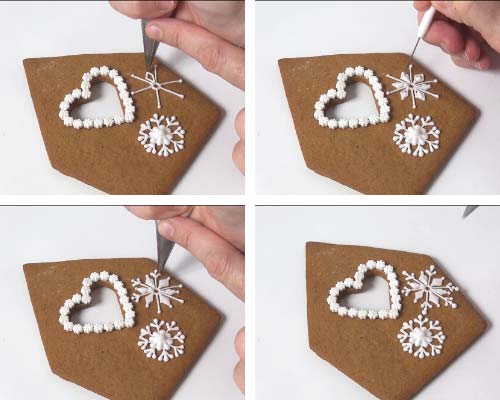
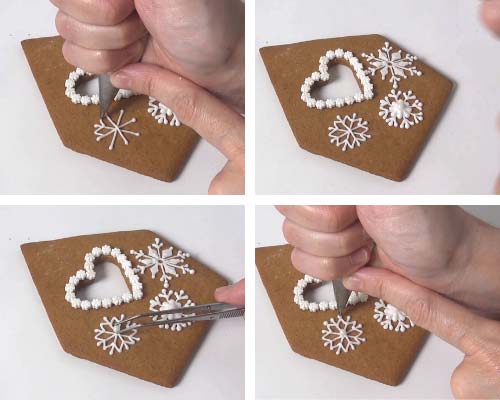
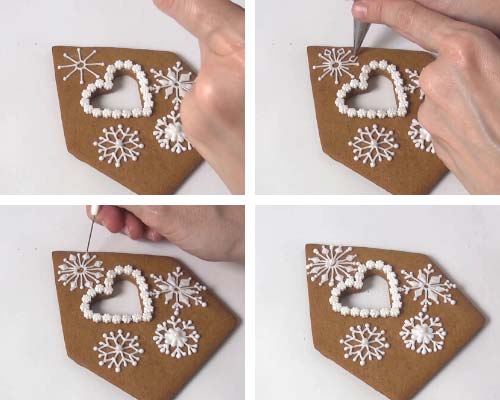
FRONT HOUSE PANEL
ROYAL ICING COLORS AND CONSISTENCIES :
- White – piping consistency
- White – 20 second consistency ( to fill small snowflake sections)
DECORATING STEPS :
Glue pretty sprinkles (white stars, snowflakes, flowers) with royal icing (piping consistency) around the heart cutout. Work in sections, if needed use tweezers to handle small decorations.
Then pipe pretty snowflakes. Use piping consistency white royal icing for line work and to flood small sections use 20 second consistency royal icing.
WINTER GINGERBREAD HOUSE ASSEMBLY
To glue the house panels together I used stiff royal icing. Glue icing shouldn’t be too thin nor overly stiff.
First assemble the base ( front, sides and back of the house). Start by piping thick line of icing on the edges of the front panel. Then carefully align side panels with the front panel and push the side panels into the royal icing glue. Finish by gluing the back panel onto the side panels. Support side panels with small skewers or toothpicks while icing is drying. Allow to dry for 5 hours.
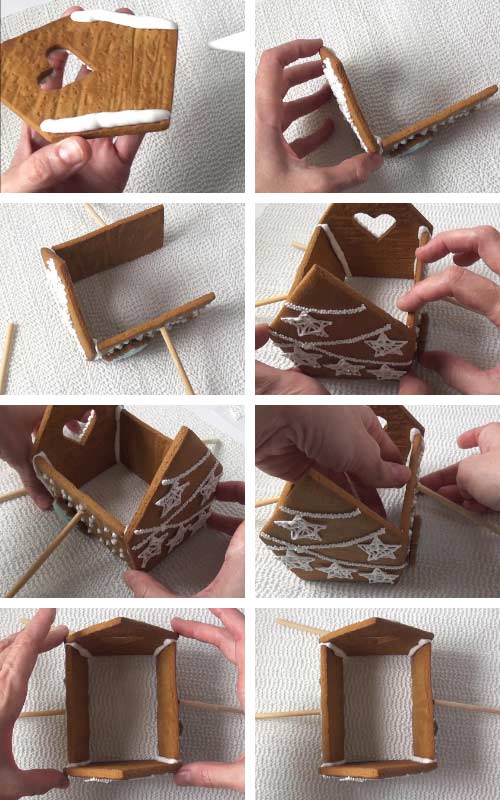
To attach the roof panels first pipe stiff royal icing onto the house base. Then with both of your hands gently press roof panels into the icing, making sure to align the tops and sides. Support roof panels with toothpicks or skewers. Allow icing to dry overnight.

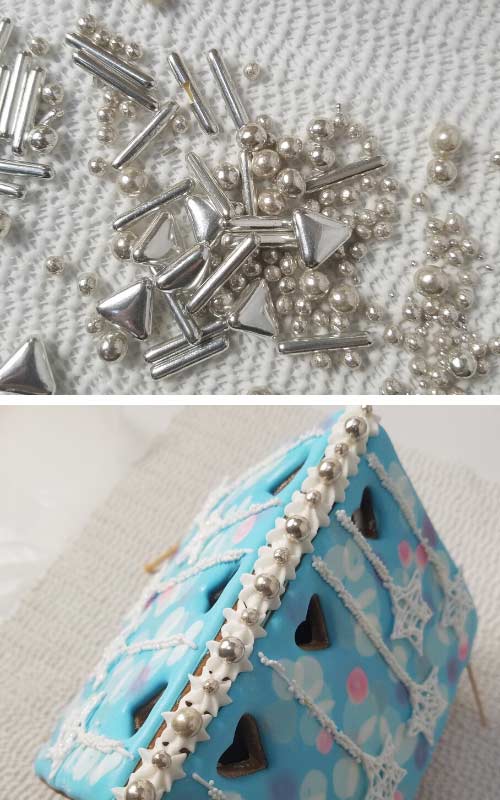
DECORATE WITH SILVER DRAGEES AND SILVER RIBBON
Decorate the top of the roof, front and back with a pretty piped white star border. Fit a piping bag with a star piping tip and fill the piping bag with thick royal icing. Pipe star borders at the top of the roof, back and front. While icing is still soft push small silver dragees into each piped star. Allow icing to fully dry.

Lastly thread a pretty ribbon through the heart cutouts. I utilized a paper clip. Secure ribbon into the clip and then extend one end of the clip and tread it through the cut outs. Tie a pretty ribbon, trim the ends.

MORE PRETTY GINGERBREAD DECORATIONS :
This post contains Amazon affiliate links that earn me a small commission, at no cost to you. I only recommend products that I use and love. Learn more about my affiliate policy here.
TO MAKE BLUE WINTER GINGERBREAD HOUSE YOU NEED
- RECIPES
- Construction Gingerbread
- Honey-Gingerbread Cookie Dough for Edible Houses
- Royal Icing
- TOOLS
- Find all the tools in my Amazon Shop or otherwise source is listed below
- Birdhouse Cookie Cutters (etsy- Bobbi’s Cookie Cutters, look up gingerbread house, option 5 inches)
- Heart Cookie Cutters ( 1.5 inch for the front house opening, and 1 inch for the roof)
- Small Tree Cutter
- Piping Bags
- Food Gel Colors : sky blue, electric pink
- Star Piping Tip
- Pearl Luster Dust
- Pink Luster Dust
- Soft Gold Luster Dust\
- Jewel Dust (FDA)
- Sugar Pearls
- Dusting Food Only Paint Brush
- Small Paint Brush
- White Snowflakes, Stars
- Tweezers
- White Nonpareils
- Silver Dragees (etsy)
- White Sanding Sugar
- Scissors
- Toothpicks, cut up skewers
- RELATED TUTORIALS
- Ultimate Guide to Royal Icing Consistency
- Royal Icing Transfers (how to make them, type of transfers, how to store them, etc.)
- Winter Gingerbread House – tutorial with narration

Hi, I’m Hani
Welcome!
Thank you for visiting Haniela’s. On my blog, you’ll find delicious sweet & savory recipes made with simple ingredients. Why not start a new adventure? Discover a world of cookie decorating with my step-by-step tutorials.

Hi, I’m Hani
Welcome!
Thank you for visiting Haniela’s. On my blog, you’ll find delicious sweet & savory recipes made with simple ingredients. Why not start a new adventure? Discover a world of cookie decorating with my step-by-step tutorials.