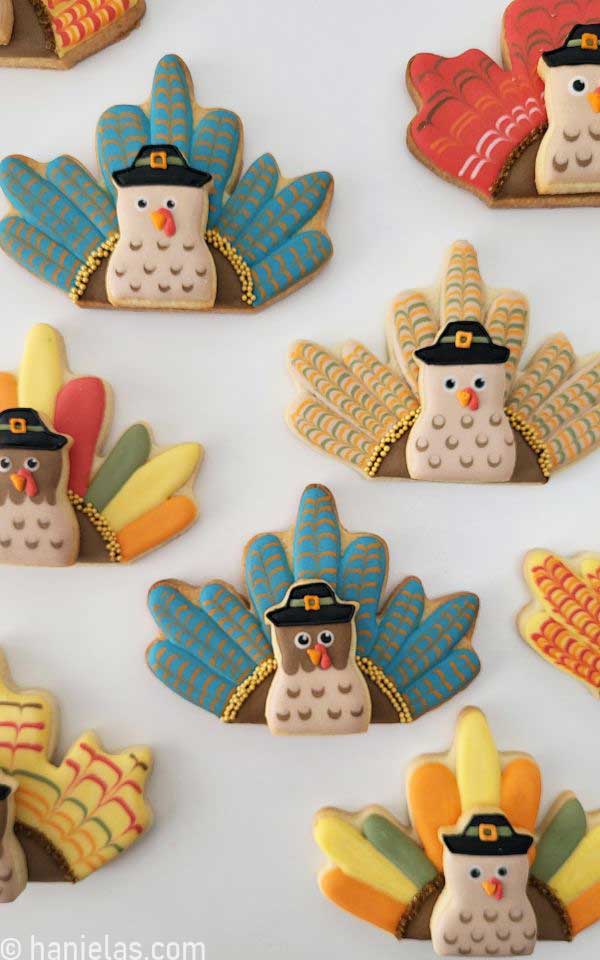
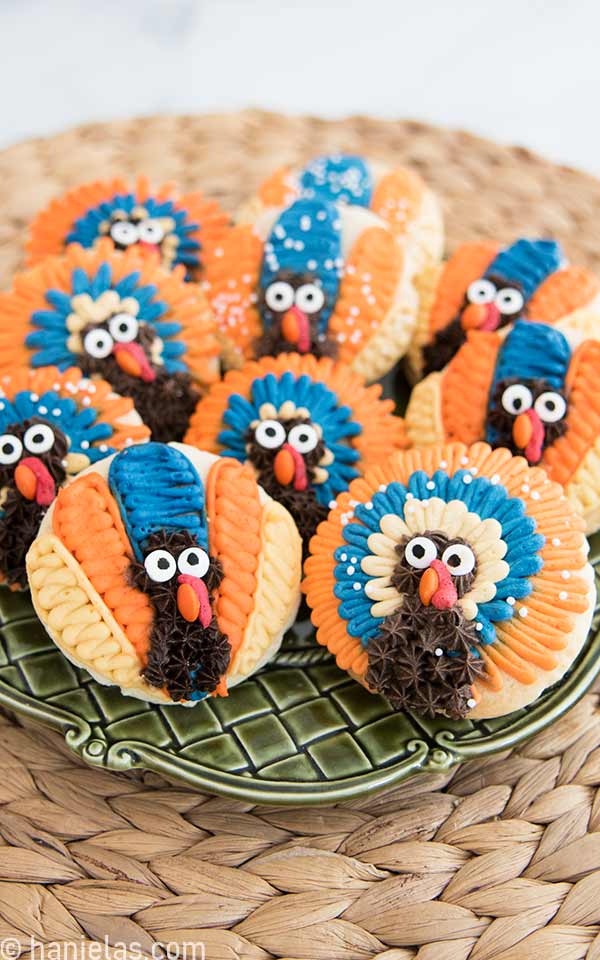
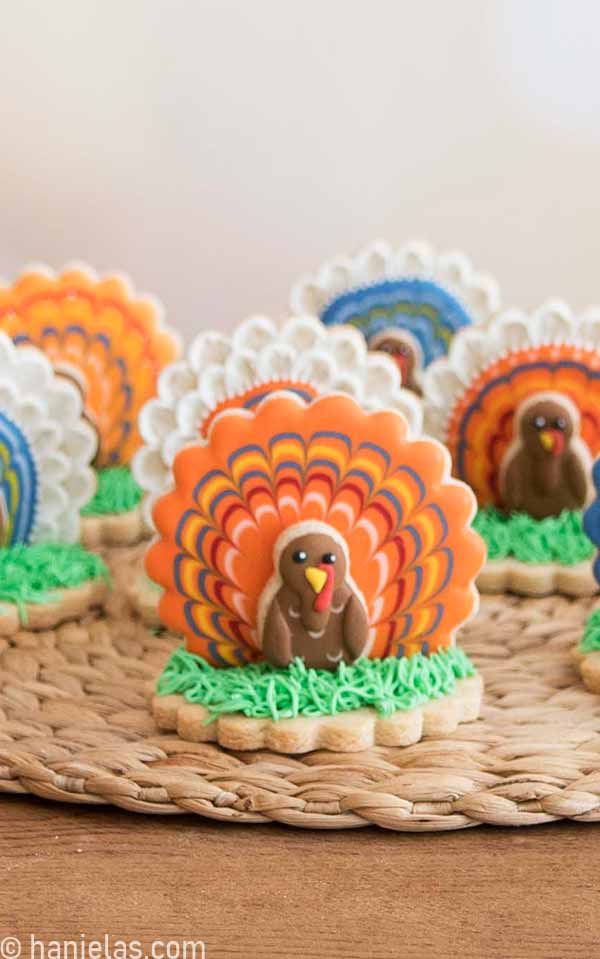
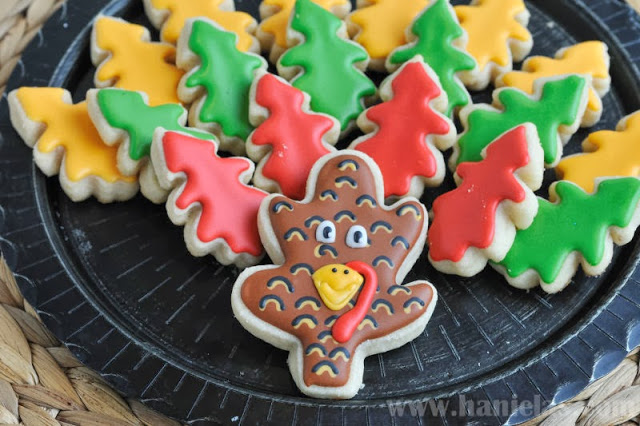
Decorated Colorful Turkey Cookies with Royal Icing
Who says you need a turkey-shaped cookie cutter to make turkey cookies? In this step-by-step tutorial, you’ll learn to make colorful turkey cookies using a maple leaf and a mini snowman cookie cutter.
COLORFUL TURKEY COOKIES STEP-BY-STEP
I’ll walk through how to decorate each cookie using the feathering/ marbling technique to create gorgeous, colorful feathers, plus a polka-dot feathering effect for the turkey’s cheerful head.
THINGS YOU NEED
- Get all the tools and supplies in Haniela’s Amazon Shop
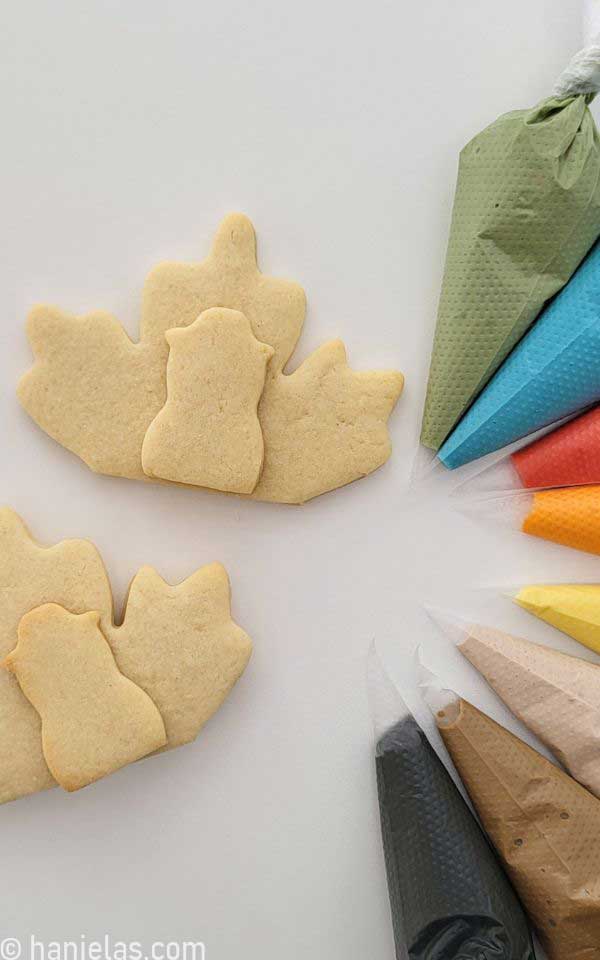
- Maple Leaf cookie cutter
- Small snowman cookie cutter, or other similar cutter, or you can make a snowman as a royal icing transfer
- Gold nonpareils and/or sanding sugar
- Gel Food Coloring: brown, orange, green, black, red, use different colors as you wish
- Tipless Piping Bags
- Scribe Tool
- Edible marker – yellow or brown
- Template optional – half circle template
This post contains Amazon affiliate links that earn me a small commission, at no cost to you. I only recommend products that I use and love. Learn more about my affiliate policy here.
COOKIE CUTTERS
- Before you bake the cookies, trim the bottom of the maple leaf cutter and also the very bottom of the Snowman cutter.
- When we glue them together, they will create a thick bottom edge (over 1/2 inch thick). As a result, an assembled cookie can sit upright and make a beautiful centerpiece or placement cookie.
- In this tutorial, I used my classic sugar cookie recipe. If you’d like, you can make a seasonal variation of my cut-out cookie recipe by adding pumpkin pie spice or cinnamon. Use about 1/2 to 1 teaspoon per batch of my classic sugar cookie dough

ROYAL ICING COLORS AND CONSISTENCIES
- I used royal icing to decorate cookies. You can use standard royal icing made with egg whites (there are 3 recipes using meringue, fresh egg whites, and pasteurized egg whites in a carton recipe), vegan icing (using aquafaba), or glaze icing.
- Tan Icing: 15-second consistency (feathers, turkey head)
- Orange Icing: 15-second (feathers), 20-second consistency (turkey beak, hat buckle)
- Green Icing: 2015-second (feathers)
- Black Icing: 15 to 20-second consistency (eyes, hat), piping consistency (hat outline)
- White Icing: 15 to 20 second consistency (eye)
- Red Icing: 20-second consistency to piping consistency (turkey wattle)
- Dark Brown Icing: 15-second consistency (half circle on the maple shape, polka dots on turkey head)
MAKE TURKEY FEATHERS WITH ROYAL ICING
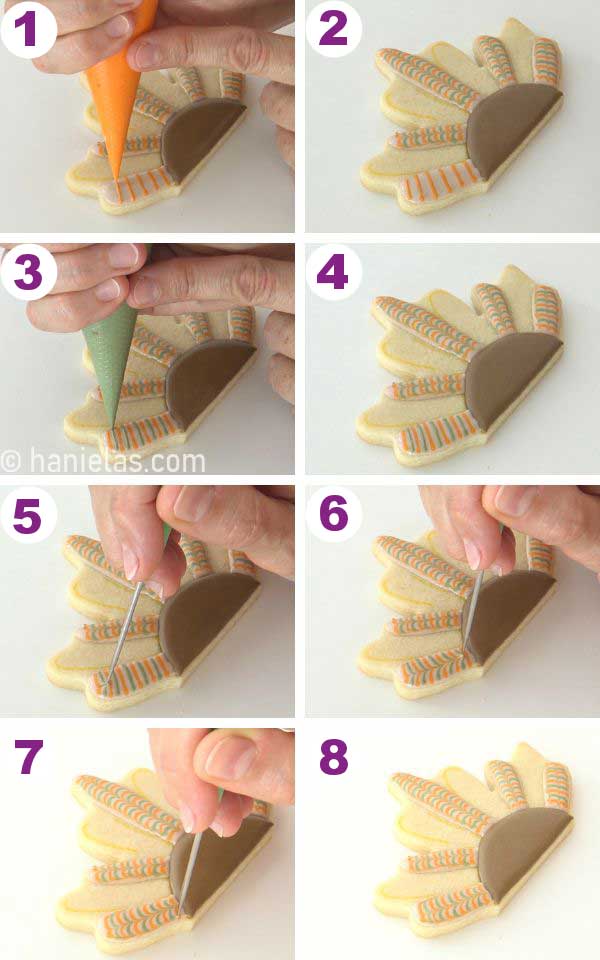
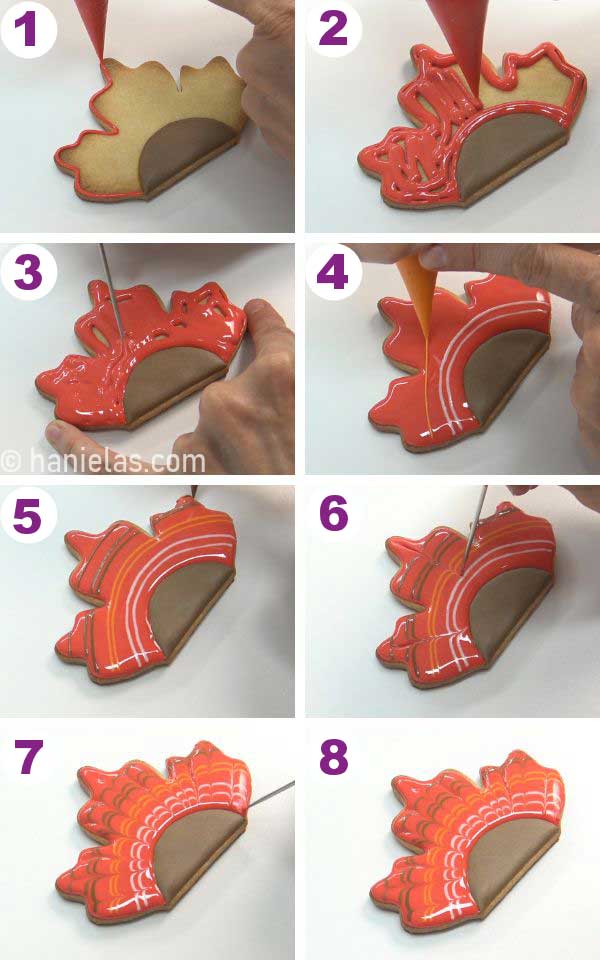
- Use a yellow edible marker and a small half-circle cardstock template and trace a guide onto the cookie (steps 1-5).

Outline and flood this half-circle section with brown icing of 15-second consistency. Let the icing crust for about 20 minutes until no longer shiny (steps 1-6).

- Now we’re going to flood every other section with tan-colored royal icing-15-20-second consistency (steps 1-6).

- Immediately pipe short lines across with orange and green icing – 15-second consistency (steps 1-4).
- To create a feathered look, run the tip of a scribe tool or a toothpick through the middle of freshly piped royal icing and down the sides (steps 5-8).
- Allow icing to crust for about 15 minutes.
- If you experience heavy cratering as your royal icing dries. You can use thicker icing, like 20-second consistency icing.
- And if you’re using 15-second consistency icing, try not to pile it up too much in the narrow sections, as you risk cratering.
- Repeat the same technique on the remaining undecorated sections.

OTHER WAYS TO MAKE A FEATHER BACKGROUND
- Another way to make turkey feathers is to flood the entire area above the brown half-circle with 15-second icing (steps 1-3).
- Then immediately, while the base layer is wet, pipe curved lines across (steps 3-5).
- Run a tip of the scribe through the icing, as shown in the image, to create a feathered/marbled look (steps 6-8).
- Let the icing dry.
- If you still experience cratering in royal icing, you can mitigate it with a simple decorating technique.
- Pipe a zigzag line or a squiggly line in the middle of a narrow area that you’re trying to decorate (step 1).
- Let this line crust, then pipe the icing over it (steps 2-8).
- This zigzag line acts as a support beam. It helps prevent icing from falling and causing cratering/dimpling.
- When creating individual narrow feathers, it’s important to let the adjacent sections crust to achieve dimension.
- Before we can proceed to the next step, let the icing dry completely for 8 to 12 hours.

DECORATE WITH SPRINKLES & SANDING SUGAR
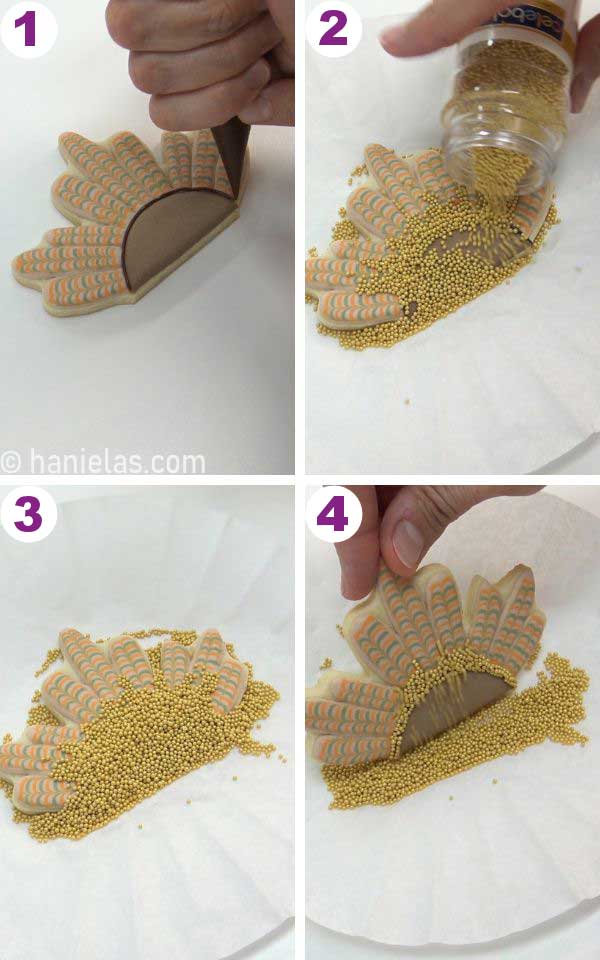
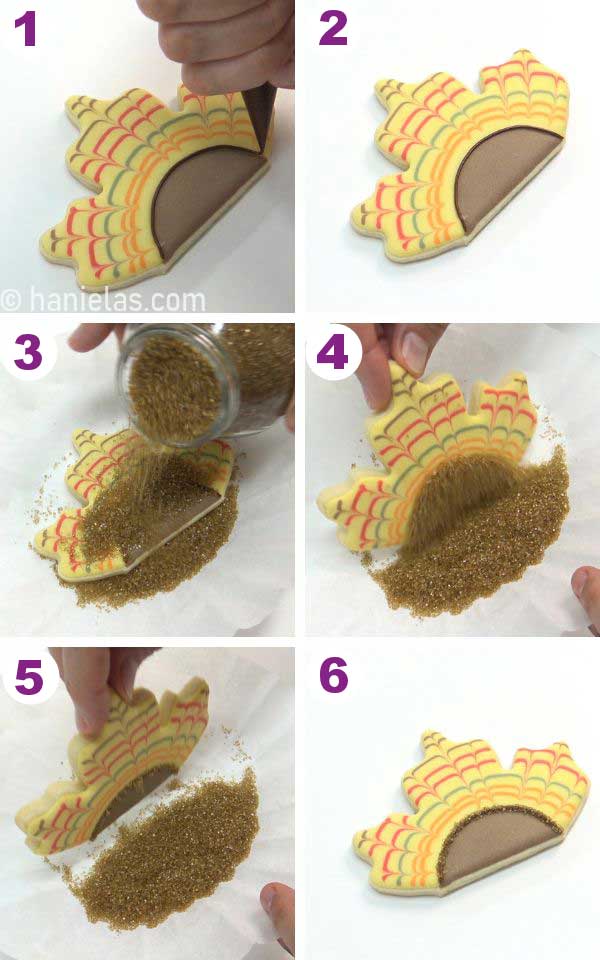
- With piping consistency, pipe a curved line along the border of the brown half-circle with a feathered background (step 1)
- Immediately dust the line of icing with gold sprinkles or use colored sanding sugar (steps 2-4).
- Repeat with all the turkey cookie designs.

TURKEY HEAD COOKIES
- I’m going to show you how to decorate two turkey head designs.
- 1st Turkey Head Design
- Ice the head with light tan icing 15 15-second consistency (steps 1-2).
- Immediately pipe brown polka dots into the bottom part of the cookie (step 3)
- Use the same color you used for the base (tan) and pipe another set of dots over the dark brown dots. Partially covering the dark brown dot, leaving a small crescent visible. This technique is great for simple feathered patterns, bubbles, and even fish scales (step 4).
- While the icing is wet, make the eyes: pipe white dots at the very top, then pipe black dots in each white dot to make the pupils (steps 5-6).
- To make the reflection, use the scribe tool to pick up a small amount of royal icing straight from the piping and place it on the edge of the black (steps 7-8).

- 2nd Turkey Head Design
- In the second design, you’re going to ice the bottom first using the polka dot feathering technique (steps 1-3).
- Immediately use dark brown icing and pipe the top section, creating a zigzag line that overlaps the top of the bottom section (steps 4-5).
- Pipe the eyes.

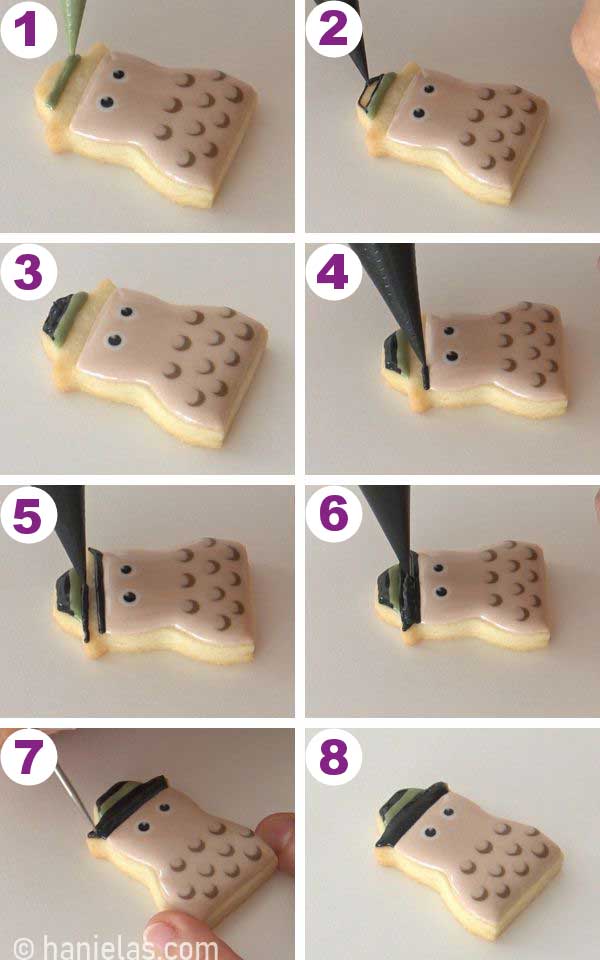
DECORATE TURKEY HAT
- To make the hat, use black and green royal icing.
- Make the hat band and then pipe the hat with black icing on top of the green. and then add a layer of black under the green (steps 1-8).
- Let the icing crust for about an hour.
TURKEY DETAILS – BEAK, WATTLE, HAT BUCKLE
- Now we can add all the little details.
- Pipe a small triangular beak with 20-second consistency orange icing (steps 1-4).
- Let the beak crust for 5 minutes.

- Pipe turkey wattle with 20 to piping consistency red icing. Start at the top of the orange beak. Pipe and S-shape down the right side (steps 1-4)
- Make a hat buckle – pipe a small square or rectangle with 20-second orange icing (steps 5-8).

Use 20 to piping consistency black icing to outline the hat and let the icing dry completely before assembling the cookies (steps 1-6).


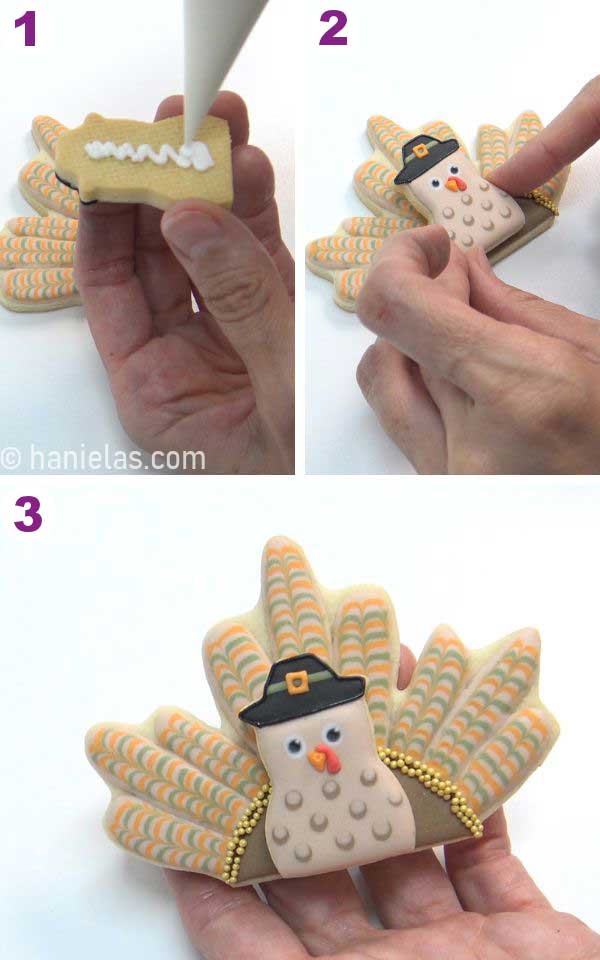
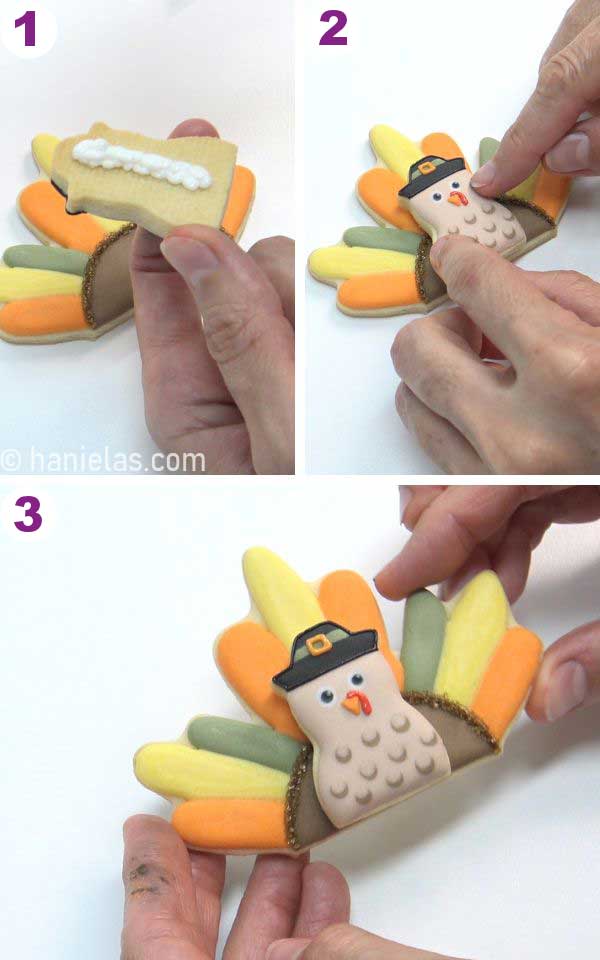
ASSEMBLE TURKEY COOKIES
- To assemble cookies, pipe a small amount of icing on the back of the turkey head.
- Adhere it to the feather background.
- Use a gentle shifting motion.
- Make sure that the bottom of the turkey head flushes with the bottom of the maple leaf.
- Allow to dry for 30 minutes to an hour before packaging or storing away in an airtight container.

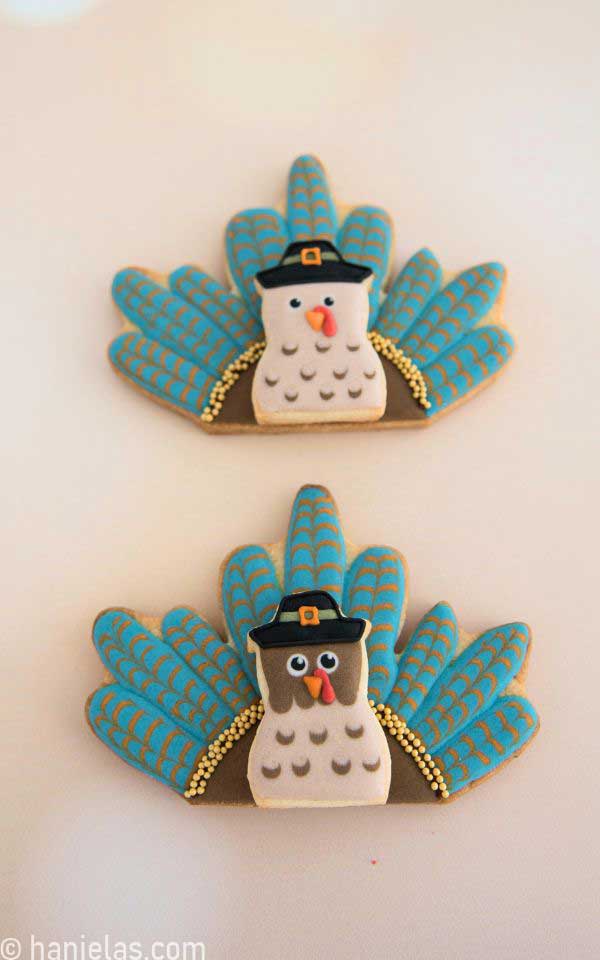
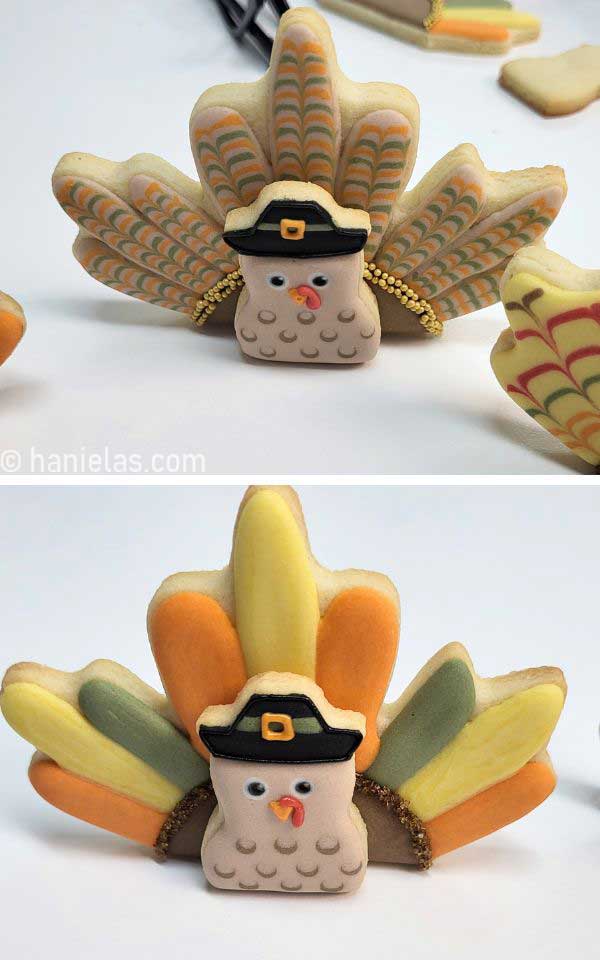
DISPLAY COLORFUL TURKEY COOKIES
You can display these turkey cookies flat or stand them upright for a playful 3D display.

COLORFUL TURKEY COOKIES VIDEO TUTORIAL
MORE THANKSGIVING RECIPES


COOKIE DECORATING TOOLBOX
- Beginner’s Guide To Cookie Decorating
- Ultimate Guide to Cut-Out Cookies (tips, tricks, troubleshooting)
- Royal Icing Recipe
- Small Batch Royal Icing Recipe
- Cookie Icing Recipes (includes vegan royal icing, glaze, fondant)
- Guide To Royal Icing Consistencies with Visual Help(what is stiff, flood icing, etc.)
- How To Freeze Royal Icing
- How To Make Royal Icing Transfers
- Royal Icing FAQ ( for example: how to make black icing, color bleeding, storage, and more)
- How To Make a Cookie Cutter Template
- Ultimate Guide To Cookie Decorating Tools

Hi, I’m Hani
Welcome!
Thank you for visiting Haniela’s. On my blog, you’ll find delicious sweet & savory recipes made with simple ingredients. Why not start a new adventure? Discover a world of cookie decorating with my step-by-step tutorials.
Hi, I’m Hani
Welcome!
Thank you for visiting Haniela’s. On my blog, you’ll find delicious sweet & savory recipes made with simple ingredients. Why not start a new adventure? Discover a world of cookie decorating with my step-by-step tutorials.