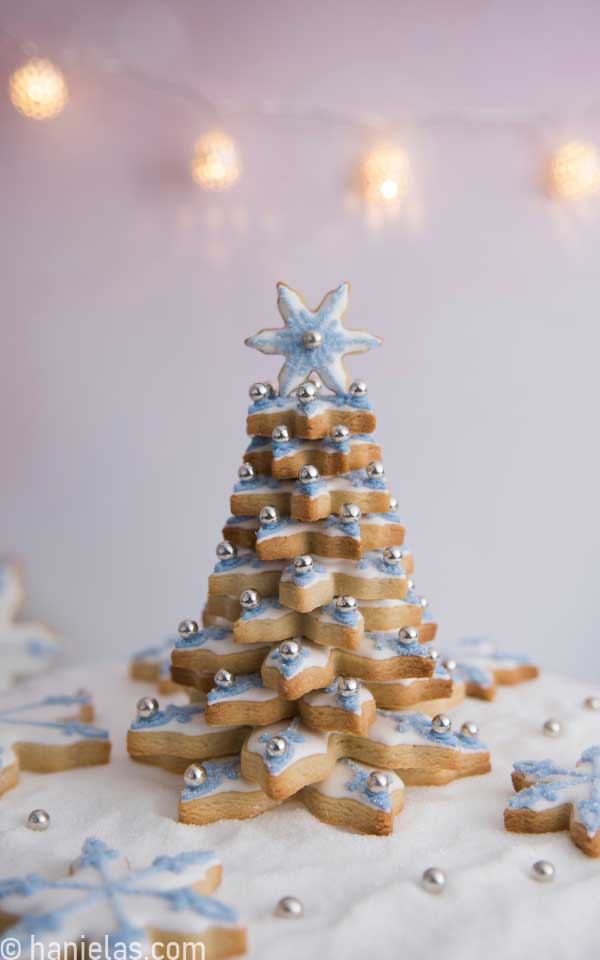
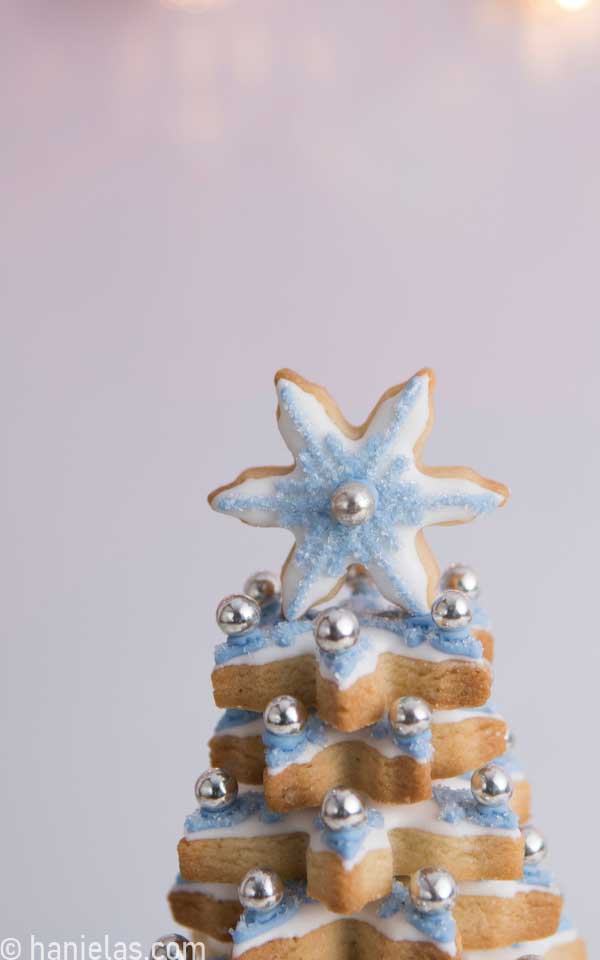
Decorated 3D Christmas Tree Cookies Tutorial
3D Christmas tree cookies have been around for a long time. Usually, these arresting 3D cookies are constructed with star-nesting cutters. However, I’ll show you how to make this popular classic design using snowflake cookies.
updated from 2012
3D CHRISTMAS TREE COOKIES STEP-BY-STEP
- Beginner’s Guide To Cookie Decorating
- Ultimate Guide to Cut-Out Cookies (tips, tricks, troubleshooting)
- Royal Icing Recipe
- Small Batch Royal Icing Recipe
- Cookie Icing Recipes (includes vegan royal icing, glaze, fondant)
- Guide To Royal Icing Consistencies with Visual Help(what is stiff, flood icing, etc.)
- How To Freeze Royal Icing
- How To Make Royal Icing Transfers
- Royal Icing FAQ ( for example: how to make black icing, color bleeding, storage, and more)
- How To Make a Cookie Cutter Template
- Ultimate Guide To Cookie Decorating Tools
Subscribe to Haniela’s Cookie Club on Patreon and get access to exclusive and ad-free tutorials, templates, sneaks peeks, and more.
THINGS YOU NEED
- Nesting Snowflake Cutters or Star Cookies Cutters (nesting sets are great for this project)
- Gel Food Coloring: blue, black – to make bluish gray
- Tipless Piping Bags
- PME Piping Tip #1.5
- Scribe Tool
- Silver Dragees
- White Sanding Sugar
- Tweezers
This post contains Amazon affiliate links that earn me a small commission, at no cost to you. I only recommend products that I use and love. Learn more about my affiliate policy here.

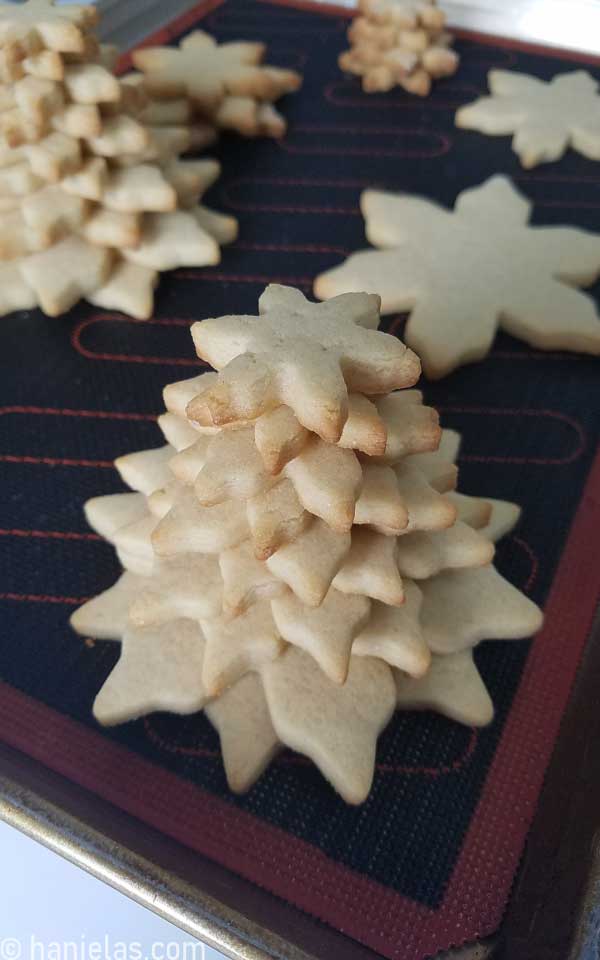
BAKE COOKIES
I used my classic sugar cookie recipe to make snowflake cookies. What are your favorite cut-out cookies?
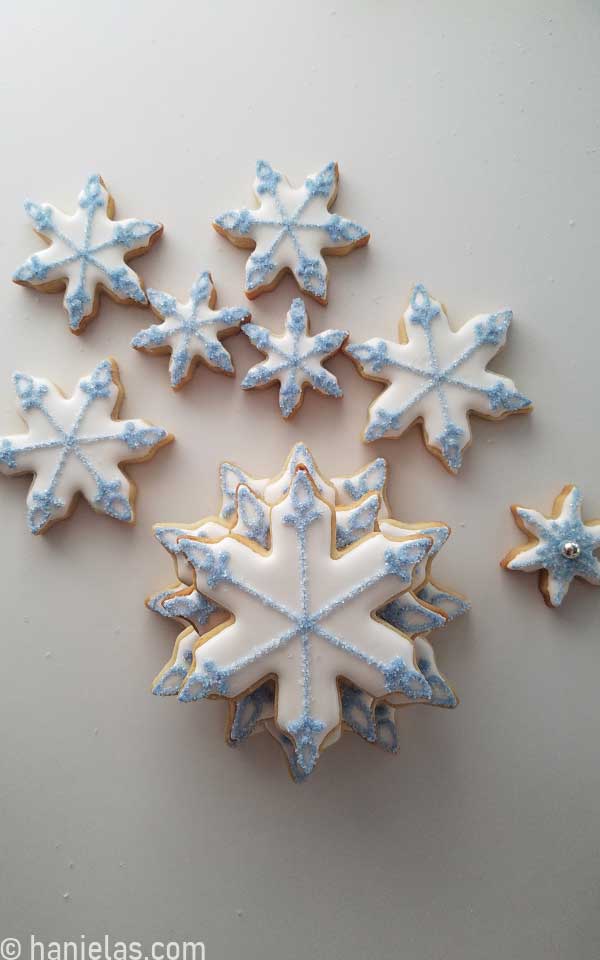
- I baked 11 cookies per Christmas Tree.
- I used five cookie cutters of the same snowflake shape but different sizes.
- I baked 2 of each shape, plus one extra small snowflake for the top of the tree.
- You can use any of these cookie-decorating icing recipes to decorate.
- Today I’m going to work with royal icing.
ROYAL ICING COLORS AND CONSISTENCIES
- White icing: 15-second consistency for flooding the cookies.
- Grayish Blue: piping consistency; I used royal blue gel color to tint the icing, and then I mixed in a minuscule amount (tip of a toothpick) of black gel food color. Use this color to pipe details on top of the white icing.
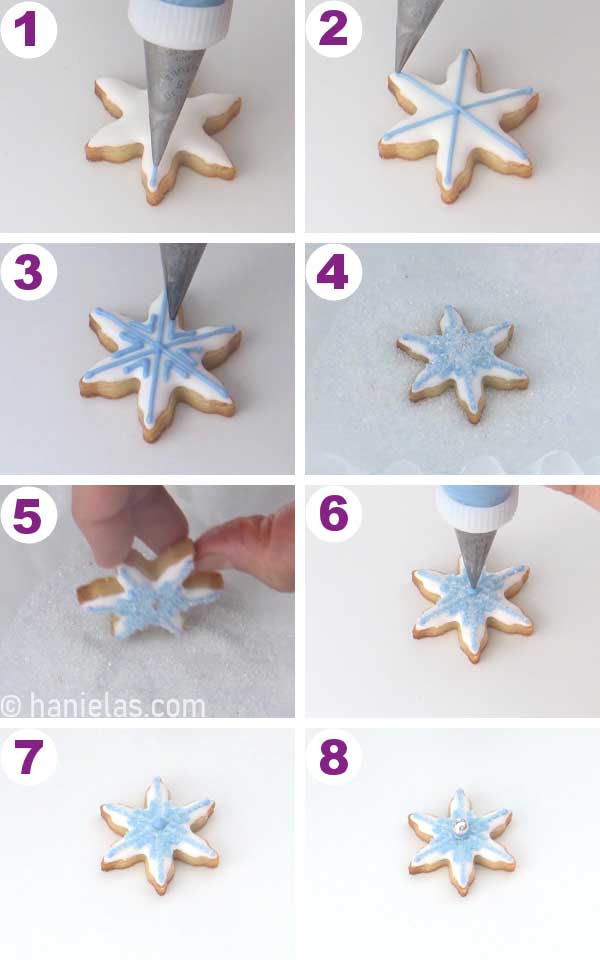
DECORATE COOKIES
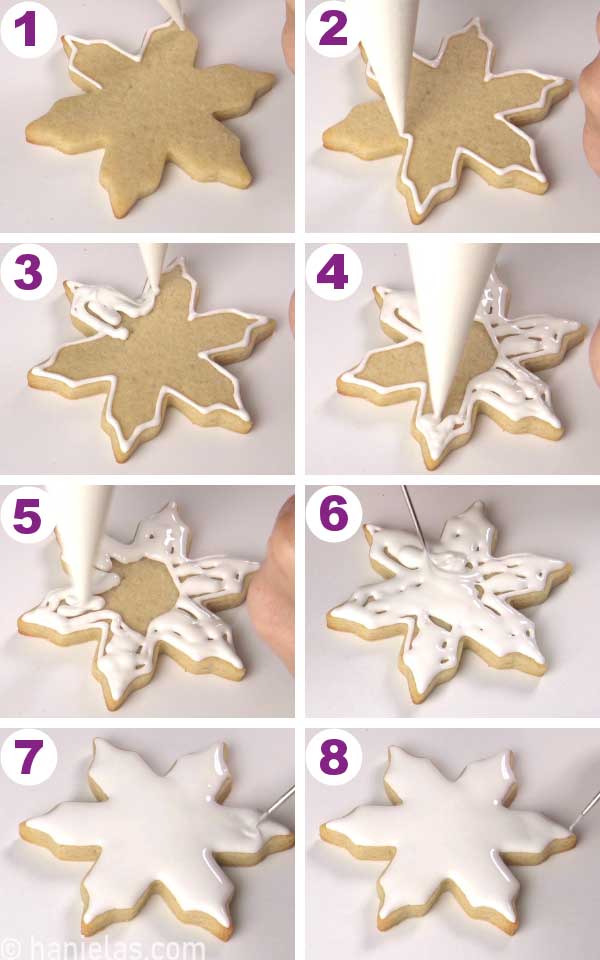
- Outline and flood the cookie with white icing (15-second consistency).
- Use a scribe to smooth and distribute the icing (steps 1-8).
- Let the icing dry for 6-8 hours.
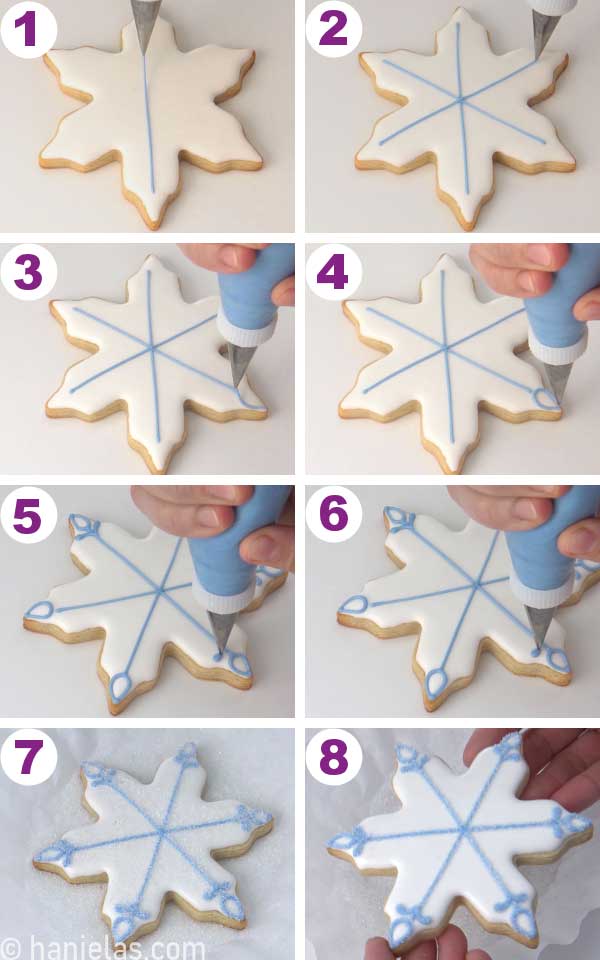
- Decorate the top of the iced snowflake cookie with piping consistency royal icing (blueish gray).
- I used a piping bag fitted with PME Piping #1.5 (steps 1-6).
- Immediately, dust the royal icing design with white sanding sugar (steps 7-8).
- Repeat decorating the top of the snowflake cookies with piping (blue-gray) icing (steps 1-4).
- Lastly, decorate the top snowflake cookie with a small silver dragee.
- Glue the silver dragee onto the middle of the cookie (steps 5-8).
- Let the icing dry for a couple of hours, and then assemble the tree.
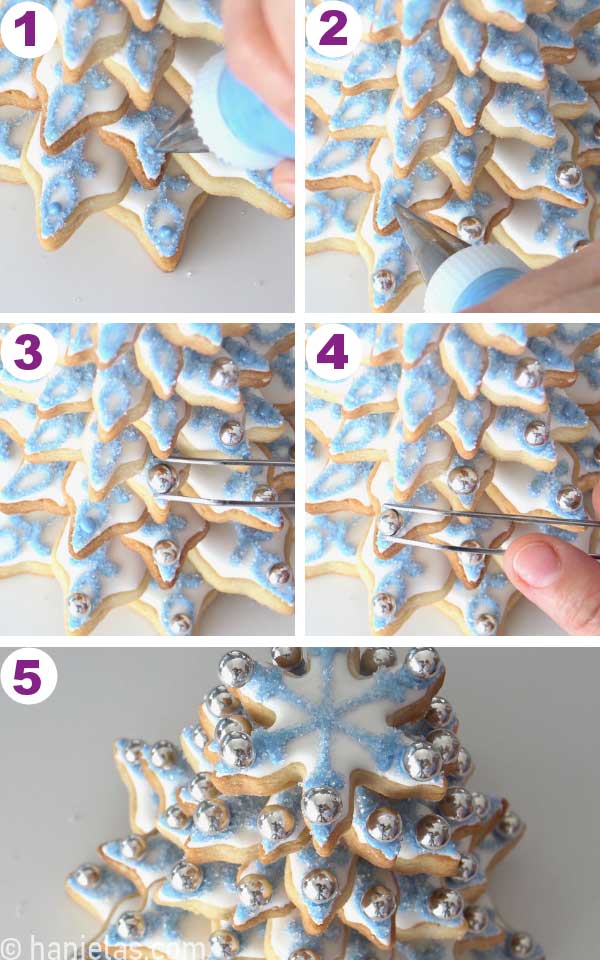
ASSEMBLE 3D CHRISTMAS TREE COOKIES
- To build the Christmas tree, start with the 2 largest snowflakes, stagger and glue them with a little bit of icing ( steps 1-2).
- Continue with the remaining 8 cookies (steps 3-8).

DECORATE WITH SPRINKLES
- Decorate snowflakes’ arms with silver dragees.
- Pipe a dot of icing into a loop decoration and attach a silver dragee using tweezers (steps 1-5).
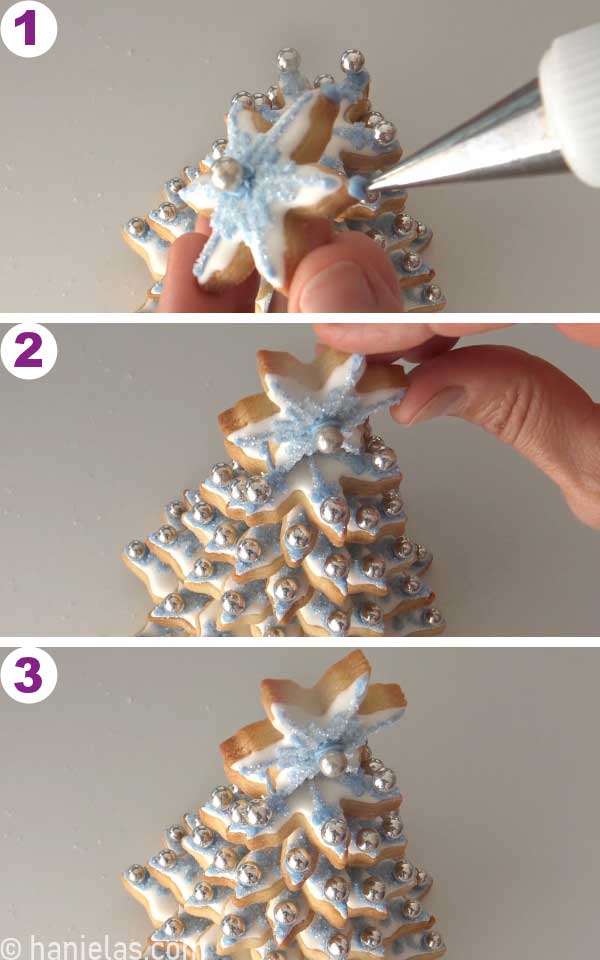
- Lastly, attach the top snowflake vertically to the assembled 3D Christmas Tree Cookie.
- Pipe icing on the bottom of 2 arms, then glue them to the top (steps 1-3).
MORE CHRISTMAS COOKIE IDEAS
- Christmas Bow Cookies
- Gingerbread People Christmas Table-Setting Cookies
- Simple Christmas Decorated Cookies
- Simple Candy Cane Cookies via LilaLoa
- Easy Christmas Holy Cookie Platter

Did you make these Decorated Cookies? Tag @hanielas on Instagram and hashtag it #hanielas
This post was originally published on November 27, 2012. On August 2, 2023, I updated this post with new step-by-step pictures and written instructions.

Hi, I’m Hani
Welcome!
Thank you for visiting Haniela’s. On my blog, you’ll find delicious sweet & savory recipes made with simple ingredients. Why not start a new adventure? Discover a world of cookie decorating with my step-by-step tutorials.

Hi, I’m Hani
Welcome!
Thank you for visiting Haniela’s. On my blog, you’ll find delicious sweet & savory recipes made with simple ingredients. Why not start a new adventure? Discover a world of cookie decorating with my step-by-step tutorials.


What an amazing project! Your centerpiece really captures the feel of the season. Gorgeous!