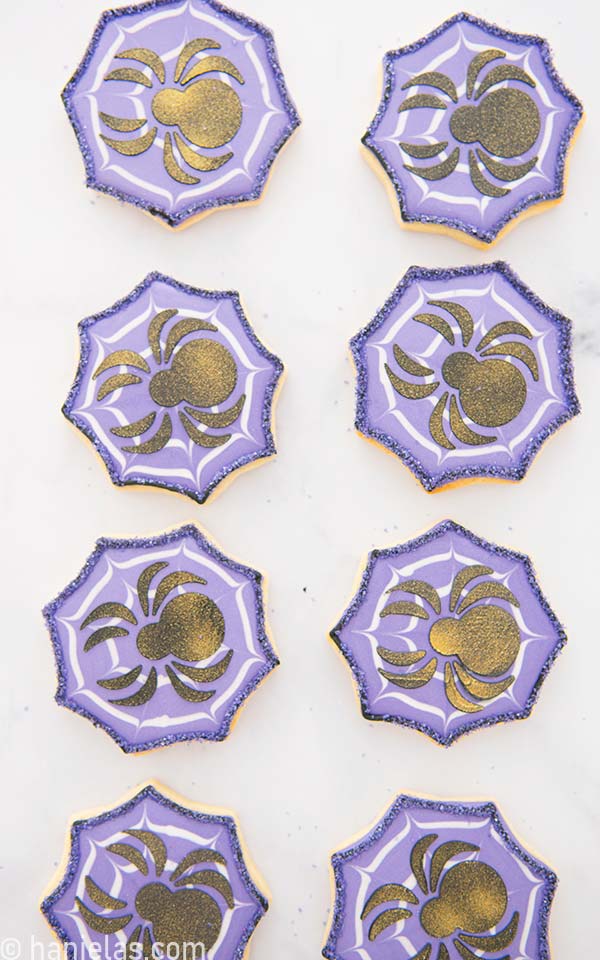
How to Decorate Spider Web Cookies
Decorated spider web cookies are a spooky and fun treat for Halloween parties. Follow this step-by-step guide to learn how to decorate simple spider web cookies with royal icing.
updated from 2010
DECORATED SPIDER WEB COOKIES STEP-BY-STEP
- Beginner’s Guide To Cookie Decorating
- Ultimate Guide to Cut-Out Cookies (tips, tricks, troubleshooting)
- Royal Icing Recipe
- Small Batch Royal Icing Recipe
- Cookie Icing Recipes (includes vegan royal icing, glaze, fondant)
- Guide To Royal Icing Consistencies with Visual Help(what is stiff, flood icing, etc.)
- How To Freeze Royal Icing
- How To Make Royal Icing Transfers
- Royal Icing FAQ ( for example: how to make black icing, color bleeding, storage, and more)
- How To Make a Cookie Cutter Template
- Ultimate Guide To Cookie Decorating Tools
Subscribe to Haniela’s Cookie Club on Patreon and get access to exclusive and ad-free tutorials, templates, sneaks peeks, and more.
THINGS YOU NEED
- Spider Web Cookie Cutter
- Gel Food Coloring: black, regal purple (electric pink and sky blue)
- Tipless Piping Bags
- Scribe Tool
- Spider Stencil
- Sanding Sugar
- Piping tip #2 (optional, to make a final outline)
This post contains Amazon affiliate links that earn me a small commission, at no cost to you. I only recommend products that I use and love. Learn more about my affiliate policy here.
BAKE COOKIES
Prepare the cookies using your favorite cut-out cookie recipes or one of these tested recipes. Let the cookies cool before decorating.
ROYAL ICING COLORS AND CONSISTENCIES
Fill piping bags with royal icing before decorating.
- Purple Icing: 15-second consistency ( base layer)
- White Icing: 15-second consistency (spider web)
- Black: piping consistency (stenciled design and outline)

FLOOD COOKIES
Outline and flood the cookie with 15-second consistency purple icing (steps 1-8). Immediately continue with the next decorating step. Don’t let the icing crust or dry.
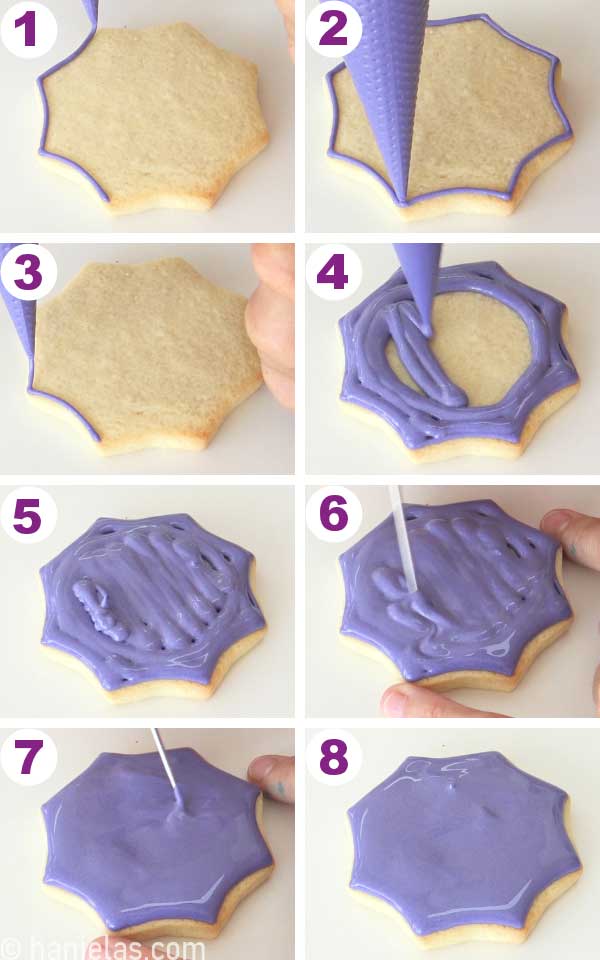
HOW TO MAKE WET-ON-WET SPIDER WEB DESIGN
- Using a 15-second consistency white icing, pipe 2 or 3 concentric circles onto wet purple icing (steps 1-5)
- Immediately shape the icing. Dip the tip of the scribe tool into the icing and move it from the center through the white circles to the edge of the cookie. Wipe the scribe tool and repeat (steps 6-8). Let the icing dry before you continue with the next step

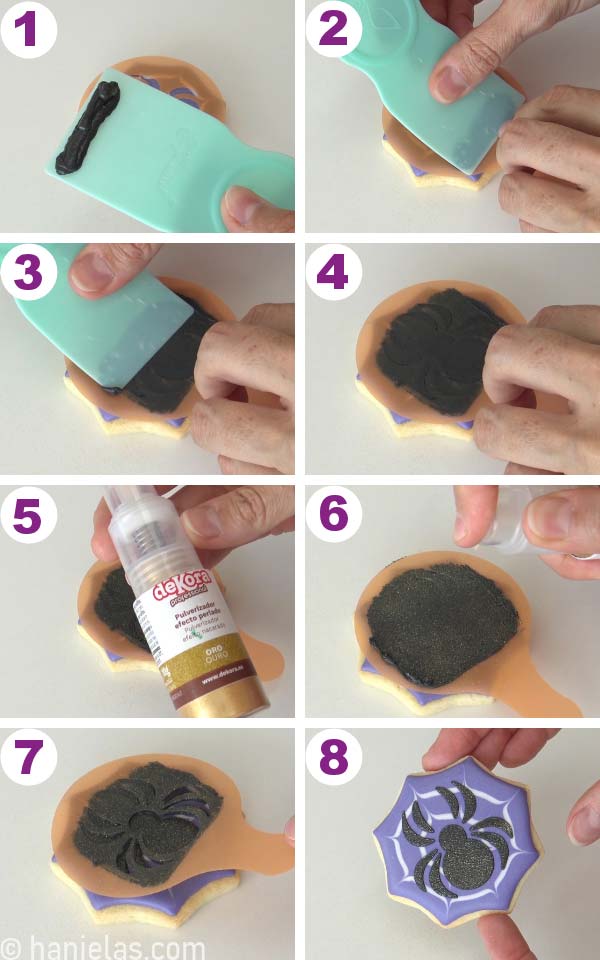
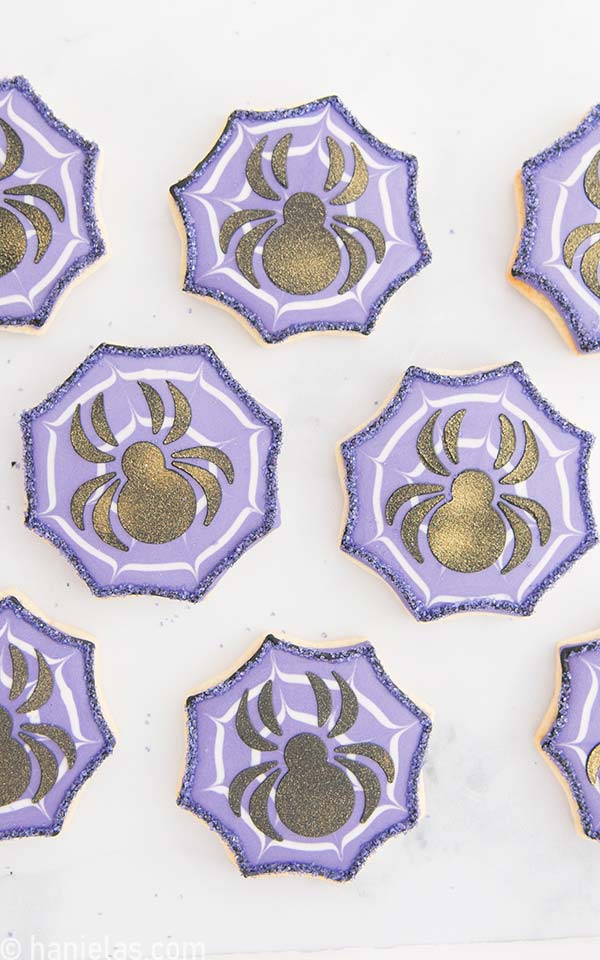
SPIDER STENCIL WITH ROYAL ICING
When your base layer is dry, you can stencil it with royal icing. You likely have a different spider stencil. That’s okay. Use piping to medium thick consistency icing. Hold the stencil in place either using your hand or use a large stencil holder or magnets to keep the stencil from shifting. Spread a thin layer of black icing across the stencil in one even layer. Spray icing with gold luster dust using a handy spray pump. Carefully lift the stencil and repeat on the rest of the cookies (steps 1-8). You’ll most likely need to wash the stencil after 4-5th time of using it. Dry it well before using it again.
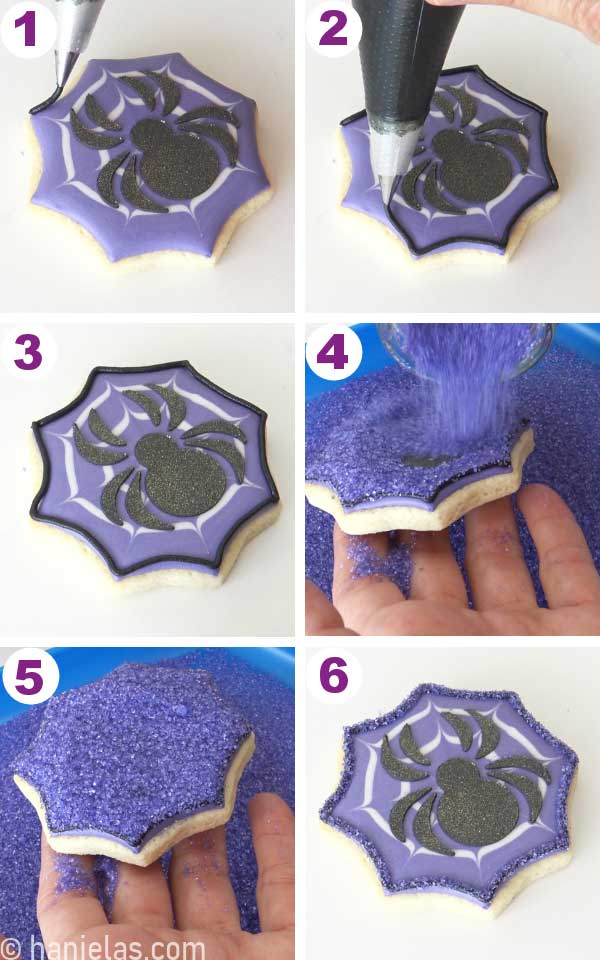
DECORATE WITH SANDING SUGAR
Outline the cookie with black icing of piping consistency (I used a piping bag fitted with a #2 piping tip). Immediately dust the black outline with purple sanding sugar. Allow the cookie to dry for a couple of hours before packaging (steps 1-6).
VIDEO TUTORIAL
MORE HALLOWEEN DECORATED COOKIES
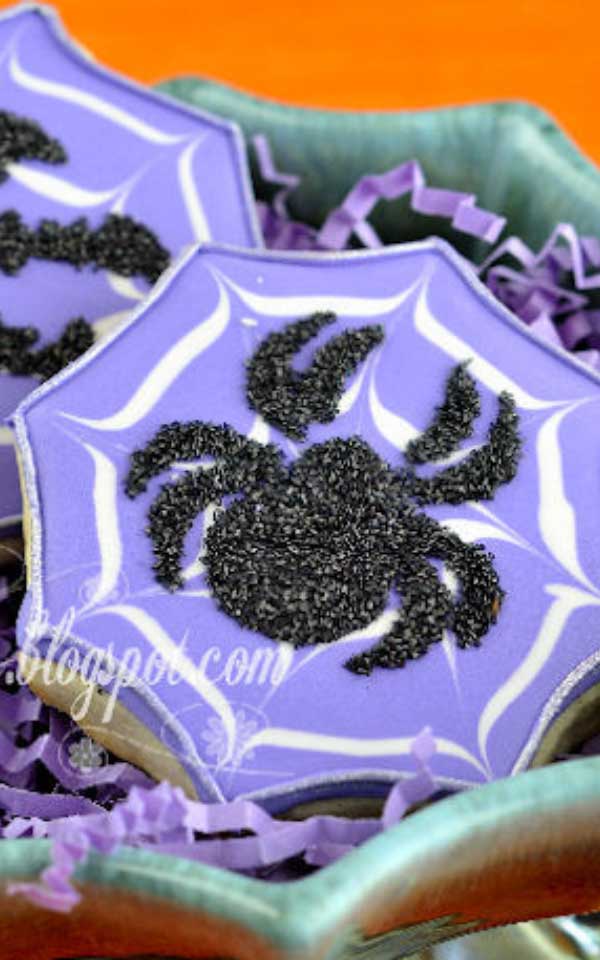
SPIDER WEB COOKIES FROM THE PAST
Below are the spider web cookies I decorated in 2010. I used black sanding sugar to create a fuzzy texture on the stenciled spider. If you decide to try this technique, turn the cookie over immediately after stenciling and dip it in black sanding sugar for the best results.
This cookie-decorating tutorial was published on October 21, 2010. On April 3rd, 2024 I updated this tutorial with new step-by-step pictures and written text.

Hi, I’m Hani
Welcome!
Thank you for visiting Haniela’s. On my blog, you’ll find delicious sweet & savory recipes made with simple ingredients. Why not start a new adventure? Discover a world of cookie decorating with my step-by-step tutorials.

Hi, I’m Hani
Welcome!
Thank you for visiting Haniela’s. On my blog, you’ll find delicious sweet & savory recipes made with simple ingredients. Why not start a new adventure? Discover a world of cookie decorating with my step-by-step tutorials.


Wow! Love all the techniques you used, Hani… the colours are great…
Whoa…these are beautiful!! Great job! :o)