Eyeball Cookies with Colored Dough
These Creepy Eyeball Cookies are made with colorful cookie dough inlays set into rich chocolate dough, then baked into hauntingly realistic eyeballs. Easy, fun, and perfect for a Halloween dessert table.

COLORED DOUGH CREEPY EYEBALL COOKIES STEP-BY-STEP
If the cookie worms in the next picture stopped you in your tracks and you want to make a creepy eyeball & cookie maggots medley, follow my tutorial on how to make cookie maggots.

THINGS YOU NEED
- Get all the tools and supplies in Haniela’s Amazon Shop
- Candy Corn Cookie Cutter,
- Round Cookie Cutters:
- 1.75-inch (4.5 cm) – sclera round, cookie dough with red sprinkles
- 1-inch (2.5 cm) – iris round, green and blue cookie dough
- 3/8-inch (1 cm) or less – pupil round, black cookie dough
- Gel Food Coloring: green, blue, black
- Red Jimmies Sprinkles
- Perforated Baking Mat
- Baking Sheet
- Flat Spatula
- 1/4-inch rolling guides
This post contains Amazon affiliate links that earn me a small commission, at no cost to you. I only recommend products that I use and love. Learn more about my affiliate policy here.
PREPARE CHOCOLATE AND VANILLA COLORED COOKIE DOUGH
To make the eye cookies with colored cookie dough, you’ll need two cookie doughs: vanilla (or other flavor) of uncolored dough and a chocolate dough. I use both of these cookie doughs to make mini tart shells. They don’t spread much in baking and are perfect for this project.
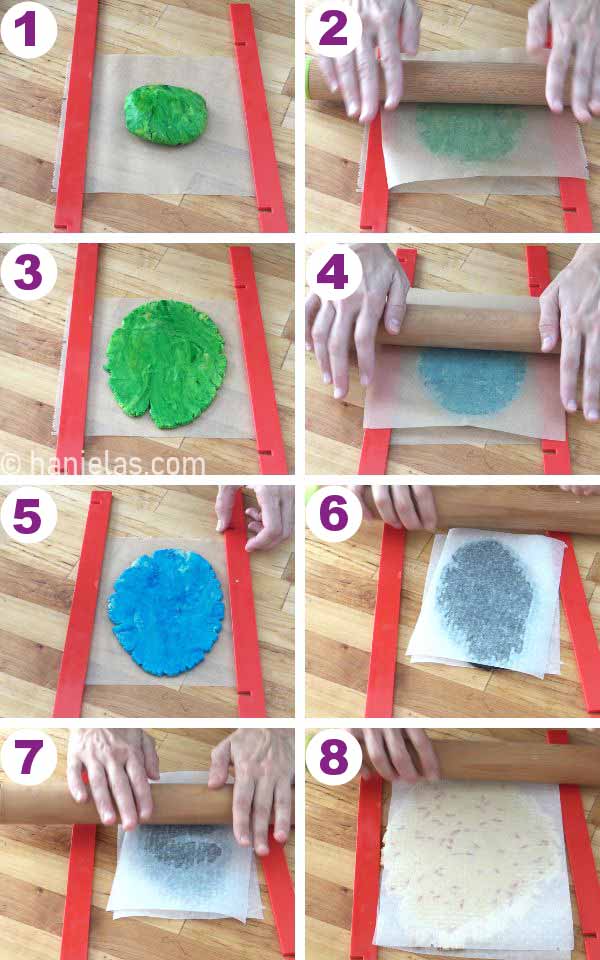
DIVIDE AND COLOR VANILLA DOUGH
- Prepare the uncolored cookie dough and divide the dough into portions:
- Sclera – 1/2 of the dough
- Blue and Green Iris – use a little over 1/3 of the remaining half, for each color
- Pupil – remaining dough

- Sclera (white part of the eye) with Red Veins
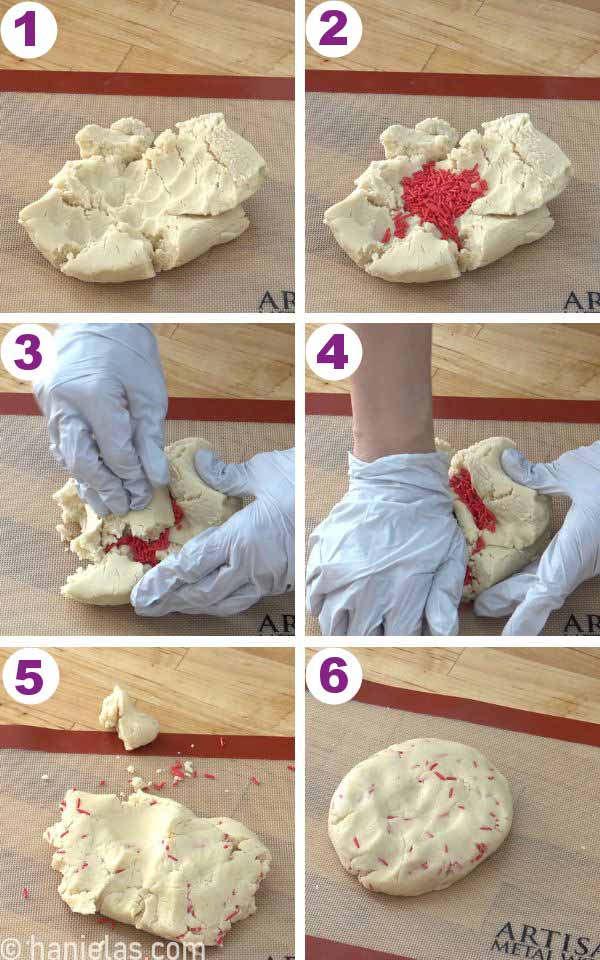
- To make the sclera with red blood veins, add red Jimmies sprinkles to the dough. If you don’t have Jimmies sprinkles you could also use red nonpareils.
- Gently knead the sprinkles into a freshly made dough (steps 1-6).
- Blue and Green Iris of an Eye
- Divide 2/3s of 1/2 of the dough (step 1).
- To make a bright green iris, I ended up adding a touch of yellow to the leaf green food coloring (steps 2-4).
- And to make the blue dough, I used royal blue food coloring.
- It’s best to color cookie dough when it’s freshly made and soft. Once the dough is chilled, it’s difficult to knead the color into the dough.

- Black Pupil of the Eye
- Use the remaining little less than 1/3 of the dough from one half of the dough.
- To make the pupil of the eye, that’s the black part of the eye, you can color your cookie dough with black food coloring (steps 1-5).
- If you prefer, you could also use some of the brown cookie dough that we’re going to use for the base of this project.

ROLL OUT COLORED COOKIE DOUGHS
- Use 1/4-inch (6mm) rolling guides on each side of the cookie dough (step 1).
- Roll the pieces of dough between two sheets of parchment (steps 2-8).
- Chill the sheets of dough for about an hour or so.
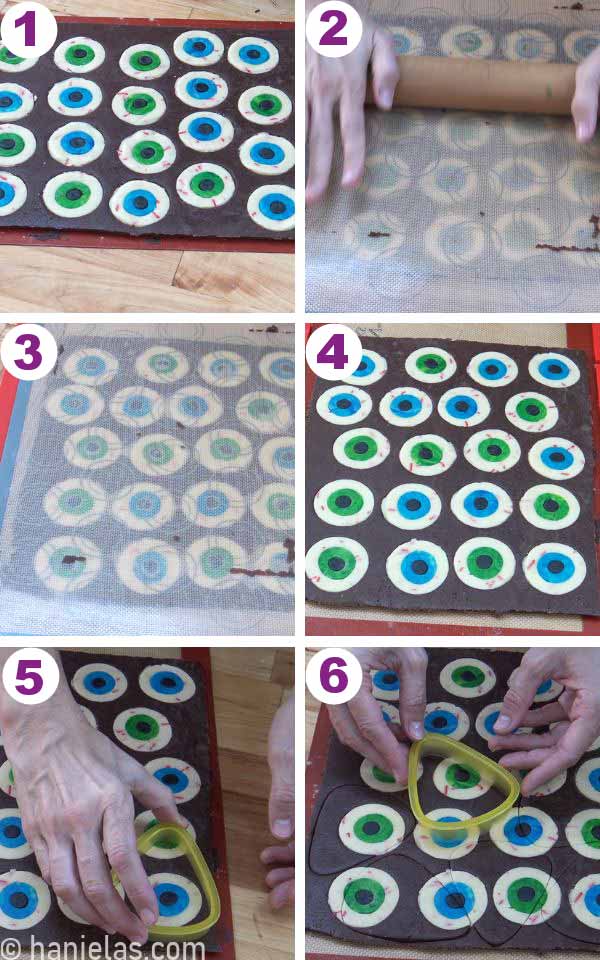
MAKE THE EYEBALL INLAYS
- You need 3 round cookie cutters:
- 1.75-inch (4.5cm) – sclera round, cookie dough with red sprinkles
- 1-inch (2.5cm) – iris round, green and blue cookie dough
- 3/8-inch (1 cm) or less – pupil round, black cookie dough
- To make the eyeball inlays, cut out rounds from each colored dough (steps 1-8).
- Use the back of a wooden spoon to gently push out a small piece of black dough if it gets stuck inside the cutter (step 7).
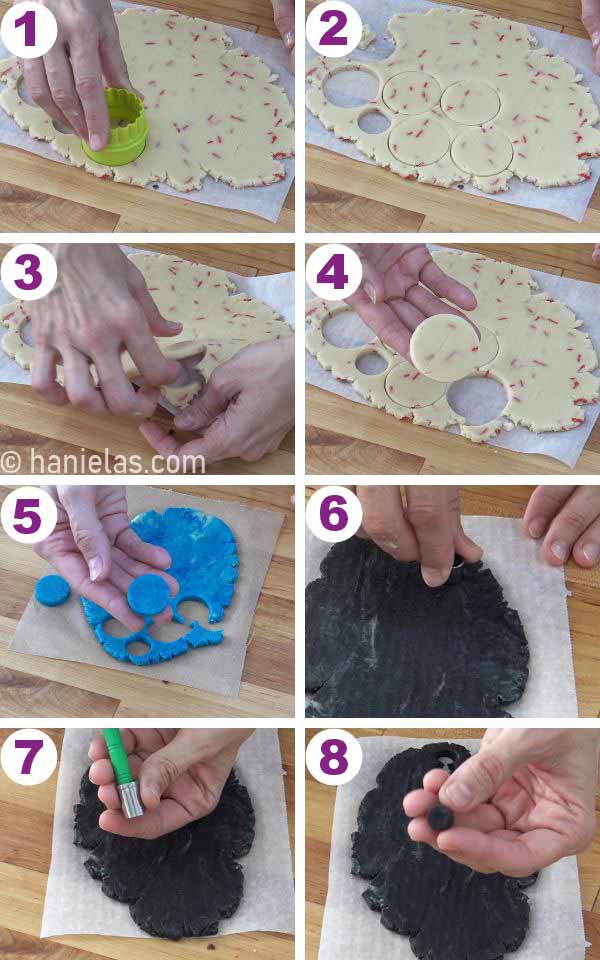
- Layer 3 colored round to form an eyeball design.
- It’s best to work with chilled cookie dough rounds.
- 1. Using the iris cookie cutter (1-inch, 2.5 cm), cut out rounds from all of the sclera rounds. You’ll be left with a ring of white cookie dough with red specks (steps 1-2).
- 2. Pick up a piece of iris round (blue or green) and carefully place it into the sclera ring. Gently push it in (steps 3-4).
- 3. Using the pupil cookie cutter (3/8-inch, 1 cm or less), cut out rounds from the iris rounds -this is the blue round you just inserted into the sclera/white ring in the previous step. Use the back of a wooden spoon to push out the dough from the cutter if it gets stuck. You’ll be left with a small hole in the middle of the blue round (steps 5-6).
- Pick up a black round and insert it into the hole to seal it (step 7).
- Repeat to make 20 + eyeball inlays (step 8). Chill for 5-10 minutes before assembling the final layer.

CHOCOLATE BASE LAYER
- Prepared one batch of chocolate cookie dough.
- Roll it out to 1/4-inch thick and chill until firm, about an hour (steps 1-8).
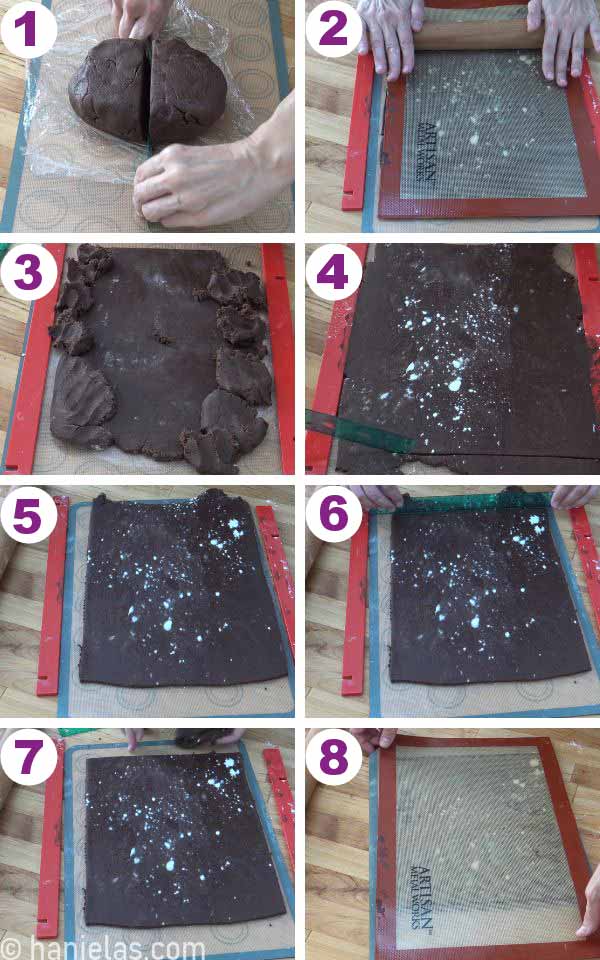
INSERT THE EYEBALLS INTO THE CHOCOLATE LAYER
- Cut out rounds from a chocolate sheet using the same cutter (1.75-inch, 4.5 cm) you used to cut out white-sclera rounds (steps 1-5).
- Carefully insert eyeball inlays into the openings (steps 6-8).
- Place 1/4 – inch rolling guides on the sides of the eyeball sheet.
- Cover the eyeball pattern layer with parchment or a silicone mat.
- Run a rolling pin across to make sure that everything is even. If there are any gaps, they’re going to be filled with just a little push of a rolling pin.
- You don’t want to press on it too hard, though, because it can misshape the eyeball pattern (steps 1-4).
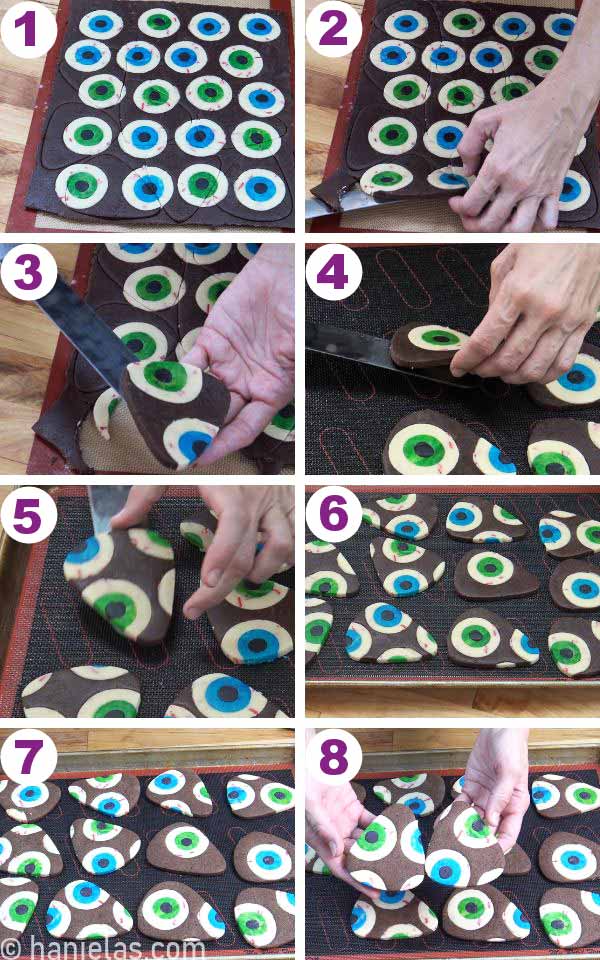
- I used a candy corn cookie cutter to cut out as many cookies as possible (steps 5-6).
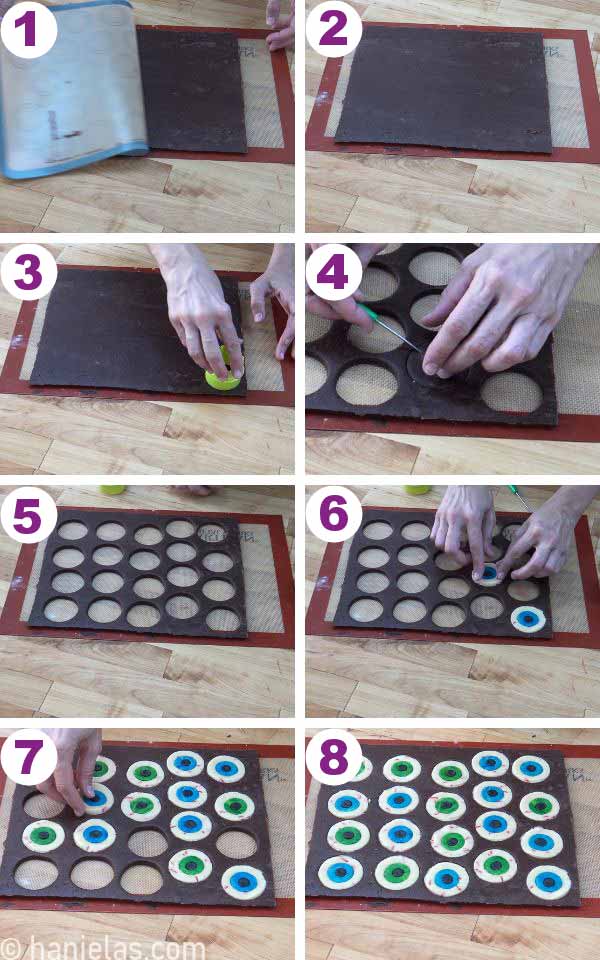
CUT THE COOKIES AND BAKE
- Carefully transfer cookies onto a baking sheet. Use a flat spatula to help you carry cookies from the rolling mat to a baking sheet (steps 1-3).
- Lay them down onto a baking sheet lined with a perforated mat or a parchment sheet (steps 4-6).
- Bake cookies at 350°F (180°C) for about 9 to 11 minutes. Bake them until they’re just puffy in the middle. If they are still wet-looking in the middle, you need to bake them for an additional minute.
- Allow to cool on a baking sheet for a couple of minutes. Then transfer cookies onto a cooling rack to cool completely.
- Cookies will keep for about 2 weeks in an airtight container
Pair the creepy eyeball cookies with edible cookie maggots for a gross enough to scare and delicious to devour Halloween treat!

VIDEO TUTORIAL
Do you want to stay updated about free cookie decorating tutorials, live events, classes, and products? Sign up for Hani’s Cookie Decorating Newsletter.
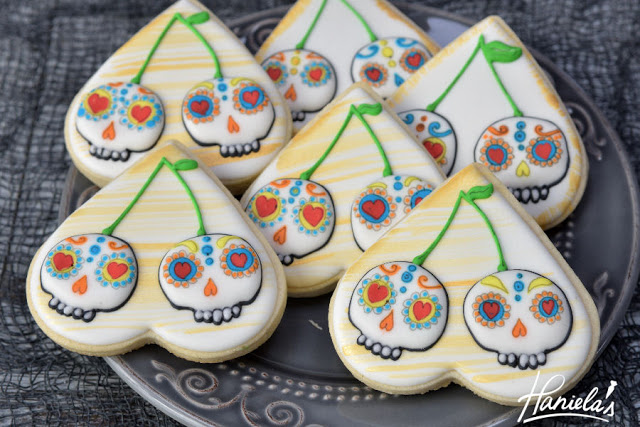
MORE HALLOWEEN IDEAS

Hi, I’m Hani
Welcome!
Thank you for visiting Haniela’s. On my blog, you’ll find delicious sweet & savory recipes made with simple ingredients. Why not start a new adventure? Discover a world of cookie decorating with my step-by-step tutorials.

Hi, I’m Hani
Welcome!
Thank you for visiting Haniela’s. On my blog, you’ll find delicious sweet & savory recipes made with simple ingredients. Why not start a new adventure? Discover a world of cookie decorating with my step-by-step tutorials.