Mother’s Day Berry Best Cookies
Treat Mom to something delightful and special: adorable Mother’s Day berry best cookies! In this tutorial, I’ll walk you through decorating three designs: a strawberry, a blooming flower, and a floral heart.

HOW TO DECORATE MOTHER’S DAY BERRY BEST COOKIES
In this cookie decorating tutorial, I use mini cookies. Mini cookies are one of my favorite things to make—they’re quick, adorable, and just the right size for a bite-sized “I love you.”
THINGS YOU NEED
- Get all the tools and supplies in Haniela’s Amazon Shop
- Strawberry Cutter
- Daisy Cookie Cutter
- Heart Cutter
- Flower Center Template
- Acetate Sheets – smooth, transparent protector sheet, or use wax paper, parchment
- Gel Food Coloring: yellow, red, green, black
- Food Only Paintbrushes
- Tipless Piping Bags
- Scribe Tool
- Pre-made royal icing flowers – you can use this tutorial on how to make easy royal icing daisies
- Red Petal Dust
- Tweezers
- Black Edible Marker
- Strawberry Bakery Emulsion – great for baking and in icing
- Rubber Air Duster
- Yellow Sanding Sugar
- Free Printable Berry Best Mom Cookie Packaging Tags
This post contains Amazon affiliate links that earn me a small commission, at no cost to you. I only recommend products that I use and love. Learn more about my affiliate policy here.
PREPARE COOKIES AND ROYAL ICING
I made the cookies using my classic sugar cookie recipe. To decorate, I prepared fresh lemon royal icing. However, if you’d prefer strawberry-flavored icing, you can use strawberry flavoring (see the list of tools and a section on things you need) or my recipe for Strawberry Royal Icing, which is made with strawberry puree. This icing gets its color from the natural color of strawberries. You can intensify it with food coloring.

ROYAL ICING COLORS AND CONSISTENCIES
- White Icing: 15-second consistency (flower)
- Yellow Icing – 25-second consistency (flower centers), piping consistency (yellow flower detail lines, strawberry seeds)
- Light Pink: 15-second consistency (heart)
- Pinkish Red: 15-second consistency (strawberry)
- Green (mix leaf green and a minuscule amount of ivory or black to mute it down): soft piping consistency (strawberry leaves)
FLOWER CENTER ROYAL ICING TRANSFERS
- Flower centers are a little less than 1/2 inch in diameter.
- Draw the lines on a piece of paper about 1/2 inch apart.
- Slide the template into a transparent, smooth protector sheet (or use wax paper/parchment).
- Secure the protector sheet with the template inside to a flat surface, like a plexiglass or baking sheet.
- Pipe rounds with yellow icing of 25-second consistency. Hold the piping bag perpendicular to the surface (steps 1-4).
- Immediately dust the icing dots with yellow sanding sugar (steps 4-5).
- Carefully remove the access sanding sugar, or wait for the dots to dry (8 hours), then remove the access sugar.
- Remove dry yellow flower centers from the acetate sheet.
- How to store royal icing transfers.

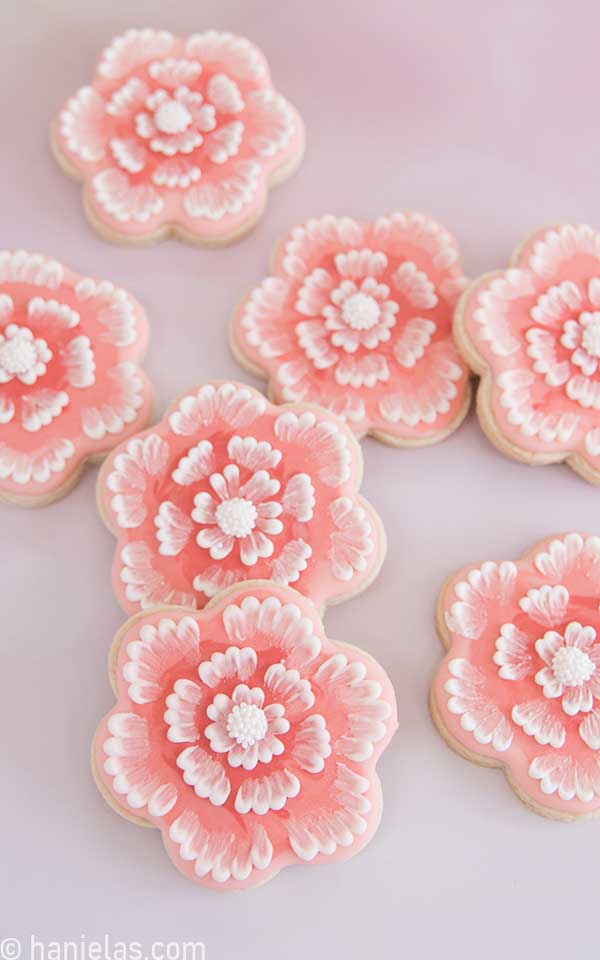
STRABERRY FLOWER COOKIES
- Outline and flood the flower cookie with white icing – 15-second consistency. Allow icing to dry for 8 hours (steps 1-6).

- With yellow piping consistency, the icing pipe has petal-shaped outlines. Start in the center of the flower (steps 1-2)
- Keep the piping bag slightly elevated and move slowly across the cookie, making five petal/teardrop-shaped outlines, always anchoring the line in the center of the flower (steps 3-5).
- Pick up the dry flower center with the tweezers and place it in the middle of the cookie. Gently press it down to ensure it adheres to the surface. Allow it to dry for an hour (steps 6-8).

STRAWBERRY COOKIES
Start by outlining the strawberry cookie with 15-second consistency icing (steps 1-2). Flood the inside, then use a scribe tool to distribute the icing evenly across the cookie surface (steps 3-6). Allow the icing to dry for 2 hours for a thick crust to form.

PETAL LEAF TIP
- Find a seam on a tipless piping bag, press it down so the seam is on the left side (step 1).
- Make a beveled cut, and cut the opening on an angle of about 45 degrees (steps 2-3).

- Use a soft piping to piping consistency of royal icing.
- To pipe the leaves using the piping tip you made in the previous step, turn the piping bag so the seam is on the top and facing the ceiling.
- Start with the bottom leaves. Squeeze the piping bag, move it towards the edge, decrease the squeezing pressure, and slowly pull away as you get closer to the edge (steps 1-4).
- Then make two top-side leaves (steps 5-6).
- Lastly, pipe a stem in the middle with a small round piping tip, equivalent to piping tip #1 or #2 (steps 7-8).
- Allow icing to dry completely for 8 hours

STRAWBERRY COOKIE DETAILS
- Use red edible petal dust to create blush on the icing. Apply it in two spots onto the bottom half of the cookie. With a dry food-only paint brush, gently in a circular motion, apply dust onto the dry icing.
- Remove the access dust with air, using a rubber dust blower or an empty decorating bottle. (steps 1-3).
- Draw eyes and a smile with a black edible marker. It’s crucial that icing is fully dry. Otherwise, edible markers can make dents in the icing that is not dry (steps 4-5).
- In this final step, use yellow, piping-consistency icing to pipe strawberry seeds – small teardrop shapes or dots (steps 6-8).
- Allow to dry for an hour.

FLORAL HEART COOKIE
Outline and flood the heart cookie with 15-second consistency pink icing. Allow icing to dry for 8 hours.

I adorned these Mother’s Day berry best cookies with pre-made royal icing flowers. A step-by-step tutorial on how to make these flowers is available in the shop on Patreon.
- I also have a couple of step-by-step flower tutorials on the blog that you can use to create similar flowers:
- Easy Royal Icing Daisy Flowers
- How to Pipe Cherry Blossoms – make them white and yellow instead of pink.
- Royal Icing Sunflowers – use white to make the petals and yellow to make the centers.
Pipe a small dot of icing on the heart cookie. Gently press down the pre-made flower to glue it onto the surface. Allow to dry for 30 minutes (steps 1-5).

Whether you’re a beginner or a seasoned decorator, these Mother’s Day berry best cookies are simple to decorate. What do you think? Will you try them and surprise your mom, grandmother, or a friend who is like mom to you?

MOTHER’S DAY BERRY BEST COOKIES PACKAGING
And if you want to package your cookies with extra love, check out my Free matching printable gift tags —perfect for adding that final, thoughtful touch to your Mother’s Day treats.
- Print tags onto white cardstock paper. Cut them. Fold along the middle (steps 1-5).

USE A HEAT SEALER
- To preserve the freshness of cookies, I often use a heat sealer to airtight seal the cookies in poly bags for gift-giving. Cookies stay fresh for much longer.
- You can comfortably fit four mini cookies into a 4×6-inch poly bag.
- Heat seal the bag, leaving a tab/flap to attach the decorative tags (steps 1-6).

ATTACH CARDSTOCK TAGS
I want to show you two ways to attach You’re the Berry Best Mom Cookie Tags onto the poly bags. First, trim the access poly bag to fit the cardstock topper tag (steps 1-2).
- Adhesive Method – Use a double-sided tape or adhesive tape. Glue one side of the tape to the ends of the cardstock tag. Peel off the adhesive protective strip of paper (steps 3-5).
- Hold the heat-sealed poly bag with both hands and gently press it down with the flap onto the adhesive tape (steps 6).
- Fold the cardstock tag over and gently press it down to make the other side stick to the adhesive tape. Press down firmly (steps 7-8).

- Stapler Method – Use a stapler to secure the cardstock topper tag onto the poly bag.
- Make sure to staple the paper tag onto the poly bag flap section, not the pouch where the cookies are sealed (steps 1-4).

Did you know that heat sealing your Mother’s Day Berry Best Cookies provides an airtight seal, increasing the cookies’ shelf life. Heat-sealed cookies last for up to 4 – 6 weeks.

MORE MOTHER’S DAY INSPIRED RECIPES
- How to make Strawberry Tulip Cookies (without icing)
- Mother’s Day Cherry Blossom Cake
- 10 Mother’s Day Breakfast Ideas via Recipe Tin Eats
- Breakfast in Bed Cookies for Mother’s Day
- Classic Sponge Bundt Cake (1st Cake I baked with my mom)

Hi, I’m Hani
Welcome!
Thank you for visiting Haniela’s. On my blog, you’ll find delicious sweet & savory recipes made with simple ingredients. Why not start a new adventure? Discover a world of cookie decorating with my step-by-step tutorials.
Hi, I’m Hani
Welcome!
Thank you for visiting Haniela’s. On my blog, you’ll find delicious sweet & savory recipes made with simple ingredients. Why not start a new adventure? Discover a world of cookie decorating with my step-by-step tutorials.