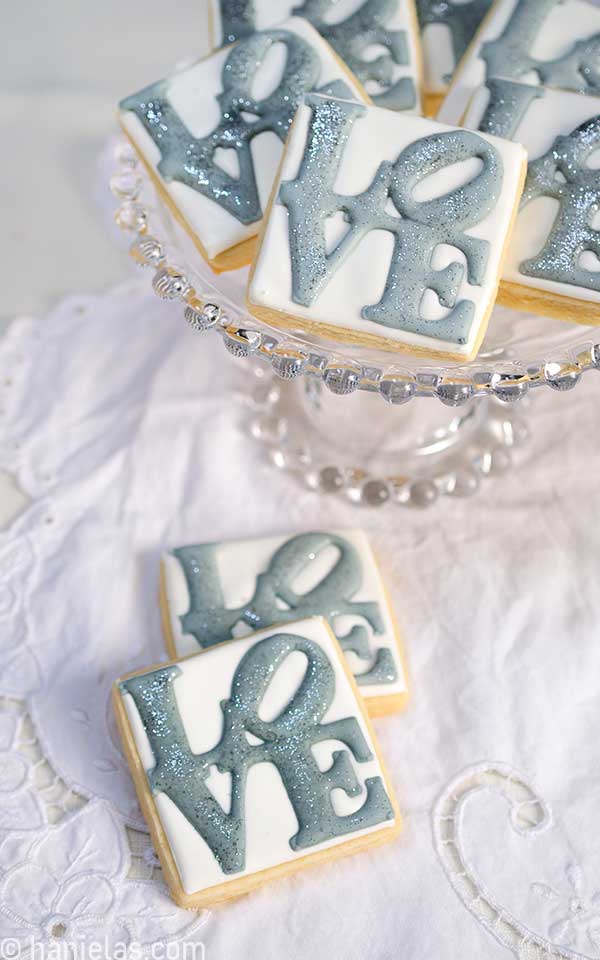
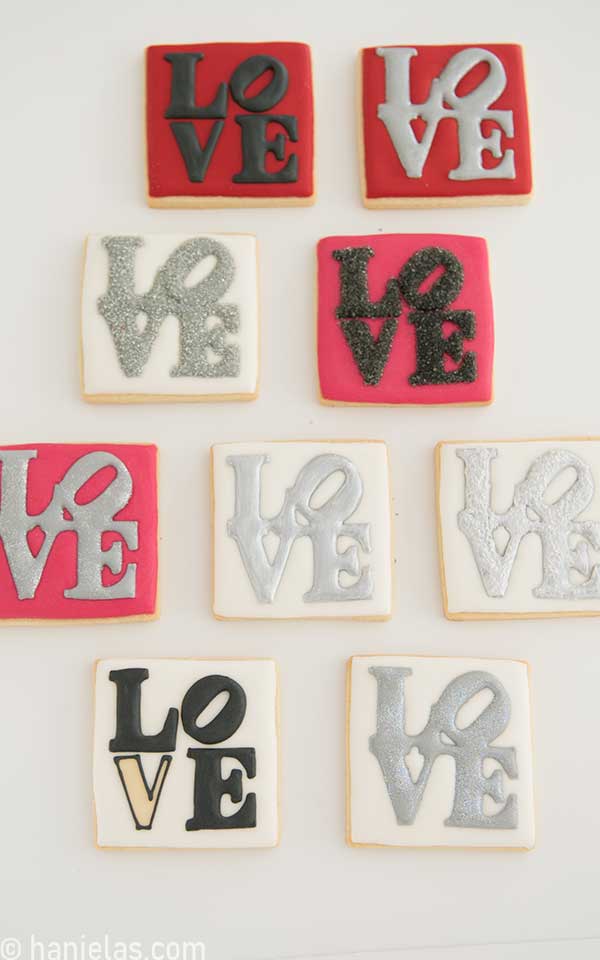
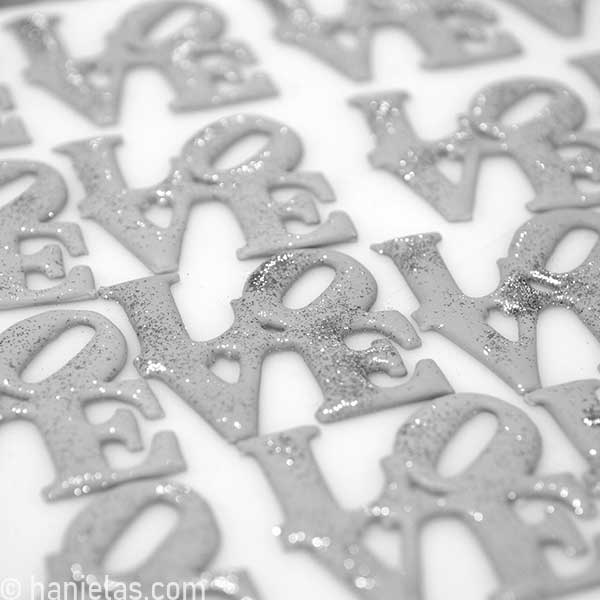
Love Statue Cookies
Inspired by the iconic work of Robert Indiana’s Love Statue, I created these well-sought-after royal icing-decorated Love Statue Cookies. These cookies are perfect for weddings, bridal showers, Valentine’s day, and any time you want to spread a little love around.
updated from 2010
HOW TO DECORATE LOVE STATUE COOKIES
Have you tried making love cookies before? Are you not sure where to start? You are in the right place. In my tutorial, I’ll share with you three easy methods (without a projector) of how to make love sugar cookies. In this step-by-step cookie decorating tutorial, I used a square cookie cutter, but LOVE statue cookies are also often made in a heart shape.
- Beginner’s Guide To Cookie Decorating
- Ultimate Guide to Cut-Out Cookies (tips, tricks, troubleshooting)
- Royal Icing Recipe
- Small Batch Royal Icing Recipe
- Cookie Icing Recipes (includes vegan royal icing, glaze, fondant)
- Guide To Royal Icing Consistencies with Visual Help(what is stiff, flood icing, etc.)
- How To Freeze Royal Icing
- How To Make Royal Icing Transfers
- Royal Icing FAQ ( for example: how to make black icing, color bleeding, storage, and more)
- How To Make a Cookie Cutter Template
- Ultimate Guide To Cookie Decorating Tools
DECORATING WITH ROYAL ICING TRANSFERS
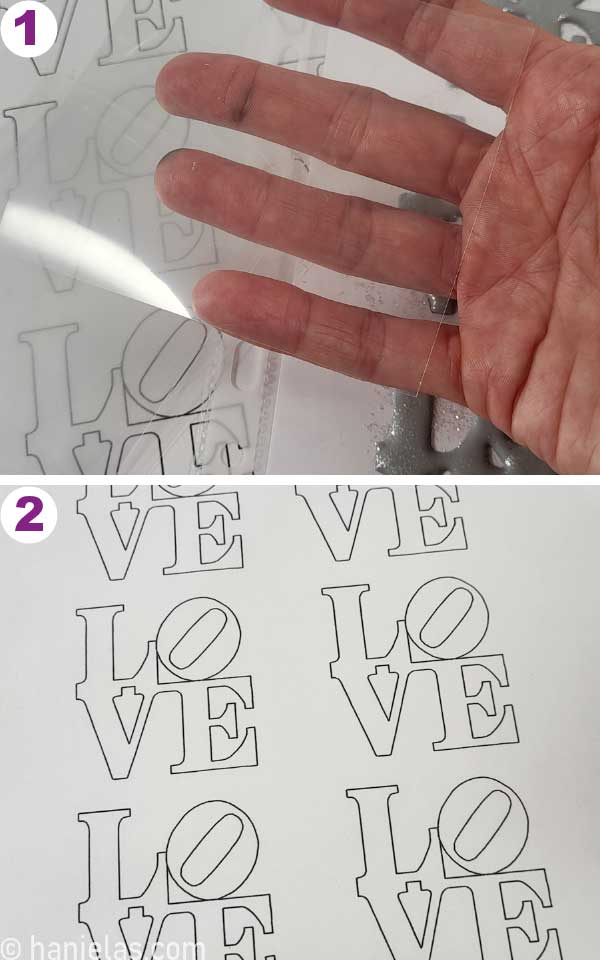
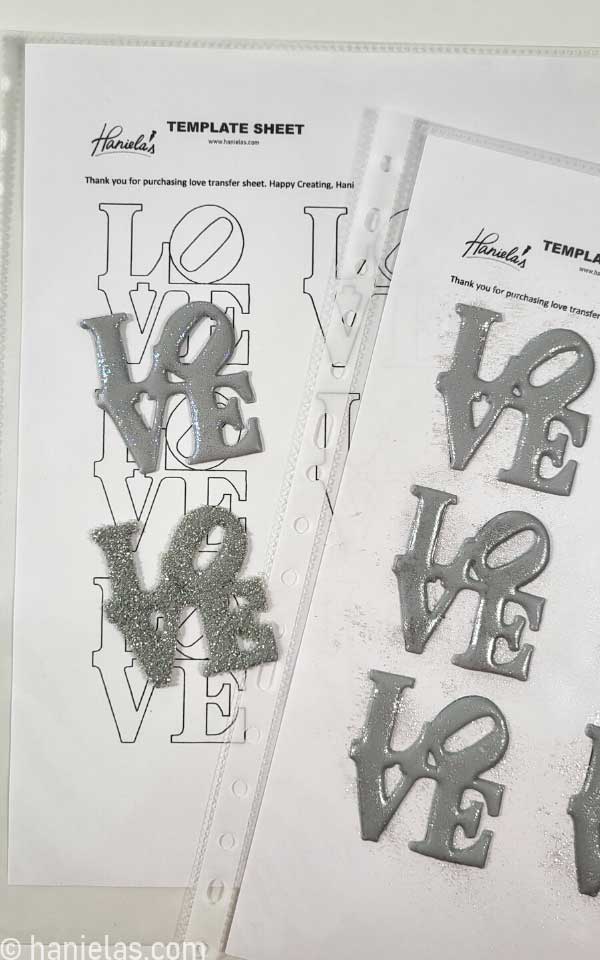
I used a handy template to make royal icing transfers. I published Ultimate Guide To Royal Icing Transfers if you’d like to learn more about what they are and ways to use them in cookie and cake decorating.
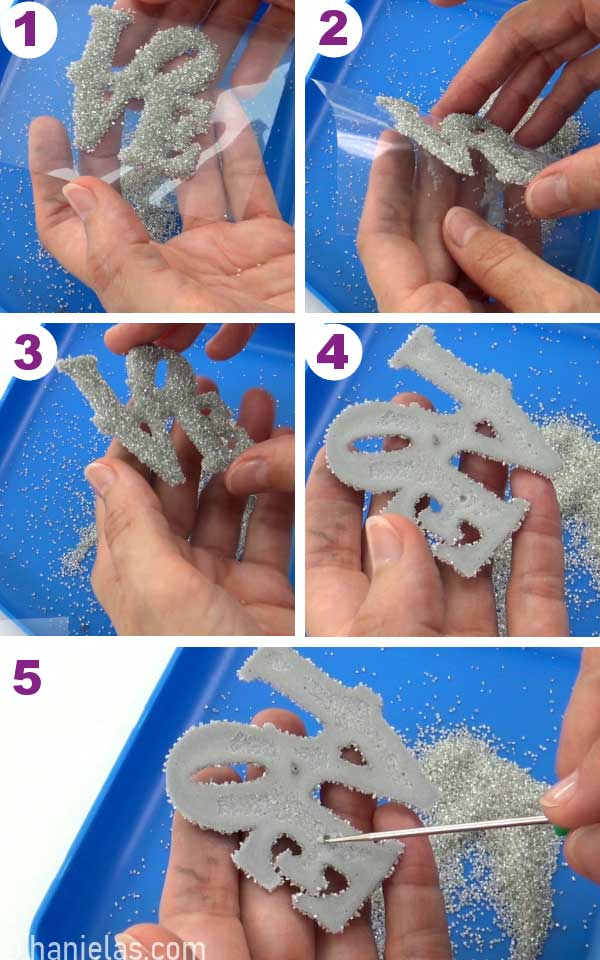
To make larger royal icing transfers, I prefer to use individual pieces of acetate (step 1) over one large piece (step 2). Using individual acetate sheets makes it easier to remove the dry transfer.
ROYAL ICING CONSISTENCY FOR ROYAL ICING TRANSFERS
- To make LOVE transfers, I used 20–second consistency icing. I filled two tipless piping bags with this icing. One for the outlining and one for the filling.
- Piping bag for outlining – I cut the tip to an equivalent of a round piping tip #1, I used this to outline LOVE.
- Piping bag for flooding – I cut the tip larger – about the size of a round piping tip #2. I used this piping bag to fill LOVE.

PIPE LOVE TRANSFERS
Use my handy template (available in my template shop). Please insert it into a clean, smooth protector sheet. Either pipe directly onto the sheet or cut a few protector sheets into smaller pieces and pipe transfers on individual pieces.

Place a piece of cut-up protector sheet/acetate onto the template. If the cut-up piece is curling around the edges, use a lightly damp cloth and rub the protector sheet. A little moisture will make the cut-up piece stick and stay flat.

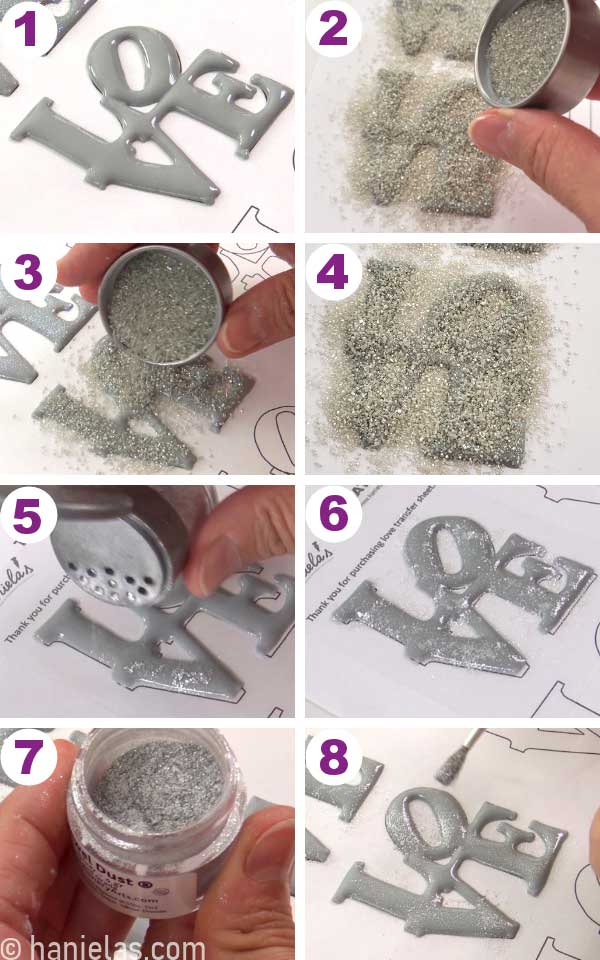
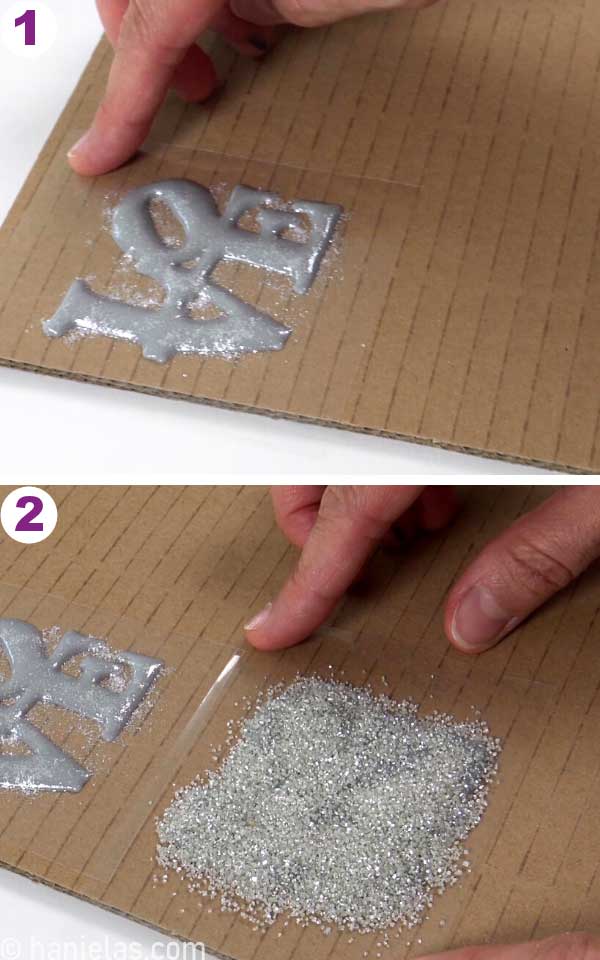
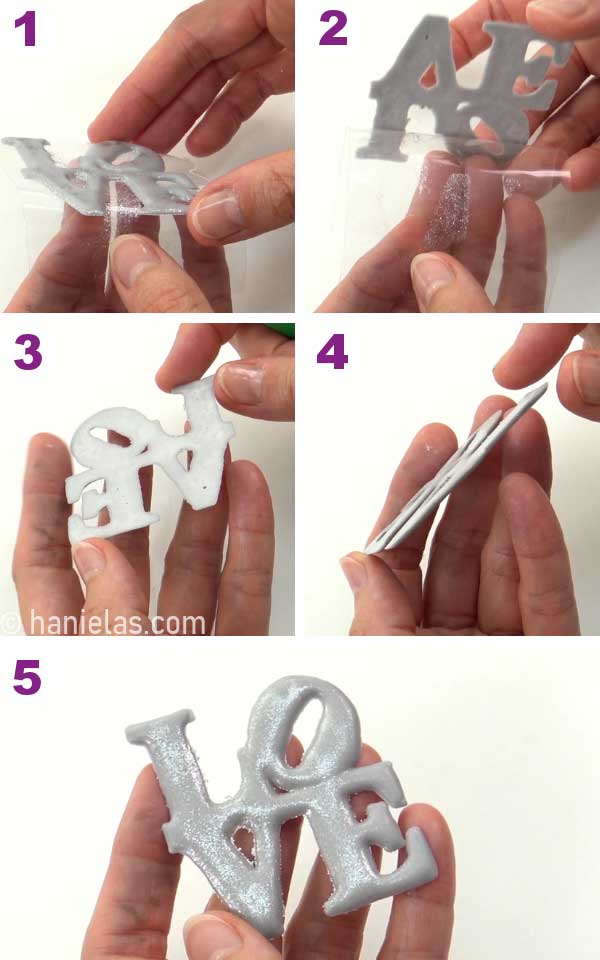
DECORATE WITH SANDING SUGAR, JEWEL DUST, SPARKLE DUST
You can decorate transfers right after you make them, while icing is wet.
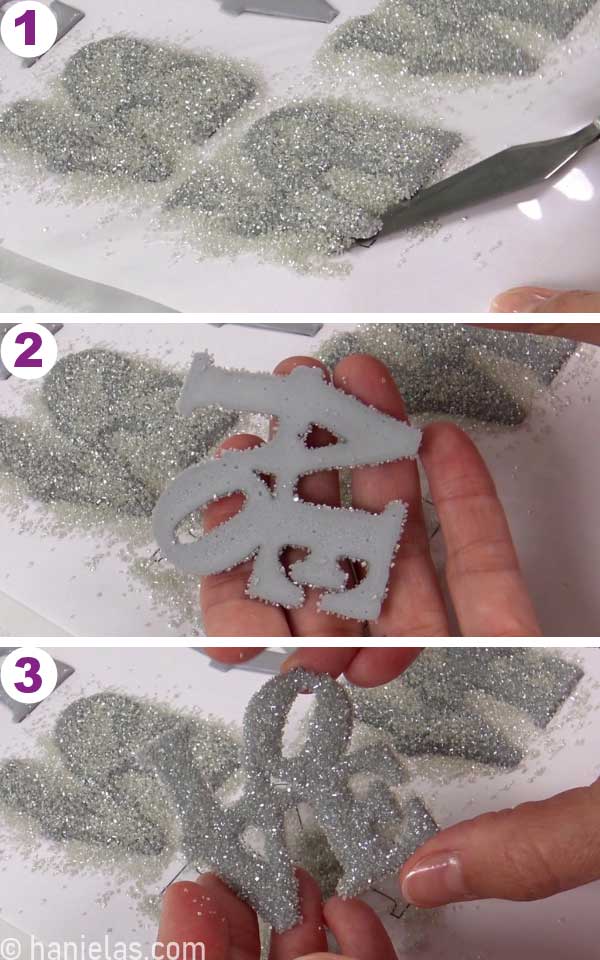
- Sanding Sugars (steps 1-4) – don’t wait for the icing to crust. Immediately after flooding the transfer dust it with sanding sugar. Let dry completely.
- Sparkling Dust (steps 5-8) – you can use dry dust to add shimmer and lustrous sparkle. I used Jewel Dust. Dip a dry brush in the dry medium or a dry spray pump. Dust the icing immediately after decorating.
LET TRANSFERS DRY
Slide transfers onto a flat surface and let them dry for 24 to 48 hours. Royal icing transfers made with acetate take longer to dry than those made with parchment/wax paper.
Leave the sanding sugar on the transfers until they are fully dry. Then, lift the acetate with the transfer, tilt it, and let the sanding sugar fall off.

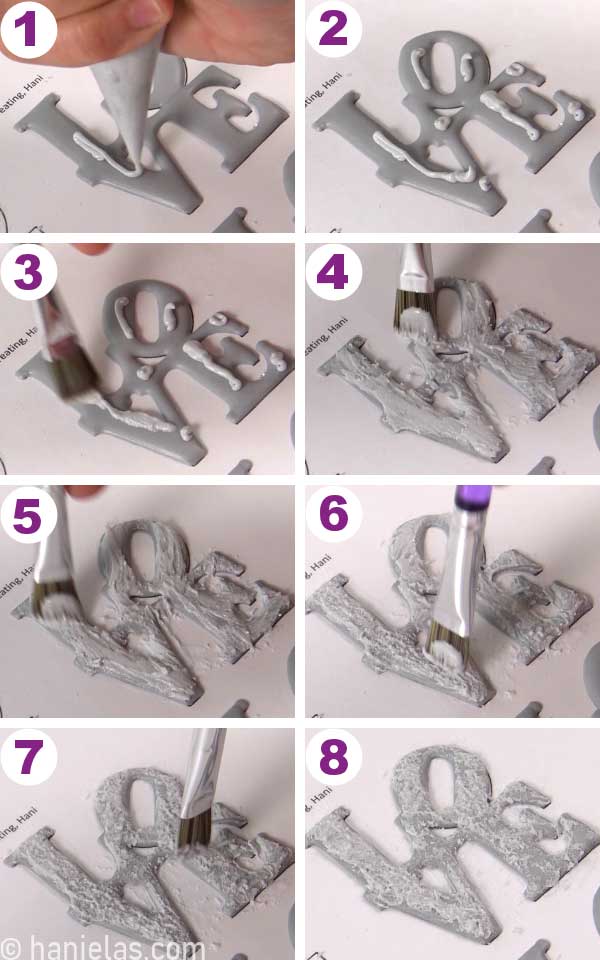
CREATE TEXTURE
Let the icing dry, and then pipe thick icing on top. Spread it with a food-only paintbrush (steps 1-5). Use a dabbing motion (up and down) to create texture in icing. Let the icing dry (steps 6-8).
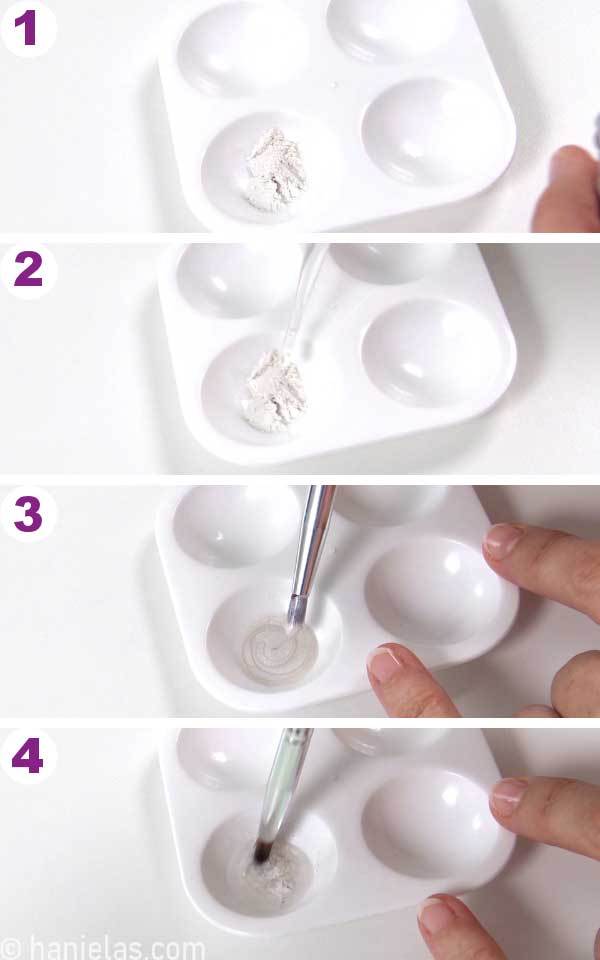
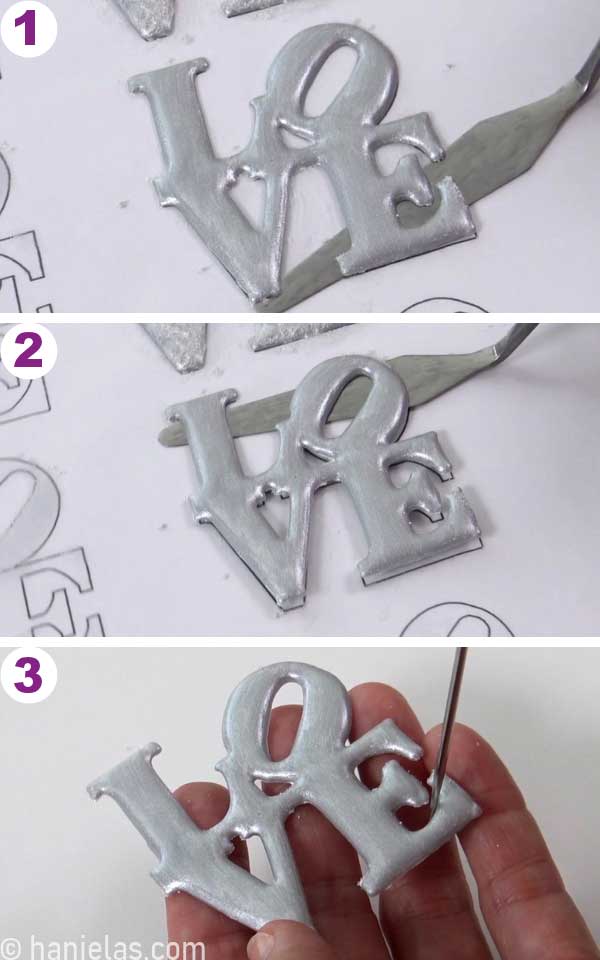
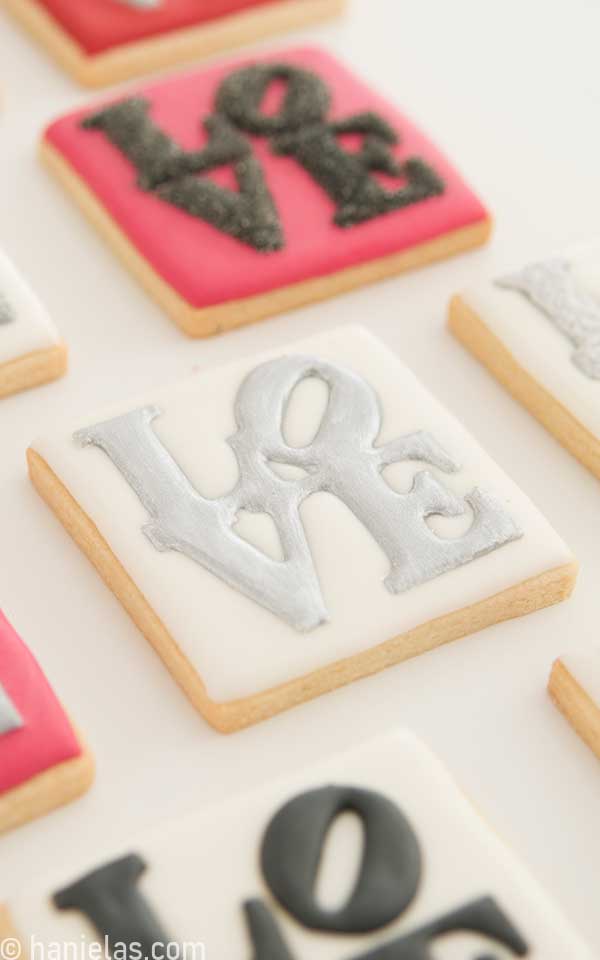
PAINT WITH LUSTER DUST
Before you can paint the icing, you need to let the icing thoroughly dry. I recommend letting transfers made with acetate dry for 24 to 48 hours. Then you can paint with edible paints, metallic paint, or create your luster dust paint.
I opted for luster dust paint. I used pearl dust. With the gray royal icing base, pearl dust works like silver. Surely you can use silver luster dust, too. There are different types of edible luster dust or metallic paints. Use dust or paints that are available to you.
Into a paint palette, add dry luster dust and pour in a few drops of Everclear – clear grain alcohol (steps 1-2). Stir with a food-only paintbrush until smooth but not too diluted. If you add too much Everclear, wait for a couple of minutes; alcohol evaporates, and the paint will thicken (steps 3-4).
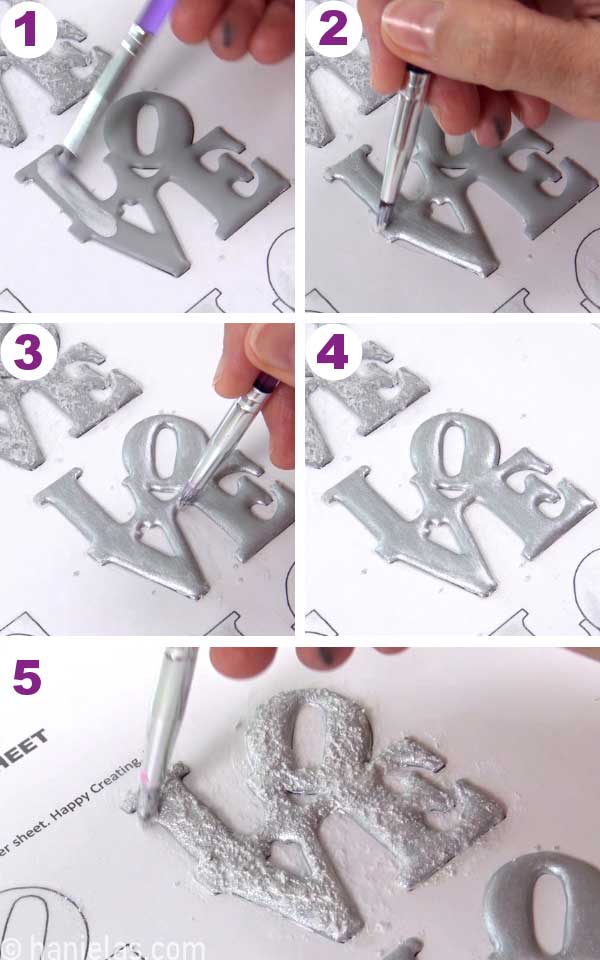
Evenly paint dry transfers with luster dust paint (steps 1-5).
HOW TO REMOVE ROYAL ICING TRANSFERS
Removing delicate transfers can be hearbreaking if they keep breaking.
As I mentioned earlier, with larger transfer like this, I prefer to use individual transfer sheet for each transfer. They are a breeze to remove once dry.
Hold the transfer with your fingers and carefully peel off the backing sheet away from the transfer.
When using a larger sheet format with several transfers. I like to use a sharp blade or a long palette knife to remove transfers from the backing sheet. Keep the blade parallel to surface or the transfer can break (steps 1-3).
HOW TO TELL ROYAL ICING TRANSFER IS DRY?
Below is an example of what a transfer that is not fully cured looks like. I was able to peel the acetate, but the first thing I noticed was the icing residue on the acetate. That’s your first clue. The second is even more apparent; icing is still somewhat soft on the underside (steps 1-5).
DECORATE COOKIES WITH ROYAL ICING TRANSFERS
Using dry on wet royal icing transfer application is super straight forward. Ice the cookie and place dry transfer onto a freshly flooded cookie. This technique works with light colored base, if you plan on using white transfers on black base, you need to use a different decorating technique as black color will seep thru the white transfer. You can use decorating stencils (explained just below).
Keep in mind not to overfill the cookie with flood icing. Otherwise it can overflow once you add dry icing transfer on the top.
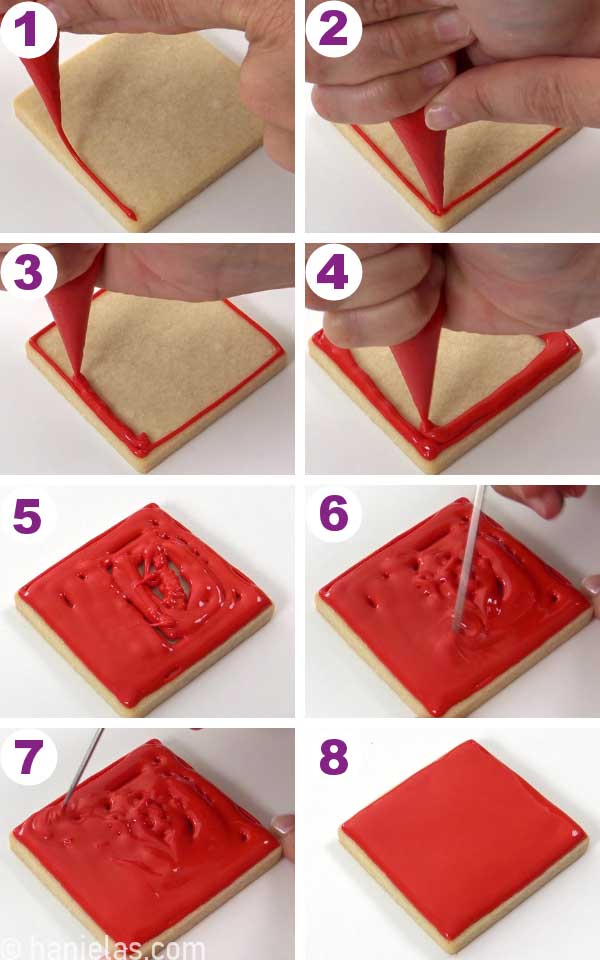
With 15 – second consistency outline and flood the cookie. Use a scribe to smooth and distribute the icing. Accentuate the corners (steps 1-3). Immediately pick dry transfer, hold it above the cookie, center it and slowly place it on top of the wet icing (steps 4-5). Check if there are any gaps between the transfer and icing. If needed either use your scribe to move the icing around to make the transfer fully adhere. Or pipe a small amount of icing around/under the transfer and use a scribe to smooth it. Let dry (steps 6-8).
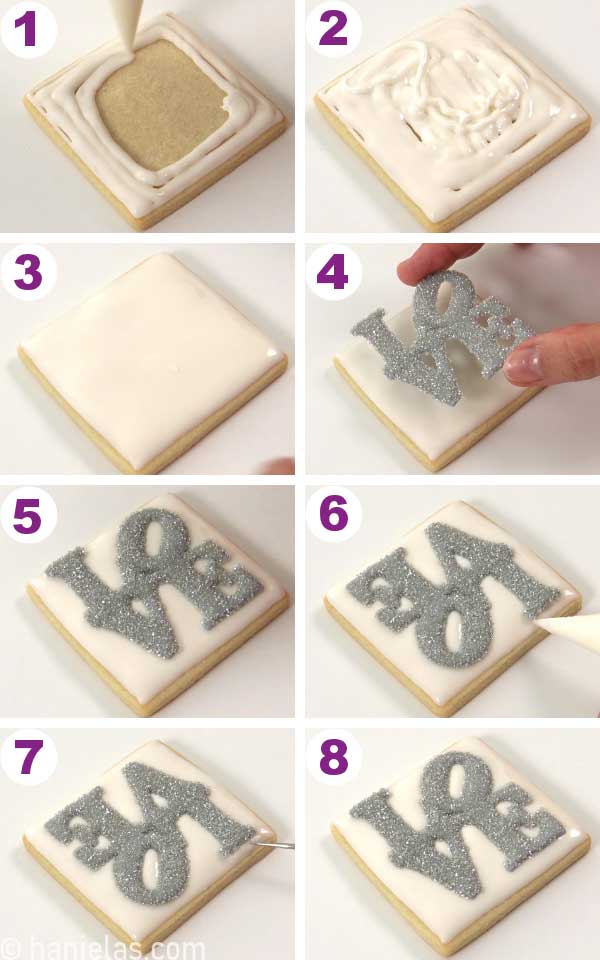
Use a scribe to gently push the transfer into the icing (steps 4-5).

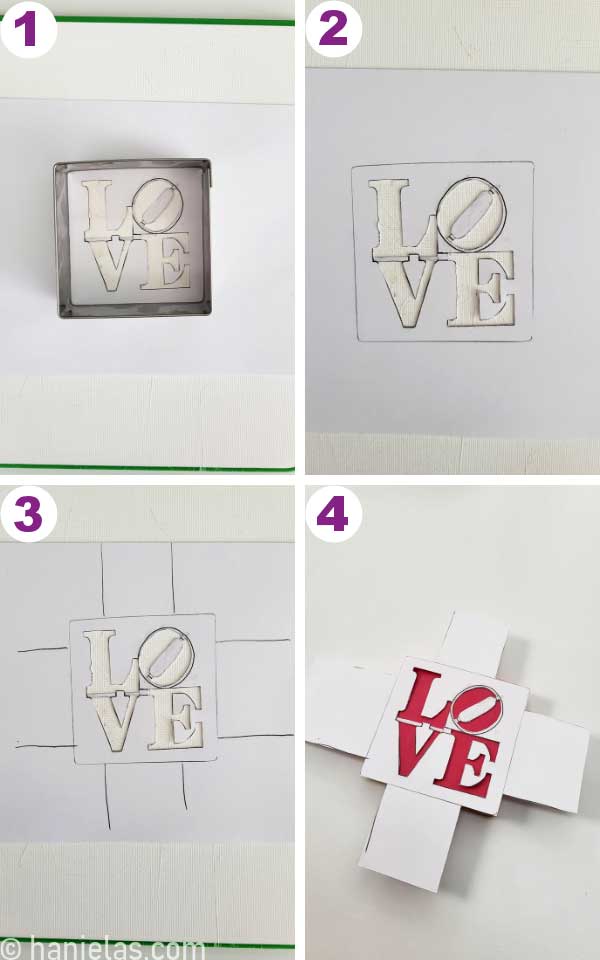
USE A DECORATING STENCIL
In case transfers are not your thing you can use decorating stencil to make love cookies.
- These stencils can be purchased online or if you are in a pinch you can make your own, using my decorating template (see the tools section at the bottom of this post).
- For this project I used a cardstock but you can also use plastic mylar sheet to make a stencil. Mylar is definitely more durable and you can use it for royal icing stenciling, too.
- To make decorating stencil I cut out LOVE with an exacto knife. If you want to make a durable cardstock stencil you can tape clear shipping tape over the image and then cut it out. I use this technique to make cookie cutter templates.
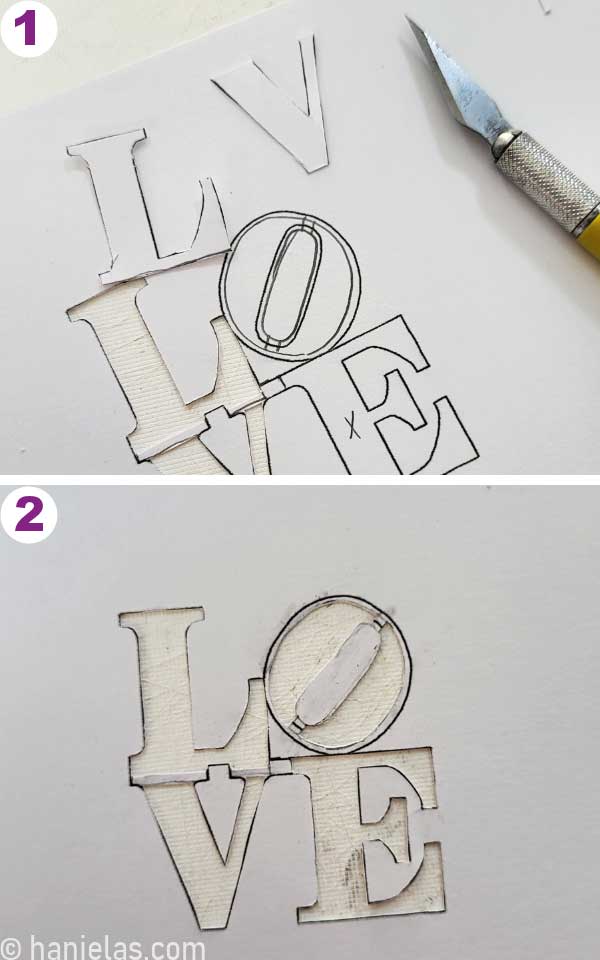
To make sure I can center my decorating stencil on a cookie I traced the cookie cutter outline around the stencil using the same cookie cutter I used to bake the cookies, leaving flaps on the sides for easier handling and anchoring with magnets when airbrushing. You can skip this step if using see thru mylar sheet.
Trace the cutter outline around the stencil. Place stencil onto a cutting board and cut it out with an exacto knife (steps 1-4).
Before you can use decorating stencil, you need to ice the cookies and let the icing dry (steps 1-8).
HOW TO TRACE LOVE OUTLINE ON A COOKIE
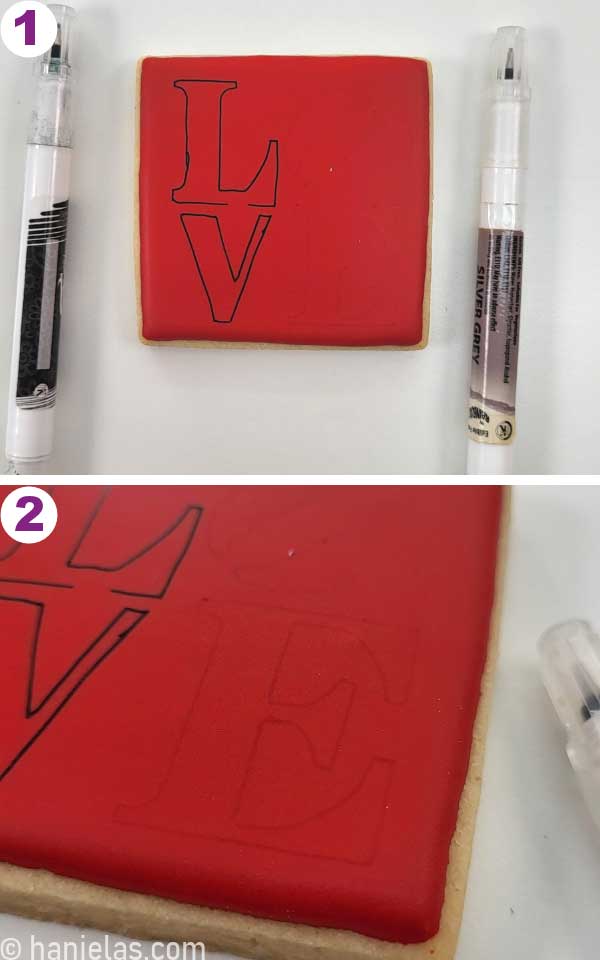
For this step you can use a scribe or an edible marker. Center decorating stencil on top of decorated cookie. I used a fine tip gray edible marker to trace the LOVE outline onto the dry icing (steps 1-3). Using gray edible marker is great because it leaves a subtle outline, no need to worry for it to show thru the icing that will be on the top.
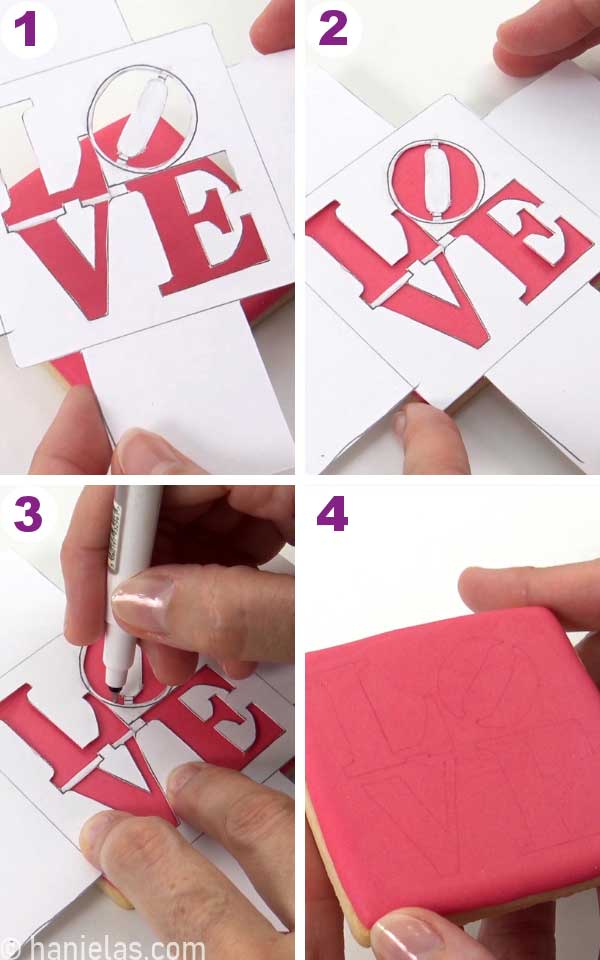
Here is a difference between black and gray marker. Both of these are fine tip markers (more about tools in the tools section at the bottom of this post). Black outline is clearly visible (step 1). On the other hand gray marker is barely visible to a naked eye. I love using gray marker whenever possible, as it doesn’t leave any harsh underline under icing that’s piped on top of it.
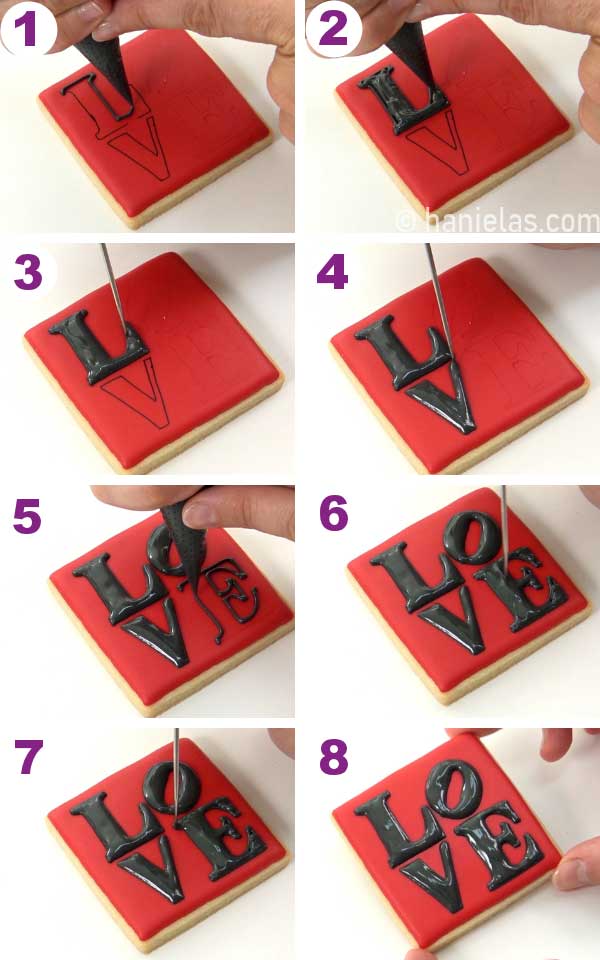
HOW TO PIPE LOVE ONTO COOKIES
Just like when making LOVE transfers, to pipe LOVE onto the cookie I use 2 piping bags filled with the same 20 to 25 – second consistency icing. First, I use a piping bag with a small opening (equivalent to tip #1) to outline the letters. Then immediately flood the inside using a piping bag with a larger opening (equivalent to tip #2). Work with one letter at a time. Use a scribe to smooth the icing. Let icing dry (steps 1-8).
AIRBRUSHING
The easiest option to decorate LOVE cookies is airbrushing. Even if you don’t own an airbrush. You can use edible sprays that are available in specialty stores or online. For this project I used Gold Color Mist spray.
First, anchor the stencil with magnets or use a stencil holder if you have one. Place magnets where the flaps are on the stencil. Depending on the magnets’ thickness, you may need to stack two magnets to match the thickness of the cookie you want to airbrush (step 1). Center stencil on the cookie (remember, the icing needs to be dry). Use an edible spray and spray it over the stencil. It’s better to do two thin coats than one heavy coat. Carefully remove the stencil (steps 2-4).
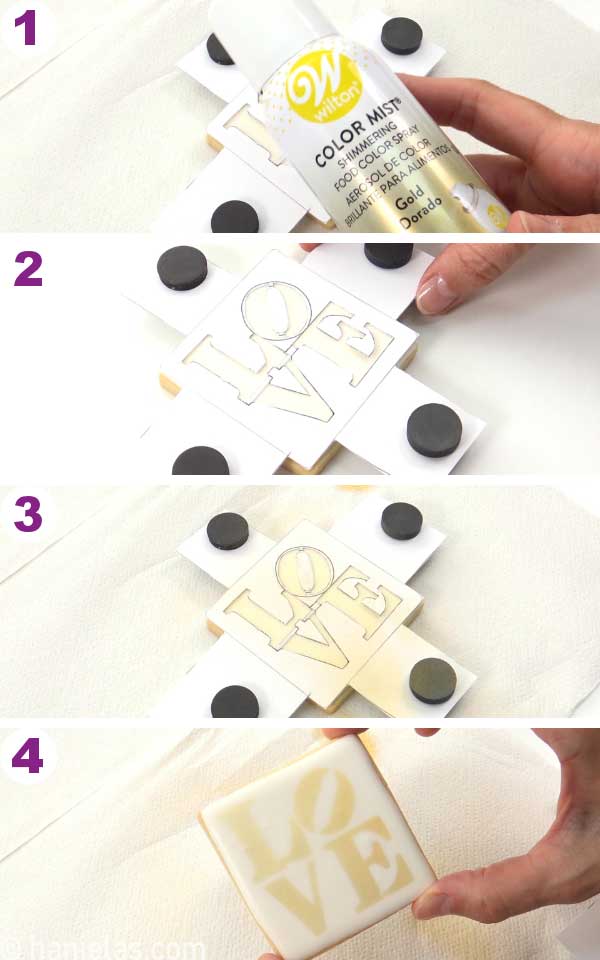
You can leave the cookie as is or you can use the airbrushed design as an outline and fill it with the icing (steps 1-3).

LOVE STATUE COOKIES SUCCESS TIPS
- Transfers can be make ahead of time. Learn more about Royal Icing Transfers.
- Pipe large transfers on individual pieces of acetate. It’s easier to remove them once they dry.
- Why do you use acetate and not parchment or wax paper? Acetate is plastic; it doesn’t absorb moisture like parchment/wax paper, so the underside of the transfer made with acetate is entirely smooth and even. Parchment and wax paper absorbs moisture from royal icing; they wrinkle on the underside of the transfer. As a result, a transfer made with parchment or wax paper will have an uneven underside. When working with larger transfers where even underside is very important it is better to use acetate.
- Let transfers dry on a flat surface – for 24 hours to 48 hours.
- Don’t make transfers the exact size as your cutter. Make them a little bit smaller.
- To pipe LOVE, use two piping bags with the same consistency icing. It is easier to work with a piping bag filled with less icing and a small opening when outlining LOVE – you have more control. Use a piping bag with a bigger opening to fill the transfers. Pipe icing around the outline first so they blend; there is no visible outline once you are done.
- Is this your first time using a tipless piping bag? How to cut an opening on a tipless piping bag? Find a seam and press it down the middle. Use sharp scissors and cut straight across.

- Don’t overfill cookies with icing. With an additional weight from the transfer, the icing can overflow the cookie if there is too much icing.
- Square cookies can be difficult to bake. Use my Sugar Cookie Recipe without baking powder or reduce it to ¼ teaspoon. For the best results, use perforated mats for baking cookies.

- Sanding sugar does wonders. It adds texture and hides any imperfections.
- I use a bead tray to catch sprinkles and sanding sugar. You can use a clean round coffee filter instead.
LOVE STATUE COOKIES FROM THE PAST
In 2010 I decorated my first LOVE statue cookies, inspired by the famous Love Park in Philadelphia, where, according to my research, the original Love Sculpture by Robert Indiana found its permanent home.
Then a year later, in 2011, I made my second Love Cookies – 600 of them, for a special occasion. These cookies were made for a bridal shower of a lovely girl Kelly; she and her fiancee got engaged by Love Sculpture in Love Park, in Philly.

MORE COOKIE DECORA
This post contains Amazon affiliate links that earn me a small commission, at no cost to you. I only recommend products that I use and love. Learn more about my affiliate policy here.
TO DECORATE LOVE STATUE COOKIES YOU NEED
- Shop Love Templates
- Square Cookie Cutter Set by Ateco
- Scribe or a tootpick
- Gray Edible Marker by Rainbow Dust
- Black Edible Marker by Rainbow Dust
- Gel Food Colors
- Edible Jewel Dust
- Silver Sanding Sugar by Wilton
- Pearl Luster Dust
- Edible Spray Mist by Wilton
- Dropper
- Food Only Paintbrush – I love this 5 piece set
- Clear Protector Sheets
This post was originally published on Mary 21st, 2010. On February 8th, 2023, I updated this post with new step-by-step pictures, and written text.

Hi, I’m Hani
Welcome!
Thank you for visiting Haniela’s. On my blog, you’ll find delicious sweet & savory recipes made with simple ingredients. Why not start a new adventure? Discover a world of cookie decorating with my step-by-step tutorials.

Hi, I’m Hani
Welcome!
Thank you for visiting Haniela’s. On my blog, you’ll find delicious sweet & savory recipes made with simple ingredients. Why not start a new adventure? Discover a world of cookie decorating with my step-by-step tutorials.


Just beautiful!! I have tried RI transfers…with no luck! I agree with Faithy..I am inspired to try again!!
thanks for the inspiration to do RI transfers! You make it look so easy! I have to try this way! 🙂