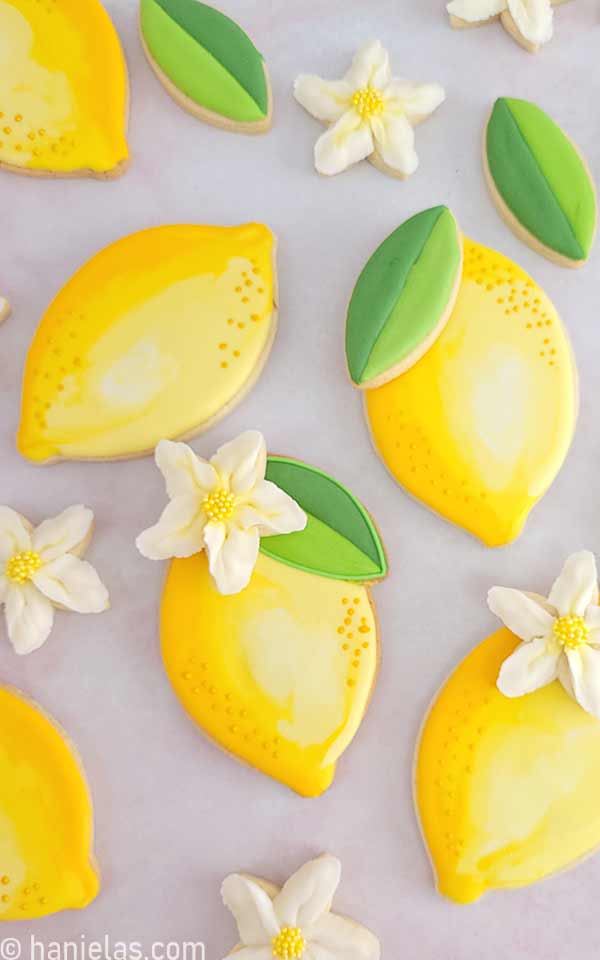
Decorated Lemon Cookies
Inspired by my innate affinity for all things lemon I made decorated lemon cookies.
HOW TO MAKE DECORATED LEMON COOKIES
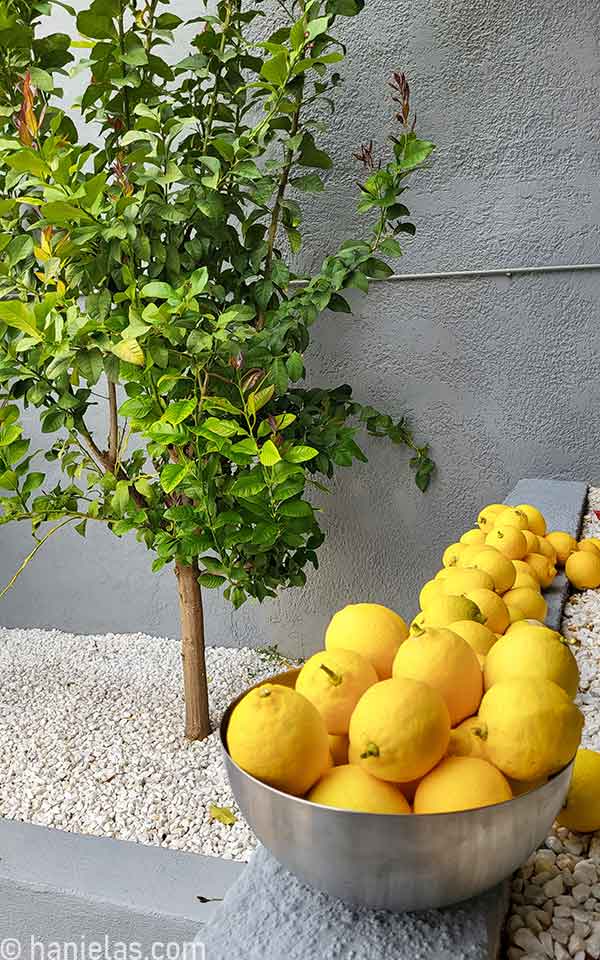
Before we jump to the tutorial I wanted tell you that we have two 4-year-old lemon trees. And despite, not reaching the maturity they are producing abundant lemon crops. It’s so exciting! Teeming with busy bees pollinating fragrant flowers all year round, it is such a joy to have my own lemons. I use them every day to make lemon water, royal icing, salad dressing, my favorite homemade lemon curd and even my own homemade lemon liqueur Limoncello.
Subscribe to Haniela’s Cookie Club on Patreon and get access to exclusive and ad-free tutorials, templates, sneaks peeks, and more.
- Beginner’s Guide To Cookie Decorating
- Ultimate Guide to Cut-Out Cookies (tips, tricks, troubleshooting)
- Royal Icing Recipe
- Small Batch Royal Icing Recipe
- Cookie Icing Recipes (includes vegan royal icing, glaze, fondant)
- Guide To Royal Icing Consistencies with Visual Help(what is stiff, flood icing, etc.)
- How To Freeze Royal Icing
- How To Make Royal Icing Transfers
- Royal Icing FAQ ( for example: how to make black icing, color bleeding, storage, and more)
- How To Make a Cookie Cutter Template
- Ultimate Guide To Cookie Decorating Tools
THINGS YOU NEED
- Lemon Cookie Cutter
- Cookie Cutter Template and Decorating Template via Haniela’s Template Shop
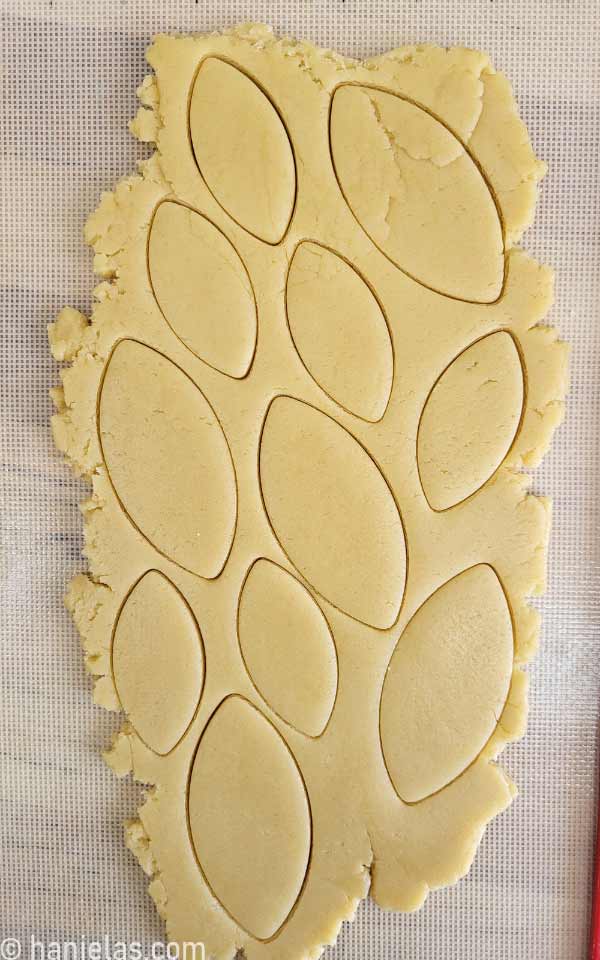
- Leaf Cookie Cutter
- Flower Cookie Cutter – use 5-petal flower or a small star cutter
- Tipless Piping Bags
- Palette Knife
- Gel Food Colors: lemon yellow, orange, leaf green, ivory
- Petal Piping Tip #103
- Flower Nail
- Funnel Tray
- Yellow Nonpareils
This post contains Amazon affiliate links that earn me a small commission, at no cost to you. I only recommend products that I use and love. Learn more about my affiliate policy here.

LEMON COOKIE CUTTER
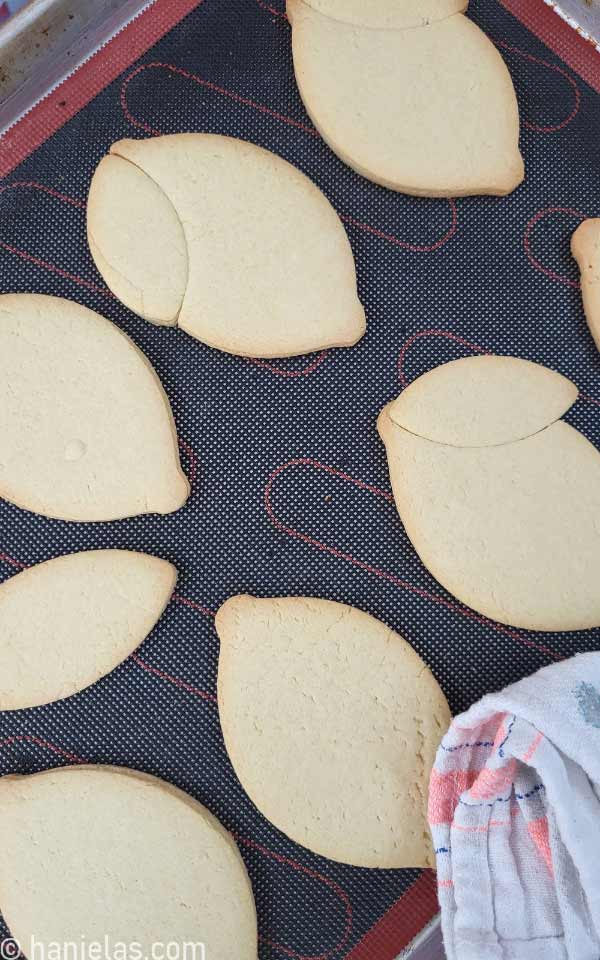
I couldn’t believe I didn’t have a lemon cutter in my vast cookie-cutter collection. I had two options: hand-cut cookies using a template or re-shaping an existing cookie cutter. So, I rummaged through my spare cutters’ bin and found a round cutter, so of course, I went with the latter. First, I flattened the round into an oval and then used nose pliers to shape the ends.

COOKIES AND ROYAL ICING
Let’s pause and explore the cookie and royal icing flavors that could be paired together. I’m sure you know if you’ve been following me for a while, that I love Fresh Lemon Royal Icing. What goes well with lemon? I often pair lemon with almond sugar cookies, gingerbread and even chocolate cookies.
As I mentioned, I used fresh lemon royal icing. To decorate, you need to color icing with food colors. For this cookie decorating project I colored my icing into 7 colors and I thinned the icing with water to 2 consistencies: 15-second consistency, and piping consistency.
ROYAL ICING COLORS AND CONSISTENCIES
- Golden yellow (15 second consistency) – color icing with yellow and add a minuscule amount of orange to make deeper yellow color.
- Medium yellow (15 second consistency)
- Light yellow (15 second consistency, piping consistency) –
- White (15 second consistency, stiff consistency)
- Bright green (15 second consistency, piping consistency) – you can use leaf coloring and add a touch of lemon to brighten the color.
- Dark green (15 second consistency) –
- Mustard color (piping consistency) – color icing with yellow and add a touch of ivory gel color or a minuscule amount of brown gel color.

BASIC LEMON COOKIES
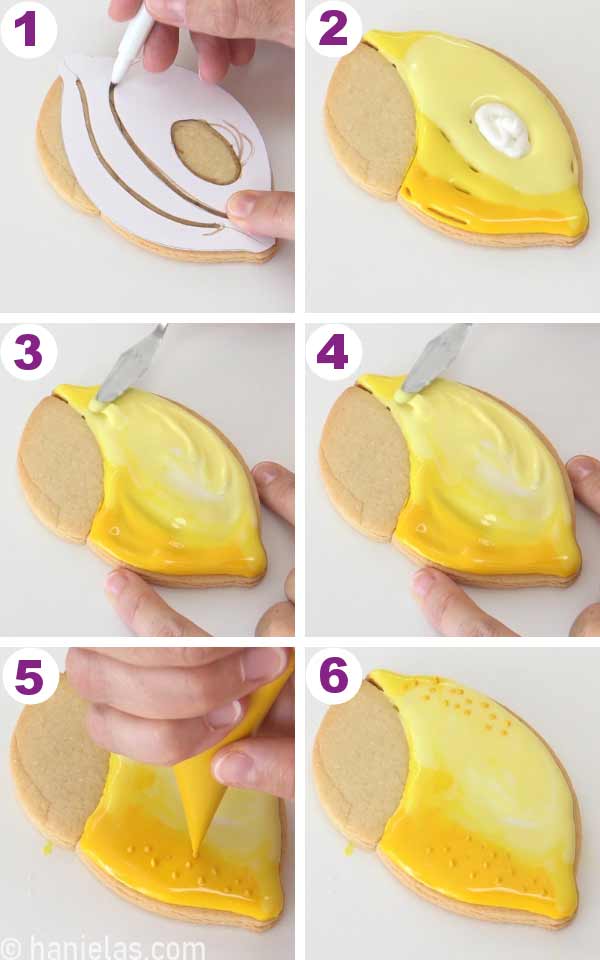
Make a cardstock decorating template based of your cookie cutter, or you can get my lemon cookie cutter template and the decorating template (see the tools section at the top of the post). It will help you achieve the overall uniformness of decorated cookies. Trace the outlines onto a cookie with an edible marker (steps 1-2). Start with dark golden yellow icing, then switch to medium yellow and light yellow, and lastly, fill the oval shape with white icing (steps 3-8).

To blend the colors I used a palette knife, instead of a scribe. It facilitates smoother blending of icing (steps 1-5). Lemon is naturally bumpy and so if the icing is not completely smooth it’s no biggie. But if it bothers you, and you notice few dimples you can pipe more icing in those sections and smooth it out with a scribe (steps 6-8)

To finish this simple lemon design, use the mustard colored icing (piping consistency) and pipe small dots on the top right edge and left bottom edge (steps 1-3).

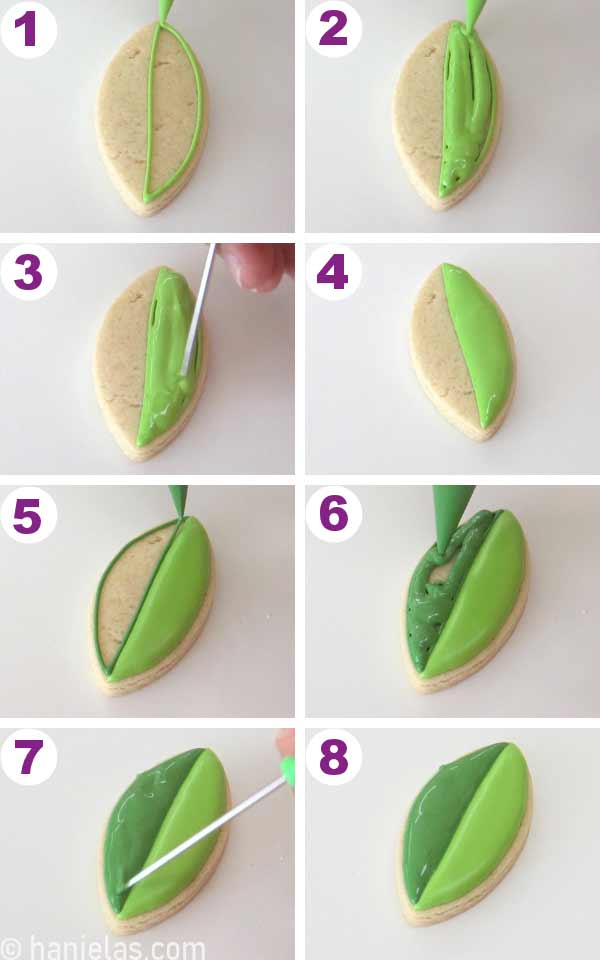
DECORATED LEMON LEAVES COOKIES
If you are making a cookie platter, to break up the yellow color addition of leaves make total sense. Yellow and green colors compliment each other and leaves are also uncomplicated to decorate.
Decorate one half of the leaf with bright green icing (15-second icing), let it crust, and then decorate the other half with 15-second dark green icing (steps 1-8).
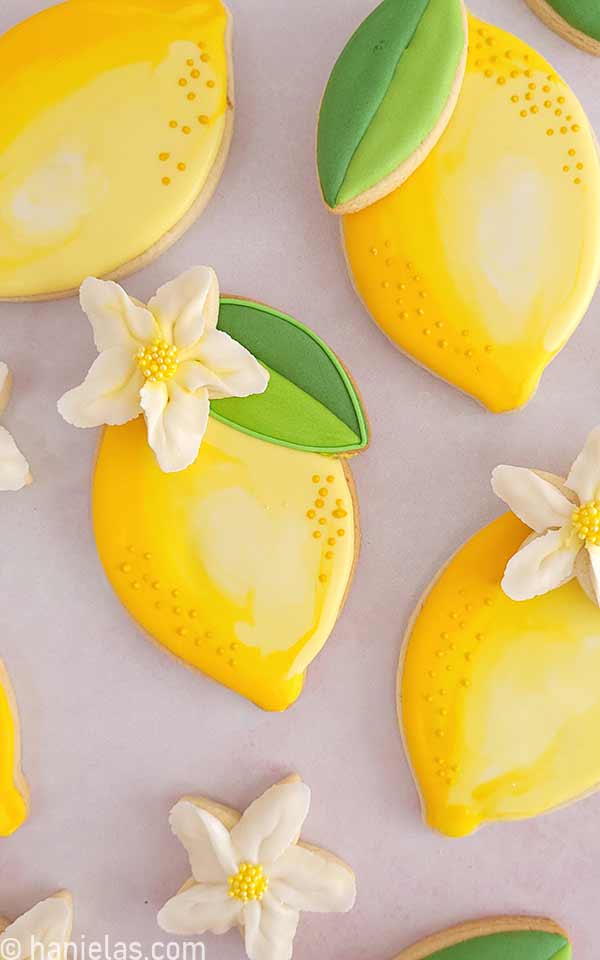
LEMON WITH A LEAF
To create lemon with a leaf cookie shape I implement a simple technique of trimming a portion of the cookie and replacing it with a new shape. In this case, I used a leaf cutter (steps 1-5). It’s not necessary to use water to glue cookies together, however for a stronger bond you can brush little bit of water on the edge of one of the cookies or some people also use lightly beaten egg whites.

Decorating of this cookie shape starts with the same steps as the first lemon cookie, except you need to avoid decorating the leaf area with yellow. Trace the decorating guides onto a cookie with an edible marker. Then fill in the lemon section with golden, medium light yellow and white icing, all 15-second consistency. Use a palette knife to blend the icing (steps 1-6).
Decorate the outer section of the leaf with dark green icing and then give it about 15 minutes to crust and decorate the other half with light green icing (steps 1-4). Allow icing to crust again, and then pipe an outline around the leaf with light green piping consistency icing (steps 5-6).

LEMON FLOWER COOKIES
To make asymmetrical 5-petal lemon flowers I used a star-like cookie cutter to cut out cookies, but any 5 petal flower cookie cutter should work.

To decorate, attach a cookie to a flower nail. Pipe a small amount of stiff icing onto a flower nail and secure the cookie onto the nail (steps 1-3). Decorate with stiff consistency icing and a piping tip #103 – pipe a flower petal. Hold the piping bag with the narrow end of the petal tip facing out and the wide end facing the center of the cookie.

Continue to pipe individual petals, a total of 5 petals. Use a food-only paintbrush or a scribe to smooth the middle of the flower in case there are icing spikes. Remove the flower from the nail and let the icing dry (steps 1-8).

After the icing dries, you can paint the center with edible paint. Into a paint palette, add few drops of yellow edible paint (yellow gel food color mixed with Everclear), and into the second cavity, pour clear alcohol (grain alcohol, Everclear) (steps 1-2). First, wet the middle of the flower with clear alcohol. Then switch to a smaller food-only paintbrush and add yellow paint onto the wet center. Color will flow from the middle into the petals’ crevices (steps 3-5). Allow to dry for couple of minutes. Unflavored alcohol will evaporate with no alcohol aftertaste.
Lastly, pipe yellow icing (piping consistency) onto the middle of the flower and dip it into yellow nonpareils sprinkles (steps 6-8).

DECORATED LEMON COOKIES VIDEO
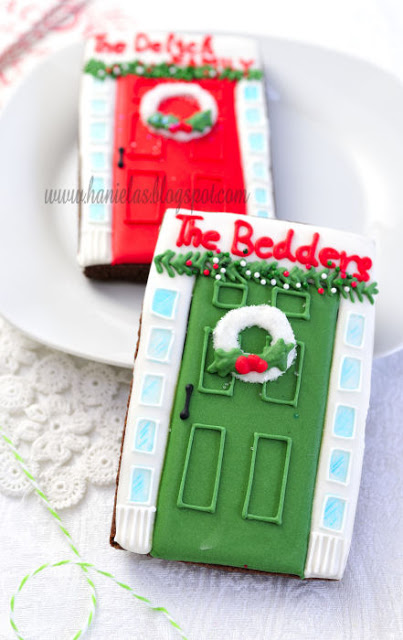
MORE FOOD-INSPIRED COOKIES
- Tomato Cookies
- Cantaloupe Cookies
- Cute Cherry Cookies via The Bearfoot Baker
- Decorated Vegetable Cookies
- Hamburger Cookies
Did you make these Decorated Cookies? Tag @hanielas on Instagram and hashtag it #hanielas

Hi, I’m Hani
Welcome!
Thank you for visiting Haniela’s. On my blog, you’ll find delicious sweet & savory recipes made with simple ingredients. Why not start a new adventure? Discover a world of cookie decorating with my step-by-step tutorials.

Hi, I’m Hani
Welcome!
Thank you for visiting Haniela’s. On my blog, you’ll find delicious sweet & savory recipes made with simple ingredients. Why not start a new adventure? Discover a world of cookie decorating with my step-by-step tutorials.