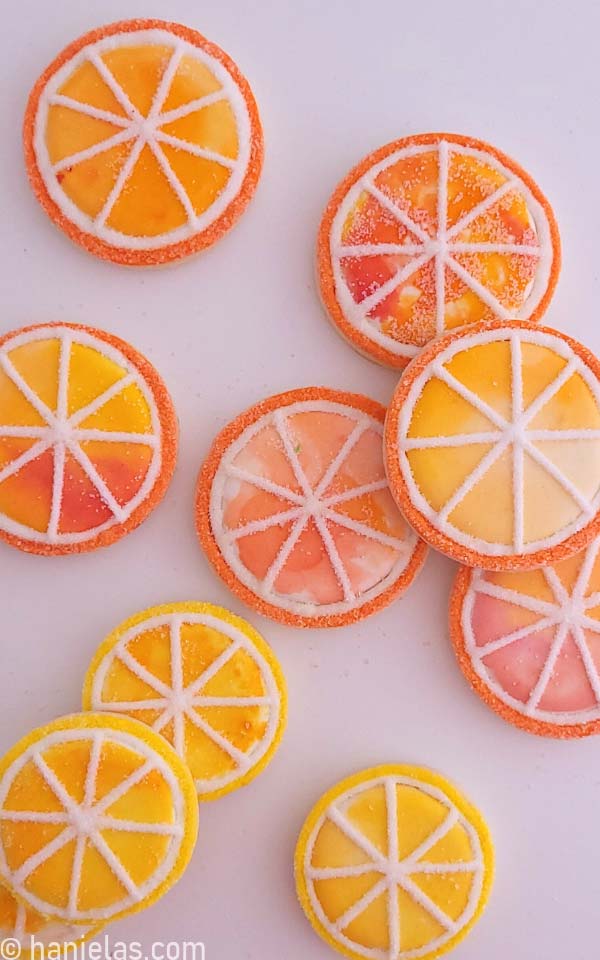
Easy Watercolor Citrus Slice Cookies
Let me show you how to create vibrant, arresting, decorated watercolor citrus slice cookies with an easy watercolor decorating technique.
EASY WATERCOLOR CITRUS SLICE COOKIES STEP-BY-STEP
The irresistibly refreshing appearance of lemons, oranges, limes, and grapefruits makes them excellent subjects for this easy and fun watercolor technique.
THINGS YOU NEED
- Get all the tools and supplies in Haniela’s Amazon Shop
- Round Cutters
- Sandwich Bag or Food Wrap
- Gel Food Coloring: yellow, pink, orange (see section on how to prepare edible paint)
- Food Only Paintbrushes
- Tipless Piping Bags
- Scribe Tool
- Granulated
- Edible Marker
- Cardstock Template
- Paper Towel
- Edible Paint Tools: Vodka or Eveclear, Food Gel Paint, Paint Palette Tray or store edible paint in Glass Jars.
This post contains Amazon affiliate links that earn me a small commission, at no cost to you. I only recommend products that I use and love. Learn more about my affiliate policy here.
PREPARE COOKIES AND ROYAL ICING
For this project, I baked two sizes of round cookies using my classic cut-out sugar cookie recipe; however, you can use any cut-out cookie recipe of your choice. I paired it with citrusy royal icing – Fresh Lemon Royal Icing.

ROYAL ICING COLORS AND CONSISTENCIES
- White Icing: 15-second consistency (base), soft piping consistency (pith)
- Yellow Icing, Orange Icing – soft piping consistency (skin)
FLOOD ROUND COOKIES
- Trace the decorating guide onto a cookie with an edible marker. Prepare a cardstock template that is smaller than the cookie, or use a smaller round cutter (steps 1-2).
- Outline and fill the cookie with 15-second consistency icing (steps 3-6).
- Using a scribe tool or a toothpick, distribute and smooth the royal icing (step 7).
- Allow icing to dry fully for about 8 hours.

EDIBLE PAINT
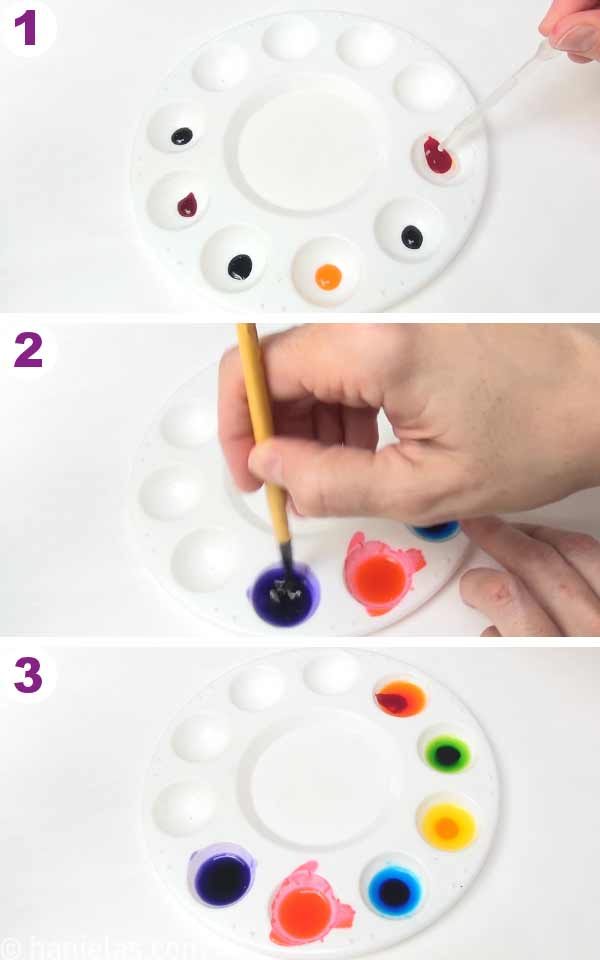
To prepare edible paint, you’ll need concentrated gel food colorings, alcohol, and stain-resistant bowls or a food-only paint palette tray.
- Into a paint palette, add a drop of gel food color: orange, yellow, pink.
- Then add clear alcohol ( I used Everclear/grain alcohol). Stir well with a food-only paintbrush.
- A little bit of residue forms in the edible paint as you stir it. This is normal. Pick up the residue with a paintbrush and rinse it off in water.
- Have a piece of dry paper towel on hand to absorb excess paint from the paintbrush.
- If you plan to use edible paint frequently, you can store it in glass jars with a dropper.

EASY WATERCOLOR EFFECT
Whenever you work with edible paints, make sure to protect your work surface and have some paper towels or kitchen towels on hand (step 1). In this beginner watercolor citrus cookies tutorial, I used a food wrap (step 2) and a sandwich bag (step 3) to create a spontaneous watercolor effect on royal icing.

WATERCOLOR ORANGE SLICE
- To create a watercolor orange background, I used orange, lemon, and pink edible paint.
- First, trim the zipper seal and layer a single layer plastic onto the protected work surface (steps 1-2).
- Deposit drops of orange, yellow and pink edible paints onto the sheet (steps 3-4).
- Add a couple of drops of clear alcohol to help the edible paint flow more smoothly (step 5).
- Use a food-only paintbrush to disperse the paint loosely across the sheet, but don’t mix it too much (steps 7-8)

- Carefully turn the sheet over and place it onto a dry white icing (steps 1-2).
- Use your fingers to move the paint around the edges gently (steps 3-4).
- Slowly remove the sheet (step 5).
- Allow the liquid to evaporate completely and let the surface dry for about 20 minutes (step 6).

- Pipe the skin and the pith with soft piping consistency icing.
- First, make an orange outline using a round piping tip #3 or #4 and then immediately pipe the white pith line using a round piping tip #2 or #3 (steps 1-2).
- Continue piping the segment lines with white icing (steps 3-5).
- Don’t wait for the icing to crust; immediately dip the icing into granulated sugar (step 6).
- Icing will most likely get slightly pushed beyond the edge of the cookie. Use a palette knife or a two-in-one decorating tool to smooth the edge, making the icing flush with the cookie’s edge (step 7).
- Allow to dry for a couple of hours.


WATERCOLOR LEMON SLICE
- To create a watercolor lemon background, I used primarily lemon and some orange edible paint.
- Here you can see that instead of a smooth sandwich bag sheet, I used a double layer of food wrap.
- Deposit drops of yellow and some orange edible paint onto a food wrap sheet (steps 1-6).

- Turn the sheet oven onto the dry icing, and use your fingers to spread the paint over the cookie gently. It’s okay if there are some white spots. (steps 1-5).
- Remove the sheet and allow the cookies to air-dry for 20 minutes before continuing with the next step.

- Use soft piping consistency icing to pipe the skin and the pith. Notice I’m using a tipless piping bag without a tip. You can see it’s possible without the piping tips, too. (steps 1-4).
- Turn the cookie onto the granulated sugar to coat the skin, pith, and segment icing lines with sugar (steps 5-6).
- Clean up the edge of the cookie as needed by gently pushing the icing that has oozed to make it flush with the cookie’s edge.


CREATIVE PACKAGING IDEA
If you’re unsure how to package the cookies, I suggest this quick and easy, adorable cookie packaging idea using cookie tags.

Do you want to stay updated about free cookie decorating tutorials, live events, classes, and products? Sign up for Hani’s Cookie Decorating Newsletter.
MORE CITRUS-INSPIRED RECIPES
- Asparagus Spring Salad with Lemon Vinaigrette
- Zucchini Lemon Bread
- Best Lemon Curd Recipe
- Mini Pink Lemonade Cheesecakes
- Orange Marmalade via Tasted Better from Scratch
- Apple Salad with Grapefruit and Coconut Cream
- Decorated Lemon Cookies with Piped Flowers
COOKIE DECORATING TOOLBOX
- Beginner’s Guide To Cookie Decorating
- Ultimate Guide to Cut-Out Cookies (tips, tricks, troubleshooting)
- Royal Icing Recipe
- Small Batch Royal Icing Recipe
- Cookie Icing Recipes (includes vegan royal icing, glaze, fondant)
- Guide To Royal Icing Consistencies with Visual Help(what is stiff, flood icing, etc.)
- How To Freeze Royal Icing
- How To Make Royal Icing Transfers
- Royal Icing FAQ ( for example: how to make black icing, color bleeding, storage, and more)
- How To Make a Cookie Cutter Template
- Ultimate Guide To Cookie Decorating Tools

Hi, I’m Hani
Welcome!
Thank you for visiting Haniela’s. On my blog, you’ll find delicious sweet & savory recipes made with simple ingredients. Why not start a new adventure? Discover a world of cookie decorating with my step-by-step tutorials.
Hi, I’m Hani
Welcome!
Thank you for visiting Haniela’s. On my blog, you’ll find delicious sweet & savory recipes made with simple ingredients. Why not start a new adventure? Discover a world of cookie decorating with my step-by-step tutorials.


These are just so lovely! And I have a set of citrus plates from Williams-Sonoma to serve them on.
Hi Carrie,
Those sounds amazing. I love anything with citrus pattern. So pretty.
Have a great day!