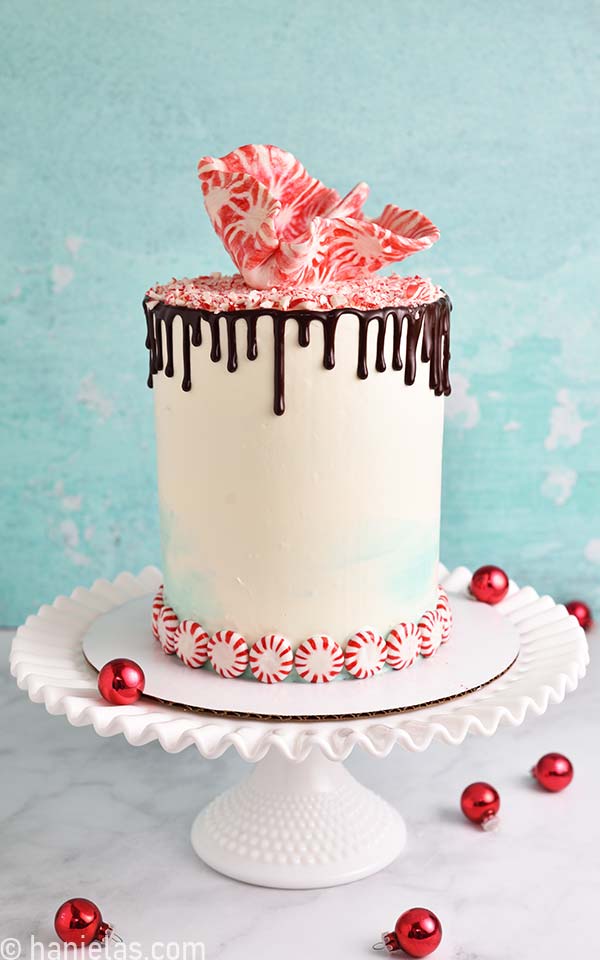
Holiday Peppermint Cake
My Holiday Peppermint Cake is made with light sponge cake, filled with delicious peppermint buttercream and decorated with fun to make peppermint candy cake sail. Let’s put this holiday perfect cake together.
HOW TO MAKE HOLIDAY PEPPERMINT CAKE
- TABLE OF CONTENTS
- Bake Sponge Cake ( learn my easy way how to make sponge cake super bright red color)
- Peppermint Buttercream
- Fill the Cake, Crumb Coat and Frost
- Teal Watercolor Buttercream (how to color Swiss Buttercream)
- Decorate with peppermint candies
- Chocolate Drips
- Decorate Top with Crushed Peppermint Candies
- How to make Peppermint Candy Cake Sail
- Edible Glaze (how to protect candy sail from humidity)
- Decorate Cake with Candy Cake Sail
- Recipes and Tools

BAKE CAKES
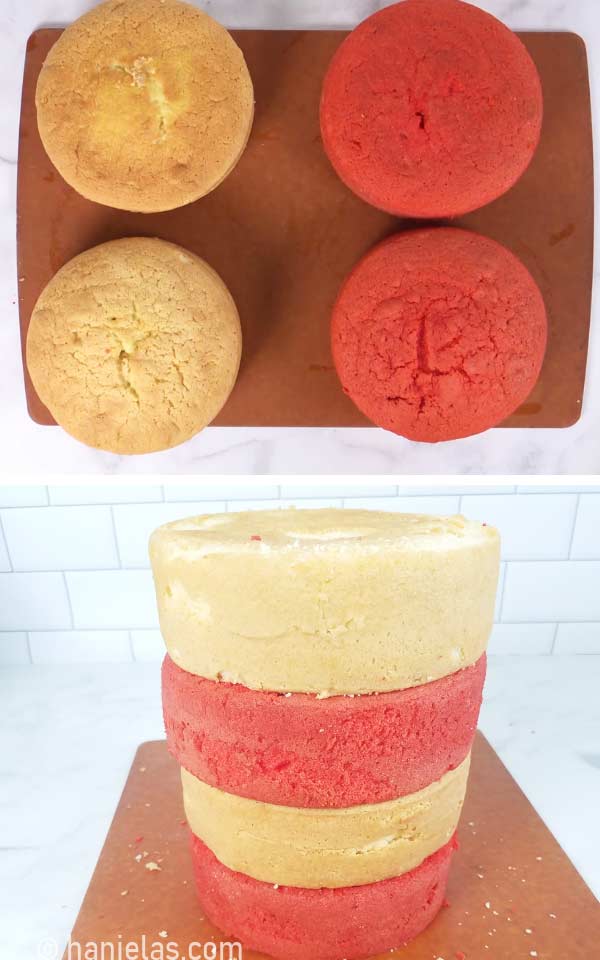
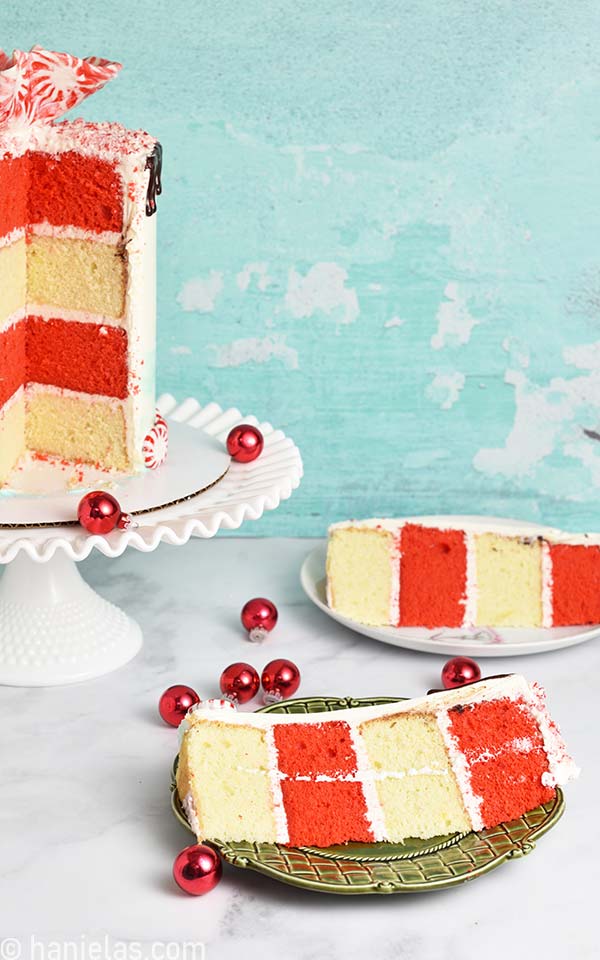
To make my decorated peppermint layered cake, I used 2 batches of my Easy Sponge Cake Recipe.
- I baked 4-6 inch cakes
- 2 Vanilla Yellow Sponge Cakes
- 2 Vanilla Red Sponge Cakes
When making sponge cakes it’s best to prepare cake batter right before you bake it. Sponge cakes rely on the lift mainly from the egg whites. The longer the cake batter sits less volume it will have as the meringue will slowly deflate as it sits.
Prepare 1st batch of sponge cake recipe, divide it into 2-6 inch cake pans and bake it. Baked cakes should be about 2 inches tall.
TIP : Butter and flour your baking pans before pouring in cake batter.
To make red sponge cake, I colored 1 batch of cake batter with concentrated gel food color (steps 1-2).

HOW TO COLOR SPONGE CAKE BATTER
- Use concentrated gel color.
- My sponge cake recipe calls for warm water.
- Into the warm water pour about 1 to 2 teaspoons of red gel food color, whisk well to combine ( steps 2-3).
- Pour colored red warm water into beaten egg yolk and sugar mixture, follow the directions in the recipe, basically instead of plain water add colored warm water, (steps 4-5).
- Fold in the rest of the ingredients as listed in the recipe and divide the red sponge cake batter into 2 prepared 6-inch cake pans (step 6).
- Bake at 350F for 28-30 minutes, until a toothpick inserted in the middle comes out clean.
- Take cakes out of the oven, let them cool in the pan for 5-10 minutes. Then invert cakes onto a cooling rack and let cool completely. (steps 7-8).

PEPPERMINT BUTTERCREAM
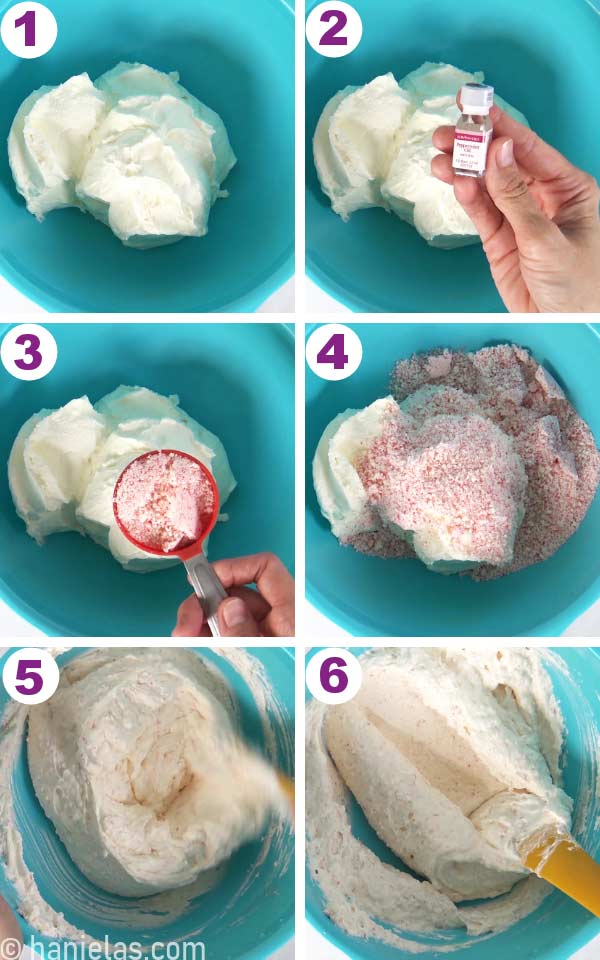
My peppermint cake recipe wouldn’t be complete without peppermint buttercream! I used both, pulverized mint candies and peppermint extract to flavor my buttercream.
I tried adding whole peppermint candies (1 cup) to my small chopper but a small appliance couldn’t handle it all at once. Instead, I put candies into a ziploc bag and I used a meat tenderizer to break them up a bit. (step 1). Then I poured them into a small chopper and pulverized them until super fine, (steps 2-4).

To make peppermint buttercream, I used Vanilla Swiss Buttercream, about 2cups, and 1/2 cup. Add Peppermint Candy Flavoring(oil-based) into vanilla buttercream – several drops and up to 1/8 teaspoon; when using alcohol-based flavoring, use 1/2 teaspoon. Then stir in pulverized peppermint candies (steps 1-6).
HOW CAN I MAKE CHOCOLATE PEPPERMINT BUTTERCREAM ?
Yes, sure you can make chocolate buttercream. Into Vanilla Swiss Buttercream (2cups and 1/2 cup) beat 1/2 cup melted and cooled dark chocolate along with 3 to 4 tablespoons of sifted dark cocoa powder. Then into chocolate buttercream stir pulverized peppermint candy and peppermint candy flavoring (oil-based) – several drops and up to 1/8 teaspoon). When using alcohol-based flavoring use 1/2 teaspoon.
TIP: Oil-based flavorings are very concentrated, be sure to use those sparingly as not overpowering flavor of your buttercream.
FILL THE CAKE
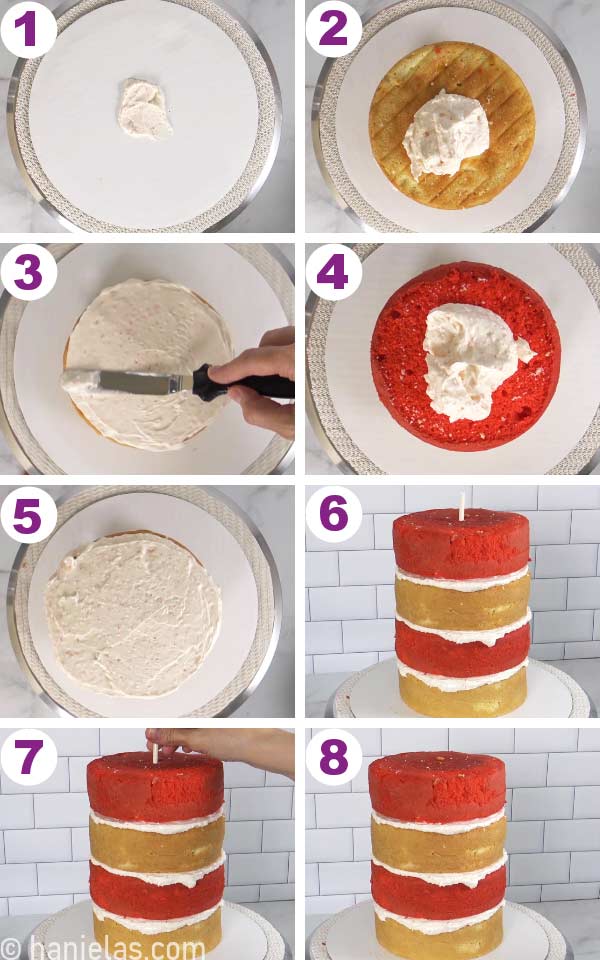
Before I filled the cake I trimmed the domed cakes a little so they would be flat.

Spread a little bit of buttercream onto a cake board or a flat plate. Place yellow sponge cake onto the cake board. Spread about 1/2 cup of peppermint buttercream onto the cake layer, (steps 1-3). Then continue, place the red cake layer on top of the iced yellow cake and repeat until you are done will all the cake layers, (steps 2-5).
Though not necessary, I like to put a drinking straw in the center of the cake for support to prevent cake layers from shifting when I’m frosting the cake. Push plastic drinking straw into the cake, trim the end, so it’s not sticking out. Then push the drinking straw in with the trimmed piece so it’s fully inserted into the cake (steps 6-8).
CRUMB COAT THE CAKE
To seal the crumbs it’s best to crumb coat the cake and then chill it.
Use leftover peppermint buttercream to crumb coat the cake and then chill it for an hour (steps 1-8).

FROST THE CAKE
To frost outside of my Holiday Peppermint Cake, I optioned for Vanilla Swiss Buttercream – about 3 cups (steps 1-8). Chill the cake for 30 minutes.

WATERCOLOR BUTTERCREAM
To create the watercolor-like effect I used a teal-colored swiss buttercream. Swiss Buttercream is notoriously difficult to color with gel food colors. In case you have oil-based food color use those to color swiss buttercream. If all you have are gel food color try this simple technique below.
COLOR SWISS BUTTERCREAM
Add 2 tablespoons of uncolored swiss buttercream into a bowl. Add few drops of teal food coloring. Stir well. Notice color is really muted and not really teal (steps 1-2). Microwave on high for 5 seconds and stir again. Look at the buttercream color now. It’s bright teal (steps 3-4).
Pour microwaved teal buttercream into about 1/4 to 1/3 cup of white buttercream and whisk well until well combined (step 5). If you’d like your buttercream to be deeper teal color, repeat the process. Don’t microwave the whole bowl of buttercream, just small amounts. Learn more about How To Color Swiss Buttercream. Pour teal buttercream into a piping bag (step 6-8).
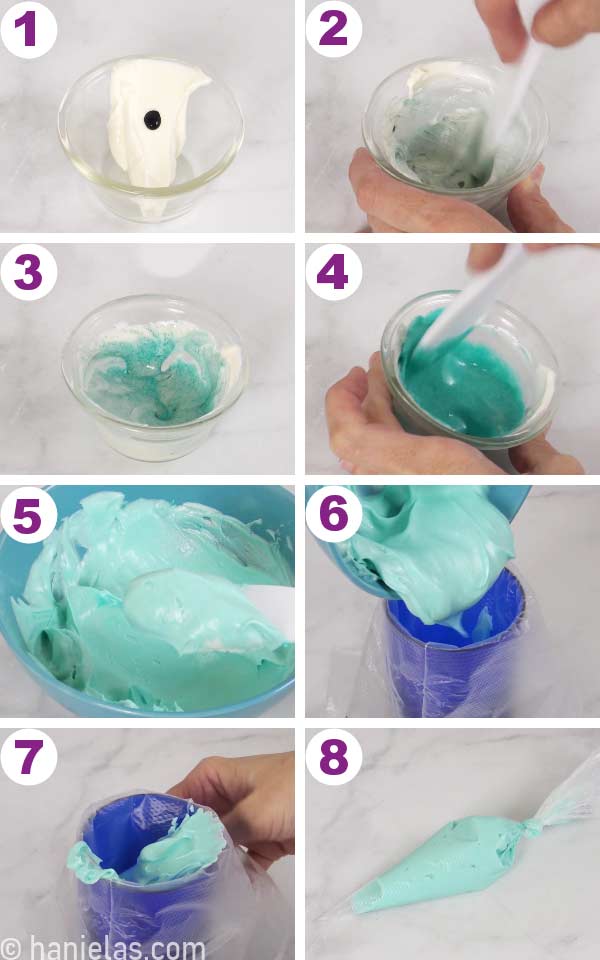
Pipe a little bit of teal buttercream on a chilled cake (steps 1-2). Smooth it with a cake smoother ( steps 3-6).

DECORATE HOLIDAY PEPPERMINT CAKE WITH CANDIES
Decorate the bottom of the cake with round peppermint candies. Gently push them into the frosting, so they stick. Chill the cake until you are ready for the next step.

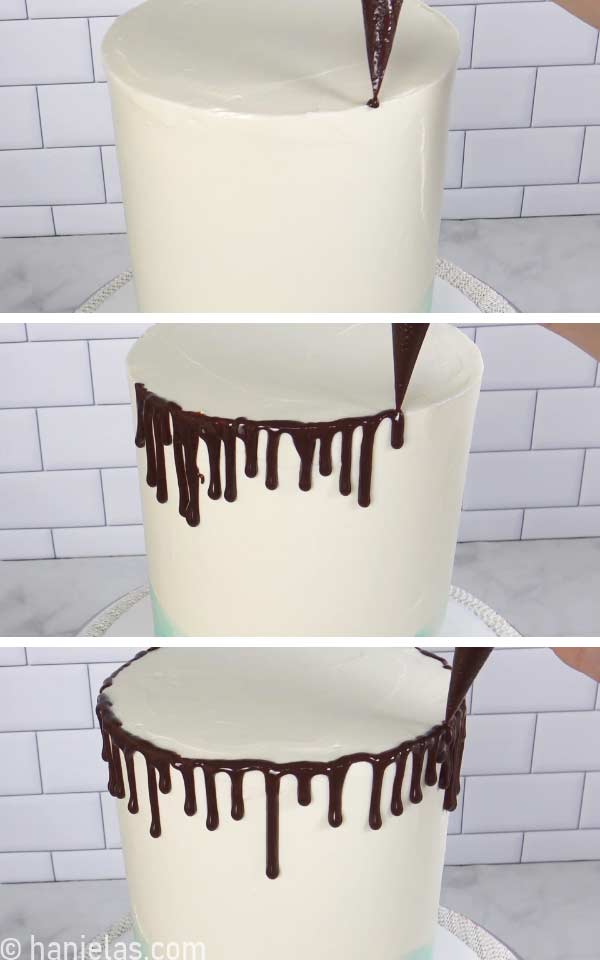
CHOCOLATE DRIPS
Make chocolate ganache: use 1 cup (6oz, finely chopped dark chocolate or chocolate chips) and 1/2 cup (120ml) heavy whipping cream.
Pour chocolate into a heat-safe bowl. Heat heavy whipping cream until nearly boiling; you’ll see tiny bubbles around on the surface. Pour it over chopped chocolate/chocolate chips. Let sit for 3 minutes. Then stir it gently. Try not to whisk it too much, so you don’t add too many air bubbles into the ganache. Allow cooling for 10-15 minutes, so it thickens up a bit before piping drips onto a cake.
Pour ganache into a piping bag. Cut a small opening on a bag and pipe the drips on a chilled cake.
TIP: You can prepare ganache ahead of time, store it in the fridge. When ready to gently heat it in the microwave until it’s fluid enough for piping drips.
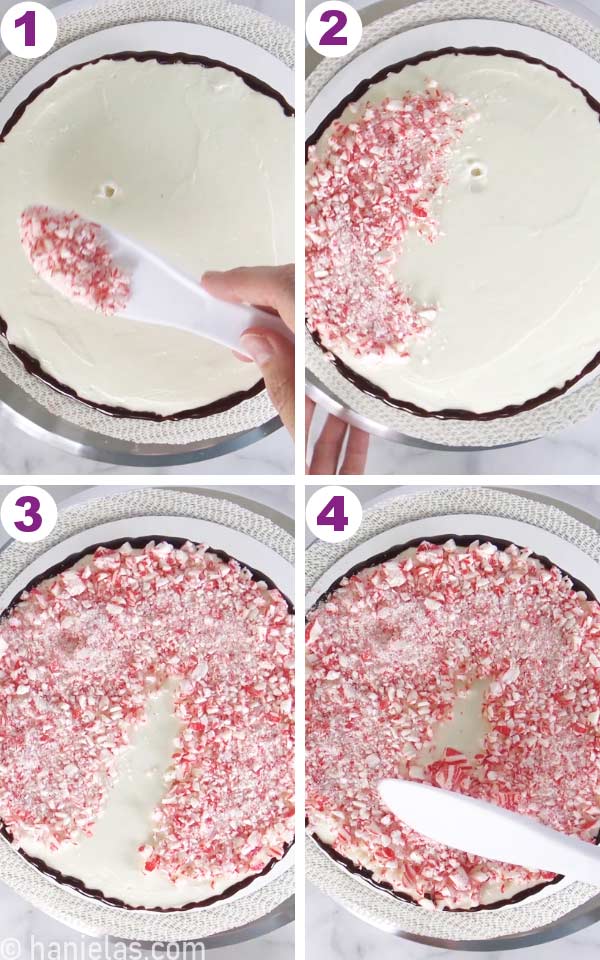
CRUSHED PEPPERMINT CANDIES
Decorate top of the cake with crushed peppermint candies.
TIP: You can purchase crushed peppermint candies in the store, they’re available during holidays.
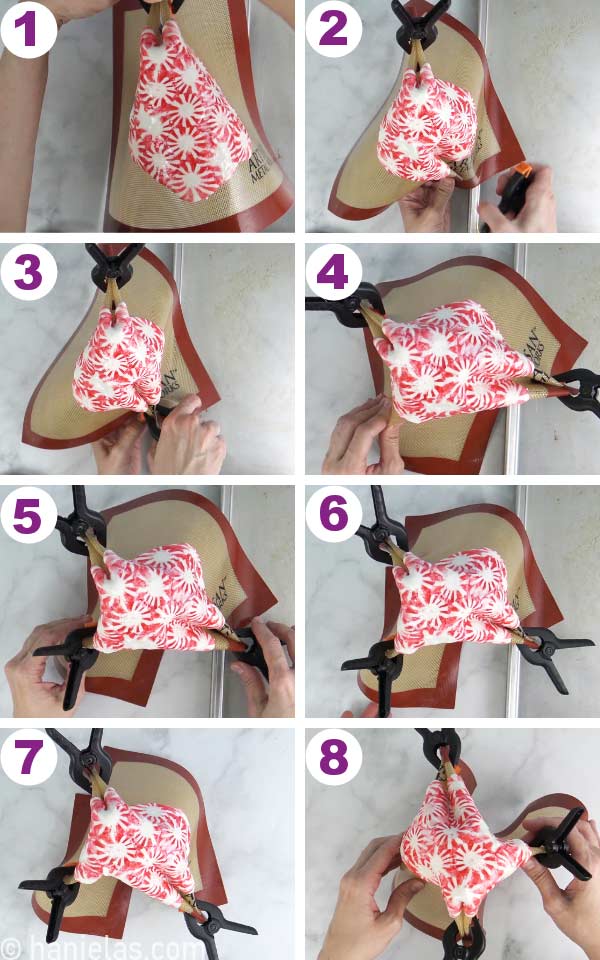
PEPPERMINT CANDY CAKE SAIL
I absolutely love the look of cake sails. They are so unique and add just the right amount of flair to any cake. If you haven’t seen it, I made a Caramel Cake Sail for my Brown Sugar Cake.
TO MAKE PEPPERMINT CANDY SAIL YOU NEED
- Round Peppermint Candies
- Silicone Baking Mat
- Clamps
- Tall slim object, such as vase, bottle, glass
- Oven Mittens
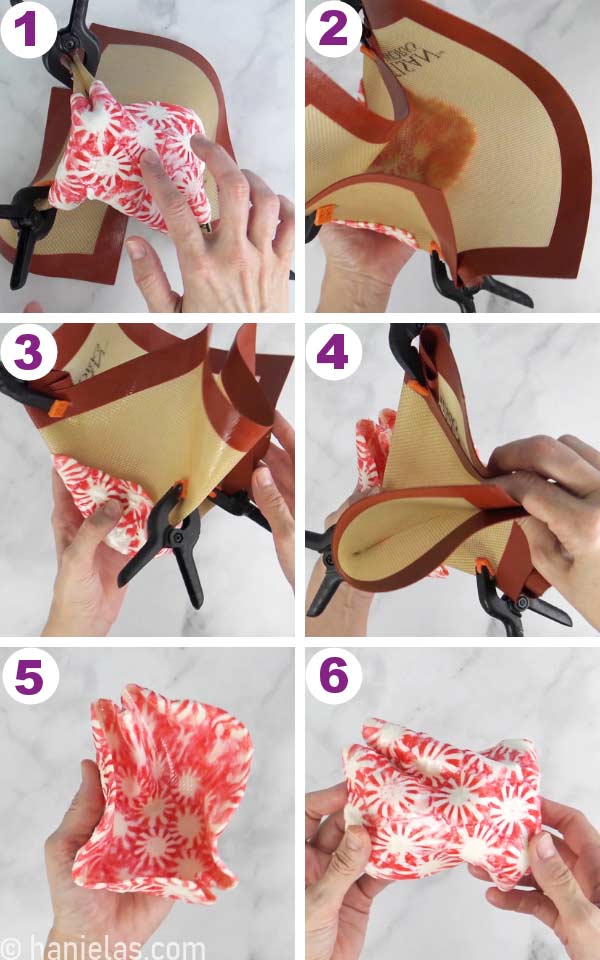
Arrange unwrapped peppermint candies on a silicone mat (steps 1-3). Bake in the preheated oven at 350F (180C) for 5-7 minutes, until melted. KEEP AN EYE ON IT SO CANDY DOESN’T BURN (step 4). Carefully with both hands, wearing oven mittens, lift the silicone mat and drape it over a tall object (steps 5-6). DON’T TOUCH MELTED CANDY WITH YOUR BARE HANDS; IT’S HOT.
TIP: Work with hot sugar only under adult supervision.

Fold the silicone mat and secure the folds with clamps. Allow cooling for 15-20 minutes (steps 1-8).
Once melted, candies harden and cool completely. You can remove the silicone mat, and voila, you have yourself a very cool-looking peppermint candy cake sail (steps 1-6).
TIP: Store candy sail in an airtight container with a bowl of raw rice or food-grade silica gel packets. Both absorb moisture and help keep sugar art stable.
PME EDIBLE GLAZE
If you can get your hands on PME Edible Glaze you can use it protect your sugar sail from the humidity. Shake the can well, (step 1). Place candy sail on a baking sheet and spray it with and edible glaze. Turn the sail over and spray it from the other side, (steps 2-6). Allow to set and then store it in an airtight container with a small bowl of raw rice or food grade silica gel packets to further protect it from moisture.
TIP : Follow the instructions on the packaging on how to use PME Glaze Spray.

DECORATE CAKE WITH PEPPERMINT CANDY SAIL
Now it’s time to decorate my holiday peppermint cake. Pipe some buttercream onto the cake. Place candy sail onto the buttercream and, using gentle shifting motion securing it on a cake.

HOW LONG CAN I KEEP THE SUGAR/CANDY SAIL ON A CAKE?
I kept the cake with the sail attached in the refrigerator for 3 days before serving it with no problems.
TIP: Candy cake sail, when stored properly, can be prepared months in advance. I had mine in an airtight container for several months. Please keep it away from direct sunlight.
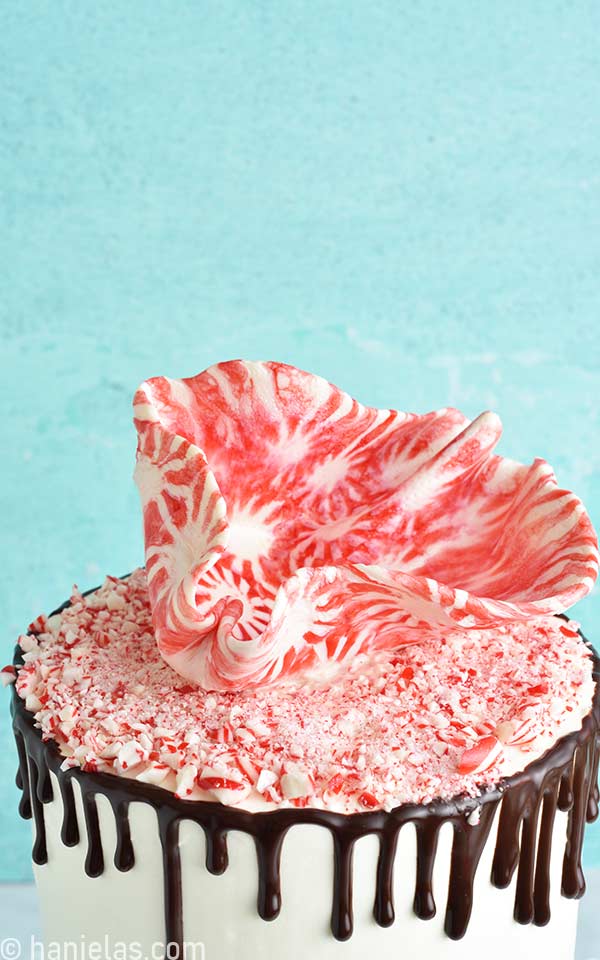

Look how beautiful is this peppermint layer cake! Alternating red and white/yellow cake layers really make it pop.
This post contains Amazon affiliate links that earn me a small commission, at no cost to you. I only recommend products that I use and love. Learn more about my affiliate policy here.
TO MAKE HOLIDAY PEPPERMINT CAKE YOU NEED
- RECIPES
- Easy Sponge Cake Recipe ( to make 4-6 inch cake you need 2 batches)
- Swiss Buttercream
- TOOLS
- Get all the supplies you need in my Amazon Store
- 6 inch cake pans
- Silicone Mat
- Cake Frosting Smoother/Icer
- Clamps to shape the candy sail decoration
- Red Gel Food Color
- Teal Gel Food Color
- Peppermint Candies
- Peppermint Flavoring
- Piping bag
- Cake Turntable
- Food Chopper to chop/pulverize peppermint candies
MORE HOLIDAY RECIPES
- Candy Cane Peppermint Patties
- Gingerbread Cake with Gingerbread Popcorn
- Candy Cane Cookies
- Hot Cocoa Candy Cane Mug Cake (buttercream cable nit and candy candy cane buttercream layers)
- Double Chocolate Mint Cookies
- Hot Chocolate Bombs

Hi, I’m Hani
Welcome!
Thank you for visiting Haniela’s. On my blog, you’ll find delicious sweet & savory recipes made with simple ingredients. Why not start a new adventure? Discover a world of cookie decorating with my step-by-step tutorials.

Hi, I’m Hani
Welcome!
Thank you for visiting Haniela’s. On my blog, you’ll find delicious sweet & savory recipes made with simple ingredients. Why not start a new adventure? Discover a world of cookie decorating with my step-by-step tutorials.


So beautiful and I love the sail!
Thank you so much June. ♥