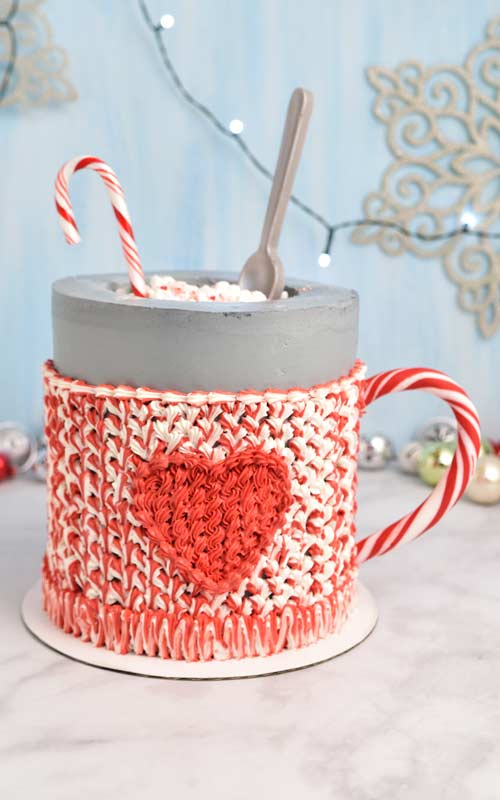
Hot Cocoa Mug Cake
My cozy giant decorated Hot Cocoa Mug Cake is made of chocolate cake layers soaked with coffee syrup, filled with peppermint buttercream and ganache. Topped with soft white marshmallows and crushed candy canes. It’s a perfect cake to serve on a cold winter afternoon.
HOW TO MAKE HOT COCOA CANDY CANE MUG CAKE
Inspired by my Homemade Hot Chocolate Mix I made this cute knitted candy cane hot cocoa mug cake. I used an easy to make delicious chocolate cake and Swiss Buttercream.
- TABLE OF CONTENTS
- Chocolate Cake Layers
- Coffee Sugar Syrup
- Peppermint Swiss Buttercream
- Fill and Frost the Cake
- How to create marbled Buttercream Knitted Pattern
- Fondant Candy Cane Mug Handle Tutorial
- Chocolate Silver Spoons
- Hot Cocoa Mug Cake Assembly
- Recipes and Tools
You can prepare chocolate cake, buttercream and all the decorations ahead of time. Let start with a simple chocolate cake.

CHOCOLATE CAKE LAYERS
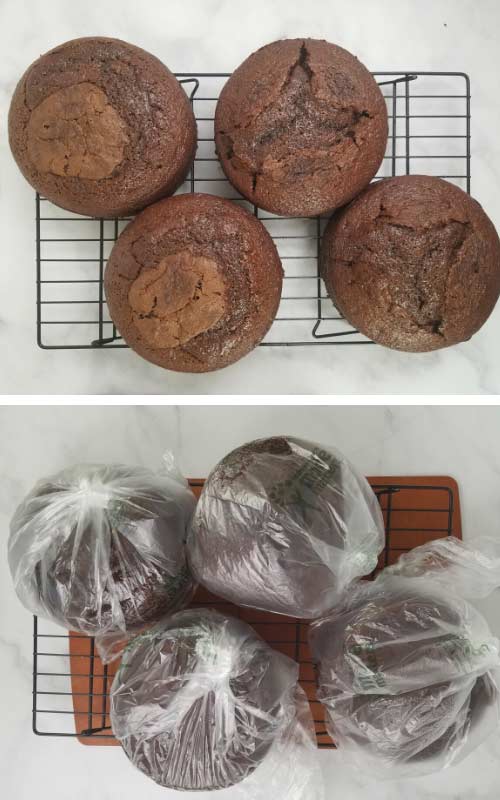
Following the chocolate cake recipe bake 4 – 6 inch cake layers. I let the cakes cool on a cooling rack till lukewarm. Then I placed each cake into a bag, you can wrap them into clear food wrap. This extra step keeps the cakes super moist.
You can bake the cakes day or 2 before you plan on putting the cake together. Store in the fridge well wrapped. Cake also freezes well. Wrap each cake layer in a plastic wrap and freeze in freezer safe bags. Cake will freeze for up to 3 months. Let it defrost completely before taking it out from the plastic.
TRIM THE CAKES
First I trimmed the top of the domed and cooled chocolate cakes. Then take one cake layer and cut out the middle using a large 4.5 inch round cookie cutter or a paper template. Freeze the cake ring for an hour.

COFFEE SUGAR SYRUP
What is sugar syrup? Sugar syrup is basically water, sugar and flavorings. Sugar is heated with water until dissolved. Then liquid is simmered for several minutes. After, syrup thickens slightly as water evaporates. Sugar syrup is used to keep cakes moist. It can be brushed our squirted onto the cake layers.
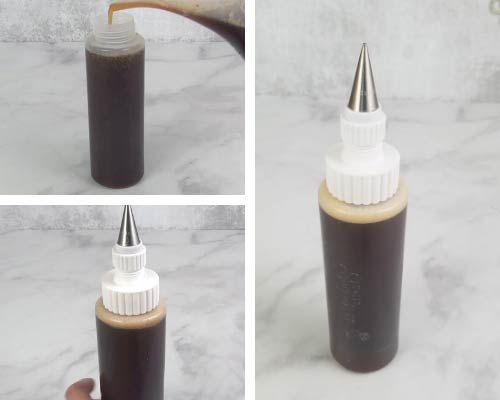
Prepare sugar syrup and once cooled flavor it with Vanilla Extract and espresso powder. Whisk well. Sugar syrup can also prepared ahead of time. Store it in the fridge for up a week.

For an easier application pour cooled coffee sugar syrup into a squeeze bottle.
PEPPERMINT SWISS BUTTERCREAM
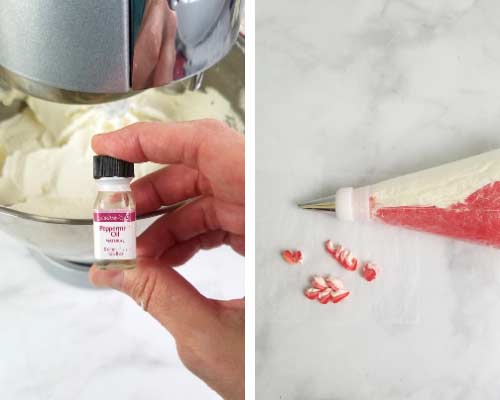
To fill and frost the cake I used Swiss Buttercream flavored with concentrated peppermint flavoring. Don’t add too much peppermint flavoring as it can overpower the flavors. I used Lorann Oil Flavorings and I added about 10-15 drops of the flavoring. Mix buttercream well, taste and only then add more flavoring if desired.
Swiss Buttercream can also be prepared ahead of time. Store it in the fridge for up to a week or freeze for up to 3 months. Let it come to room temperature before using. After thawing whip buttercream with a mixer for a couple of minutes before using.
COLOR SWISS BUTTERCREAM
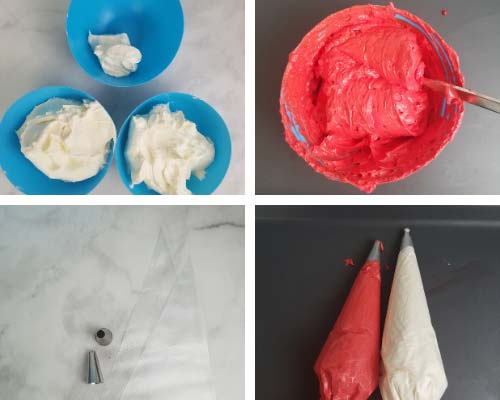
I prepared 2 batches of my Swiss Buttercream. I flavored it with vanilla and peppermint flavoring. Then I measured about 1 2/3 cups of uncolored buttercream into 2 bowls (each bowl with 1 2/3 cups of buttercream). I colored one buttercream with red gel food coloring. Follow my tutorial on How to color Swiss Buttercream.
PREPARE PIPING BAGS
Fit 2 large piping bags with a round piping tip #12. Fill one piping bag with red buttercream and the second bag with white buttercream. Set aside.
FILL AND FROST HOT COCOA MUG CAKE
- Pipe a small amount of buttercream onto a cake board.
- Pour or brush cooled coffee sugar syrup on the bottom and top side of each chocolate cake layer.
- Alternating red and white buttercream pipe rounds onto the cake.
- Positional second chocolate cake layer piped buttercream. Gently press down so cake sticks to the buttercream. Don’t press hard.
- Then repeat with piping red and white rounds. Set remaining white and red buttercream in piping bags aside. You’ll need it to pipe knitted pattern later.
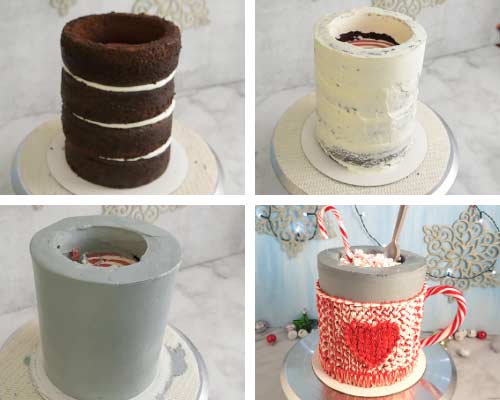
- Once you have 3 cake layers stacked insert drinking straws (5) into the cake. One straw goes in the center and then insert 4 more straws spaced out in a rectangle to about 2.5 inch from the center straw. Cut the drinking straws to height of the cake with scissors.

CRUMB COAT THE CAKE
What is a Crumb coat layer of buttercream ? Crumb coat is the 1st layer of buttercream smoothed onto the cake to seal all the cake crumbs. This way cake crumbs won’t get mixed into a final coat of buttercream.
Crumb coat the cake with uncolored buttercream and then refrigerate cake until firm, about an hour.
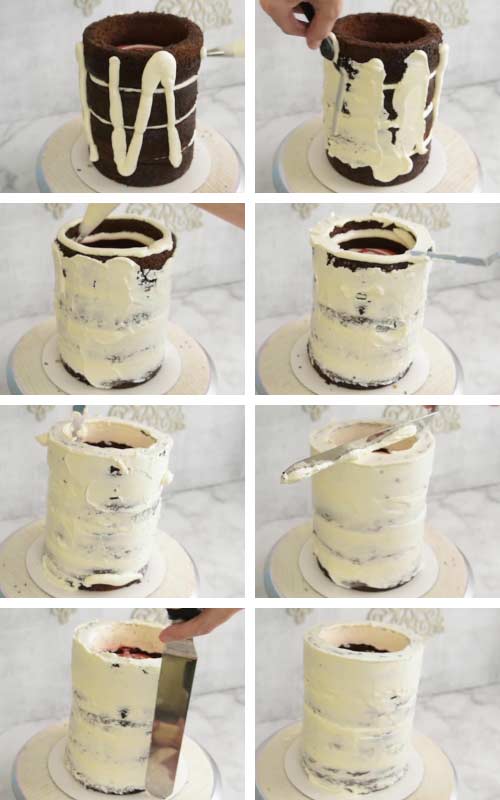
FROST THE CAKE
Color remaining white buttercream (not buttercream that is in the piping bags) with black gel food coloring. Again, follow my How to Color Swiss Buttercream Guide.
Frost the outside of the cake with light gray buttercream. Chill until firm before continuing with the next step.

HOW CREATE MARBLED BUTTERCREAM KNITTED PATTERN
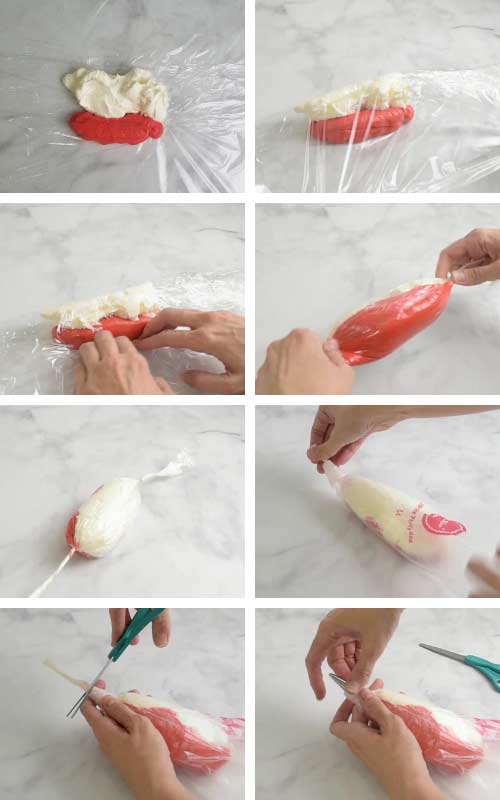
Pipe remaining white and red buttercream (buttercream in piping bags) onto a plastic wrap. Wrap buttercream into a plastic wrap. Twist the end and tie one end into a knot.
Fit a piping bag with a coupler, thread the end of the buttercream pouch through the hole. Trim the end of twisted plastic wrap with scissor. And then secure a small star piping tip #14 onto the coupler with a ring.
With a medium size heart cutter (3inch) make a shallow indentation onto the side of the chilled cake. Then mark the top line of the knitted design by lightly marking the perimeter of the cake with a toothpick.

- Decorate the sides of the cake with a simple knitted pattern using marbled red and white buttercream and a star tip #14. Pipe marbled buttercream around the heart shape.
- This simple knitted pattern consists of shell shaped borders. Another example of this shell border can be seen in my Knitted Sweater Cake.
- Decorate the bottom with piped zig zag pattern and top with a shell border. How to pipe a shell border.
- Once you are done piping with marbled buttercream you can squeeze it all out into a bowl. Stir well till you have a uniformed color. Color it with more red color if desired . Use this buttercream to pipe a rope design in the heart section using a star tip #14.
- Chill the cake with a knitted design until firm.

HOW TO MAKE FONDANT CANDY CANE MUG HOLDER
To make the mug handle I used fondant. Prepare a small batch of marshmallow fondant. You won’t need all of the fondant to make the handle. Measure about 1 cup of white fondant and knead about 1 tsp of tylose powder into the fondant. Tylose will make fondant dry faster and firmer.
Divide tylose cured fondant in half. Color one portion of fondant with red gel food coloring. Wear gloves when you color fondant. Also, have a small amount of Crisco and corn starch on hand. As you knead red gel color into white fondant add a pea size of Crisco to it, too. Knead it into the fondant with gel color. If fondant becomes too sticky add knead in little bit of corn starch.
Roll each color of fondant into a ball, flatten it slightly with a rolling pin. It is not necessary to use a round cutter. Cut each color of fondant into 8 wedges.
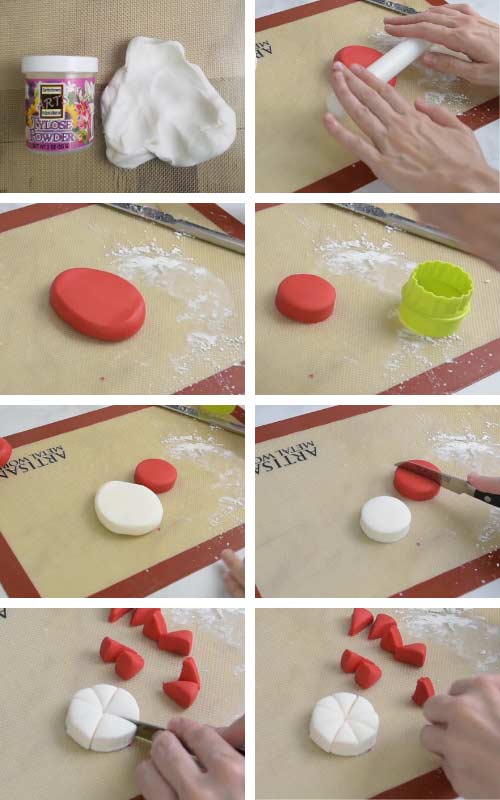
Glue pieces together as shown in the picture. Use a little bit of water and brush it on the sides of white and red fondant pieces.
Shape the disk with your hands into a log. Gently twist the ends to create candy cane pattern.
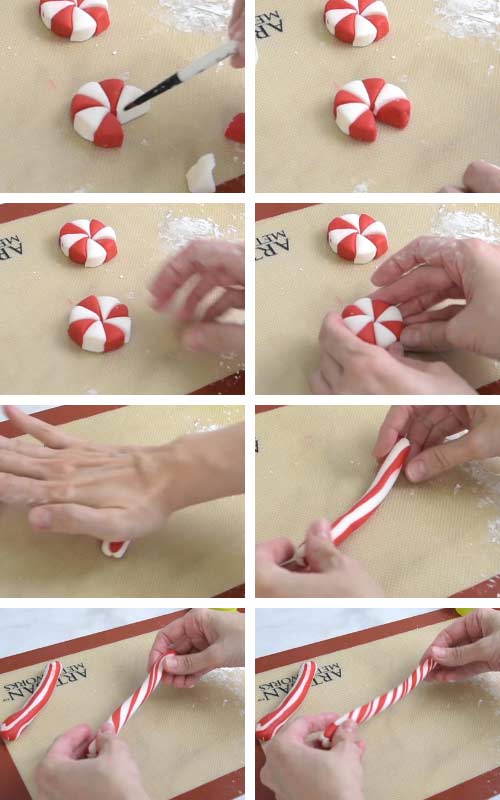
Shape the candy cane log using a heart cookie cutter (I used 4.5 inch cutter). Trim the ends and insert a toothpick into each end. Use a gentle twisting motion to insert the toothpick into a soft fondant. Let candy cane mug handle dry for several hours or overnight, until firm.

CHOCOLATE SILVER SPOONS
Melt 1/3 cup white candy melts. Add 3 or 4 disks of black candy melts. Stir until melted. Stir well till you have gray chocolate. Pour melted chocolate candy melts into a piping bag. Cut the tip of the piping bag and pipe chocolate into a clean spoon silicone mold. Give the mold a little shake to smooth the chocolate. Chill for 20 minutes.
Carefully remove chocolate spoons from the mold. I had couple of them break. It’s an easy fix. Heat a plate in the microwave for a minute or two. Soften the ends of the broken chocolate spoon using a gentle heat from the plate and immediately press the ends together. Let chocolate harden.

Dust chocolate spoon with a dry silver luster dust. Be sure to use a dry food only paint brush.
Then heat a toothpick in a microwave. Actually you can do this before you brush luster dust on the chocolate spoon. Very carefully and with a twisting motion insert heated tip of a toothpick into the spoon. Don’t put too much pressure on the toothpick or chocolate will crack. Rather heat the toothpick again and repeat.

CRUSHED CANDY CANES
To make crushed candy cane powder place unwrapped candy canes into a small bag. Place a kitchen towel over the bag. Then either using a meat tenderized or a rolling pin stike the candy canes until they are broken up into a fine dust.

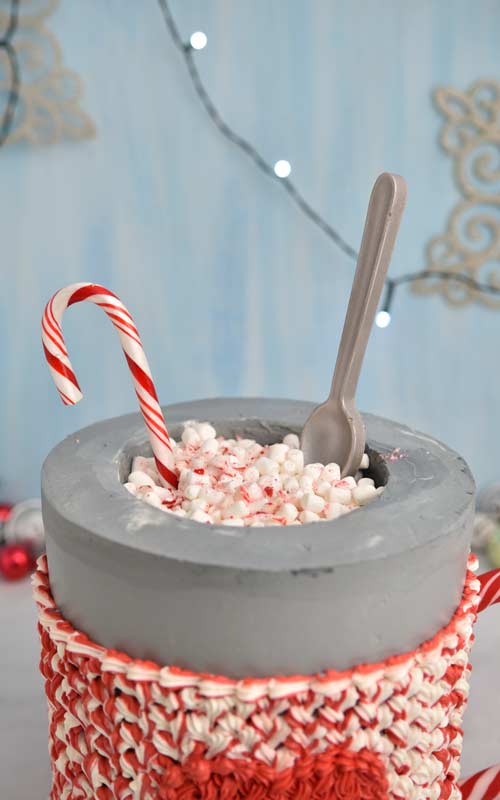
HOT COCOA MUG CAKE ASSEMBLY
Prepare ganache and pipe it into the top cavity, up to about ½ inch down from the top. Carefully insert the chocolate silver spoon. Fill the cavity with micro marshmallows or use mini marshmallows. They work just as well.
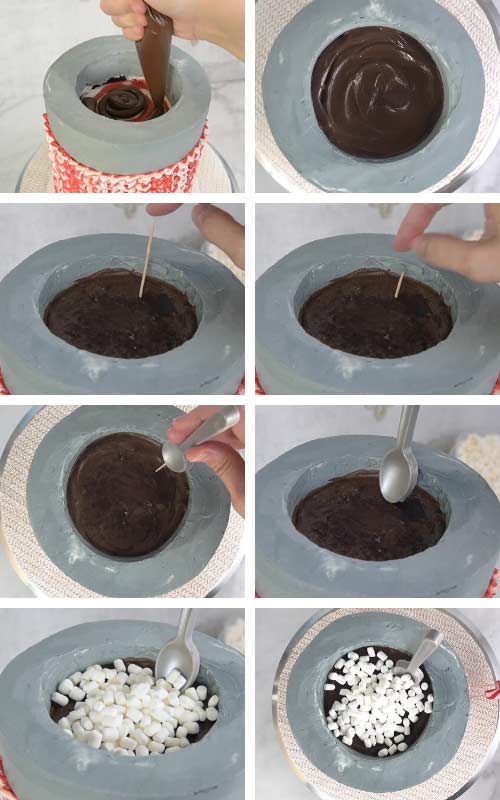
Insert candy cane mug handle.

Sprinkle generous amount of crushed candy cane powder onto the marshmallows. Then make a hole in the cake with a bamboo stick or a lollipop stick. And lastly to make this festive Hot Cocoa Mug Cake complete insert an unwrapped candy cane into the cake.

You can prepare this cake ahead of time and store it in the fridge for up to 3 days or so. Serve the cake at room temperature. I’d say bring out of the fridge at least an hour before serving.
TO MAKE HOT COCOA MUG CAKE YOU NEED
- RECIPES (see recipe card below for all the recipes)
- Chocolate Cake
- Peppermint Swiss Buttercream
- Coffee Syrup
- Small Batch Marshmallow Fondant
- Ganache
- TOOLS
- Get all the tool in my Amazon Shop
- 6 inch cake pans
- Parchment
- Spatulas, Buttercream Smoother
- Tylose Powder
- Gel Food Colors : red, black
- Piping Bags
- Piping Tips : 2 – round piping tips #12, star tip #14
- Coupler
- White and Black Chocolate Candy Melts
- Spoon Silicone Mold
- Silver Luster Dust
- Food Only Paint Brush
- Crisco, Knife, Corn Starch, Toothpick, Drinking Straws, Scissors
- HOT COCOA MUG CAKE –DETAILED VIDEO TUTORIAL WITH NARRATION

MORE FUN CANDY CANE TREATS :
- Candy Cane Peppermint Patties
- Christmas Tree Candy Cane Cake Roll
- Starbucks Peppermint Mocha Cakes in Red Edible Cups
- Candy Cane Icebox Cake
- Easy Candy Cane Cookies

Hot Cocoa Mug Cake
Ingredients
Chocolate Cake
- 3 cup sugar
- 2 3/4 cup all purpose flour
- 1 cup unsweetened cocoa
- 2 tsp baking soda
- 2 1/4 tsp baking powder
- 1 tsp table salt
- 4 eggs at room temperature
- 1 1/2 cup buttermilk at room temperature (make your own : measure 1 1/2 cup milk into a bowl, remove 1 tbsp milk and replace it with lemon juice or white distilled vinegar. Let sit for 5 minutes. Then whisk well.)
- 2/3 cup oil
- 1 tbsp Vanilla Extract
- 1/2 tsp Almond Extract
- 1 to 2 tbsp espresso powder
- 1 1/2 cup boiling water
Peppermint Swiss Buttercream
- 2 batches of Swiss Buttercream (see recipe notes)
- 10-15 drops Lorann Peppermint Oil Candy Flavoring or use 1/2 to 1 tsp peppermint extract
Coffee Sugar Syrup
- 1 1/2 cup water
- 1 cup sugar
- 1 tbsp espresso powder
- 1 tsp Vanilla Extract
Ganache
- 1 1/2 cup dark chopped chocolate
- 2/3 cup whipping cream
Small Batch Marshmallow Fondant
- 4 oz mini marshmallows (115 grams)
- 1/2 lb powdered sugar (2cups, 227grams)
- 1/2 to 1 tbsp water
- 1-2 tbsp Crisco
- 1/4 tsp Vanilla, Lemon, Almond Extract
- corn starch as needed
Instructions
CHOCOLATE CAKE
- Preheat oven to 350F. Spray 4 6 inch cake pans with a non stick spray. Line the bottom with a parchment round. Spray again with a non stick spray with flour. Or butter and dust pans with flour. Shake out excess flour and set aside.
- In a large bowl sift flour (2 cup and 3/4c up), granulated sugar (3 cups), unsweetened cocoa powder (1 cup), baking soda (2 tsp), baking powder (2 and 1/4 tsp) and table salt (1 tsp). Set aside
- In another bowl whisk together eggs (4 large eggs at room temperature), buttermilk ( 1 cup and 1/2 cup), oil (2/3 cup), Vanilla Extract (1 tbsp), Almond Extract (1/2 tsp).
- Bring water (1 cup and 1/2 cup) to boil, whisk in espresso powder (1 to 2 tbsp).
- Pour wet ingredients (egg mixture, not boiling water) into dry ingredients and beat with a hand held mixer for about 3 minutes, until well combined. Then gradually using medium speed beat in boiling hot water mixed with espresso powder. Mixture will be fluid and it will appear runnier than other cake batters. This is normal.
- Divide cake batter into prepared cake pans.
Bake Chocolate Cakes
- Bake 2 pans on the top oven rack (about 2/3) and 2 cake pans on the bottom rack (1/3). Bake for 30 minutes, then rotate pans. Bottom ones to the top rack and top one to the bottom rack and continue baking for additional 20-25 minutes or until toothpick inserted in the center comes out clean.
- Remove baked cake from the oven and let cool for 20-25 minutes. Then run a dull knife along the edges and carefully invert cakes onto a cooling rack. Let cool for 20 more minutes. When cakes are lukewarm, wrap or cover cakes into plastic wrap or place them into ziploc bags. Let cool completely. Cakes stay soft and moist.
PEPPERMINT BUTTERCREAM
- Prepare 2 batches of Swiss Buttercream (see recipe notes for recipe). Flavor prepared vanilla Swiss Buttercream with peppermint extract or use concentrated Lorann Peppermint Oil. Use 1/2 to 1 tsp Peppermint Extract or 10-15 drops of concentrated Lorann Peppermint Candy Oil Flavoring.
COFFEE SYRUP
- In a sauce pan combine water (1 cup and 1/2 cup) and sugar (1 cup). Heat on medium until until sugar is dissolved. Bring mixture to simmer and cook for 10 minutes. Remove from heat and let cool. Then stir in Vanilla Extract (1 tsp) and espresso powder (1 tbsp). Set aside. Can be prepared up to week ahead. Store in the fridge.
GANACHE
- Measure 1 1/2 cup chocolate into a heat proof bowl. Use either semi sweet chocolate chips or chop chocolate bar into smaller pieces. Heat whipping cream (2/3 cup) till almost boiling. Pour hot cream over chopped chocolate, cover with a paper towel and a plate, let sit for 3 minutes. Then whisk well until smooth. Let cool to room temperature.
SMALL BATCH MARSHMALLOW FONDANT
- Coat a wooden spoon with cricso. Measure powdered sugar(2 cups, 1/2 lb) into a medium size bowl. If sugar appears to have lots of lumps be sure to sift it. Measure mini marshmallows (4 oz, 115 grams) into a microwave safe bowl. Pour in water(1/2 to 1 tbsp). Heat marshmallows in the microwave in 15 second intervals stirring well after each time, until all of the marshmallows are melted. Try not to over heat. Once melted stir in extract (almond, vanilla or lemon – 1/4 tsp).
- Then scrape out melted marshmallows and pour sticky mixture over powder sugar. First stir mixture with a wooden spoon coated with crisco, stir until somewhat combined. Then coat your hands with crisco and knead the mixture until homogeneous and smooth.
- Coat white marshmallow fondant with a thin layer of crisco, cover tightly with a plastic wrap and refrigerate for at least an hour or so. Best to let it rest overnight. Marshmallow fondant can be prepared ahead and stored in the fridge, well covered for up to a month.
Notes
WHERE IS RECIPE FOR SWISS BUTTERCREAM ?
Here is the recipe for Swiss Buttercream I use. To make Hot Cocoa Mug Cake you’ll need 2 batches of Swiss Buttercream. It can be made all at once, simply double the recipe.DO I HAVE TO USE COFFEE IN SUGAR SYRUP?
No, you don’t. You can omit coffee and use vanilla syrup or use vanilla and chocolate extracts or you can spike it up with flavored liqueur.CAN I USE AMERICAN BUTTERCREAM INSTEAD OF SWISS BUTTERCREAM?
Sure, you can use American Buttercream.I DON’T HAVE BUTTERMILK WHAT NOW?
make your own : measure 1 1/2 cup milk into a bowl, remove 1 tbsp milk and replace it with lemon juice or white distilled vinegar. Let sit for 5 minutes. Then whisk well.This post contains Amazon affiliate links that earn me a small commission, at no cost to you. I only recommend products that I use and love. Learn more about my affiliate policy here.

Hi, I’m Hani
Welcome!
Thank you for visiting Haniela’s. On my blog, you’ll find delicious sweet & savory recipes made with simple ingredients. Why not start a new adventure? Discover a world of cookie decorating with my step-by-step tutorials.

Hi, I’m Hani
Welcome!
Thank you for visiting Haniela’s. On my blog, you’ll find delicious sweet & savory recipes made with simple ingredients. Why not start a new adventure? Discover a world of cookie decorating with my step-by-step tutorials.


Lots of love you put into this adorable cake! The peppermint candy, the spoon, and so clever in shaping the cup handle! As far as taste…. it’s gotta be delicious with all those flavors!!!