Decorated Baseball Cookies with Royal Icing
Celebrate the win of your team with realistically decorated baseball cookies.
HOW TO MAKE DECORATED BASEBALL COOKIES WITH ROYAL ICING
Are you planning a baseball-themed birthday party, or perhaps you want to cheer up a friend who is a baseball enthusiast? Below you’ll find step-by-step instructions on how to decorate baseball cookies with basic decorating tools.
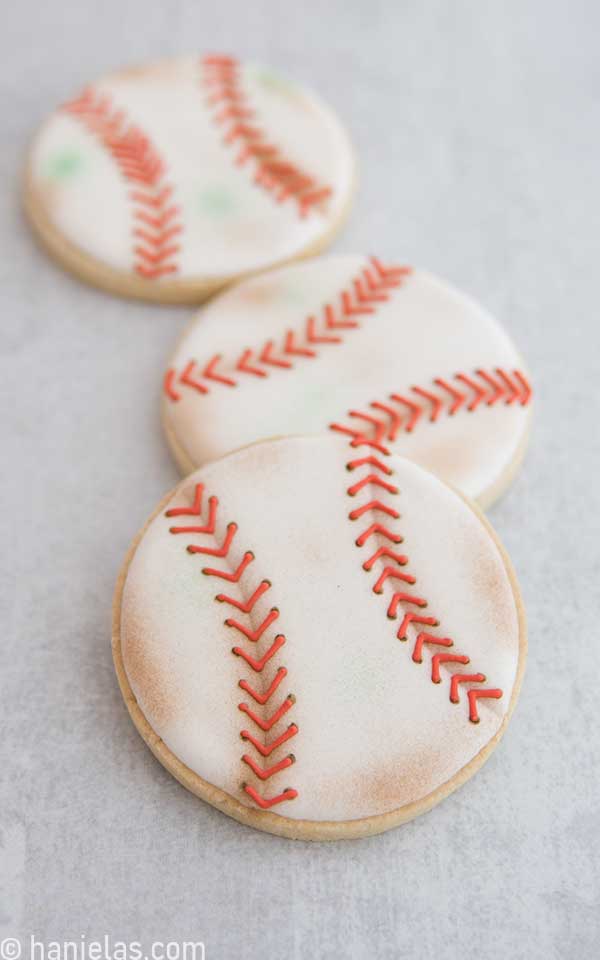
I use an airbrush in this cookie decorating tutorial to give the baseball a “dirty” appearance. Don’t worry if you don’t have an airbrush.an I’ll share an alternative way to achieve the “dirty” baseball look.
TO MAKE DECORATED BASEBALL COOKIES YOU NEED
- Round cookie cutter (3-inch)
- Template
- Scribe
- Piping bags
- Gel Food Colors: super red (Americolor Brand)
- Edible markers
- Airbrush
- Airbrush colors: brown, green
- Brown petal dust
- Paintbrush
This post contains Amazon affiliate links that earn me a small commission, at no cost to you. I only recommend products that I use and love. Learn more about my affiliate policy here.
- Beginner’s Guide To Cookie Decorating
- Ultimate Guide to Cut-Out Cookies (tips, tricks, troubleshooting)
- Royal Icing Recipe
- Small Batch Royal Icing Recipe
- Cookie Icing Recipes (includes vegan royal icing, glaze, fondant)
- Guide To Royal Icing Consistencies with Visual Help(what is stiff, flood icing, etc.)
- How To Freeze Royal Icing
- How To Make Royal Icing Transfers
- Royal Icing FAQ ( for example: how to make black icing, color bleeding, storage, and more)
- How To Make a Cookie Cutter Template
- Ultimate Guide To Cookie Decorating Tools
STEP 1: ICE ROUND COOKIES WITH ROYAL ICING
Start by tracing the decorating guide onto a cookie with an edible marker. Then outline and flood the middle section with 15-second consistency white icing. Use a scribe tool to smooth and evenly distribute the icing. Let the icing crust well, for about 30 minutes (steps 1-8).
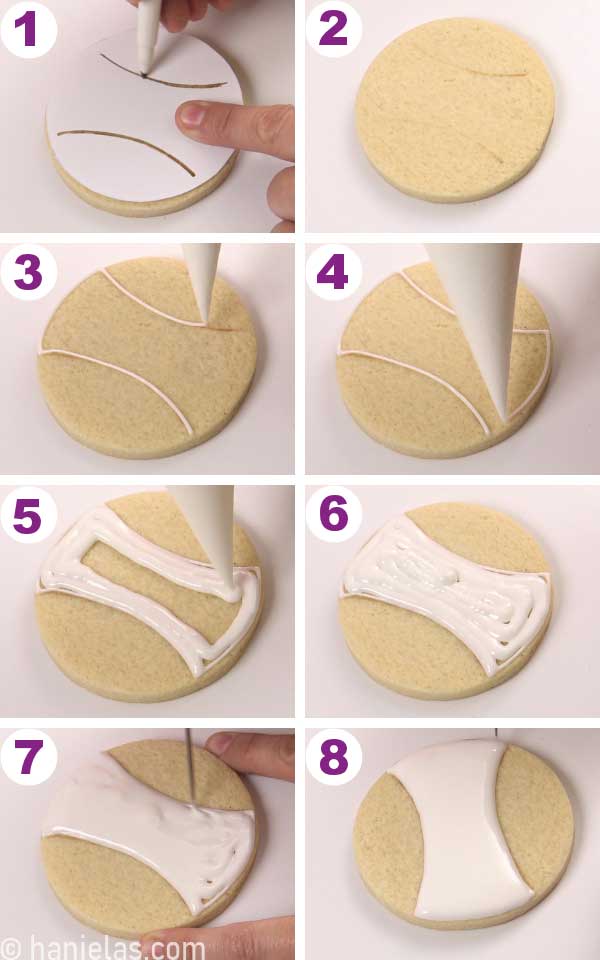
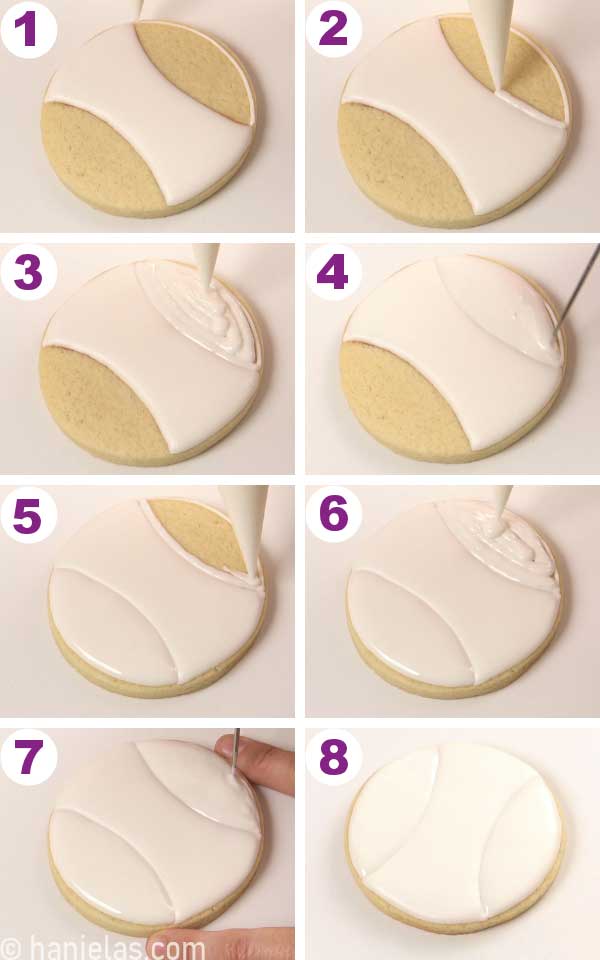
Once the middle section is well-crusted, outline and flood both sections on each side (steps 1-8).
STEP 2: AIRBRUSHING
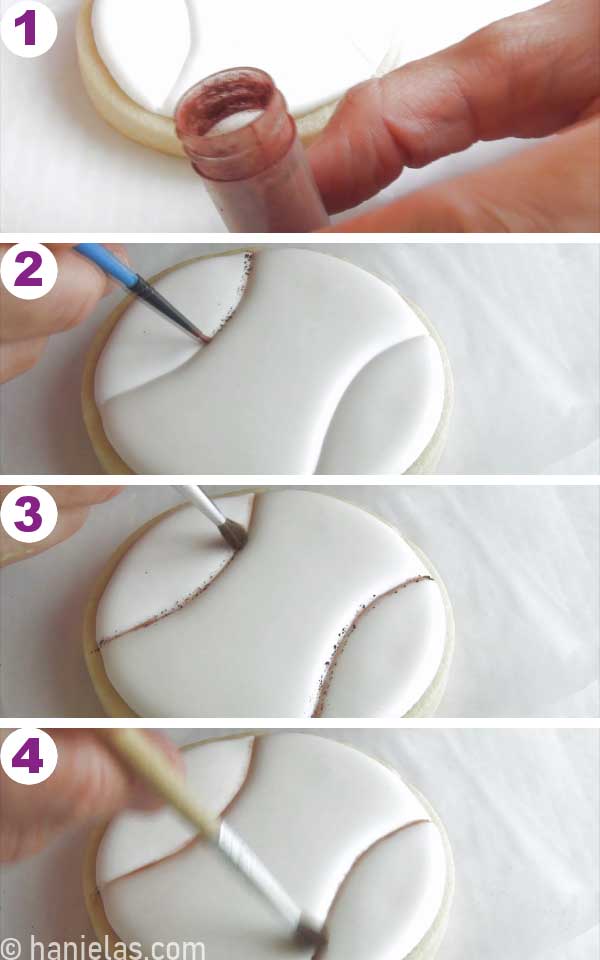
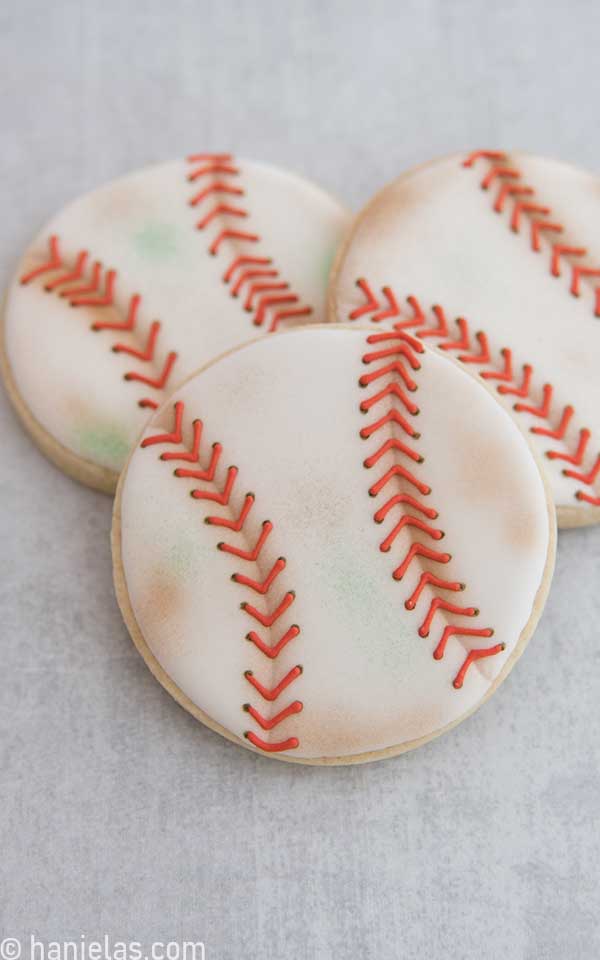
The purpose of airbrushing is to create a high level of realism. And so, if you have a food-only airbrush, you can quickly give the baseball cookies an upgrade with just a few strokes. To “dirty” up the baseball cookie, I used brown airbrush color and also some green for grass marks. If you don’t have an airbrush, keep on reading. Below I’ll share an alternative to airbrushing that you can use to decorate baseball cookies.

If airbrushing is out of the question, you can use several things to “dirty” up the baseball. You can use brown petal dust. Dip a dry food-only paintbrush in brown petal dust and then apply the dust onto the seams. Brush it on well with a dry, fluffier brush (steps 1-4). You can try ground cinnamon if you don’t have brown petal dust.
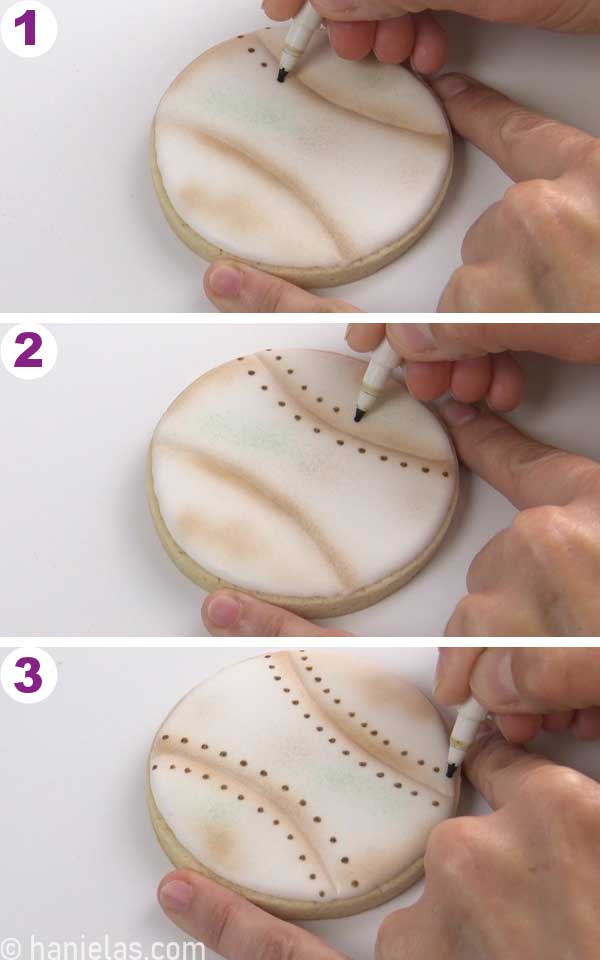
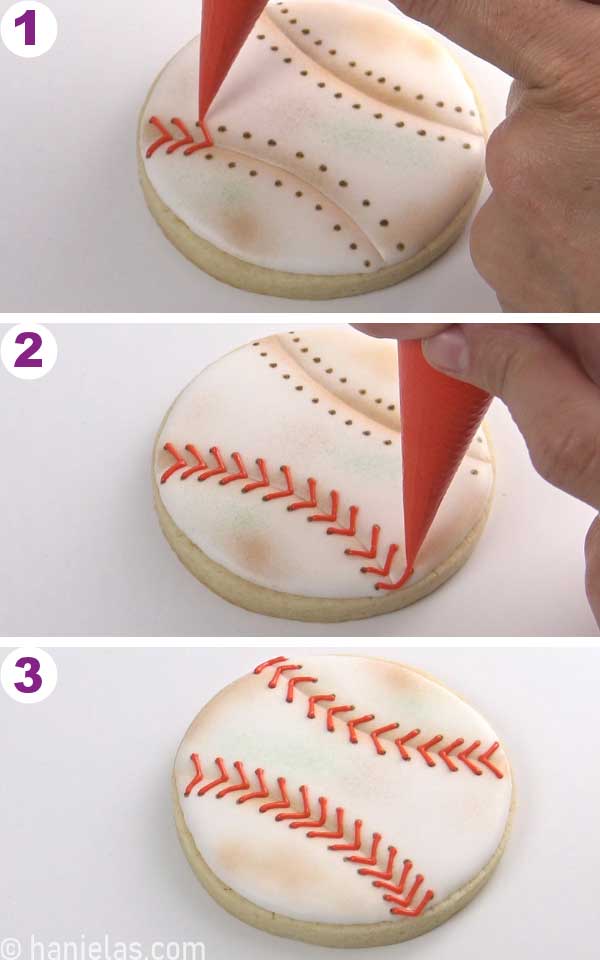
STEP 3: BASEBALL STITCHING
To create the baseball stitching I used a simple technique, creating the depth with a brown edible marker (FooDoodlers).
Draw brown dots along the seams. Make the dots small but big enough so when you pipe the red stitch, red will not completely cover the dot (steps 1-3).
Now you can pipe the stitching with piping consistency red icing. Start each red line in the middle or slightly past the center of the brown dot. Remember that brown dots must remain partly visible for the realistic stitching effect. Repeat on both seams (steps 1-3).
I first released my tutorial on how to decorate baseball cookies using a simple stitching technique in 2014. In the image below, you can see the cookies from 2014 and 2023.
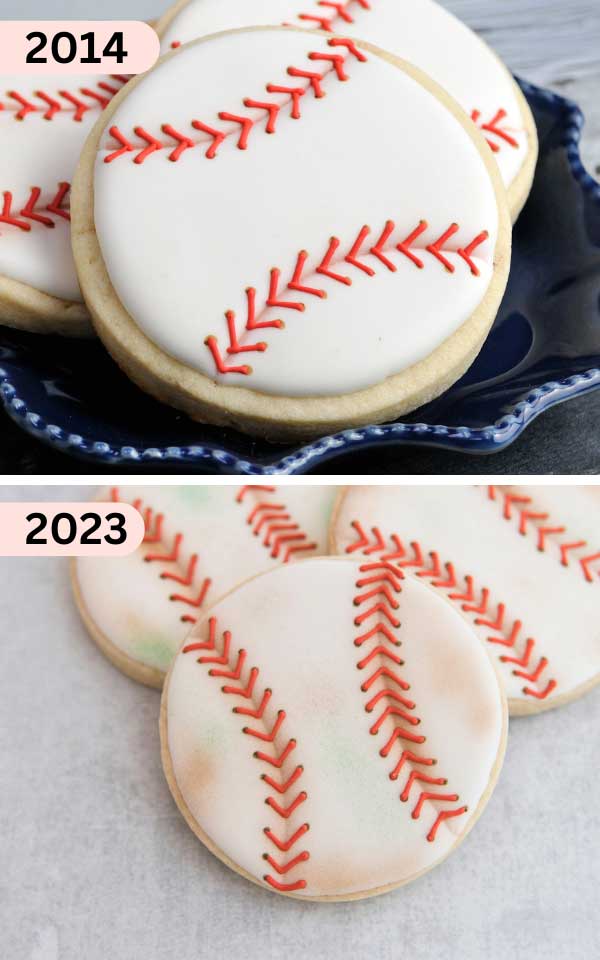
2023-shading created with airbrushing.
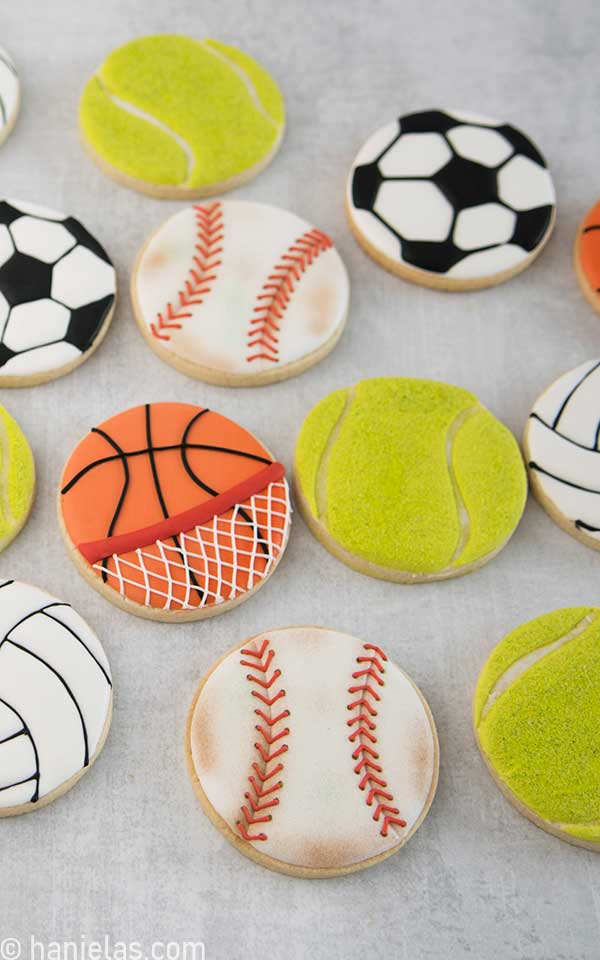
MAKE MORE SPORT COOKIES
- Soccer Ball Cookies
- Basketball Hoop Cupcakes
- Decorated Golf Cookies via Sweet Sugarbelle
- Tennis Ball Cookies
- Basketball Cookies

Hi, I’m Hani
Welcome!
Thank you for visiting Haniela’s. On my blog, you’ll find delicious sweet & savory recipes made with simple ingredients. Why not start a new adventure? Discover a world of cookie decorating with my step-by-step tutorials.

Hi, I’m Hani
Welcome!
Thank you for visiting Haniela’s. On my blog, you’ll find delicious sweet & savory recipes made with simple ingredients. Why not start a new adventure? Discover a world of cookie decorating with my step-by-step tutorials.