
Family Favorite Coconut Lamingtons Recipe |Soft and Freezer Friendly|
These coconut lamingtons are a recipe I’ve been making for over two decades, and they’ve never let me down. Passed down in my family, this is one of those timeless bakes that’s simple, reliable, and always a crowd favorite.

updated from 2010
WHY I LOVE COCONUT LAMINGTONS
- Childhood memories – In Slovakia, these coconut lamingtons are called “Coconut Hedgehogs”. It’s a playful name inspired by their fluffy coconut coating that resembles tiny spines. It’s a nostalgic treat I grew up with, though I didn’t learn about its history until I moved to the USA.
- One-bowl sponge cake – This cake is made using a simple one-bowl sponge, enriched with honey, which keeps it incredibly moist and tender with a texture that stays beautiful for days.
- Excellent shelf life – Glaze-coated and coconut-dipped cakes stay fresh for 2 weeks. I store them in the fridge, layered between wax paper.
- Freezer-friendly – The fact that they freeze beautifully is something I take full advantage of. Having a batch tucked away in the freezer has saved me more than once when unexpected guests show up, or I need a quick, homemade dessert to take to a party.
- Delicious, unique glaze – I love how the glaze comes together, without the need for chocolate or heavy cream. It’s made with good-quality cocoa powder, butter, and powdered sugar.
- My husband’s and crowd favorite – My hubby has a very limited list of desserts he enjoys, and this is one of them. And of course, it doesn’t hurt that it’s always a hit at gatherings, parties, and family dinners.
- Versatile -While I like them unfilled, they are easily filled with a variety of fillings like whipped cream, pastry cream, Nutella, jam, or lemon curd.
WHAT ARE COCONUT LAMINGTONS
Lamingtons are made from sponge cake or butter cake. The cake is cut into squares or rectangles. Each piece of cake is then dipped into chocolate glaze and rolled in shredded desiccated coconut. The cakes are then left to set. Resting is what gives the cakes their distinctive texture, for which they are known. As they rest, the flavors deepen, and the texture becomes even more tender and delicious.

THINGS YOU NEED
- Find all the tools in my AMAZON SHOP
- 9×13 USA Pan
- Parchment Paper
- Hand-Held Mixer
- Cooling Rack
- Vanilla Extract
This post contains Amazon affiliate links that earn me a small commission, at no cost to you. I only recommend products that I use and love. Learn more about my affiliate policy here.
INGREDIENTS

- Sponge Cake Ingredients
- Eggs
- Powdered sugar
- Oil or melted butter
- Honey
- Vanilla Extract
- All-purpose Flour
- Baking powder
- Salt

- Chocolate Glaze Ingredients
- Cocoa powder
- Powdered Sugar
- Cream of Tartar or Lemon Juice (optional)
- Butter
- Milk
- Vanilla Extract
- Dark Rum or Chocolate Liqueur (optional)
- Unsweetened dessicated coconut

PREPARE A BAKING PAN
To make the lamington sponge cake, I use a 9×13-inch pan, or a slightly larger pan is fine, too. Spray the pan with nonstick spray, or butter it and line it with parchment.

ONE BOWL SPONGE CAKE STEP BY STEP
This one-bowl sponge cake comes together quickly. The finished cake is delicate yet sturdy enough to dip in chocolate glaze and coat with coconut. Start by preparing the dry ingredients: sift or whisk together the flour, baking powder, and salt, then set aside.

CAKE BATTER

1. Beat whole, room-temperature eggs with powdered sugar for 5-10 minutes until a thick, pale foam forms (steps 1–3). Gradually add oil or melted butter to the egg foam and beat for a couple more minutes (steps 4–5). Then, mix in honey and vanilla extract (steps 6–9).

2. And now all you have to do is gradually beat in the flour mixture, alternating with room-temperature milk. Run a spatula down the sides and bottom to ensure everything is well mixed.
BAKE THE CAKE
Pour sponge cake batter into a prepared baking pan. Spread the batter evenly with a spatula (step 1-4).

Bake the sponge cake at 350°F (180°C ) for 20–25 minutes, or until a toothpick inserted in the center comes out clean (step 1). If the cake is browning too much, cover it with foil. Let the cake cool in the pan for about 10 minutes, then invert it onto a cooling rack. Peel off the parchment and allow the cake to cool completely (steps 2–4). To transfer the cooled cake to a cutting board, place the board on top of the cake. Holding both the cutting board and cooling rack, carefully flip the cake, then remove the cooling rack (steps 5–8).

CUT CAKE INTO CUBES
- Baked sponge cake is about 9×13 inches.
- Trim all sides by about ¼ to ½ inch. Now, the cake should be about 8×12 inches (steps 1-2).
- Use a ruler to mark cuts into the cake 2 inches apart, horizontally and vertically.
- Then I cut the cake into 2-inch squares or smaller, if you prefer.
- I cover the cakes with a kitchen towel while preparing the chocolate glaze so they don’t start to crust.
TIP: When using a very soft cake recipe (for example, a boxed yellow cake), allow the cake to rest overnight before cutting and dipping.

FILLINGS
If you’re not filling the cakes, you can move on to the dipping and coating step. Growing up, we’d make Lamingtons without fillings. Fillings can definitely kick it up a notch and make them extra fancy. They are a great way to add extra flavor and texture. It looks like, after some research, the most prevalent fillings include jam, pastry cream, and whipped cream. If you use any of the 2 latter two, keep in mind that both keep in the fridge for about 3-4 days.
- Popular Lamington Fillings:
- Nutella or other Chocolate, Nut Spread
- Pastry Cream
- German Buttercream
- Whipped Cream
- Jam or Raspberry Cake Filling
HOW TO FILL LAMINGTONS
- Sandwich style (filling is showing)
- Dip each cake into the chocolate glaze, then coat it in desiccated coconut.
- Let them sit for 30–60 minutes before slicing each cake horizontally.
- Fill with your choice of buttercream, whipped cream, or pastry cream.
- Spread the filling onto the cakes and sandwich them.
- Or for a more elegant display, use a large star piping tip.
- Sandwich style (filling is not showing)
- For fillings like jam or buttercream, you can slice the cake horizontally first, then spread the filling between the layers.
- Refrigerate for several hours to allow the layers to set and adhere together.
- Then cut the cake into squares or rectangles, dip each piece in the chocolate glaze, and coat with desiccated coconut.
- Injection style (‘sink the bismark’)
- Another way to fill lamingtons is to use a Bismarck filling tip – it is a long, narrow, tube-like piping tip with a pointy end and is commonly used to inject fillings into donuts and eclairs.
- This method keeps the cake whole; you don’t need to cut it horizontally.
- Insert the long nozzle into the cake, and squeeze the piping bag filled with filling to deposit the filling inside the cake.
- Then dip the cake in chocolate glaze and coat it with coconut.


CHOCOLATE GLAZE
For the richest chocolate flavor, use a good-quality cocoa powder. I’ve made this glaze with cocoa powders ranging from 10% to 16% cocoa butter, and all have produced excellent results. A higher cocoa butter content adds a richer, more rounded chocolate flavor, but quintessential natural cocoa powder works beautifully in this recipe.

1. Continuous stirring prevents the glaze from sticking to the bottom of the pan and scorching. If the glaze burns, even slightly, it will develop a bitter flavor that cannot be corrected, so it’s best to discard it and start over.
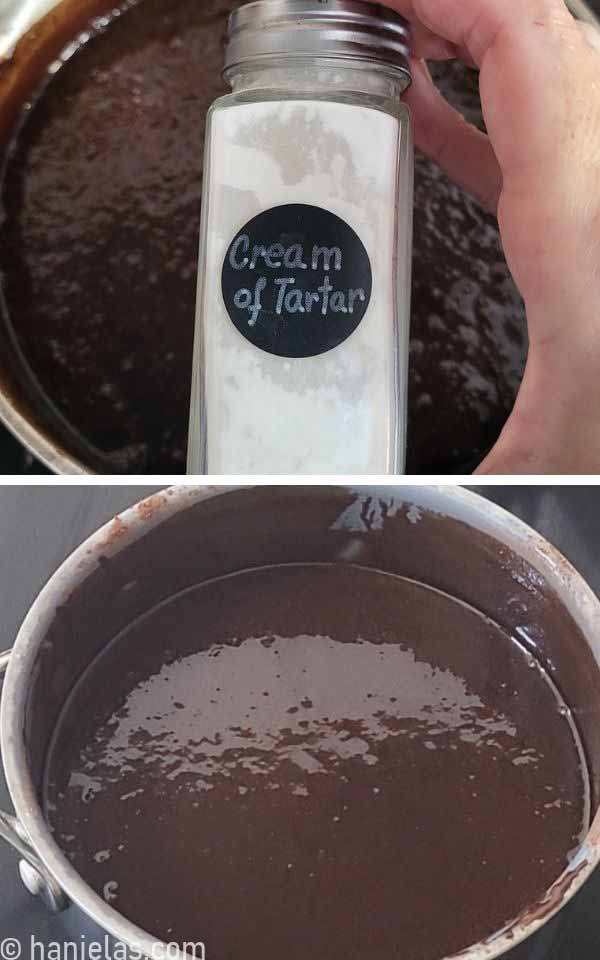
2. TIP: One of my favorite tricks for preventing crystallization is adding ¼ teaspoon of cream of tartar. It helps keep the sauce silky smooth and reduces the risk of a grainy texture.
COAT THE LAMINGTONS
The Secret to Even Coating: Instead of dipping one cake at a time, place 3–6 sponge squares into the warm chocolate glaze together. A brief soak allows the sponge to absorb the glaze more evenly, creating moister lamingtons while making the coating process faster and more efficient.
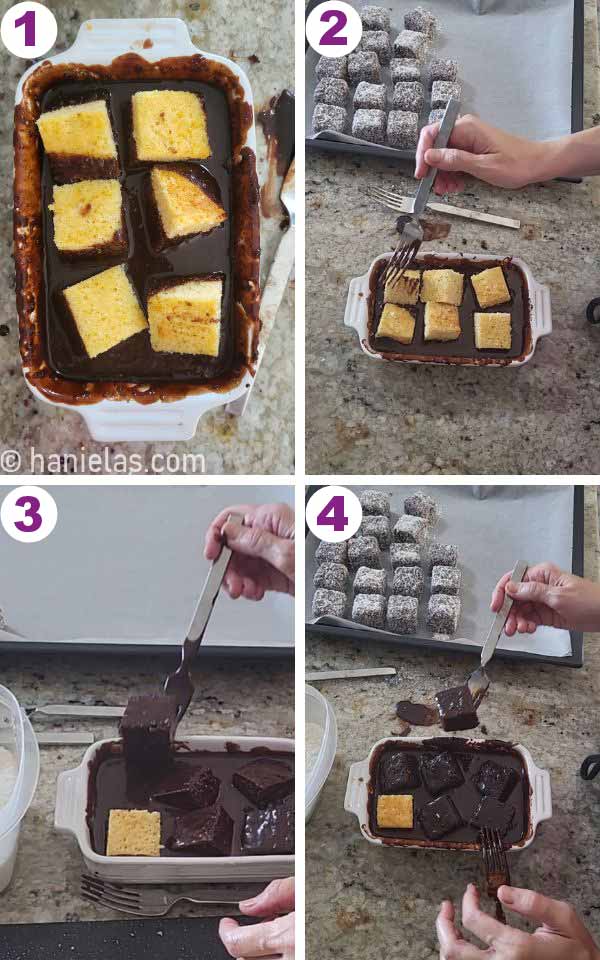
1. Using a fork, gently turn the cakes until all sides are coated. Lift one cake from the glaze, scraping the bottom of the fork against the rim of the bowl to remove any excess glaze before transferring it to the coconut.
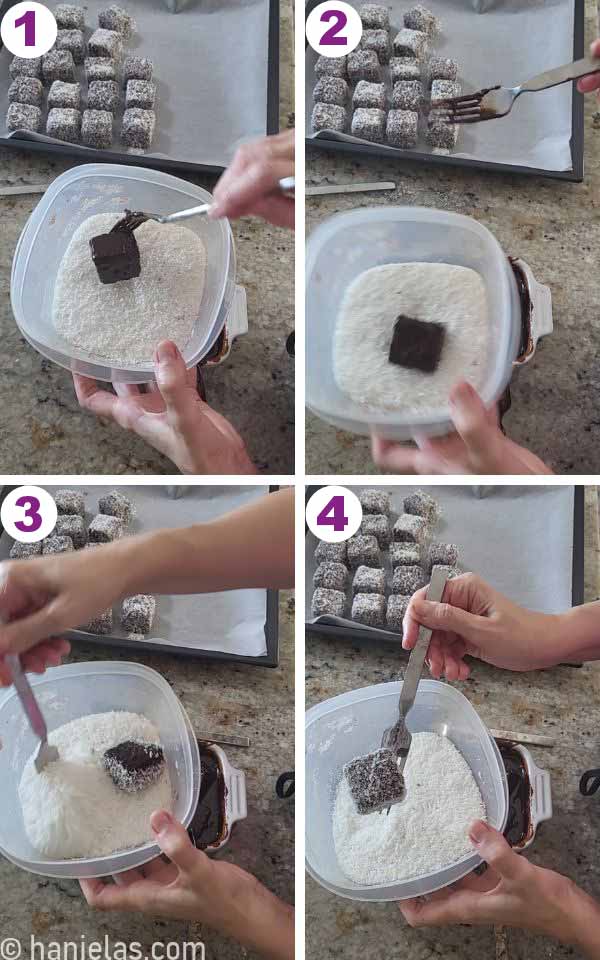
2. Toss the cake gently in the desiccated coconut until evenly coated, using a fork to help cover all sides if you prefer to keep your hands clean. Place the finished lamington on a parchment- or wax-paper-lined tray and repeat with the remaining cakes, replenishing the bowl with more sponge squares as you work.
TIP: Keep the chocolate glaze warm throughout the coating process. As it cools, it will thicken, making it harder for the sponge to absorb the glaze evenly. Gently rewarm it as needed to maintain a smooth, pourable consistency.
FREEZING AND STORAGE
One of the best things about coconut lamingtons is how well they keep. They’ll stay fresh in an airtight container in the refrigerator for up to 10 days, and they freeze beautifully if you want to make them ahead.
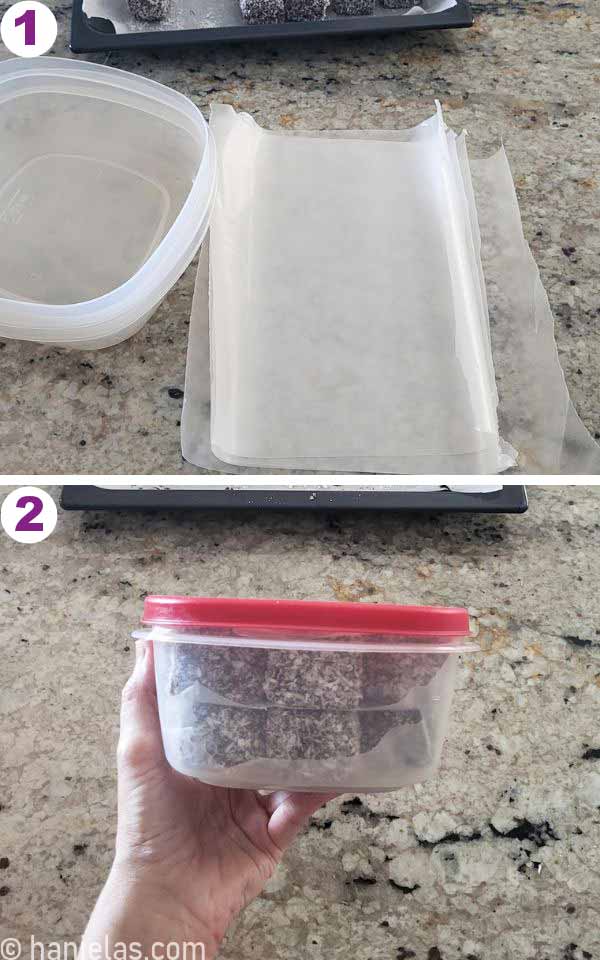
Freeze Lamingtons: Freeze the coated lamingtons in an airtight container, separating the layers with wax or parchment paper, for up to 4 months.
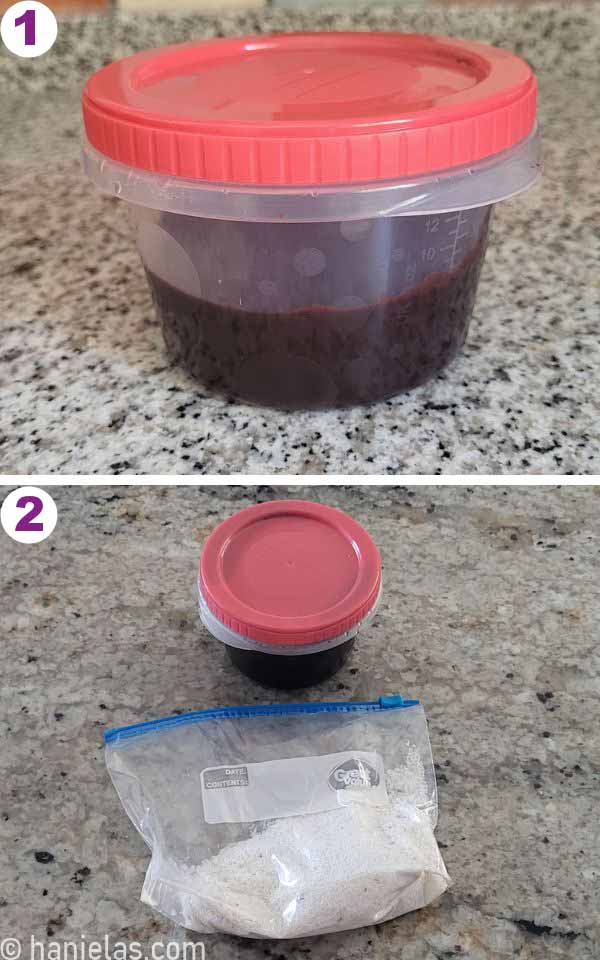
Save the Leftovers: Freeze leftover chocolate glaze and coconut separately for up to 4 months. Reuse them for another batch of lamingtons or turn them into cake balls.
FAQ & SUCCESS TIPS
- how long do lamingtons keep?
- how should I store coconut cakes?
- can I bake the cake ahead?
- can I freeze lamingtons?
- is there a dairy-free lamington version?
- how should I serve them?
- can I use sweetened shredded coconut?
- the glaze is getting too thick to coat
- can I use something instead of coconut?
How long do lamingtons keep?
Store covered at room temperature for 2–3 days, or refrigerate in an airtight container for 10–14 days. Lamingtons filled with whipped cream or pastry cream keep in the fridge for up to 3 days.
How should I store coconut cakes?
Store them in an airtight container, layered between parchment or wax paper
Can I bake the cake ahead?
I often bake the cake in the evening and glaze it the next morning. Keep it well covered at room temperature with plastic wrap and a kitchen towel to prevent it from drying out.
Can I freeze lamingtons?
That is an astounding yes! I freeze them all the time, layered in a freezer-safe container layered between wax or parchment paper. They freeze well for up to 3-4 months.
Is there a dairy-free lamington version?
Substitute milk with a dairy-free alternative and use vegan butter/margarine, or half the amount of coconut oil, to prepare the chocolate glaze.
How should I serve them?
Lamingtons taste best after resting 12–24 hours in the fridge. While I often enjoy them chilled, it’s best to bring them to room temperature before serving.
Can I use sweetened shredded coconut?
- Unsweetened desiccated coconut is the traditional choice for coating lamingtons.
- Sweetened shredded coconut can be used instead, but it will make the cakes sweeter. To balance the flavor, reduce the glaze sugar by about ½ cup.
- Because sweetened shredded coconut contains more moisture than desiccated coconut, dry it slightly before using.
- Spread it on a baking sheet and bake at 200°F (95°C) for 10–15 minutes, tossing occasionally. Let it cool completely before coating the lamingtons.
The glaze is getting too thick to coat
As the glaze cools, it will thicken. To return it to a pourable consistency, gently rewarm it in the microwave.
I don’t care for coconut. Can I use something else?
You can use ground walnuts or almonds to coat the cakes.

MORE COCONUT TREATS
- Double Chocolate Cherry Coconut Cookies
- Coconut Cupcakes via Cooking Classy
- Dessicated Coconut Macaroons
- Whipped Coconut Cream
- Coconut Cake with Roasted Coconut


Lamingtons recipe
Ingredients
Sponge Cake
- 2 1/3 cup all purpose flour 330 grams
- 1 tbsp baking powder
- 1/2 tsp salt
- 4 large eggs, at room temperature
- 1 1/4 cup powdered sugar 150 grams
- 6 tbsp oil or melted butter 82-85 grams
- 2 tbsp honey 45 grams
- 1 tsp Vanilla Extract
- 1 cup milk, at room temperature 240-250 grams
Chocolate Glaze
- 2 1/2 cup powdered sugar 300 grams
- 1/2 cup cocoa powder 50 grams
- 1/4 tsp cream of tartar
- 6 tbsp milk 90-95 grams
- 1 cup unsalted butter, 2 sticks 226 grams
- 1/2 tsp Vanilla Extract
- 2 tbsp Rum or Chocolate Liqueur (optional)
Instructions
Preheat Oven
- Preheat oven to 350°F (180℃)
Baking Pan
- Line a 9×13-inch (23 cm-33 cm) cake pan with parchment.
Sponge Cake
- Into a bowl, combine all-purpose flour (2 cups and 1/3 cup, 330 grams), baking powder (1 tablespoon), and salt (1/2 tsp). Set aside.
- In a large bowl, beat 4 large eggs with powdered sugar (1 cup and 1/4 cup, 150 grams) on medium-high for 5-8 minutes, until pale in color. Then gradually beat in oil (6 tablespoons, 82-85 grams). Beat till well combined. Then beat in honey (2 tablespoons, 45 grams), and lastly add Vanilla Extract (1 teaspoon). Beat well.
- Gradually, on medium speed, beat in flour mixture, alternating with room-temperature milk (1 cup, 240-250 grams).Scrape the sides and bottom of the bowl with a spatula to ensure everything is well mixed together.Pour cake batter into a prepared 9×13-inch cake pan. Use a spatula to evenly distribute the batter into the pan.
Bake Sponge Cake
- Bake the cake in the preheated oven at 350℉ (180℃) for 20-25 minutes, until a toothpick inserted in the center comes out clean. Cool the cake in the pan for 5-10 minutes. Invert the cake onto a cooling rack, cover it with a kitchen towel, and cool completely.TIP: If you're short on time, cover the cake well and let it rest overnight before coating.
Cut Cake into Squares or Rectangles
- Trim the sides of the cake, about 1/4 to 1/2 inch off each side. Then cut the cake into 1.5-inch (4cm) to 2-inch (5cm) squares. Cover with a towel while you prepare the chocolate glaze so the cake doesn't crust around the edges.
Chocolate Glaze
- In a saucepan, combine powdered sugar (2 cups and 1/2 cups, 300 grams), cocoa powder (1/2 cup, 50 grams), cream of tartar (1/4 tsp), and milk (6 tablespoons, 90-95 grams ). Heat over low heat, stirring frequently, until the mixture is completely melted and smooth. Gradually add the butter, whisking until fully melted and the glaze is smooth and homogeneous. Do not leave the glaze unattended, as it can scorch on the bottom of the pan. Remove from the heat and stir in the 1/2 teaspoon of Vanilla extract and, if using, the 2 tablespoons of chocolate liqueur or dark rum.
Lamington Coating Process
- Pour the chocolate glaze into a bowl large enough to hold 3–6 sponge squares at a time. Add the sponge squares and use a fork to gently turn them until evenly coated.Lift one cake from the glaze with a fork, scraping the bottom of the fork against the rim of the bowl to remove any excess glaze.Transfer the coated cake to the coconut. Gently toss it until evenly coated, using a fork to help cover all sides.Place the finished lamington on a parchment- or wax paper-lined tray. Repeat with the remaining sponge squares, adding more cakes to the glaze as you work.TIP: Keep the chocolate glaze warm while dipping. As it cools, it will thicken; gently rewarm it as needed to maintain a smooth, pourable consistency.
Video
Notes
- What can I use if I don’t have cream of tartar? Use 1/2 tsp of freshly squeezed lemon juice.
This post was originally published on June 25th 2010. On May 2nd, 2020, and July 6th, 2026, I updated this post with new step-by-step photos, written text, and a video.

Hi, I’m Hani
Welcome!
Thank you for visiting Haniela’s. On my blog, you’ll find delicious sweet & savory recipes made with simple ingredients. Why not start a new adventure? Discover a world of cookie decorating with my step-by-step tutorials.

Hi, I’m Hani
Welcome!
Thank you for visiting Haniela’s. On my blog, you’ll find delicious sweet & savory recipes made with simple ingredients. Why not start a new adventure? Discover a world of cookie decorating with my step-by-step tutorials.




Finally made it!!!! Wonderful process, I shall write a little post about it, and give you all the credit!!!!! thank you, Hani…
I’m so glad you like them, Sallysan 🙂 ♥
A true labor of love! I only made a very small batch once and it was quite tricky, I need to make it again using your method
Thank you for such a detailed post, love the step by step photos…
Thank you so much Sally. It can be tricky to find the way to dip and coat them.
At the end they are so worth the time, especially when I know they will make someone happy 🙂
The sponge looks so delicate! What a yummy dessert.
Hi June, Thank you.
This looks delicious!! I have yet to try lamingtons but maybe i should try it after looking at how delicious yours look!
These look delicious, I've never tried lammingtons but I'll give these a go with the kids!
Haniela, I love you see your pictures, read your recipes and story tales about the recipes and other things….
I will have to try this recipe sometimes and I hope to make a wonderful picture as yours!!!