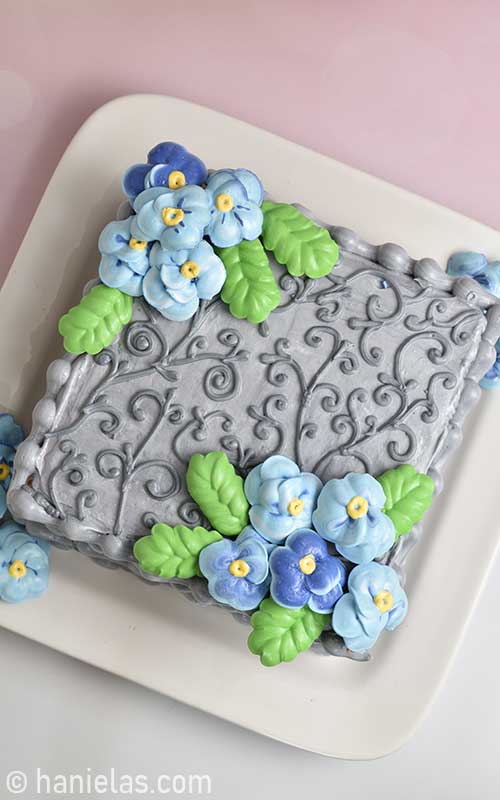
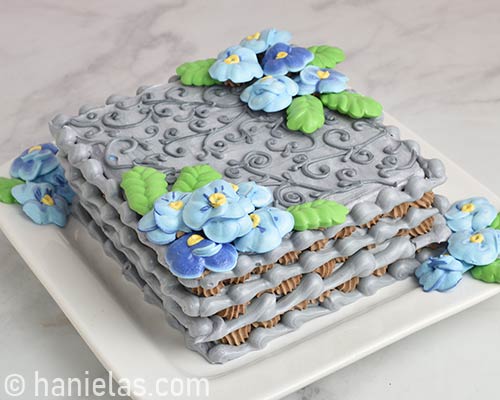
Pansy Meringue Cake
With extra egg whites on hand I decided to make a beautiful floral Pansy Meringue Cake filled with Chocolate Whipped Cream. Adorned with delicate pansy flowers it’s a perfect flourless Spring Cake.
I’m super excited to be teaming with my friend Amber of SweetAmbs in a Spring Pansy Flower Collaboration. Amber in her step by tutorial teaches you how to Paint beautiful Pansy Flowers with Food Coloring.
As you know I got an early start with my Pansy Mother’s Day Cookies and my step by step Royal Icing Pansy Flowers Tutorial few weeks ago. And so instead of decorated sugar cookies I decided to contribute with a meringue cake embellished with hand piped meringue pansy flower arrangements.
HOW TO MAKE PANSY MERINGUE CAKE
Meringue cakes are as the name suggests made from a meringue. These types of cakes and desserts are especially delicious paired with fruits, tangy curds, fruit cake fillings, nuts, coffee or dark chocolate. Today I paired sweet meringue with an easy to make Chocolate Whipped Cream.
- TABLE OF CONTENTS
- Prepare Meringue
- Meringue Cake Layers
- Pipe Filigree Design with Meringue
- Meringue Cake Decorations (Meringue Pansies and Leaves)
- Bake Meringue
- How to Store Baked Meringue
- Chocolate Whipped Cream Filling
- Meringue Cake Assembly
- Tools and Templates
- Collaboration with SweetAmbs
STEP 1 – PREPARE MERINGUE
First we have to prepare meringue. Meringue is made from egg whites.
In a clean and heat proof bowl whisk together egg whites, granulated sugar and strained lemon juice.
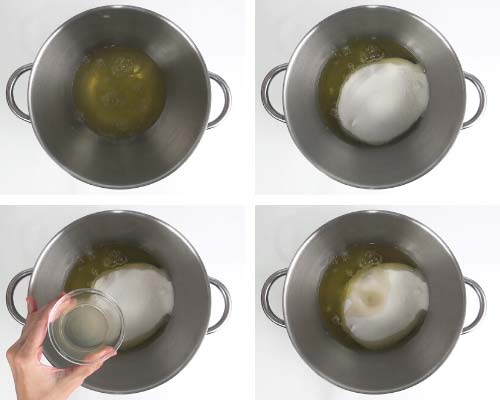
- Place the bowl with egg whites, sugar and lemon juice over a pot of simmering water.
- Whisk egg whites mixture constantly using a wire whisk. Until all of the sugar is completely dissolved. It is important that sugar is dissolved. Undissolved sugar crystals can cause sugar beading on the baked meringues.
- To test if sugar is dissolved rub the mixture between your fingers. It has to be smooth. If you feel graininess keep heating the mixture until all of the sugar is dissolved.
- Mixture will be white and soapy. This is normal.
- Once sugar is fully dissolved return the bowl to your mixer and whip the mixture using a wire attachment. Start at the low speed and then increase it to medium high.
- Try not to beat meringue at high speed. Beating meringue at high speed can cause cracks in baked meringues. Beat it until medium peaks are formed. Then beat in Vanilla Extract and corn starch.
- Continue beating meringue until stiff peaks are formed. Meringue should be glossy and smooth. Grainy meringue is a result of overbeating.

TIP : I’m adding corn starch to the meringue to stabilize it. Starch aids in moisture absorption. It’s especially helpful in humid, hot climates where meringue is more likely to weep. Corn starch can absorbs extra moisture leaving you with perfectly crisp meringues. And a meringue cake layers are also easier to cut.
STEP 2 – MERINGUE CAKE LAYERS
Use gel food colors to color meringue and use a folding mixing method Avoid stirring meringue as it will significantly deflate whipped meringue.
Scoop out about 2/3 of stiff whipped meringue into a clean bowl. Add couple of drops of black food color. Fold the meringue until light gray, (step 1-5). Fit a 16 inch piping bag with a cake icer tip. Fill a prepared piping bag with about 3/4 of colored gray meringue. Reserve some for the piped border and filigree design, (step 6-8).

Fit another piping bag with a Round Piping Tip #12 and fill the bag with 2/3 of remaining gray meringue.

STEP 3 – PIPE CAKE LAYERS
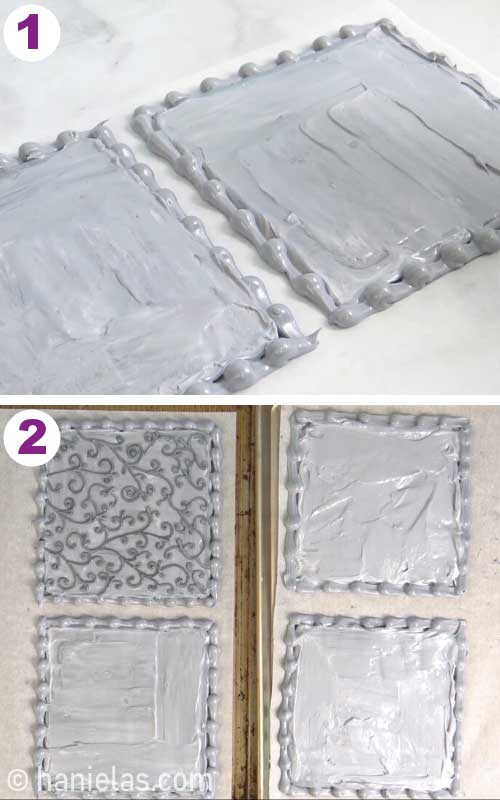
On 2 sheets of parchment trace a square outline using template (about 6×6 inch) and a pencil. Turn the parchment over so pencil marks are facing your work surface. You should have 2 parchment sheets with 4 square outlines.
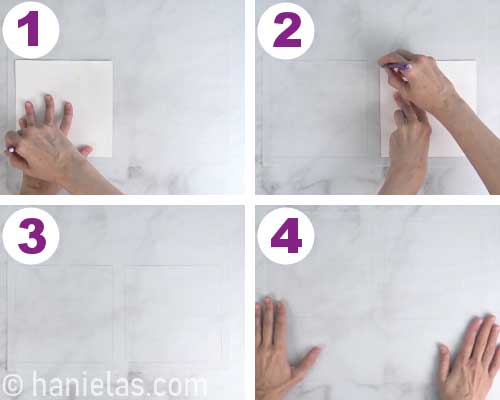
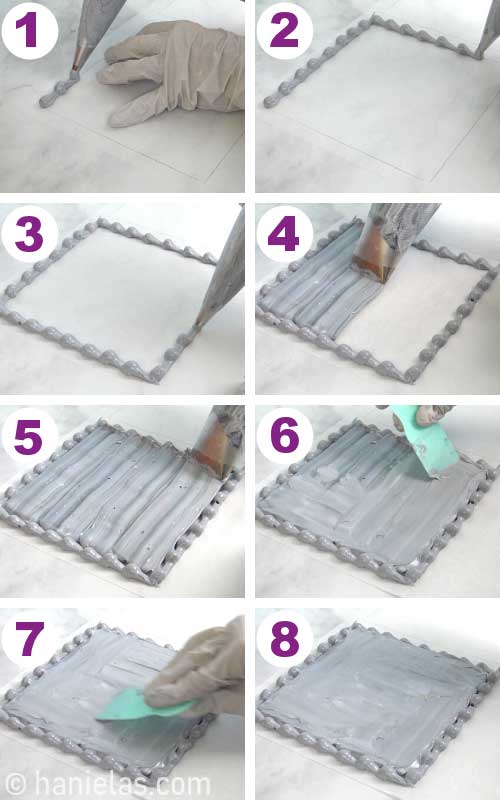
Pipe a simple border with a round piping tip #12, (step 1-3). Then take a large bag fitted with a cake icer and pipe strips of meringue inside. Smooth it out with a small spatula or a spreader, (step 4-8).
STEP 4 – PIPE FILIGREE DESIGN
Color remaining gray meringue with a little bit of black gel food coloring to make it darker gray. Fit the piping bag with a round piping tip #2, (step 1-4).
Take a filigree template and place it on a side for the reference. Pipe a swirly pattern onto one meringue cake layer.

STEP 5 – MERINGUE CAKE DECORATIONS
Divide remaining white meringue into 4 bowls. Color 1/3 of the meringue with royal blue to make light blue. Color about 3 tbsp with lemon yellow and a minuscule amount of orange to make golden yellow. Divide remaining meringue in half. If you have some gray meringue left squeeze it out into one of the bowls. Then color meringue in a bowl with gray with royal blue and regal purple. And lastly color last bowl of meringue with leaf green.

Layer dark indigo meringue onto a food wrap. Spread light blue meringue on the top. Form a pouch, (step 1-4). Prepare a piping bag. Fit a piping bag with a petal tip #104. Trim one end of the pouch and insert it into a prepared piping bag. Align indigo meringue stripe with a wide opening on a petal tip, (step 5-7). Fill another piping bag fitted with a round piping tip #2 with a golden yellow meringue, (step 8).

STEP 6- PIPE MERINGUE PANSIES
Pipe a small amount of meringue onto a flower nail, or alternatively use a double sided tape. Attach a parchment square onto a flower nail, (step 1-3).
Hold the piping bag at about 45 degree angle. Wide part of the piping tip should be facing center of the flower nail and narrow part of the tip should be facing out. Pipe the 1st petal. Squeeze the piping bag evenly. Turn the flower nail slowly, move piping bag outwards and then bring it in to finish the petal where you started off, stop squeezing and pull away, (step 4-5). Pipe the second petal slightly overlapping the first petal, (step 6-8).
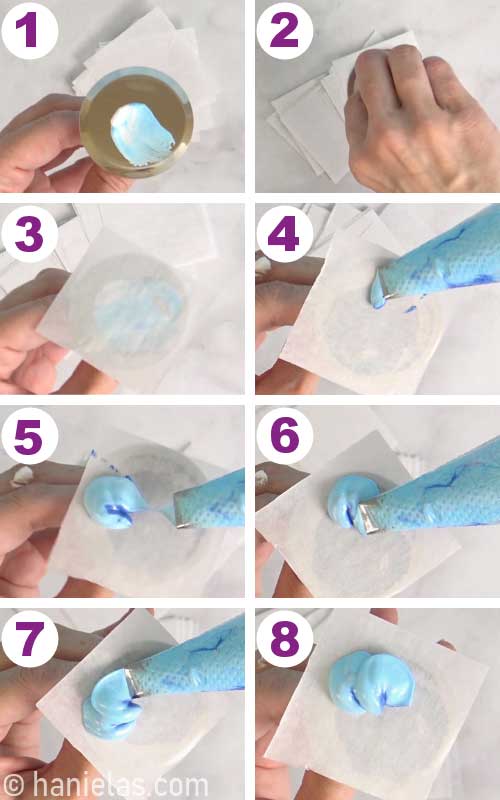
Pipe 2 more petals overlapping the first 2 petals, (step 2-3). Now with the same piping bag pipe ruffled petal along the open/bottom section. To pipe ruffled petal move piping bag back and forth as you squeeze the piping bag. Ruffled petal should be about the same width as 1st 2 back petals. Stop squeezing the piping bag and pull away, (step 4-6)
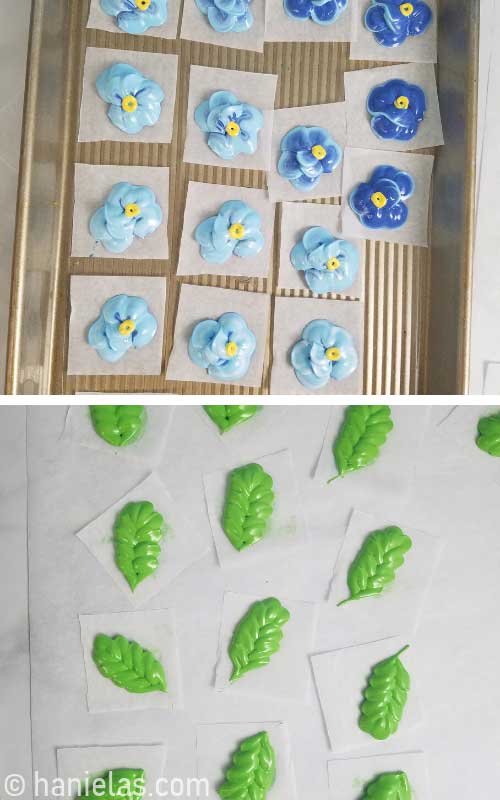
And now you can pipe a small center loop with golden yellow meringue, (step 7-8).

STEP 7 – PIPE WAVY LEAVES
To pipe the leaves I used a Petal Tip #101. Attach parchment square onto the flower nail. Hold the piping at about 45 degree angle. Start piping at the bottom center edge.
Squeeze the piping bag and move it away from you. Use back and worth motion to create wavy design. Once you come to the point where you want to start piping second half of the leaf turn the flower nail slightly. Move the piping bag towards you as you squeeze it. And with the same back and worth motion pipe the second half of the leaf.

Place piped flowers and leaves on baking sheet and/or fit them onto the baking sheets with meringue layers.
STEP 8 – BAKE MERINGUE
Bake meringues at 175F for 3 hours. Then turn off the oven and leave the meringues in the oven until the oven cools, about 2-3 hours.

Baker meringues should be stored immediately. Carefully peel off parchment paper from the flowers, leaves and baked meringue cake layers.

STEP 9 – HOW TO STORE BAKED MERINGUE COOKIES
Store baked meringue cookies immediately in an airtight container, layered between parchment sheets. Excessive moisture can cause meringues to become sticky. To combat moisture I like to add a small bowl of raw rice to a container along with meringues. I have stored baked meringues this way for 2 weeks with no issues.

STEP 10 – CHOCOLATE WHIPPED CREAM
To fill the cake I used a simple Chocolate Whipped Cream.
Beat chilled heavy whipping cream until frothy. Gradually beat in powdered sugar, (step 1-3). Then sift in cocoa powder and beat it in along with Vanilla Extract, (step 4-8).

Fit a piping bag with a Star Tip #32 an fill the bag with prepared Chocolate Whipped Cream.

STEP 11 – FILL MERINGUE CAKE
Assemble the pansy meringue cake for up 6 hours ahead.
Place meringue cake layer onto a plate. Pipe the filling on the top. Repeat until you are dong with all the layers, (step 1-8).
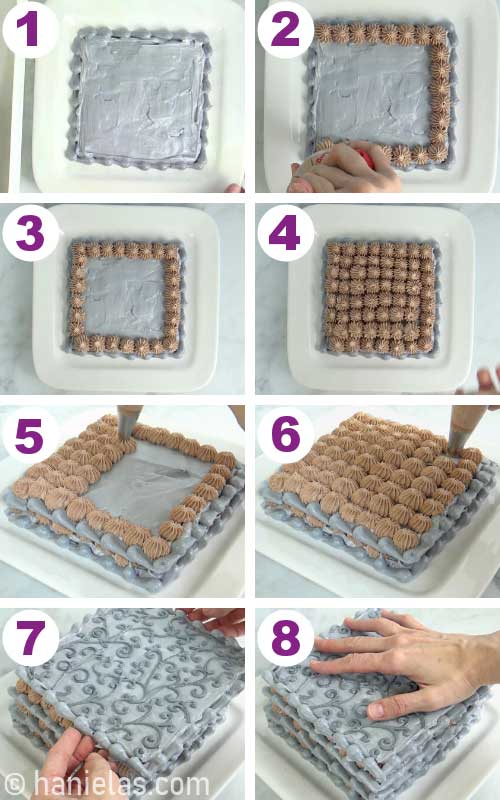
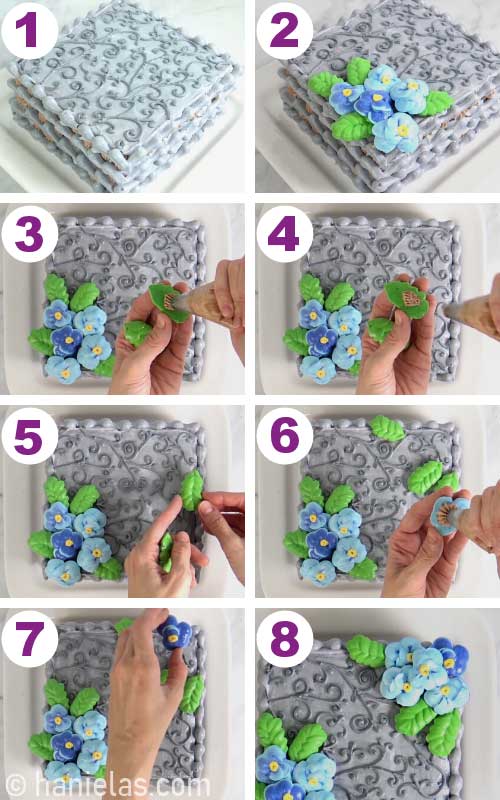
STEP 12 – DECORATE PANSY MERINGUE CAKE
Decorating the cake with meringue flowers is super easy. Before you glue meringue decorations onto the cake do a dry run. Start with the leaves and then add the flowers. Once you are happy with your designs take a picture with your phone. Disassemble arrangement.
Then to adhere meringues onto the cake use leftover filling. Pipe a small amount of filling on the back of the leaves and flowers. Gently press them onto the cake. If you can’t remember your arrangement use a picture on your phone for the reference.
CAN YOU FREEZE BAKED MERINGUES ?
Yes, you can freeze baked meringue cookies and cake layer. Freeze them in a plastic freeze safe container, layered between parchment paper. Freeze for up to 2 months. Let defrost on a kitchen counter for an hour or 2.
HOW TO STORE MERINGUE CAKE?
I filled the cake with whipped cream filling without any kind of stabilizer (gelatin or Dr.Oetker Whip It powder). This simply means that it’s best to serve the cake within 3-5 hours. Store in the fridge until ready to serve. After 6-8 hours whipped cream without a stabilizer may start to weep a little.
TIPS : To make whipped cream filling more stable you can prepare Chocolate Whipped Cream with Dr. Oetker Whipped Cream Stabilizer or dissolved gelatin. See notes in the recipe card.
HOW TO CUT MERINGUE CAKE?
Use serrated knife to cut the meringue cake.

SPRING PANSY COLLABORATION WITH SWEETAMBS
Check out how to make these life like Pansy Cookies on SweetAmbs Cookie Decorating Blog.


Pansy Meringue Cake
Ingredients
MERINGUE CAKE LAYERS
- 9 egg whites
- 2 cups granulated sugar
- 2 tsp freshly squeezed and strained lemon juice, or vinegar(not balsamic)
- 2 tbsp corn starch
- 1 tsp Vanilla Extract
- 1 tsp Almond
CHOCOLATE WHIPPED CREAM FILLING
- 2 1/2 cup chilled heavy whipping cream
- 3/4 cup powdered sugar
- 1/4 cup dark cocoa powder
- 1 tsp Vanilla Extract
Instructions
MERINGUE
- Trace square template onto the parchment sheets. You'll need 2 parchment sheet and trace the template 4 times. Turn the parchment upside down so the ink side is facing down. Set aside.
- Preheat oven to 175F, or the lowest oven setting.
- Use grease free bowl and tools when preparing meringue.
- In a clean, heat proof and grease free bowl of your mixer combine egg whites (9 egg whites), granulated sugar (2cups) and freshly squeezed and strained lemon juice(or use white distilled vinegar, (2tsp).TIP : You can use apple cider vinegar or white white vinegar if you don't have white distilled vinegar. Don't use balsamic vinegar.
- Heat the egg white mixture over the pot of simmering water. Whisking constantly, heat the mixture till all of the sugar is dissolved. To check if sugar is dissolved rub the mixture between your fingers. If you feel no grainy particles you can remove the bowl from the heat.
- Mixture will be white and soapy, this is normal.
- Return bowl with heated egg white mixture to the mixer and beat on medium speed for about a1 to 3 minutes, then increase speed to medium high. Beat until medium stiff peaks are formed. This can take 10 minutes. Beat in Vanilla Extract (1tsp) and Almond Extract (1stp) then beat in corn starch (2tbsp). Beat until stiff peaks are formed. Watch it carefully so you don't over beat.
GRAY MERINGUE CAKE LAYERS
- Take about 2/3 of stiff white meringue and color it with black gel color to make it gray. Then scoop about 3/4 of gray meringue into a piping bag fitted with a large cake icer tip. Then take 2/3 of remaining gray meringue and fill the piping bag fitted with a round piping tip #12. Color remaining small portion of gray meringue with a little bit of black food coloring to make it darker gray. Fill a piping bag fitted with a round piping tip #2. You should have 3 piping bags: fitted with cake icer, round piping tip #12 and round piping tip #2(darker gray)TIP : Use folding mixing technique when coloring meringue with gel color.
- Now you are going to pipe onto prepared parchment sheets. Pipe a beaded border following the square outline. Then fill the inside with gray meringue using cake icer piping tip. Smooth the meringue with a spatula best you can.
- You should have 3-4 meringue cake layers. Decorate 1 layer with a filigree design using darker meringue and a piping bag fitted with a round tip #2.
PANSY AND LEAF MERINGUES
- Divide remaining white meringue into 4 bowls. Color 1/3 of the meringue with royal blue to make light blue. Color about 3 tbsp with lemon yellow and a minuscule amount of orange to make golden yellow. Divide remaining meringue in half. If you have some gray meringue left squeeze it out into one of the bowls. Then color meringue in a bowl with gray with royal blue and regal purple. And lastly color last bowl of meringue with leaf green.
- Pipe pansy flowers and leaves – follow step by step tutorial and a video tutorial how to pipe flowers and leaves.
BAKE MERINGUE
- Bake meringue layers and flowers with leaves in the preheated oven at 175F for 3-4 hours. After this time turn off the oven and let the meringue cool in the oven as the oven cools, 2-3 hours. Then remove meringue layers from the oven. Peel of the parchment and store meringues immediately in an airtight container. Prepare meringue layers up to 4-5 days ahead, and up to 2 weeks. Store away from the moisture.TIP : Store meringue layered between parchment with a small bowl of raw rice.
CHOCOLATE WHIPPED CREAM FILLING
- Beat chilled heavy whipping cream until frothy. Then gradually beat in powdered sugar (3/4 cup). Beat until soft peaks are formed then beat in sifter cocoa powder (3/4 cup) and Vanilla Extract (1stp).TIP : To stabilize whipped cream so it doesn't start weeping in several hours, you can use dissolved gelatin or Dr. Oetker Whipping Cream Stabilizer (Whip It). Check the recipe notes for directions how to stabilize whipped cream.
ASSEMBLE MERINGUE CAKE
- Fit a piping bag with a star tip #32 and fill the bag with Chocolate Whipped Cream Filling. Pipe filling on the bottom meringue cake layer. Place another meringue layer on the top and repeat until you are done with all the meringue layers. Make sure to reserve meringue layer with filigree pattern so it sits on the top.
- Arrange pansy meringue flowers and leaves on top of the cake. Pipe little bit of leftover whipped cream on the back of each flower and leaf and attach it onto the cake.
Notes
HOW TO STABILIZE CHOCOLATE WHIPPED CREAM?
To stabilize whipped cream use gelatin or Dr. Oetker Whipping Cream Stabilizer. How to use gelatin to stabilize whipped cream For Example, to make Chocolate Whipped Cream Filling for Pansy Meringue Cake I’d use 1 tsp dissolved in 2tbsp water. Sprinkle gelatin over cold water. Let it bloom for 5 minutes. Heat bloomed gelatin for 5 second, stir well until gelatin is completely dissolved. Let cool to room temperature. Beat dissolved gelatin into whipping cream after you add sugar. Beat on high speed. Don’t over beat whipping cream.HOW SHOULD I STORE ASSEMBLED CAKE?
Store filled and assembled cake in the fridge until ready to serve. If using whipped cream without a stabilizer it’s best to serve within 3-5 hours. If using whipped cream with stabilizer it’s best to serve within 8 hours.TO MAKE PANSY MERINGUE CAKE YOU NEED
- Step by Step YouTube Video Tutorial
- Get all the tools you need in my Amazon Shop
- Square Cake Layer Template
- Filigree Template
- Stand Mixer
- Parchment
- Spatula and or a small Spreader
- Piping Tips : Cake Icer Tip (cake layers), Petal Tip #104 (pansies), Petal Tip #101 (leaves), Round Tip #2 (filigree, pansy center loop), Round Tip #12(cake layer border), Star Tip #32 (pipe the filling)
- Food Gel Colors : royal blue, black, leaf green, yellow, orange
MORE MERINGUE DESSERTS :
- Strawberry Chocolate Cream Rose Meringue Cake
- Cranberry Orange Cable Knit Sweater Meringue cake
- Mermaid Meringue Cookies
- Meringue Rose Cookies
- Meringue Lollipops
- Hydrangea Meringue Cookies

This post contains Amazon affiliate links that earn me a small commission, at no cost to you. I only recommend products that I use and love. Learn more about my affiliate policy here.

Hi, I’m Hani
Welcome!
Thank you for visiting Haniela’s. On my blog, you’ll find delicious sweet & savory recipes made with simple ingredients. Why not start a new adventure? Discover a world of cookie decorating with my step-by-step tutorials.
Hi, I’m Hani
Welcome!
Thank you for visiting Haniela’s. On my blog, you’ll find delicious sweet & savory recipes made with simple ingredients. Why not start a new adventure? Discover a world of cookie decorating with my step-by-step tutorials.