Graduation Cap Cookies
Celebrate the academic achievement of your graduate with decorated graduation cap cookies. Classic graduation cap cookie features a design that resembles the traditional graduation cap, with a square-shaped cookie base decorated with a tassel. And if you are playful, you can dress them up – they can be personalized with the name, school logo, embellished with flowers, or fun messages.
HOW TO DECORATE GRADUATION CAP COOKIES
The simplest way to make royal icing decorated graduation cap cookies is to use a graduation cap cookie cutter. There are several cutters on the market. My cutter is very traditionally shaped with a square-shaped base and a tassel on the side.
- Beginner’s Guide To Cookie Decorating
- Ultimate Guide to Cut-Out Cookies (tips, tricks, troubleshooting)
- Royal Icing Recipe
- Small Batch Royal Icing Recipe
- Cookie Icing Recipes (includes vegan royal icing, glaze, fondant)
- Guide To Royal Icing Consistencies with Visual Help(what is stiff, flood icing, etc.)
- How To Freeze Royal Icing
- How To Make Royal Icing Transfers
- Royal Icing FAQ ( for example: how to make black icing, color bleeding, storage, and more)
- How To Make a Cookie Cutter Template
- Ultimate Guide To Cookie Decorating Tools

I’ve done several decorated graduation cap cookies in the past (see the bottom of the post for inspiration). I wanted to try something new and exciting.
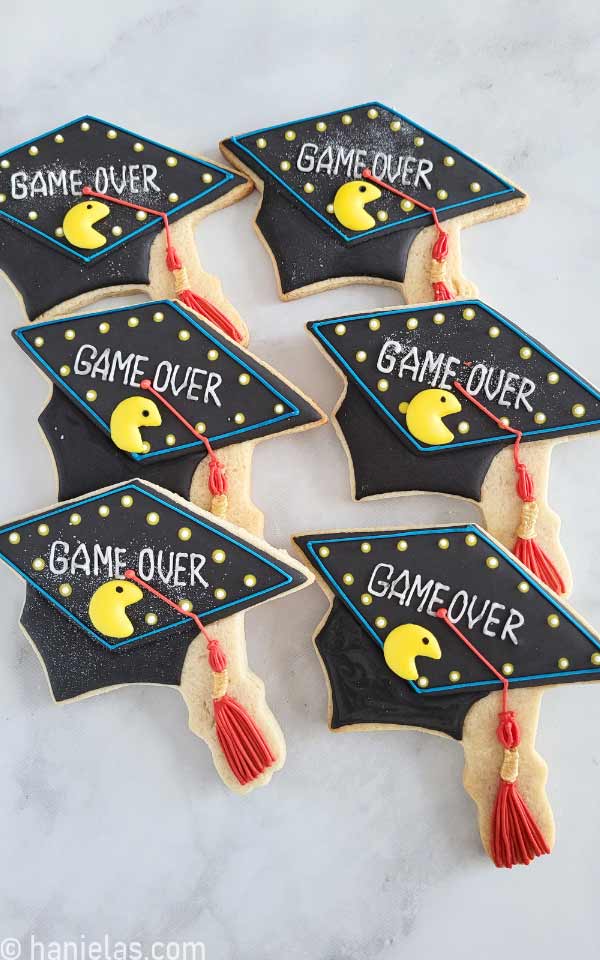
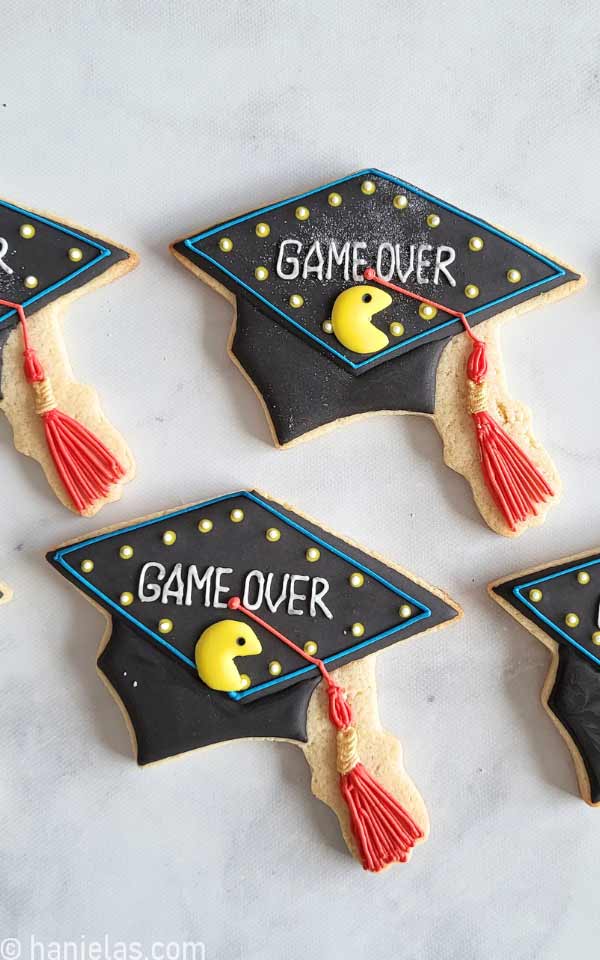
A graduation cap topper is a perfect canvas to express oneself. Graduates often creatively decorate their caps to make them uniquely their own. I found so many different ones on the internet. I’ve seen some embellished with flowers, paintings, and fun or inspiring messages. I was hooked when I saw several caps inspired by Pac-Man, a classic arcade game. So, today I’ll share how to create GAME OVER graduation cap cookies. If you prefer not include a playful message, you can skip it and keep these more traditional.
DECORATE GRADUATION CAP: TOPPER AND BASE
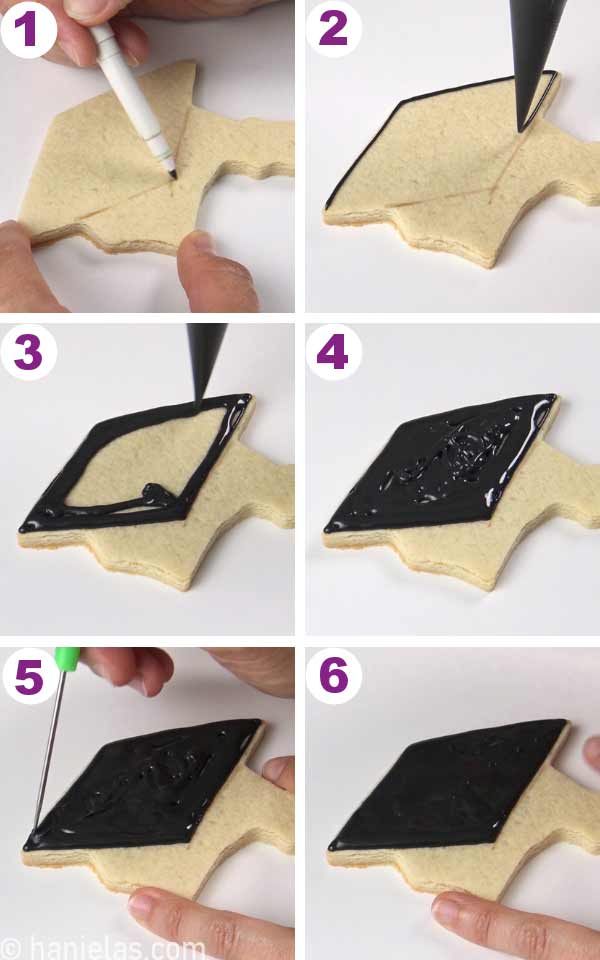
If you struggle with visualizing outlines use an edible marker to draw the topper outline. And then outline and flood the topper with 15-second consistency black icing (steps 1-6). Immediately follow with the next step, don’t allow icing to crust. How to make black icing?
Create a yellow dotted border around the topper. Use 15-second consistency bright yellow icing. This technique is called wet-on-wet, meaning you pipe wet yellow icing onto the wet black base. Yellow icing sinks into the black base, creating a seamless finish (steps 1-8).

Let the icing crust before decorating the bottom section. Again, if you need a little help finding the bearings on the cookie, use an edible marker to draw the outline and then outline and flood with black icing. Use a scribe tool to smooth and shape the icing while wet (steps 1-6). Allow icing to dry overnight.
TIP: If you are in a rush you can let it dry till surface is dry to the touch and continue with the next step, however don’t put any pressure on the surface as icing underneath the crust is still wet.

HOW TO WRITE ON COOKIES: USE A TEMPLATE
To have perfectly centered writing on the cookies, you can use a projector (via Borderlands Bakery). You can implement this simple cardstock template method if you don’t have a projector. Trace the cutter shape onto a cardstock, cut it out, and cut out the section where you want to position your message.
First, lay the template on top of the topper cookie section. Then with a 25-30 second consistency white icing and a PME piping tip #1.5 pipe GAME OVER. Carefully lift the cardstock template (steps 1-8).
TIP: Practice writing on a piece of paper or parchment first and then move onto cookies.

For some bling, immediately after piping, dust the letters with edible glitter (The Sugar Art Diamond Dust – details are in the tools section at the bottom of the tutorial).

NEON LIGHT EFFECT WITH ROYAL ICING
To create a neon light effect, pipe small white dots (25-30 second consistency) in the middle, on top of the yellow dots (steps 1-3).

With piping consistency, bright royal blue icing outline the topper (steps 1-3).

HOW TO MAKE A GRADUATION CAP TASSEL WITH ROYAL ICING
Did you know that the graduation cap tassel dates back to the 14th century (via Tassel Depot). Back then, tassels were used to celebrate the different levels of academic achievements. Nowadays, the tassel’s color usually coincides with the school’s color.

To make the tassel I used piping consistency red royal icing and a PME piping tip #1.5. First pipe the straight line, start in the middle of the topper and bring the line where the tassel section starts (steps 1-2). Pipe a small dot over the line in the center of the topper (step 3). Next, make the fringe, pipe short lines/threads of icing, keeping the lines apart at the bottom and connected at the top. Layer lines on top of each other (steps 5-8).

Make a coiled piece with thick ivory royal icing and PME piping tip #1.5. To pipe the coil, pipe small loops of icing, partly stacking the loop on the previous loop (steps 1-4).

Finish the tassel and pipe the neck. Make sure to pipe red lines as if coming from the coiled piece (steps 1-5). Let the icing dry.

PAINT TASSEL WITH GOLD LUSTER DUST
Mix gold luster dust with little bit of Everclear to make edible gold paint (steps 1-3).

With a food-only paintbrush, paint the coil with gold edible paint. (steps 1-3).

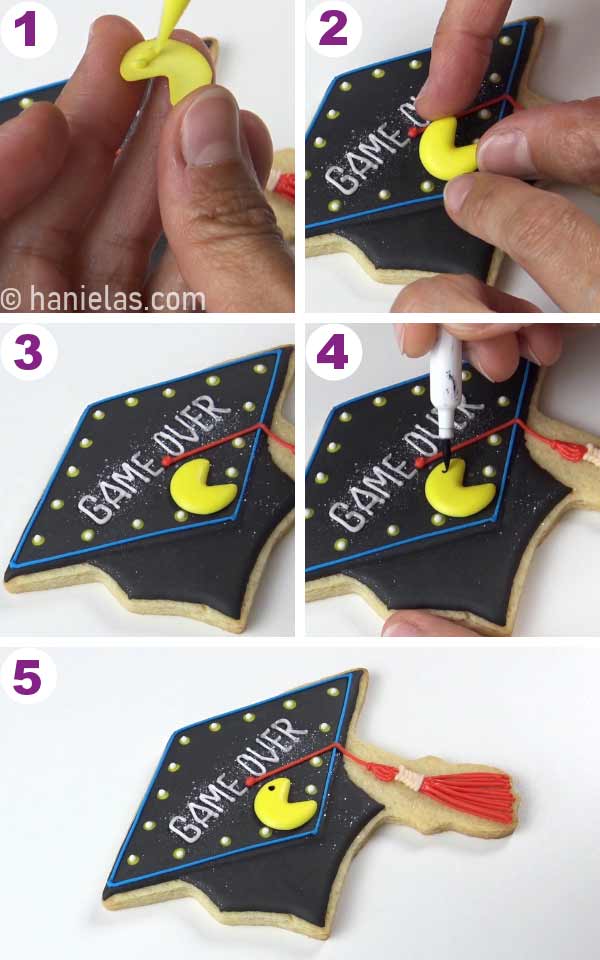
ROYAL ICING TRANSFERS: HOW TO MAKE YELLOW PAC-MAN
To complete this graduation cap design, I attached cute yellow pac-man onto the cookie with a dot of icing. You can make this popular fictional character as royal icing transfer.
Place the template into a smooth protector sheet and pipe directly onto the protector sheet. With 20 to 25-second consistency, yellow icing pipe the face. You can make the eye right after with black icing or wait for the yellow to dry and then draw the eye with a black edible marker. Let icing dry and then carefully remove pac-man decorations from the acetate (steps 1-8).

ATTACH PAC-MAN DECORATION
Turn the pac-man over and pipe a dot of icing on the underside. Attach it onto a cookie (step 1-3). Then with a black edible marker draw an eye (steps 4-5).
Pair these graduation cap cookies with simple diploma cookies (via Lila Loa) .

Did you make these Decorated Cookies? Tag @hanielas on Instagram and hashtag it #hanielas
CREATIVE GRADUATION CAP COOKIE DESIGNS
Here are the graduation cap cookies from the past. Blue is also a very traditional color, along with a gold tassel. I used a grass piping tip and stiff icing to make the tassel skirt. It’s so quick and easy. Have you tried it?

In this design, I incorporated the school’s track team logo. Similarly, like with pac-man I made shoe as royal icing transfer and then attached the track shoe onto the cookie.
To make this cookie I was asked to replicate hand painted Penn State University graduation cap topper design onto a square cookie.

MORE CREATIVE DECORATED COOKIE IDEAS
- Watercolor Elephant Cookies
- Cute Papa Bear Cookies via Semi Sweet
- LOL Dolls Cookies
- Simple Butterfly Cookies
- Rainbow Fish Cookies
TOOLS YOU NEED TO MAKE GRADUATION CAP COOKIES
- Ann Clark Cookie Cutter
- R&M Cookie Cutter – actual cutter used in this tutorial, I used pliers to widen the tassel area.
- Metal Scribe
- Gel Food Colors: black, red, ivory, yellow
- Edible Markers: brown, black
- Gold Edible Luster Dust
- Small Paint Palette
- Sugar Art Diamond Dust (edible glitter)
- Food-Only Paint Brush
- Dropper
- Everclear Alcohol
- Tipless Piping Bags
This post contains Amazon affiliate links that earn me a small commission, at no cost to you. I only recommend products that I use and love. Learn more about my affiliate policy here.

Hi, I’m Hani
Welcome!
Thank you for visiting Haniela’s. On my blog, you’ll find delicious sweet & savory recipes made with simple ingredients. Why not start a new adventure? Discover a world of cookie decorating with my step-by-step tutorials.

Hi, I’m Hani
Welcome!
Thank you for visiting Haniela’s. On my blog, you’ll find delicious sweet & savory recipes made with simple ingredients. Why not start a new adventure? Discover a world of cookie decorating with my step-by-step tutorials.