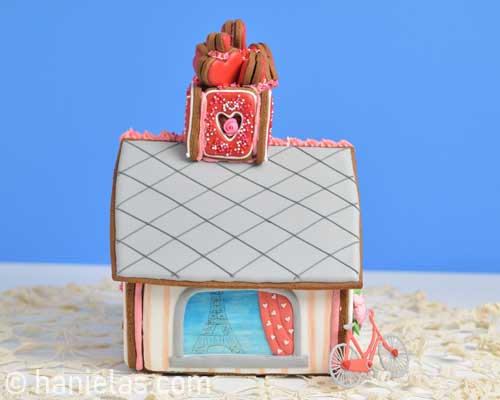
Valentine’s Day Gingerbread House
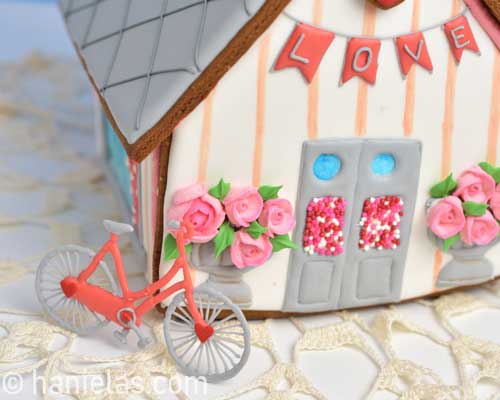
This Valentine’s Day Gingerbread House is inspired by the city of love – Paris. My gingerbread love shack design features Paris famous landmark – Eiffel Tower, cute bicycle with a basket full of hearts, balloons, roses and lots of hearts cookies.

HOW TO DECORATE PARIS INSPIRED GINGERBREAD HOUSE
This Valentine’s Day Gingerbread House has a lot of cute details. Among others I’ll show how to make dainty royal icing roses, royal icing transfers (bicycle), easy grid piping technique with a template, aging/antiquing of royal icing and much more.
- TABLE OF CONTENTS
- Gingerbread house panels
- How to pipe royal icing roses (ribbon and open rose)
- Make edible paint
- Side panel (with Eiffel tower)
- Front house panel
- How to age royal icing
- Back house panel
- Roof, Chimney and Heart Cookies
- Valentine’s Day Gingerbread House Assembly
- Recipes and Tools

GINGERBREAD HOUSE COOKIE PANELS
Let’s start with the house cookie panels. I used my Construction Gingerbread to make all the cookies for Valentine’s Day Gingerbread House. And to decorate I used Royal Icing. You can make house cookie panels ahead of time. Store cookies flat in an airtight container until ready to use, up to 2 weeks.
HOW TO PIPE ROYAL ICING ROSES
To decorate I also used Royal Icing Roses. These can be made ahead of time. Just like Royal Icing Succulents they have a long shelf life. Store them in an airtight container, away from a direct sunlight and moisture.
ROYAL ICING COLORS AND CONSISTENCIES :
- 2 Shades of Pink – stiff royal icing
DECORATING STEPS :
- TOOLS :
- Flower Nail
- Toothpick or scribe tool
- Wax Paper Squares
- Petal Piping Tip #101
- Damp Paper Towel
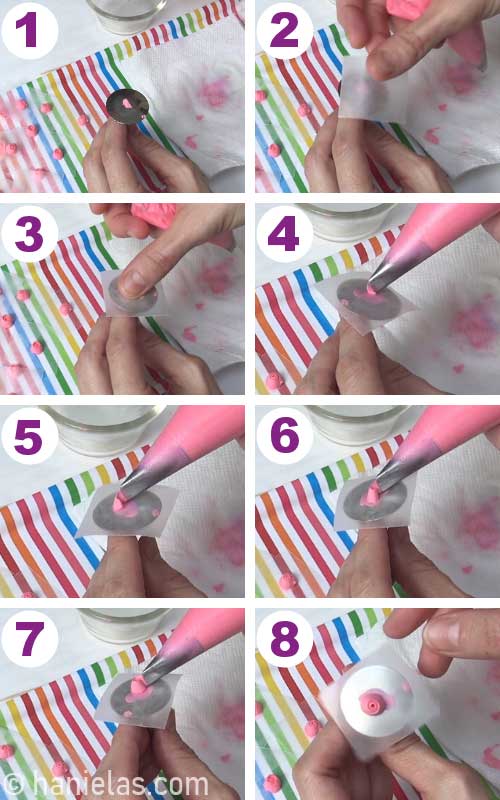
ROYAL ICING RIBBON ROSES
Ribbon roses are easier to make than roses with individual layered petals. Prepare stiff royal icing. Color it with pink gel food coloring. Fit a piping bag with a Petal Piping Tip #101.
Pipe a small amount of icing onto the flower nail (1). Secure wax paper square onto the flower nail(2-3). Start piping in the center of the flower nail. First you need to anchor royal icing onto the wax paper. I start piping at about 80 degree angle, having narrow part of the petal tip facing up (4).
Slowly start turning the flower nail and lower the piping bag so it’s nearly parallel with the flower nail. Continue turning flower nail and putting pressure onto the piping bag until you are happy with the size of the ribbon rose. Release the pressure and pull away the piping tip in the direction of piping (5-8). Carefully remove wax paper with a piped ribbon rose and set it aside onto a flat tray to dry.
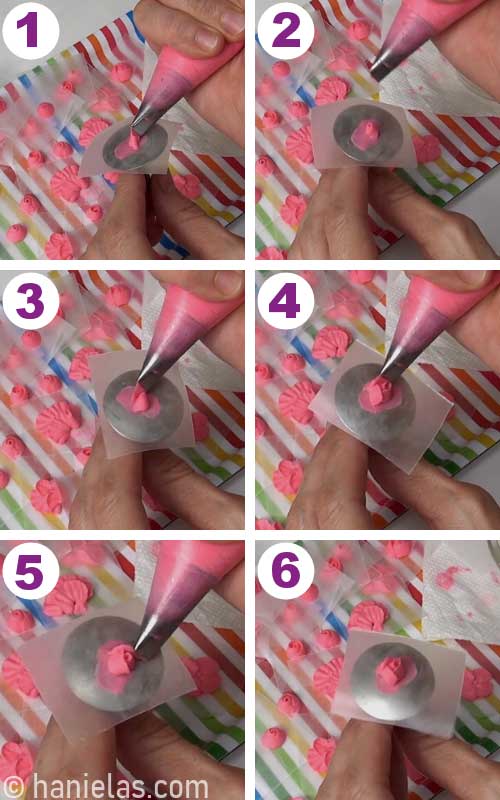
ROYAL ICING OPEN ROSE
Roses with individual petal take a little bit more practice. In this example I used 2 shade of pink.
Start with a darker share of the pink and then for the last row of petals switch to light pink.The beginning of piping of an open rose is same as with ribbon rose. First you need to anchor royal icing onto the wax paper.
I start piping at about 80 degree angle, having narrow part of the petal tip facing up. Slowly start turning the flower nail and lower the piping bag so it’s nearly parallel with the flower nail. Then once you have the first petal formed release pressure on the piping bag and pull away with the piping tip (1-2).
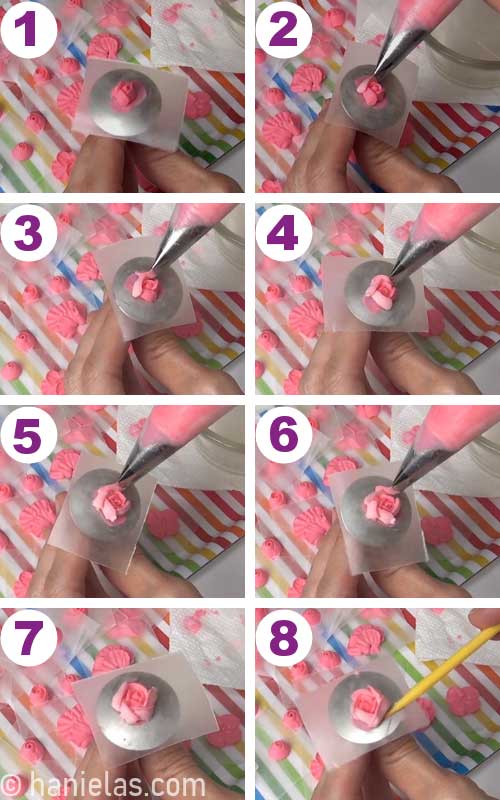
Now you can start building the rose with petals. I piped 3 petals. Be sure to overlap the petals slightly (3-6).
Continue piping more petals with a lighter shade of pink. I piped 5 slightly overlapping petals (2-7). Clean up the bottom of royal icing rose with a toothpick or a needle tool. Carefully remove wax paper with a freshly piped rose and place it onto a flat surface and allow to dry completely. Once dry simply peel the wax paper away from the sugar rose decoration.
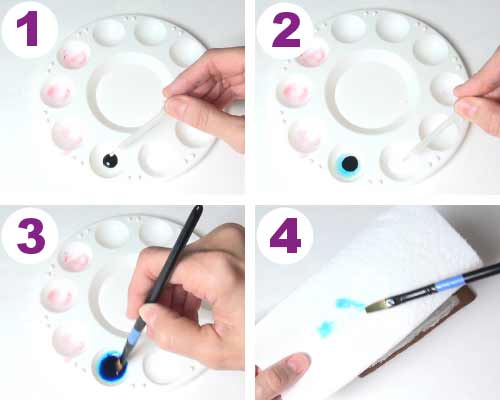
HOW TO MAKE EDIBLE PAINT
In this tutorial I used edible paint. Let me start by explaining how to prepare edible paint.
Add a few drops of sky blue gel food coloring and white gel food coloring into food only paint palette. Then into each food color add a small amount of alcohol. For this you can use a dropper. It is best to use clear alcohol with high alcohol content.
Mix gel food color with alcohol well. Discard any residue formed in mixing the process. Remember alcohol will evaporate quickly so it’s best to prepare edible paint right before you plan on using it. Or store it in an airtight glass containers until ready to use.
WHAT KIND OF ALCOHOL CAN I USE?
For example Vodka, Everclear – Grain Alcohol, Lemon Extract. Depending onwhat’s available to you, you can get Everclear at these proofs 151(75.5%) or 190(95%). However some states in the USA don’t allow 190 proof to be sold to general public. You should be able to find proof 151 (75.5%). Or you can also use Lemon Extract – I use McCormick brand – usually a good quality lemon extract has 85-86% alcohol.
SIDE PANEL
Side panels both have large windows with pink curtains. One of the window panes also features reflection of Eiffel Tower drawn with an edible marker.
ROYAL ICING COLORS AND CONSISTENCIES :
- White – 15 second consistency
DECORATING STEPS :
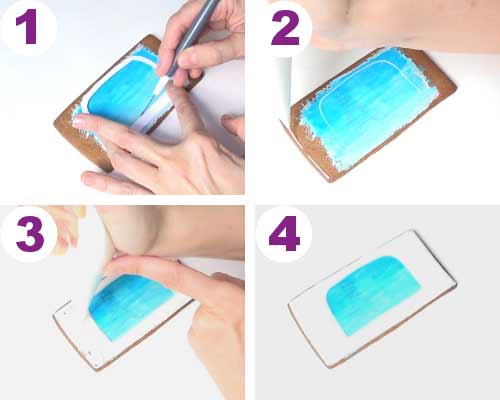
With a food only paint brush apply a thin layer of white icing (15sec) onto a cookie. Place window template over to see if all of the area is covered with icing. Allow icing to dry completely before painting (1-4). Drying time depends on how thick you applied icing. Usually icing that is brushed on thinly will dry in about 1 to 2 hours.
Prepare edible paint using sky blue and white get colors. Immediately paint dry white icing. Starting with light blue at the bottom and increasing intensity of blue as you got to the top of the window. Don’t over saturate icing with liquid. Use a paper towel to absorb excess liquid from the brush bristles. Allow painted cookie to dry. Alcohol evaporates pretty quickly (5-8).

Trace the window design onto the icing with a needle tool or an edible marker. I used a needle tool to trace the outline onto the icing. Gently scrape the surface of the icing, leaving a visible outline.
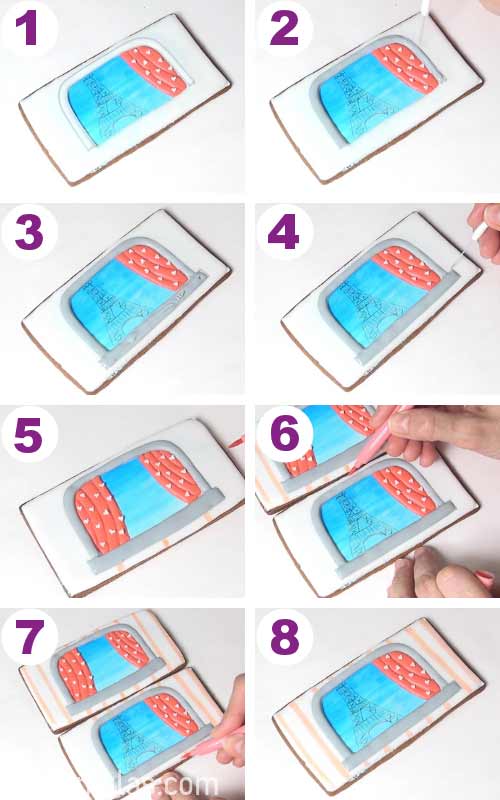
Then with white icing (15sec) outline and flood the cookie. Allow icing to dry for 8 hours.
ROYAL ICING CURTAIN
ROYAL ICING COLORS AND CONSISTENCIES :
- Pink – 20 second consistency
DECORATING STEPS :
Pipe curtain in sections. Flood every other section first and decorate it with heart sprinkles. Allow sections to crust and then flood the sections between. This way sections won’t blend together and you’ll create curtain like effect.

DRAW EIFFEL TOWER
With black edible marker draw the Eiffel Tower onto the window pane.

WINDOW FRAME
ROYAL ICING COLORS AND CONSISTENCIES :
Gray – 20 second consistency
DECORATING STEPS :
Pipe the top window frame outline and flood it with light gray royal icing (20sec). Allow icing to crust and then outline and flood the bottom of the frame. Let the icing dry overnight (1-4)
Draw stripes across with pink edible marker (5-8).
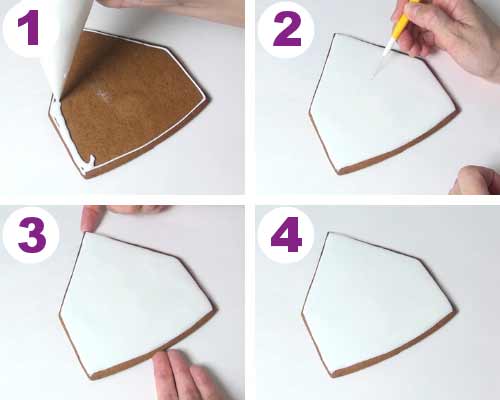
FRONT HOUSE PANEL
ROYAL ICING COLORS AND CONSISTENCIES :
- White – 10 to 15 second consistency
DECORATING STEPS :
Outline and flood the cookie with white icing (10-15 sec). Use a needle tool to distribute the icing and to pop any bubbles in the icing. Allow icing to dry overnight.
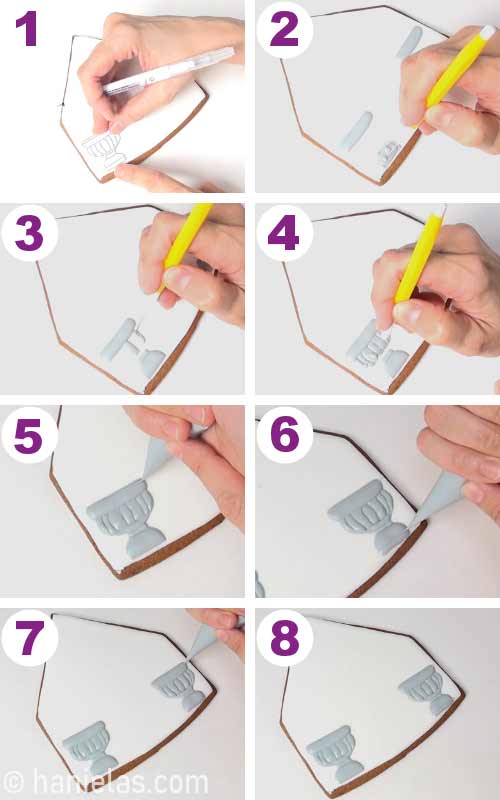
FLOWER POTS AND FRONT DOORS
ROYAL ICING COLORS AND CONSISTENCIES :
- Gray – 20 to 25 second consistency
- Gray – piping consistency
DECORATING STEPS :
Trace the flower pot outline onto the dry icing with an edible marker. Then with light gray icing (20 to 25 sec) flood flower pot in sections. Letting neighboring sections crust before flooding sections next to it. Then allow to crust well (1 hour or so). Pipe top and bottom outlines with light gray piping consistency icing. Allow flower pots to dry completely before antiquing.
Now you can make the door. Use light gray royal icing (20 sec) to outline and flood the door. Flood one half of the door first and allow it to crust. Then continue and flood the other half of the door. Let icing dry.
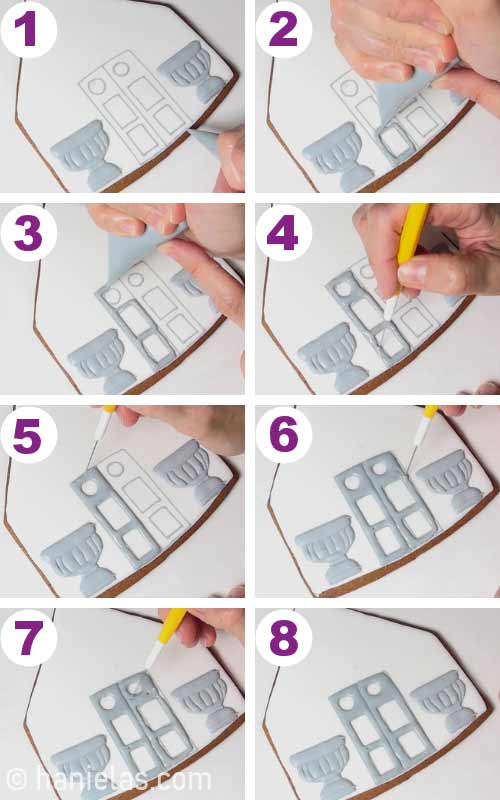
DECORATE WITH SPRINKLES AND EDIBLE MARKER
Finish the door with edible marker and sprinkles.
ROYAL ICING COLORS AND CONSISTENCIES :
- White – 15 second consistency
Light Gray – 20 second consistency
DECORATING STEPS :
Draw pink stripes across the whole cookie with an edible marker. With blue edible marker color inside of the top circle cut outs or use blue edible paint. You can use lightly damped food only paint brush to distribute the blue marker color over white icing.
Then pipe white icing (15sec) into the middle rectangular cut-outs. Immediately dust icing with pretty pink and red nonpareils. Lastly flood the bottom rectangular cut-outs with light gray icing(20sec). Let icing dry.

HOW TO AGE/DISTRESS ROYAL ICING
I used a quick antiquing technique to finish gray flower pots. Draw on the seams on flower pots with brown edible marker. Then blend lines with a damp food only paint brush. You can dip brush bristles into vodka or Everclear (grain alcohol – 151 or 190 Proof), or McCormick Lemon Extract, or use water. Be sure not to over saturate royal icing with liquid. Remove excess water into a dry paper towel.

BUNTING BANNER
ROYAL ICING COLORS AND CONSISTENCIES :
- Gray – piping consistency
- Pinkish Red – 20 second consistency
DECORATING STEPS :
First pipe the bunting banner outline. Allow outline to crust for 3-5 minutes. Then flood each section with pinkish red royal icing (20sec). Use a needle tool to shape the icing. Allow to crust. Then with light gray icing pipe letters L O V E on the banner.

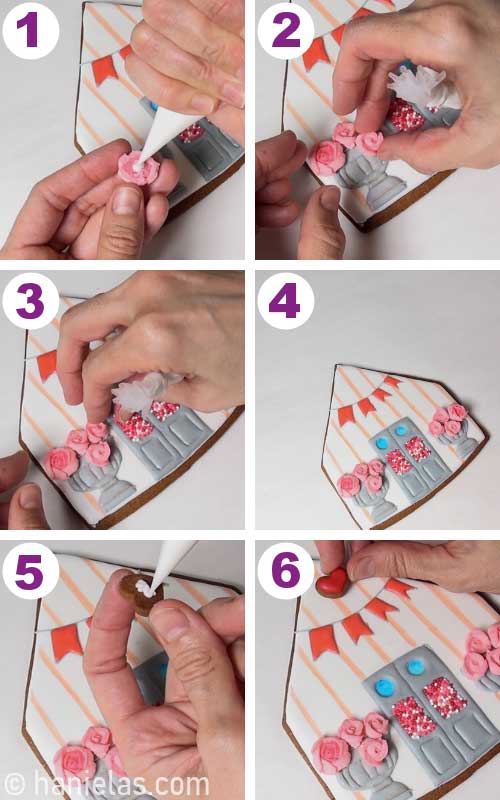
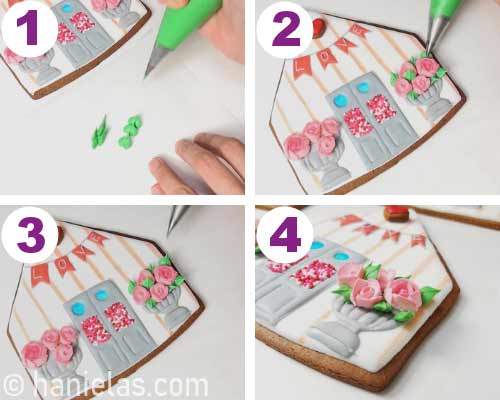
DECORATE WITH ROYAL ICING ROSES AND COOKIES
While bunting banner is crusting you can decorate with royal icing roses and small heart cookie.
ROYAL ICING COLORS AND CONSISTENCIES :
- White – piping consistency
DECORATING STEPS :
Glue different sizes of dry royal icing roses onto the flower pots. Arrange roses while glue icing is wet. Attach small heart cookie just above the bunting banner. Then allow glue icing to dry.
PIPE LEAVES
To conclude flower pot design I added easy piped royal icing leaves.
ROYAL ICING COLOR AND CONSISTENCY :
- Leaf Green – stiff icing with a tiny peak that bends slightly, overly stiff icing will result in the tip of the leaf breaking off as you pull away with the piping bag
DECORATING STEPS :
Fit the piping bag with a Leaf Piping Tip and fill the piping bag with a green leaf royal icing (stiff with a small peak that bends down a little). Pipe the leaves between roses and few leaves can also be added at the base of the rose.
BACK HOUSE WALL
ROYAL ICING TRANSFERS – BICYCLE DECORATION
Bicycle is made as Royal Icing Transfer. Learn more about Royal Icing Transfers in my ultimate guide to royal icing decorations.
ROYAL ICING COLORS AND CONSISTENCIES :
- Light Gray, Pinkish Red – 20 to 25 second consistency
DECORATING STEPS :
Place a piece of wax paper over the template. Secure wax paper with a masking tape so it doesn’t slide while you pipe with royal icing.
Pipe the wheels and spokes with light gray (20sec). Allow icing to crust. Continue piping frame with pinkish red (20sec). Allow to crust. Pipe the seat, handles and petals. Attach heart sprinkles in the center of the wheels. Allow to dry completely. Don’t be tempted to remove bicycle from the wax paper before it fully dries.
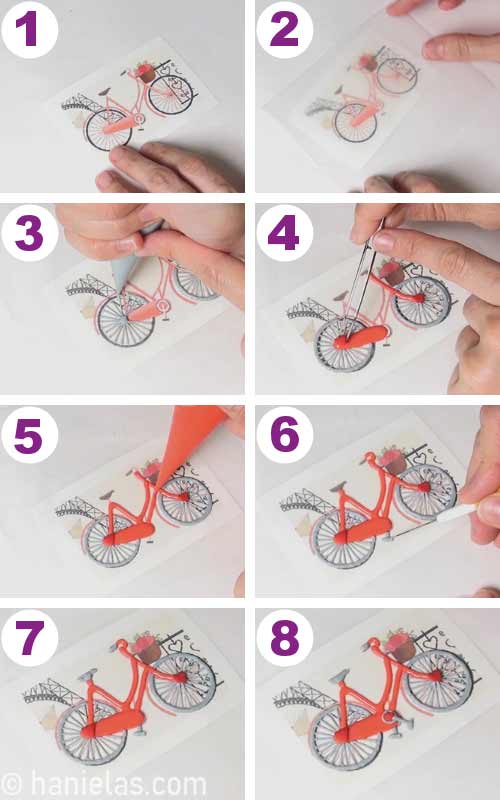
Carefully peel the wax paper away from the bicycle.
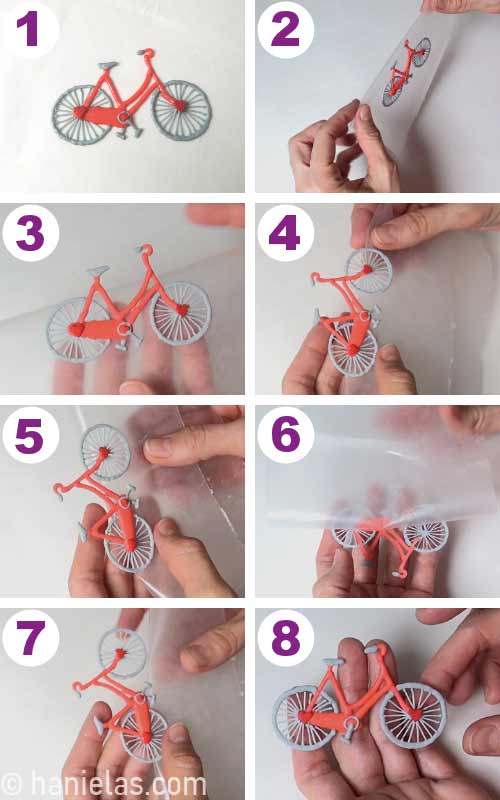
DRY ON WET ROYAL ICING TRANSFER APPLICATION
To attach bicycle onto the cookie I used dry on wet method. I applied dry royal icing transfer (bicycle) onto the wet royal icing base. I also used this same technique to make Spiderman Cookies.
ROYAL ICING COLORS AND CONSISTENCIES :
- White – 10-15 second consistency
- Light Gray – 20 second consistency (bicycle basket)
DECORATING STEPS :
Outline and flood the cookie with white icing (10 to 15 sec). With a needle tool distribute the icing evenly and accentuate corners. Then immediately and with care lift up bicycle decoration and place it on top of the wet white icing. Allow decoration to sink slightly into the icing and if needed use a needle to very gently push the decoration into the icing. You don’t want to press too hard as it can break easily. Allow icing to dry overnight.

FLOWER BASKET
ROYAL ICING COLORS AND CONSISTENCIES :
Light Gray, White – 20 to 25 second consistency
DECORATING STEPS :
Pipe a small basket at the front of the bicycle. Allow to crust well (1-2). Draw stripes across with pink edible marker (3).
Pipe white icing (20sec) just above the basket and immediately dust icing with micro heart sprinkles.

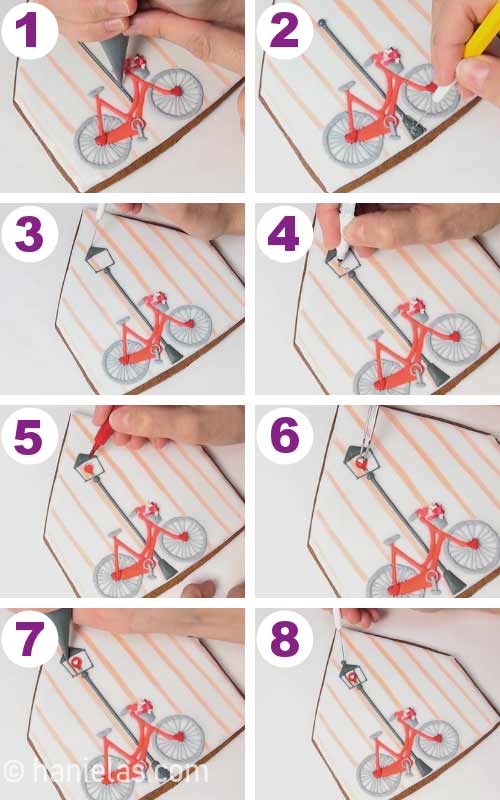
STREET LAMP
ROYAL ICING COLORS AND CONSISTENCIES :
- Dark Gray – 20 to 25 second consistency
- Red – 20 second consistency
DECORATING STEPS :
Pipe the street lamp pole with dark grey icing (20 to 25sec ) (1). Allow pole to crust and then pipe the base (2). Pipe the lamp frame and small roof (3).
With edible marker draw red light bulb (4-5). Pipe a dot of icing onto the red bulb and attach a small heart sprinkle onto the red light bulb (6). Then pipe additional lines across with dark gray icing and pipe a small dot on the top of the lamp’s hood (7-8).
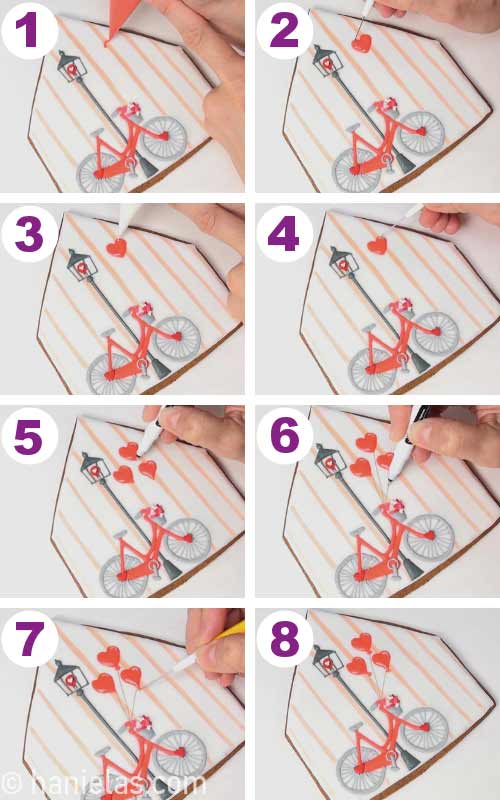
HEART BALLOONS
ROYAL ICING COLORS AND CONSISTENCIES :
- Red – 20 second consistency
DECORATING STEPS :
With red icing (20sec) pipe 3 hearts above the bicycle. Shape them with a needle tool. Allow to crust well (30 minutes) (1-4).
Then with an edible marker draw thin black lines for the strings (5-6). Lastly pipe a small neck on each of the balloons with red icing (20sec). Shape the icing with a needle tool (7-8).
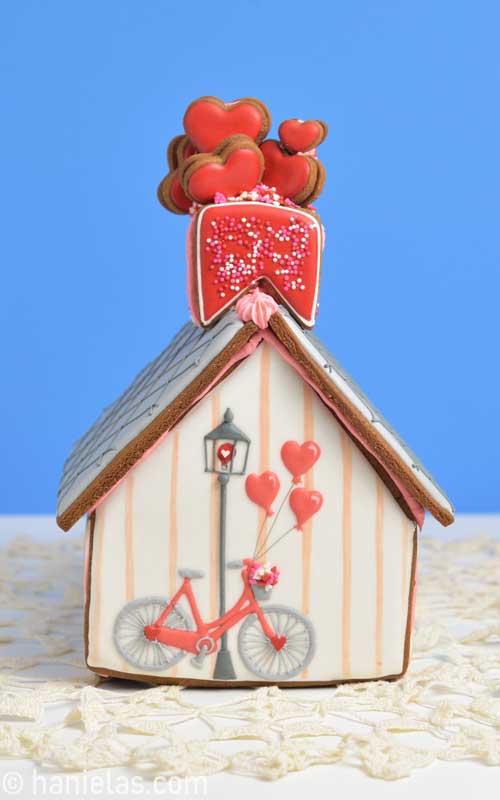
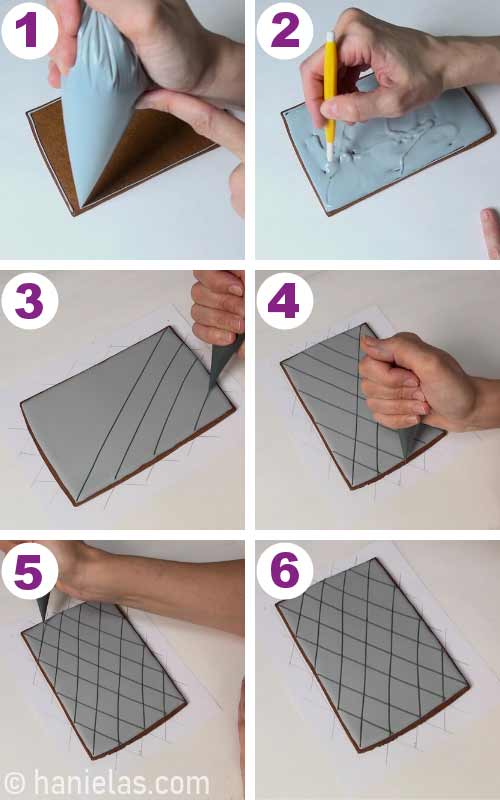
ROOF, CHIMNEY AND HEARTS
ROYAL ICING COLORS AND CONSISTENCIES :
- Light Gray – 10 to 15 second consistency
- Dark Gray – piping consistency
DECORATING STEPS :
Outline and flood both roof panels with light gray royal icing (10 to 15 sec). Allow do dry overnight. Then finish by piping a lattice diamond pattern design on the top with dark gray icing (piping consistency). To help with the even distribution of lines use a diamond lattice pattern template underneath a cookie.
CHIMNEY
ROYAL ICING COLORS AND CONSISTENCIES :
- White – piping consistency
- Red – 20 second consistency
DECORATING STEPS :
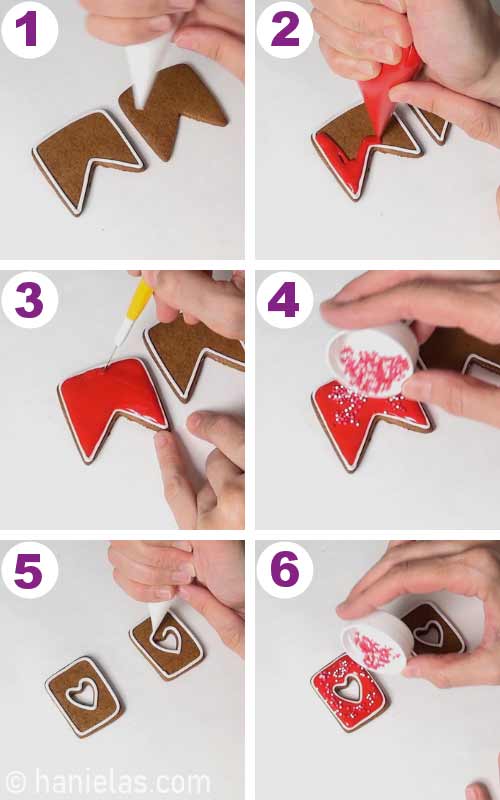
HEART COOKIES
ROYAL ICING COLORS AND CONSISTENCIES :
- Red – 20 second consistency
DECORATING STEPS :
Flood heart cookies with red icing (20sec) and let the icing dry(1-4). Then sandwich larger hearts together with a little bit of icing. Let dry(5-8).

LOVE SHACK GINGERBREAD HOUSE ASSEMBLY
ROYAL ICING COLORS AND CONSISTENCIES :
- Light Pink – thick consistency
DECORATING STEPS :
Allow icing on all of the house panels fully dry before assembling the house.

HOUSE BASE
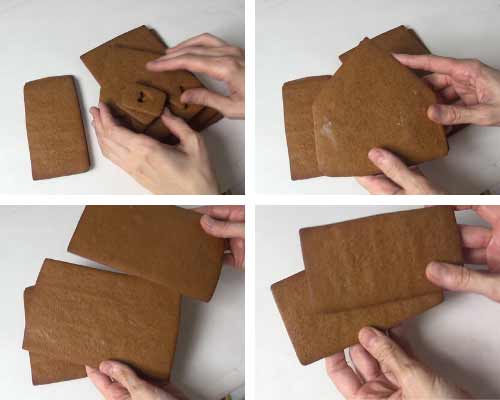
Pipe thick royal icing on the edges on undecorated side of front house panel. Then attach side panels (1-4). Support front panel with a small bottle of sprinkles. Pipe royal icing on the ends of side panels. And attach the back panel onto the sides. Gently push the back panel into the icing. Use small bottles to keep house panels from sliding. Allow to dry for 4-5 hours. (5-8)
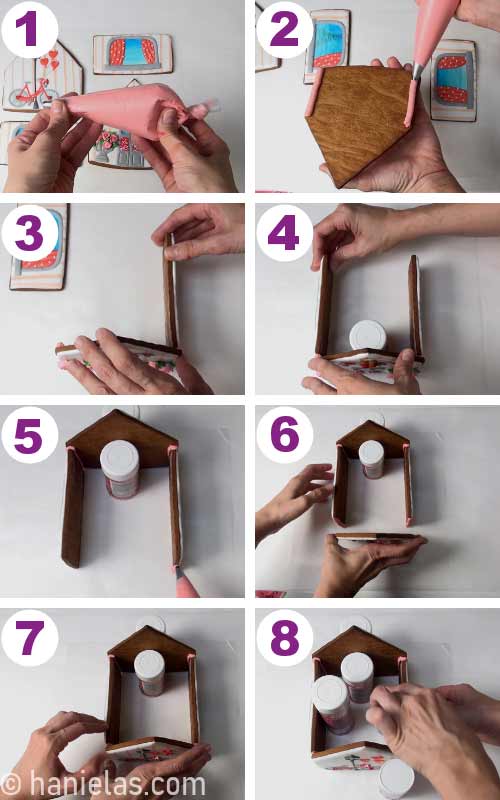
ATTACH ROOF AND CHIMNEY
Now that the base of Valentine’s day gingerbread house is ready we can attach the roof panels. Pipe icing onto angled edges. Align roof panels and press them onto the icing. Hold roof 2 panels in place with your fingers while placing small bottles or skewers to support the roof . This helps to keep the roof panels in place without them sliding down. Allow to dry for 6 hours (1-5).
To fill the small gap between roof panels use a open Star Piping Tip and thick royal icing. Then glue together chimney and attach it into the roof (6-8).
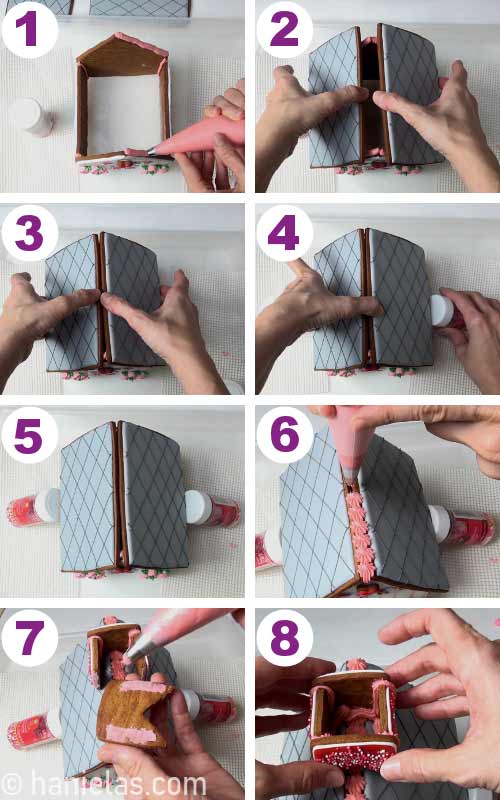
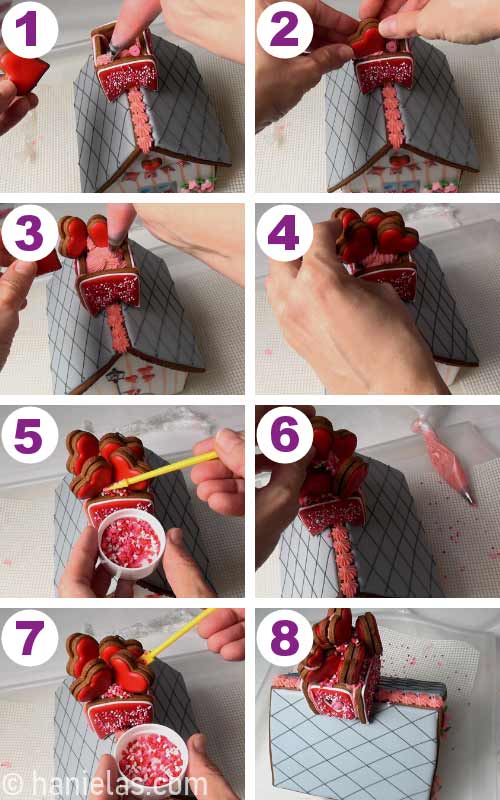
DECORATE WITH HEART COOKIES
In this last step I used thick icing and heart sandwich cookies to fill the chimney. To hide/mask the icing sprinkle tiny heart sprinkles or red nonpareils over wet icing.


TO MAKE VALENTINE’ S DAY GINGERBREAD HOUSE YOU NEED
- RECIPES
- Construction Gingerbread Dough
- Royal Icing
- TOOLS
- Find all the tools in my Amazon Shop
- Cookie Cutters : House Cutters (or use these front and side House Templates), Heart Cutters
- Templates : flower pot, window, bicycle
- Wax Paper
- Needle Tool
- Piping Bags
- Two in One Tool (yellow tool)
- Micro Heart Sprinkles
- Gel Food Colors : black, red, pink, leaf green,
- Piping Tips : Petal Tip #101, Leaf Tip, Star Tip
- Edible Markers : Americolor Pink (to draw stripes), Rainbow Dust Black Fine Tip (to draw Eiffel Tower), Foodoodlers Brown (antiquing on flower pots)
- Food Only Paint Brush
- Paint Palette
- Dropper
- Full step by step tutorial with narration can be found on Haniela’s YouTube Channel
MORE CUTE VALENTINE’S DAY IDEAS :
This post was published on January 29th, 2018. On January 5th, 2020 I updated this post with new step by step photos, written text and a video.
This post contains Amazon affiliate links that earn me a small commission, at no cost to you. I only recommend products that I use and love. Learn more about my affiliate policy here.

Hi, I’m Hani
Welcome!
Thank you for visiting Haniela’s. On my blog, you’ll find delicious sweet & savory recipes made with simple ingredients. Why not start a new adventure? Discover a world of cookie decorating with my step-by-step tutorials.
Hi, I’m Hani
Welcome!
Thank you for visiting Haniela’s. On my blog, you’ll find delicious sweet & savory recipes made with simple ingredients. Why not start a new adventure? Discover a world of cookie decorating with my step-by-step tutorials.