Strawberry Whoopie Pies
Let’s make delicious and super cute Strawberry Whoopie Pies with my versatile and easy-to-use vanilla whoopie pie recipe.

updated post from 2015
HOW TO MAKE STRAWBERRY WHOOPIE PIES
- TABLE OF CONTENTS
- Strawberry Template
- Whoopie Pie Cake Batter
- Color Cake Batter
- Pipe Whoopie Pies & Bake
- Strawberry Filling
- Assemble Strawberry Whoopie Pies
I put a fun twist on traditionally round whoopie pies and shaped them into cute little strawberry mini cakes. All you need is a template and parchment to pipe the cake batter on.

STRAWBERRY TEMPLATE
Print the strawberry template on paper.
TIP: You can also make a template with a heart cookie cutter. For optimal results, use a 2.5-inch cookie cutter, and trace heart shapes onto paper. Leave about 2-3 inches between each heart shape.

VANILLA WHOOPIE PIE CAKE BATTER
- Ingredients
- Flour
- Baking Powder
- Salt
- Butter
- Granulated Sugar
- Egg
- Vanilla
- Buttermilk
TIP: Don’t have buttermilk? I never have buttermilk, and I always make quick buttermilk using ingredients at home. There are at least six ways to prepare buttermilk at home. The simplest way to make buttermilk is to add distilled vinegar or lemon juice to milk. And this is how you do it: into 1 cup measure, pour 1 tablespoon of vinegar or lemon juice and top it off with room to lukewarm milk. Let sit for 5 minutes, stir and use in the recipe.
Cream room temperature butter and granulated sugar for 3-5 minutes, until well blended and fluffy, (steps 1-2). In a small dish whisk one whole egg and Vanilla Extract, (step 3). Beat egg mixture into the butter mixture for 5 minutes, until creamy and pale in color, (steps 4-6).
TIP: Use room temperature ingredients. How to tell if butter is at room temperature? And a quick way to warm up a cold egg is to submerge it into warm water for 5 minutes.

Into a mixing bowl sift flour, baking powder, and salt. On low speed into the butter mixture, beat flour and buttermilk. You should have semi-dense cake batter.
TIP: If you haven’t baked in a while, check the expiration on the baking powder. If it’s past the date, toss it and get a new one.

COLOR CAKE BATTER
Divide cake batter into small bowls and color it with gel food colors: red, pink, leaf green, and yellow, (steps 1-4).
- Here are approximate measures of different colors :
- Redish Pink – about 2/3 of cake batter
- Green – divide remaining 1/3 of cake batter to 2/3 for the green
- Yellow – and 1/3 for the yellow
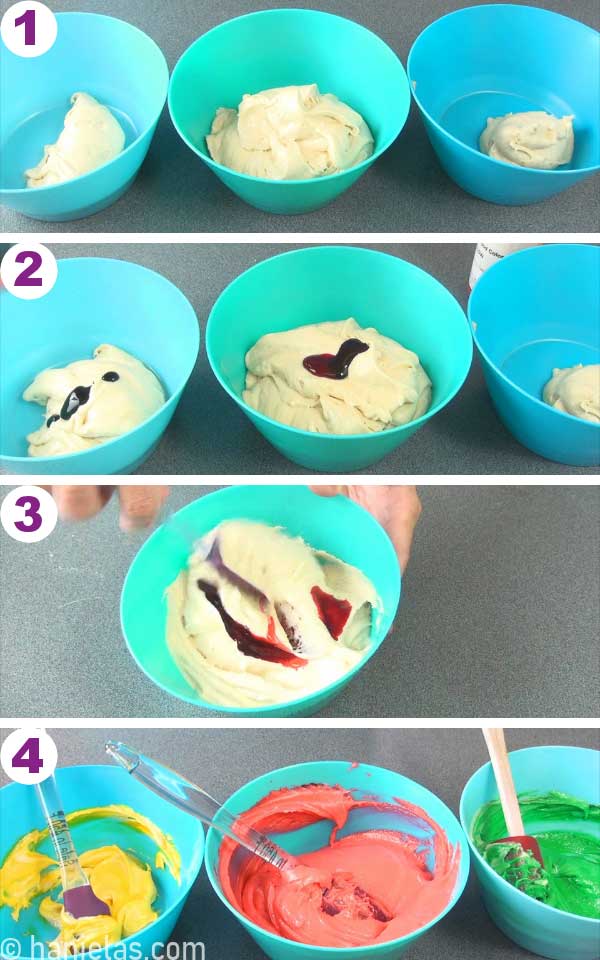
Fill 3 piping bags with colored cake batter, (steps 1-3).

PIPE STRAWBERRY CAKES
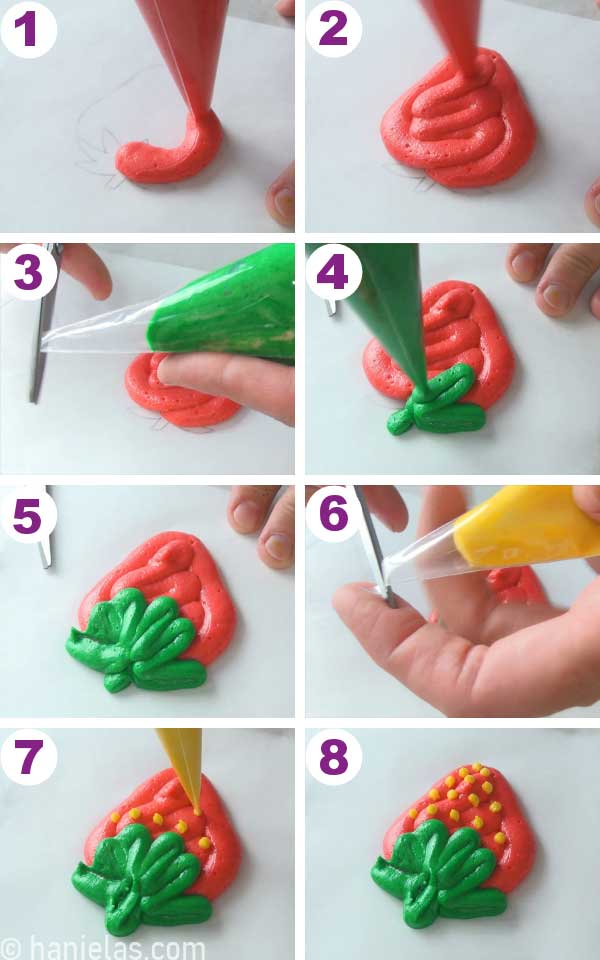
Place a template onto a baking sheet. Lay parchment sheet on top of it. Pipe strawberry shapes with red batter. Then take green batter and pipe a stem and leaves. Lastly, pipe tiny yellow seeds onto the red strawberry (steps 1-8).
Carefully slide the template down the baking sheet and continue piping more strawberry whoopie pies onto the parchment.

BAKE WHOOPIE PIES
Bake whoopie pies at 350F (180C) for 12-14 minutes. They should look puffy, and when you insert a toothpick in the center it should come out clean, (steps 1-2). Let cool on a baking sheet for 5 minutes. Then transfer each cake onto a cooling rack to cool completely, (steps 3-5).
TIP: Use a flat spatula to lift cakes from the baking sheet.

STRAWBERRY FILLING
This easy mascarpone strawberry filling is quick to put together.
I used heavy cream, but you can also use whipping cream if you can’t find heavy cream at the grocery store.
Beat heavy cream until it reaches soft peaks. Then gradually beat in powdered sugar and mascarpone cheese. Don’t forget to add a splash of Vanilla Extract. And lastly, fold in fresh diced strawberries, (steps 1-8).

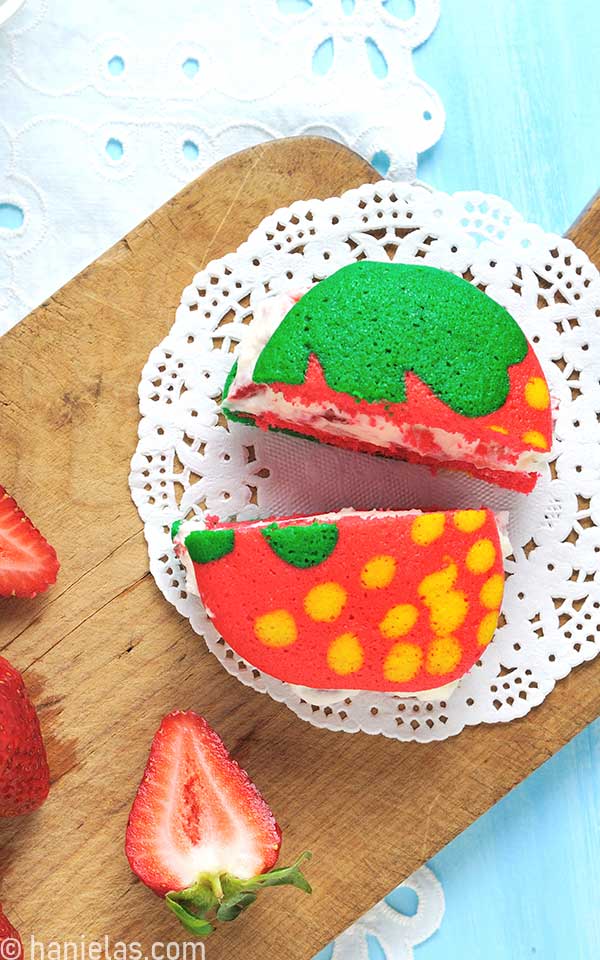
ASSEMBLE STRAWBERRY CAKES
To sandwich two cakes together fill them with fresh strawberry filling. I used a 1-inch cookie scoop. Scoop the filling out onto one half of the whoopie pie. Gently press the other half onto the filling to sandwich two cakes together.
Store Strawberry Whoopie Pies in the fridge in one layer, in an airtight container for up to 3-4 days.

MORE WHOOPIE PIES RECIPES
- Rose Patterned Strawberry Shortcake Whoopie Pies
- Double Chocolate Whoopie Pies
- Carrot Cake Whoopie Pies
- Father’s Day Whoopie Pies Denim Pocket
- Harry Potter Whoopie Pies

Strawberry Whoopie Pies
Ingredients
STRAWBERRY WHOOPIE PIES
Vanilla Whoopie Pie Cake Batter
- 1/2 cup granulated sugar
- 4 room temperature, unsalted butter
- 1 large egg
- 1 tsp Vanilla Extract
- 1 cup all purpose flour
- 1/2 tsp baking powder
- 1/4 tsp salt
- 1/*2 cup buttermilk (check recipe notes how to make it at home)
Mascarpone Strawberry Filling
- 1/2 cup heavy cream or whipping cream
- 1/2 cup mascarpone cheese
- 1 cup powdered sugar
- 1 tsp Vanilla Extract
- 1 1/2 cup fresh, washed and diced strawberries
Instructions
Vanilla Whoopie Pies
- Preheat oven to 350F. Prepare baking sheet and a template, if using.
- In a bowl cream room temperature butter (4 tablespoons) with granulated sugar (1/2 cup) for 3-5 minutes, until fluffy.
- In a small bowl combine 1 whole large egg and Vanilla Extract(1 teaspoon).
- Beat egg mixture into the butter-sugar mixture and beat until pale in color and creamy, about 3 minutes.
- Into another bowl sift all purpose flour (1 cup), baking powder (1/2 teaspoon) and salt (1/4 teaspoon)
- On low speed, into the butter mixture alternatively beat buttermilk and flour mixture.
- This mixture is semi-dense.
- Divide the cake batter into 3 bowls and color it with gel food colors. I used red and pink, leaf green and yellow.
- Slide a strawberry template onto a baking sheet and lay parchment paper on the top. Pipe strawberry cakes onto the parchment.
- Bake cakes in the preheated oven 350F, for 12-14 minutes. Let cool on a baking sheet for 5 minutes, then transfer onto a cooling rack to cool completely.TIP: Use a wide spatula to lift cakes from the baking sheet.
Mascarpone Strawberry Filling
- In a clean bowl, beat chilled heavy cream (1/2 cup) till soft peaks are formed. Gradually, alternating beat in powdered sugar (1cup) and mascarpone cheese (1/2cup).
- Then fold in fresh, washed, diced strawberries (1cup and 1/2 cup).
Fill Whoopie Pies
- Sandwich 2 strawberry cakes with strawberry filling.TIP: Use a cookie scoop to measure filling onto cakes.
- Enjoy immediatelly or store in the fridge for up 3-4 days. TIP: I prefer to let sandwiched cakes rest for several hour before serving.
Notes
- HOW TO MAKE BUTTERMILK? – Spoon 1/2 tablespoon of vinegar or lemon juice into a 1/2 cup measure. Top it off with room temperature or lukewarm milk. Let sit for 5 minutes, stir well and use in this recipe.
- CAN I FREEZE WHOOPIE PIES – It is best to freeze whoopie pies either unfilled or filled with a filling without fresh fruit.
- DO YOU USE SALTED OR UNSALTED BUTTER? – I prefer to use unsalted butter for baking.
Did you make this recipe? Tag @hanielas on Instagram and hashtag it #hanielas
TO MAKE STRAWBERRY WHOOPIE PIES YOU NEED
- TOOLS
- Find All the Tools in my Amazon Shop
- Baking Sheet
- Piping Bags
- Gel Food Colors
- Hand-Held Mixer
- Cookie Scoop
This post contains Amazon affiliate links that earn me a small commission, at no cost to you. I only recommend products that I use and love. Learn more about my affiliate policy here.
This post was originally published on June 26th, 2015. On March 29th, 2021 I updated this blog post with new step-by-step photos, written text.

Hi, I’m Hani
Welcome!
Thank you for visiting Haniela’s. On my blog, you’ll find delicious sweet & savory recipes made with simple ingredients. Why not start a new adventure? Discover a world of cookie decorating with my step-by-step tutorials.

Hi, I’m Hani
Welcome!
Thank you for visiting Haniela’s. On my blog, you’ll find delicious sweet & savory recipes made with simple ingredients. Why not start a new adventure? Discover a world of cookie decorating with my step-by-step tutorials.