How to Make Barbecue Grill Cake [Video]
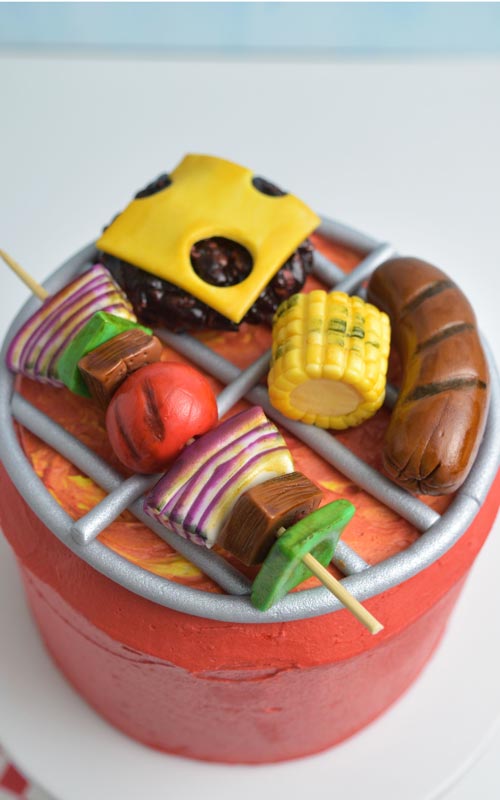
Looking for a fun cake idea for someone who loves grilling? I created this Barbecue Grill Cake with step-by-step tutorials for realistic fondant BBQ decorations like corn, kebabs, peppers, cheese, sausage, and onions. This cake is perfect for Father’s Day, summer parties, and BBQ-themed birthdays.
THINGS YOU NEED
- Recipes
- Cake Recipes: Velvet Vanilla Pound Cake, Simple Sponge Cake, German Chocolate Cake ( I baked the cake in a 6-inch Cake Pan)
- Swiss Buttercream – I used it fill and frost the cake
- Small Batch Marshmallow Fondant – to make decorations
- Edibles
- Tylose Powder – You need a tiny bit to make a quick gumpaste
- Food Colors: red, orange, yellow, ivory, black, green, brown, purple, fuschia
- Silver Mist Spray , Airbrush with Silver Metallic Airbrush Color or Silver Luster Dust – use one of these to create a silver finish on grill grates.
- Tools
- Clay Extruder
- Exacto Knife
- Cookie Scrapper/ 2-in-1 Decorating Tool
- Toothpick
- Knife
- Spatula
- Bamboo Skewer
- Pliers
- Paint Brush
- Paint Palette
This post contains Amazon affiliate links that earn me a small commission, at no cost to you. I only recommend products that I use and love. Learn more about my affiliate policy here.
FILL AND FROST THE CAKE
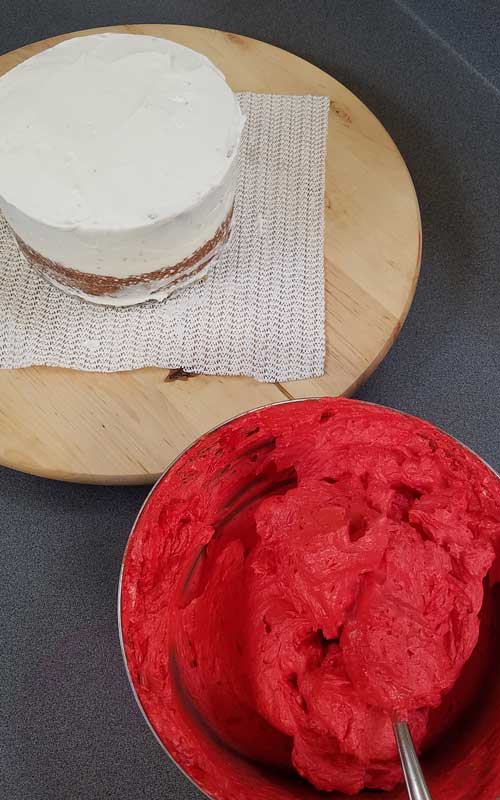
I baked two 6-inch Vanilla Pound Cakes and let them cool completely. Then I trimmed the tops and bottoms of each, having two cake layers. Spread a little Swiss buttercream onto a cake board to anchor the first layer in place. Set the first cake layer onto the board and brush or pour simple syrup onto each layer. Spread about ½ cup of Swiss buttercream onto the cake, then place the second layer on top. Apply a thin crumb coat over the entire cake and chill until firm, about 1 hour, though longer is perfectly fine too. Frost the outside of the cake with red buttercream. Use a bench scraper to smooth the sides. And a long spatula to smooth the top. Chill the cake until you are ready to decorate.
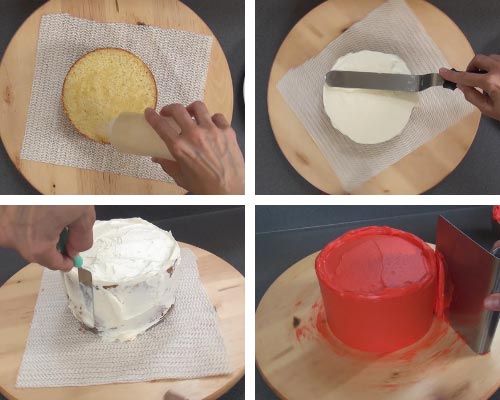
I need to point out one thing. If you haven’t colored Swiss Buttercream before, be sure to check out my tips on How To Color Swiss Buttercream with gel food colors.
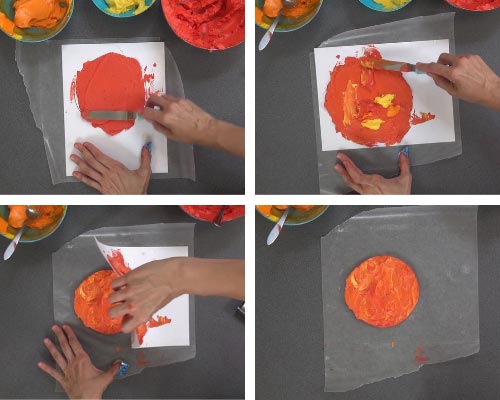
FIRE BUTTERCREAM TRANSFER
- Whenever possible, I like to use templates or stencils for decorating, whether I’m working on cookies or cakes. They make the process easier, more consistent, and much faster.
- To create the fire decoration, I used red, orange, and yellow Swiss buttercream.
- Start by placing a 5-inch round stencil* over a sheet of wax paper.
- Spread the colored buttercream over the stencil, marblining the colors together with a spatula to create a flame-like effect. I spread the buttercream to about a ¼-inch thickness.
- Carefully hold the wax paper steady with one hand while gently lifting off the stencil.
- Transfer the buttercream fire round onto a flat board and refrigerate or freeze until firm before using.
- I used this same buttercream transfer technique to make my pretty Burlap Wreath Cake as well.
- *I cut out a 5-inch round from cardstock.
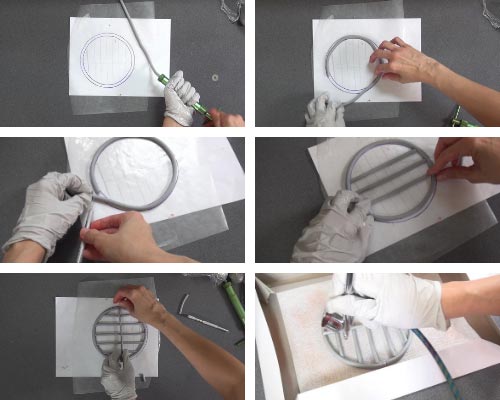
GUMPASTE GRILL GRATE
To make the grill grate, I used quick gumpaste, which is simply fondant kneaded with Tylose powder to help it dry faster and become sturdier. I mainly decorate with homemade marshmallow fondant. So, first, I prepared fondant using my small batch recipe. I colored it, and then kneaded in Tylose powder to turn it into quick gumpaste.
- Template – Trace a 5-inch circle onto a piece of paper and draw grid lines inside to create a grill grate template.
- Grease wax paper – Place a sheet of wax paper over the template and lightly grease it with Crisco.
- Gray quick gumpaste – Color about ¾ cup (150-190 grams) of white fondant with a small amount of black gel food coloring, then knead in 1 teaspoon of Tylose powder.
- Clay extruder – Fit a clay extruder with a large-hole disk and press out long ropes of gumpaste.
- Shaped grill grate – Arrange the ropes over the wax paper, using the template underneath as a guide. Trim the inner sections with a sharp knife.
- Glue the pieces – Attach them with a little water or edible glue.
- Let dry – Transfer the grill grate onto a flat surface and let it dry overnight.
- Silver finish – The next day, airbrush the grate with silver food coloring. You have several options- you can use a silver mist spray, airbrush, or brush the dry gumpaste decoration with dry silver luster dust. If airbrushing, let it dry for about 30 minutes before placing the grate on the cake.
- Decorate the cake – Use a wide spatula to carefully transfer the grill grates onto the cake.
CORN
- Yellow and ivory gumpaste – Color about 4 tbsp (tablespoons) of fondant with ivory, and another 4 tbsp with yellow gel food colors. Then knead 1/4 teaspoon Tylose powder into each portion.
- Corn core – First, shape the ivory gumpaste into a log to form the corn core, then trim the ends to neaten the shape.
- Corn seeds – Create a marbled gumpaste by briefly kneading the yellow and leftover ivory gumpaste together.
- Roll it out – Roll the marbled gumpaste ¼-inch thick.
- Corn kernel pattern – Cover with food wrap and gently mark a grid pattern with a dull knife or bench scraper, being careful not to cut all the way through the gumpaste.
- Assembling the Corn Kernels – Cut the grid piece to match the size of the corn core. Lightly brush the back with water, then wrap it around the core.
- Shape the ends of the corn kernels: I placed the food wrap over the ends and gently pressed shallow crease lines with a knife or a two-in-one tool. Align these lines with the main kernel grid to keep the pattern consistent.

TOMATO, MEAT, ONION
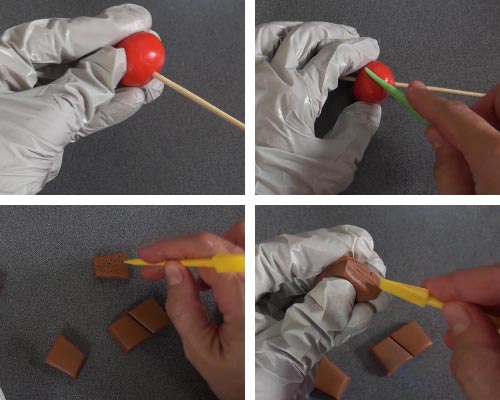
- Tomato
- Color 2 tablespoons of white fondant with red gel color. Knead in 1/8 teaspoon of Tylose.
- Shape 2 tbsp of red gumpaste into a ball.
- Thread it onto a bamboo skewer.
- Make dents in the tomatoes.
- Let dry.
- Meat chunks
- Color 8 tablespoons of white fondant with brown gel color. Knead in 1/2 teaspoon of Tylose.
- Roll out half of it to ½ inch thick. Use the rest to make the sausage.
- Cut it into small, irregular, rectangular shapes.
- Create texture with the sharp end of a cookie scraper or a toothpick.
- And make shallow slits into the sides.
- Thread them onto the bamboo skewer and let them dry.
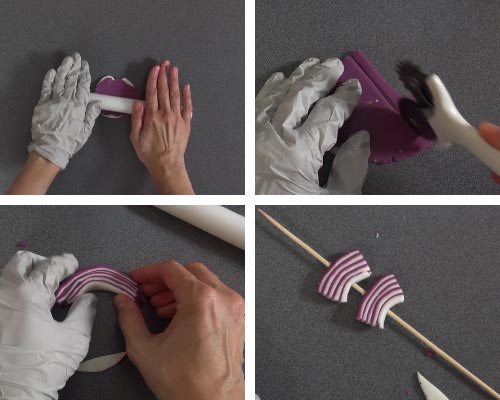
- Onion
- Color 4 tbsp of fondant with purple or fuchsia gel food coloring. Then knead in tylose to make quick gumpaste.
- Roll out 4 tbsp of purple and 4 tbsps of white gumpaste.
- Layer purple fondant on the white and roll it out to about 1/8 inch thick.
- Cut it into strips, glue the strips with water, with purple facing out.
- Trim the ends and thread them onto a bamboo skewer.
- Let dry.
BBQ KEBABS
- Green pepper
- To make green peppers, roll out about 3 tbsp of green gumpaste and cut out rectangular shapes. Thread the peppers onto the bamboo stick.
- Assemble kebabs
- Thread tomatoes, onions, meat, and green peppers onto the bamboo stick.
- Let all the decorations dry for at least 5 hours.
- Thicker pieces are best left dry overnight.

BURGER
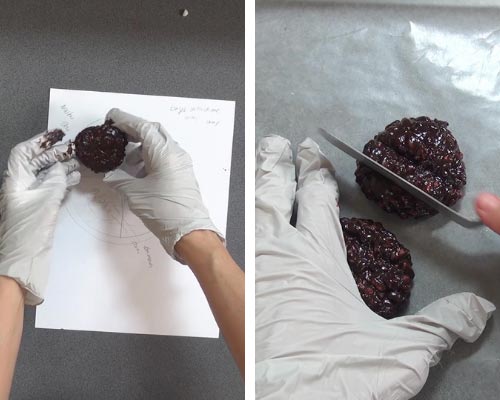
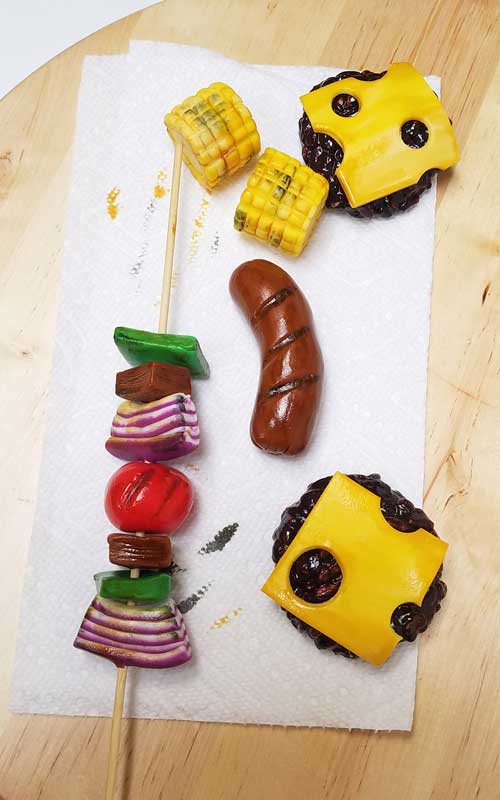
I used Rice Krispies to make the burger. Melt 1 cup mini marshmallows with 1 tbsp butter in the microwave on 50% power. Add 1 tbsp cocoa powder, brown, and red food coloring, stir well. Stir in 1 1/2 cups Rice Krispies cereal. Shape the mixture into disks. Use a template for the grill grates for size reference. Make grill dents with a spatula.
CHEESE AND SAUSAGE
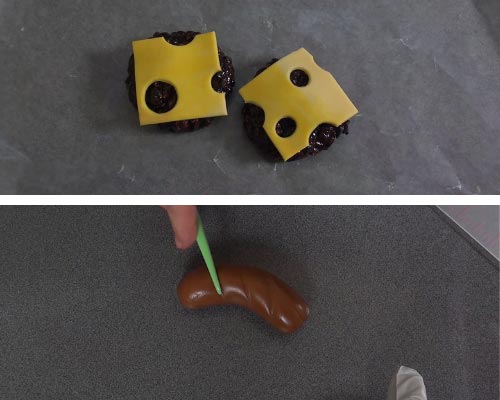
- Cheese
- Roll out the remaining yellow-ivory marbled gumpaste to about 1/8 thick.
- Cut out squares about the size of the burger, then, with a small round cutter or the wide part of a piping tip, cut out rounds. Drape it over the burger.
- Sausage
- Shape leftover brown gumpaste into a sausage. Make the dents and shape the ends (see the video for details). Let it dry.
PAINT THE GUMPASTE
To bring the decorations to life, I painted them with edible paint. I mixed a small drop of brown and black gel food coloring with a little clear vodka or Everclear (grain alcohol) to create the paint. Upon mixing, you might notice sediment in the edible paint. Discard it. Using a food-safe brush, I lightly painted the dried gumpaste decorations, being careful not to oversaturate the brush. It’s best to build the color in thin layers rather than applying too much liquid at once, which can soften the gumpaste. I focused especially on enhancing the grill marks for a realistic effect. Let the decorations dry for 20–30 minutes before handling.

ATTACH BUTTERCREAM ‘FIRE’ TRANSFER
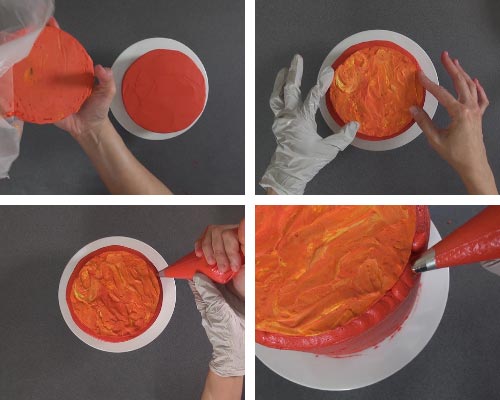
Remember the fire buttercream transfer we prepared in the beginning? I carefully peeled the wax paper away from a round transfer. To attach it to the cake, all you need to do is spread a small amount of buttercream on top of the cake, then gently place the fire transfer in position. Fill in the gap between the edge of the cake and the transfer with red buttercream, smoothing it out at an angle with a spatula. Chill the cake for about 20 minutes to set.
BARBECUE GRILL CAKE ASSEMBLY
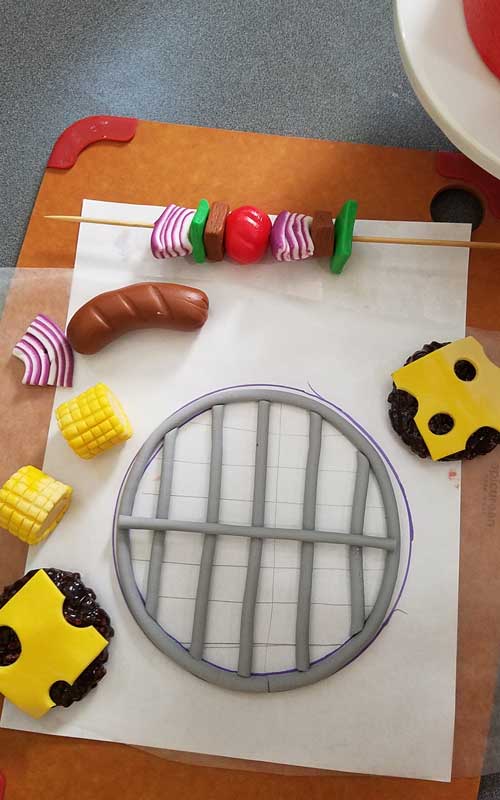
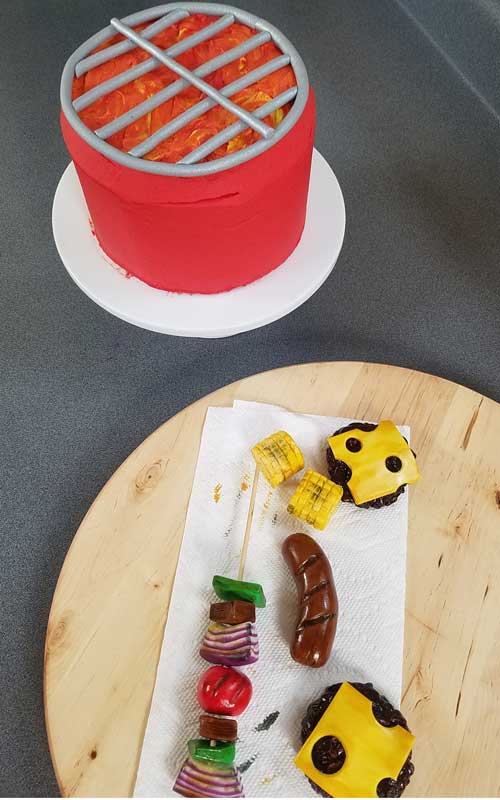
Using a wide spatula, carefully place the grill grates onto the cake. Arrange the burger, corn, and kebabs on top, trimming the bamboo skewers with pliers if needed.

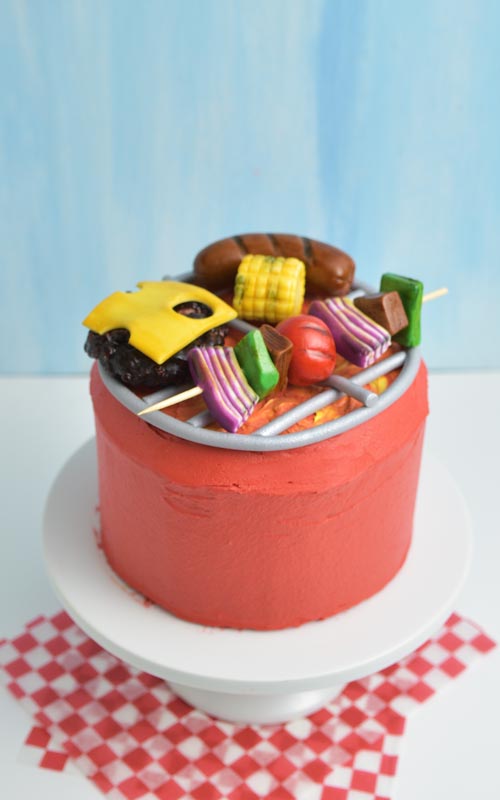
I absolutely love how this Barbecue Grill Cake turned out! To make it feel even more special, personalize it with a message like “Happy Birthday, King of the Grill” or “Happy Father’s Day.” You can use the same simple wax paper transfer method I used in my Willy Wonka Cake.
PIN IT for later
WATCH GRILL CAKE VIDEO STEP-BY-STEP
This post contains Amazon affiliate links that earn me a small commission, at no cost to you. I only recommend products that I use and love. Learn more about my affiliate policy here.

Hi, I’m Hani
Welcome!
Thank you for visiting Haniela’s. On my blog, you’ll find delicious sweet & savory recipes made with simple ingredients. Why not start a new adventure? Discover a world of cookie decorating with my step-by-step tutorials.

Hi, I’m Hani
Welcome!
Thank you for visiting Haniela’s. On my blog, you’ll find delicious sweet & savory recipes made with simple ingredients. Why not start a new adventure? Discover a world of cookie decorating with my step-by-step tutorials.