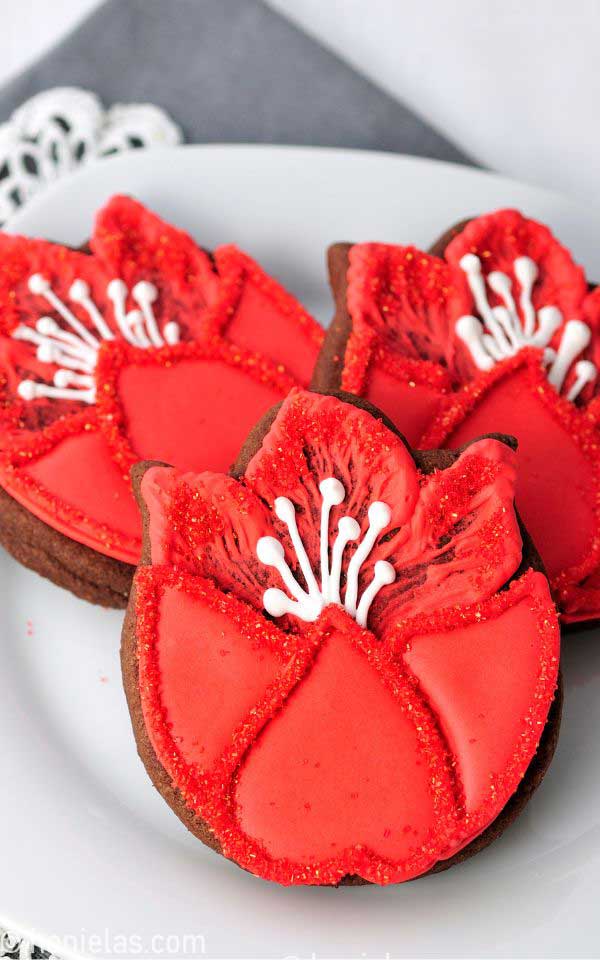
How to Decorate Brush EmbroideryTulip Cookies
Tulips are a timeless symbol of spring, and in this tutorial, I’ll show you how to bring them to life with texture and dimension. I used two fan-favorite cookie-decorating techniques: brush embroidery and sanding sugar to decorate brush embroidery tulip cookies.
BRUSH EMBROIDERY TULIP COOKIES TUTORIAL
Instead of keeping this classic tulip design flat, I’ve decided to add soft movement and depth with delicate brush embroidery petals. In addition, you can enhance the look with sparkling sanding sugar for a subtle texture and a light-catching detail. Both techniques play a key role in bringing this tulip design to life – perfect for spring celebrations, Mother’s Day, bridal showers, or Easter.
THINGS YOU NEED
- Get all the tools and supplies in Haniela’s Amazon Shop
- Tulip Cookie Cutter
- Gel Food Coloring: red
- Tipless Piping Bags
- Scribe Tool
- Edible marker: yellow and black
- Food-Only Paintbrush
- Red Sanding Sugar
This post contains Amazon affiliate links that earn me a small commission, at no cost to you. I only recommend products that I use and love. Learn more about my affiliate policy here.
ROYAL ICING COLORS AND CONSISTENCIES
I used royal icing to decorate cookies. You can use standard meringue-based royal icing made with egg whites, vegan icing (using aquafaba), or thick glaze icing.
- Red Icing: piping consistency (brush embroidery, outlines), 20-second consistency(petals)
- White Icing: piping consistency (protruding lines), 20-25 second consistency (large dots)
BRUSH EMBROIDERY
- Pipe a thick border with outline/piping consistency royal icing. It’s easier to do one section at a time (step 1).
- Using a food-only, lightly damp paintbrush, pull a portion of the icing, moving the strokes inwards, toward the middle of the cookie (step 2).
- Clean the paintbrush bristles frequently: dip the paintbrush in water and pat it dry with a paper towel.
- Continue with other sections (step 3).
- Allow icing to crust for 20 minutes.

FLOOD COOKIES
- Pipe the petals: pipe petal outlines with piping consistency icing (step 1). Allow to set for 5 minutes.
- Flood the petals with 20-second flood consistency icing (step 2).
- Let the icing crust for 2 hours.

DECORATE WITH SANDING SUGAR
- First, pipe the flower stamens with piping consistency, then let them dry for an hour.
- Then outline the petals with red piping consistency icing.
- Sprinkle sanding sugar on top of the freshly piped icing, and shake off the excess (step 1-2).
- Pipe random small dots onto the dry-brushed embroidery design.
- Using a food-only paintbrush, brush the icing inwards.
- Immediately sprinkle sanding sugar on top freshly brushed icing
- Shake off the excess.


Do you want to stay updated about free cookie decorating tutorials, live events, classes, and products? Sign up for Hani’s Cookie Decorating Newsletter.
MORE FLORAL COOKIES
- Pansy Vase Cookies
- Cherry Blossom Butterflies
- Lemon Cookies with Flowers
- Mini Succulent Cakes with piped Succulents
COOKIE DECORATING TOOLBOX
- Beginner’s Guide To Cookie Decorating
- Ultimate Guide to Cut-Out Cookies (tips, tricks, troubleshooting)
- Royal Icing Recipe
- Small Batch Royal Icing Recipe
- Cookie Icing Recipes (includes vegan royal icing, glaze, fondant)
- Guide To Royal Icing Consistencies with Visual Help(what is stiff, flood icing, etc.)
- How To Freeze Royal Icing
- How To Make Royal Icing Transfers
- Royal Icing FAQ ( for example: how to make black icing, color bleeding, storage, and more)
- How To Make a Cookie Cutter Template
- Ultimate Guide To Cookie Decorating Tools

Hi, I’m Hani
Welcome!
Thank you for visiting Haniela’s. On my blog, you’ll find delicious sweet & savory recipes made with simple ingredients. Why not start a new adventure? Discover a world of cookie decorating with my step-by-step tutorials.

Hi, I’m Hani
Welcome!
Thank you for visiting Haniela’s. On my blog, you’ll find delicious sweet & savory recipes made with simple ingredients. Why not start a new adventure? Discover a world of cookie decorating with my step-by-step tutorials.


These cookies are gorgeous! I’ve never seen the brush embroidery technique used this way. Very creative!
Thank you, Darita.
Possibilities with this technique are endless.
Have an amazing day!
Beautiful use of the embroidery technique! These are my favorite tulip cookies that I've seen.