How to Make Mini Succulent Cakes
Sometimes you don’t need a full-size sheet cake. Or perhaps you are intimidated by decorating a large cake, and a small cake is more manageable. Mini cakes are perfect for birthdays, small parties, or when you need something special but want to avoid leftovers. I’ve been enamored with beautiful succulents for what seems like forever, and they inspired me to create these sweet buttercream mini succulent cakes.

HOW TO MAKE BUTTERCREAM MINI SUCCULENT CAKES

WHAT YOU NEED TO MAKE BUTTERCREAM MINI SUCCULENT CAKES
- Baked Mini Cakes: I used my recipe for two egg sponge cake (see the notes in the recipe card for measurements); it is perfect for making 2 small mini cakes or one 7.5 inches by 5 inches cake. I use small foil baking pans. You can bake in them and wash them after and re-use them.
- Buttercream: 1 batch of Swiss Buttercream or American Buttercream
- Filling – I used tangy and delicious Lemon Curd.
- Piping Tips: petal tip#101, large star tip #4B, small star tip #16, round #3, round PME 1.5 or #1, leaf tip #352
- Gel Food Colors: forest green, leaf green, teal, lemon yellow, ivory, black, deep pink, or claret. Suppose you only have leaf green gel color-use black, ivory, and yellow to create different shades of green. Use minuscule (tip of a toothpick) amounts of black and ivory to create more earthy green tones.
- Other Tools: Small Spatula, Piping Bag, Couplers, cake slicer or a knife
TORTE AND FILL MINI CAKES
Level the cake tops and torte the cake. Reserve the trimmer tops for the cake sand. (steps 1-3). Fill the cake with lemon curd and place it back into the washed aluminum pan you used to bake the cake (steps 4-8).

HOW TO MAKE AN EDIBLE SAND FROM CAKE
Bake cake trimmings at 300F (150C) for 15 minutes or until dry. Then crush dry cake in a coffee grinder or a smaller chopper and process until fine. Cake crumbs work great as sand (steps 1-5).

PREPARE PIPING BAGS: WHAT PIPING TIPS TO USE
I used several piping bags and piping tips couplers. If you plan on using the same buttercream with different piping tips, use a coupler, it allows you to swap out a piping tip quickly.
- Large Star Tip #4B
- Small Star Tip #16
- Round Piping Tips #3, PME 1.5 or #1
- Petal Tip #101 or 102
- Leaf Piping Tip #352

Swiss Buttercream can be challenging to color with gel colors; it’s better to use oil-based colors, but if you have standard gel food colors, don’t despair. Follow my easy trick on how to color swiss buttercream.

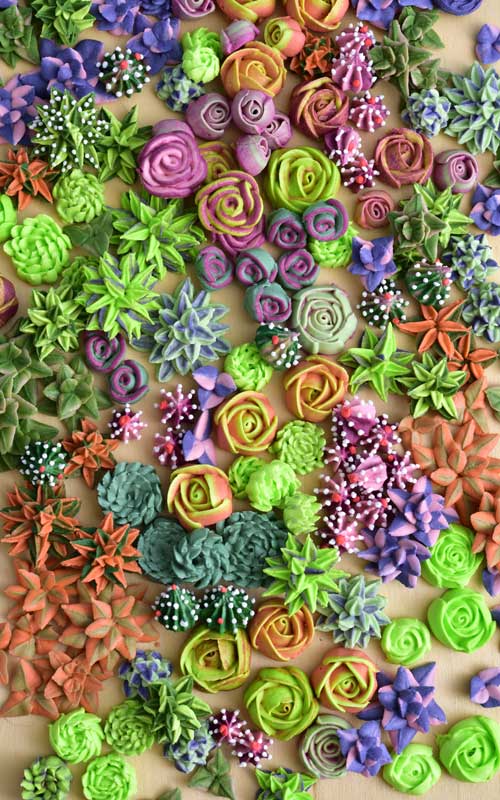
To make deep green, I used a forest green gel color with a little bit of leaf green gel color to brighten it up.

This bright green is a result of electric green gel coloring, or you can use lemon yellow gel color and and a touch of leaf green to it.

I use easy striping technique to prepare 2-tone buttercream for piped succulent roses. Onto a food wrap spread pink buttercream (accent color) and a thick layer of green buttercream (dominant color) on the top (steps 1-3). To make this shade of green, I used a leaf green gel color with a touch of ivory or brown. Make a pouch and thread one end thru a piping bag fitted with a coupler. Trim the end (steps 4-6). Then attach petal piping tip #101 and secure it onto the piping bag with a coupler’s ring. Align the wide end of the petal tip with pink buttercream (steps 7-8).


HOW TO PIPE BUTTERCREAM SUCCULENT ROSES
- Pipe a dot of buttercream onto the flower nail. Attach a parchment square (step 1).
- Start piping, hold the piping bag perpendicular to the flower nail, with the wide end facing out, anchor buttercream onto the flower nail (step 2).
- As as soon as you anchor buttercream, slowly bring the piping down so it’s parallel with the flower nail and make the first closed petal (step 3).
- Then, make more petals around it. Hold the piping bag with the wide end of the petal tip facing up and the narrow end facing the flower nail (steps 4-8). Carefully lift the parchment with the piped succulent and transfer it onto a flat freezer-safe tray.

This second succulent ribbon rose is a bit easier, it’s basically one continuous petal. Anchor buttercream onto the flower nail, keep the wide end of the piping tip facing up. Bring the piping bag to flower nail level, or a little above, don’t break the petal, turn the flower nail as you pipe buttercream, wrap the previous swirl with buttercream, stop squeezing the piping bag once finished.

Freeze buttercream succulents for 30 minutes, until firm.

DECORATE MINI CAKES WITH BUTTERCREAM SUCCULENTS
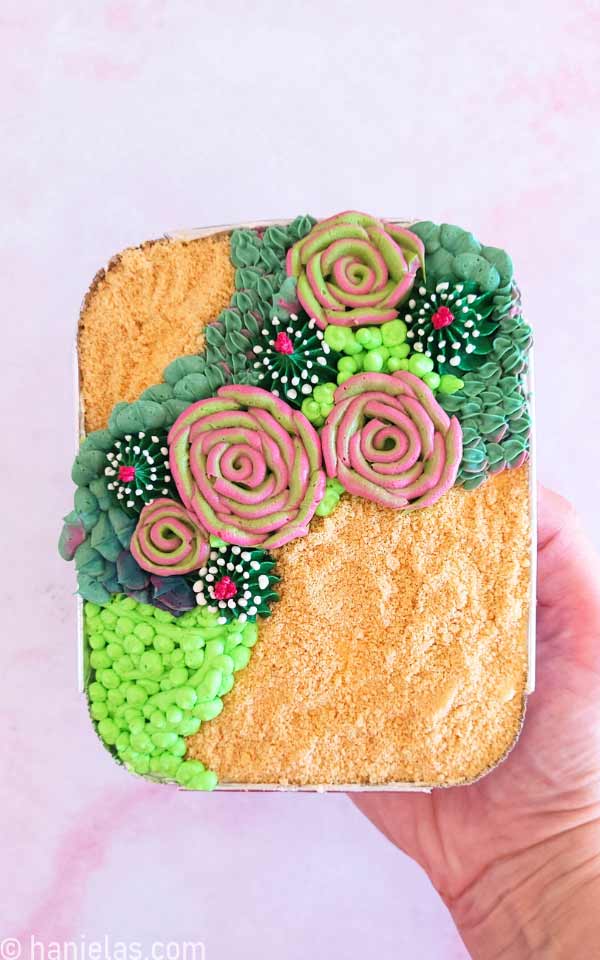
First spread a thin layer of uncolored buttercream on top of the cake. Smooth it with a spatula (steps 1-2). Use a toothpick and draw the borders into the buttercream (step 3). Cover outer sections with cooled cake sand; gently tap the cake on the work surface, this helps to level the fine cake crumbs (steps 4-8).

Pipe branches and dots with a round piping tip #3 (steps 1-6).

With a large star piping tip #4B, pipe stars onto the white buttercream layer (steps 1-2).

Decorate green stars with white buttercream and pipe rows of small white dots on the ribs of the stars (steps 1-4). Then with dark pink buttercream, pipe a flower, and pipe short “vertical” dots in the middle of each large green star (steps 5-6).

Remove frozen buttercream flowers from the freezer. Peel off the parchment from buttercream succulents and arrange them on cake (steps 1-3). Then use a star piping tip #16 (piping bag striped with pink and filled with teal green- teal mixed with a minuscule amount of black) and pipe clusters of buttercream and fill some of the blank areas (steps 5-8).

Add more texture with a leaf tip. Swap out star piping tip #16 for leaf tip #352. Pipe leaves on top of each other to cover empty areas with buttercream leaves (steps 1-4). Lastly, use bright green and piping tip #3 to fill those hard-to-reach spots (step 5). You can use a spoon or spatula to move edible sand to cover empty areas.

MORE CREATIVE CAKES
- Mason Jar Cake with Buttercream Hydrangea and Ranunculus Flowers
- Rainbow Scratch Art Cake
- Hot Cocoa Mug Cake
- How to Make Rosette Cake via Chelsweets
- Pastel Rainbow Birthday Cake

SUCCULENT COLLABORATION WITH SWEET AMBS
My friend Amber of SweetAmbs and I share an affinity for succulents, so it was only a matter of time before we teamed up for a sweet succulent collaboration. You’ll be surprised what Amber used to pipe her beautiful succulents. Learn about this fun decorating technique in a video: How to Make Succulent Cookies with Oreos.

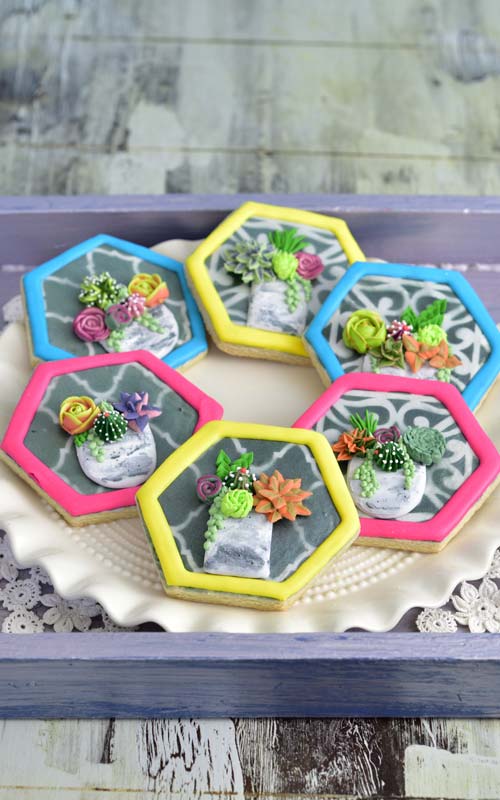
MORE SUCCULENT TREATS


Hi, I’m Hani
Welcome!
Thank you for visiting Haniela’s. On my blog, you’ll find delicious sweet & savory recipes made with simple ingredients. Why not start a new adventure? Discover a world of cookie decorating with my step-by-step tutorials.

Hi, I’m Hani
Welcome!
Thank you for visiting Haniela’s. On my blog, you’ll find delicious sweet & savory recipes made with simple ingredients. Why not start a new adventure? Discover a world of cookie decorating with my step-by-step tutorials.


I love this mini cake concept, I remember your class on succulents last year that I took – very cool
I am amazed by Amber’s method with the Oreos! who would think of that? 😉
Thank you so much, Sally. I think I’ll make minis for PT folks.:-)
The Oreo technique is so fun. Thank you for stopping by.
beautiful as always. Hani – you are so talented!!
Thank you so much, Eileen.