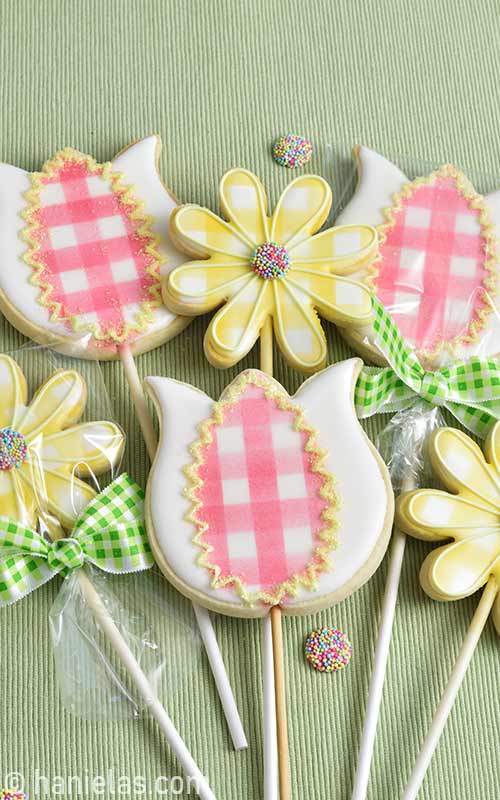
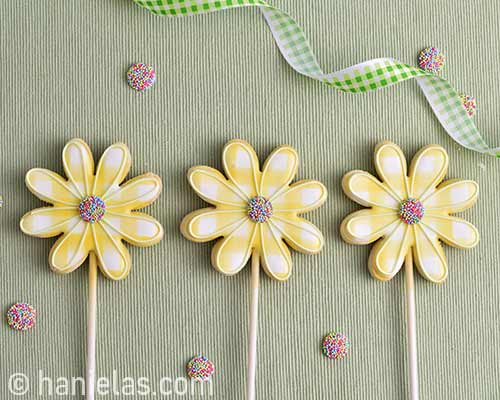
Gingham Flower Cookies
My pink and yellow Gingham Flower Cookies are perfect for welcoming the Spring!
HOW TO MAKE PRETTY GINGHAM FLOWER SUGAR COOKIES
Today I’m going to show you how to decorate gingham flower sugar cookies. And let’s start with how to make easy sugar cookies on a stick.

TO MAKE GINGHAM FLOWER SUGAR COOKIE POPS YOU NEED
- Royal Icing
- Roll Out Cookie Recipes
- How to Thin Royal Icing to 15 and Piping Consistency
- TOOLS
- Find all the tool you need in my Amazon Shop
- Cookie Cutters – You can use any Tulip and Daisy cutter.
- Lollipop Sticks
- Cardstock
- Mylar Material (look in my amazon shop in the Stencil Section)
- Wax Paper
- Rainbow Nonpareils
- Needle Tool
- Yellow Sanding Sugar
- Airbrush
- Airbrush Food Colors : Pink, Yellow
This post contains Amazon affiliate links that earn me a small commission, at no cost to you. I only recommend products that I use and love. Learn more about my affiliate policy here.
HOW TO MAKE FLOWER COOKIES ON A STICK
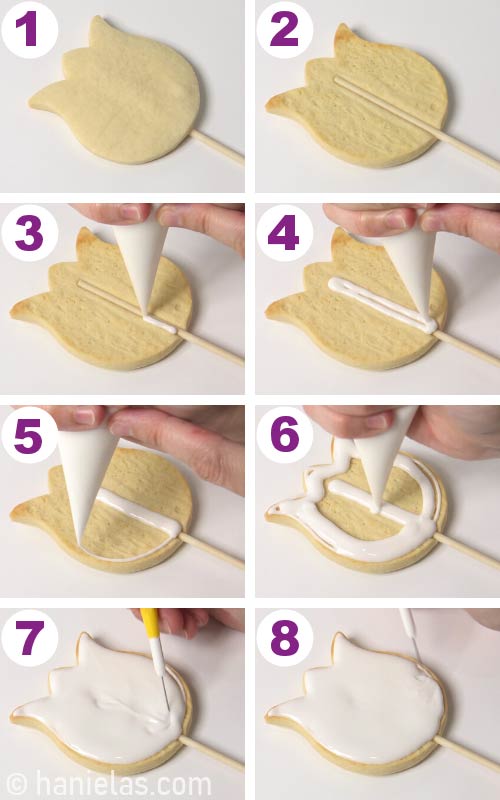
To make cookies you can use your favorite roll out sugar cookie recipe. I used my Vanilla Sugar Cookies. Roll the dough out to ¼ inch thick. Cut out cookie shapes with a daisy and tulip cookie cutter, (step 1-2).
Lay lollipop sticks onto a baking sheet lined with parchment paper. Then place each cookie onto the lollipop stick and gently press the cookie onto the stick, (step 2-6). Bake cookies as directed in the recipe. I baked them at 375 F for about 9-10 minutes.
After baking be sure to let the cookies cool on a baking sheet for 10 minutes before lifting them up with a spatula and transferring them onto a cooling rack to cool completely, (step 7-8).
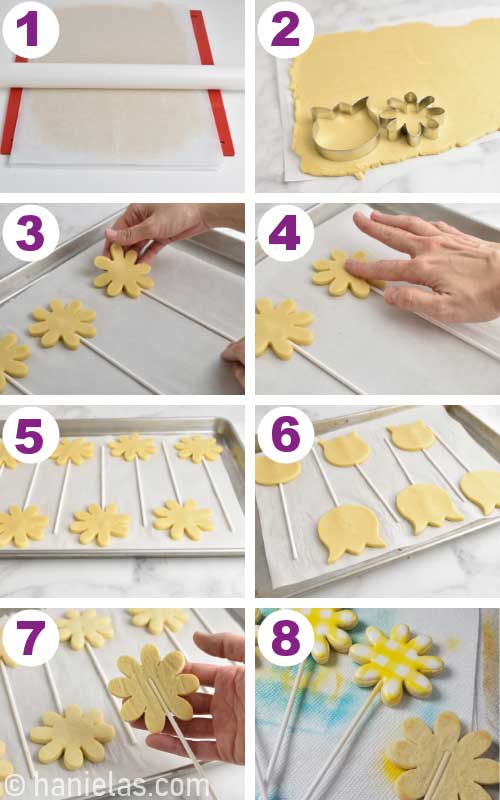
Then with royal icing decorate the side of the cookie with a lollipop stick exposed.
HOW TO MAKE HOMEMADE STRIPE STENCIL FOR AIRBRUSHING
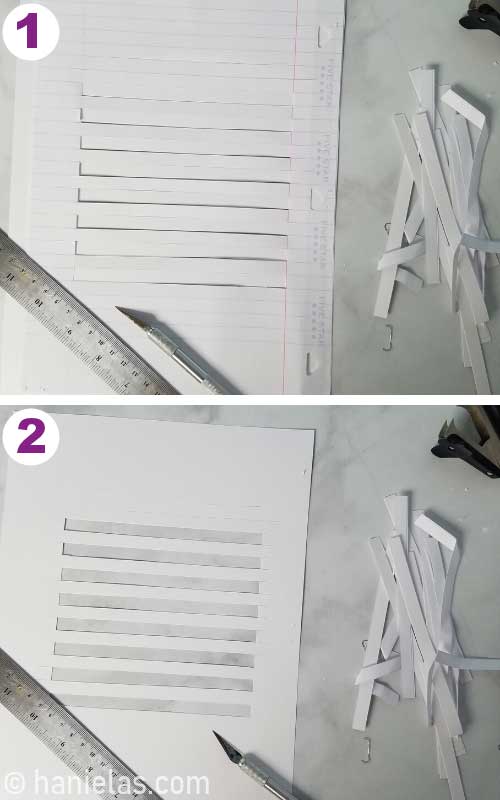
If you don’t have a stripe stencil don’t worry it is super simple to make at home.
To make stencil you can either use a plastic Mylar Stencil sheets (6mil) or you can also use cardstock paper.
TO MAKE A STRIPE STENCIL YOU NEED
- Lined Paper
- Cardstock (standard size) or Mylar Plastic Sheet (6 mil, these usually come in 12×12 inch size, 1 inch is 2.54cm)
- Exacto Knife
- Ruler
- Cutting Board – to protect your work surface
- Tape or a stapler- to secure lined paper onto the stencil material (card stock or mylar sheet, use a tape when using mylar material)
First you need to determine a stencil size you need. For this project I needed a standard size stencil (6×6 inch). Mark 6×6 inch dimensions onto a lined paper.
You can either staple or tape lined paper onto the cardstock. If using mylar sheet I’d recommend using a tape only so you don’t waste any of the mylar material.
Then place a straight ruler onto a lined paper, and following the lines, with an exacto knife cut out every other stripe until you have 6×6 square covered. Be sure to leave about a half inch to 1 inch border around a cut-out section. Don’t cut thru the whole width of stencil material.
TIP: Be sure to place your cardstock with the lined paper attached onto a cutting board. DO NOT PLACE IT AND CUT IT DIRECTLY ON A TABLE!
TIP: Cardstock paper is not as durable as plastic mylar sheet. On the other hand cardstock is super inexpensive and easier to cut by hand than mylar sheet.
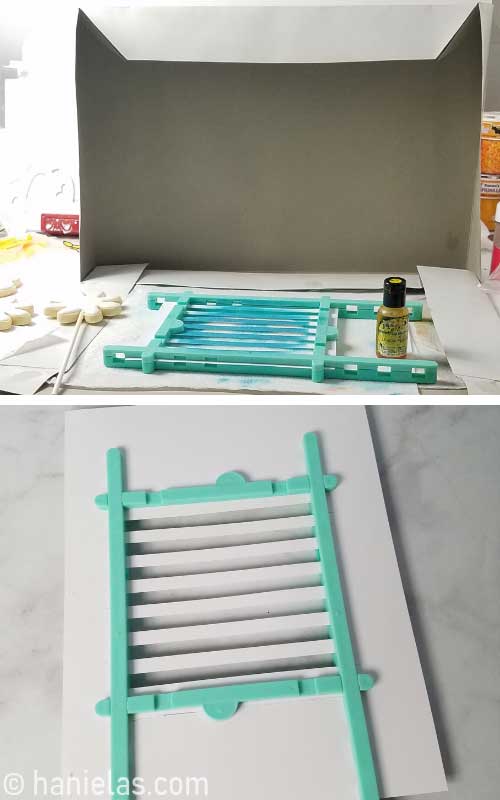
PORTABLE AIRBRUSHING STATION
If you’d done some airbrushing in the past you know that with airbrushing there is also over spray. To protect my work area when I airbrush cookies I use an airbrushing booth.
It is super easy to set up and really cheap, too. Basically, I use cardstock gift box. Top and bottom. Bottom part of the gift box is lined with a paper towel and it’s where I place the cookie to be airbrushed. Top/lid part of the gift box is hooked under the bottom to make it stand in a “L” shape.
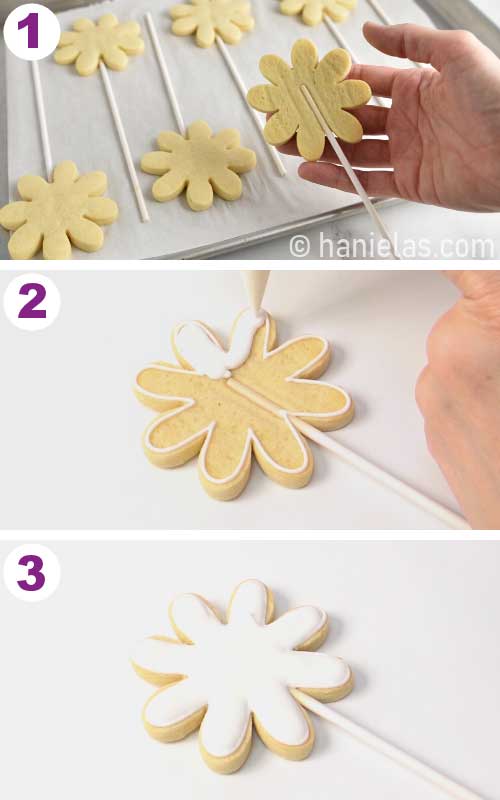
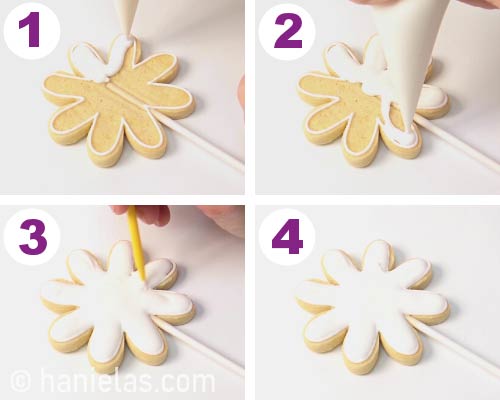
DECORATE DAISY COOKIE WITH ROYAL ICING
Start with outlining and flooding daisy cookies with white royal icing (15 second consistency). Allow icing to dry.
STENCIL HOLDER
When airbrushing it’s best to secure stencil in either a stencil holder or if you don’t have one you can also use magnets.
To airbrush flower cookies on a stick I had to use magnets because lollipop stick in the cookie was in the way of stencil holder frame. Magnets offer little more flexibility in this case and they worked really well, too.
TIP: I used standard side magnets to secure stencil in place. Ideally you want the thickness of the bottom magnets to be about the same as the thickness of the cookie you are airbrushing (little over 1/4 inch, equals to the thickness of the cookie + royal icing layer). That way stencil can snugly sit on top of the cookie, leaving very little room for under stencil overspray.

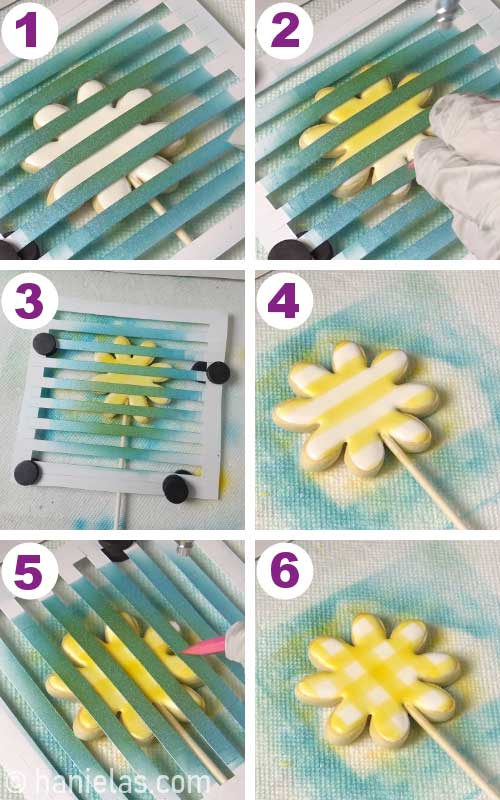
DAISY COOKIES AND HOW TO AIRBRUSH GINGHAM PATTERN ON A COOKIE
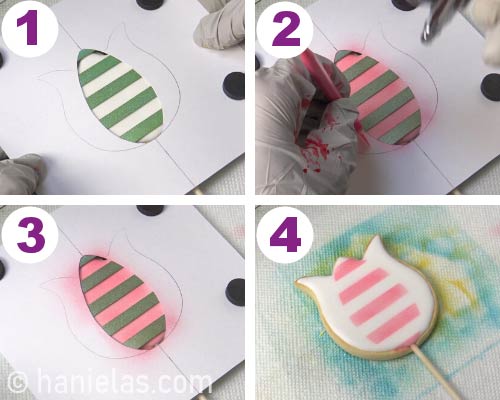
Secure stripe stencil with magnets and place it directly over the iced cookie. Feed the airbrush gun with a little bit of yellow airbrush color. Airbrush surface of the cookie (step 1-4).
Then lift the stencil up and arrange it on a top of a cookie again so that stencil stripes are perpendicular to the airbrushed stripes on the cookie. Airbrush over the stencil again. Lift up the stencil and voila you should have beautiful gingham flower cookies, (step 5-6).
TIP: Use a scribe tool or 1-in-2 tool to hold stencil stripes in place as you airbrush. Sometimes air from the airbrush will get under the stripes and move them a bit. Holding them in place helps to keep the lines clean and sharp without excessive overspray.
ROYAL ICING FLOWER CENTERS
I prepared flower centers ahead of time. These are called Royal Icing Transfers (my ultimate guide to royal icing transfers shows you how to create different types of transfers and how to use them in decorating).
First on a piece of paper draw 2 parallel lines, about ½ inch or little more apart if you want flower centers to be larger. Then place a piece of wax paper over the template.
Pipe large dots with pink royal icing (25 second consistency) between the lines. Don’t allow dots to crust, (step 1-2). Immediately dust them with rainbow nonpareils, covering dots completely in an even layer, (step 3). Slide the wax paper with royal icing dots onto a paper towel.
Gently lift up wax paper, holding 2 corners and allow excess nonpareils to fall onto the paper towel. Lay wax paper with nonpareils covered royal icing dots onto a flat surface. Allow flower centers to dry overnight. Then peel off the wax paper from dry royal icing decorations, (step 4-5)
TIP: Make RIT (royal icing transfers) ahead of time. Days, weeks and even months in advance is fine. Store them in an airtight container away from a direct sunlight and moisture, until ready to use.

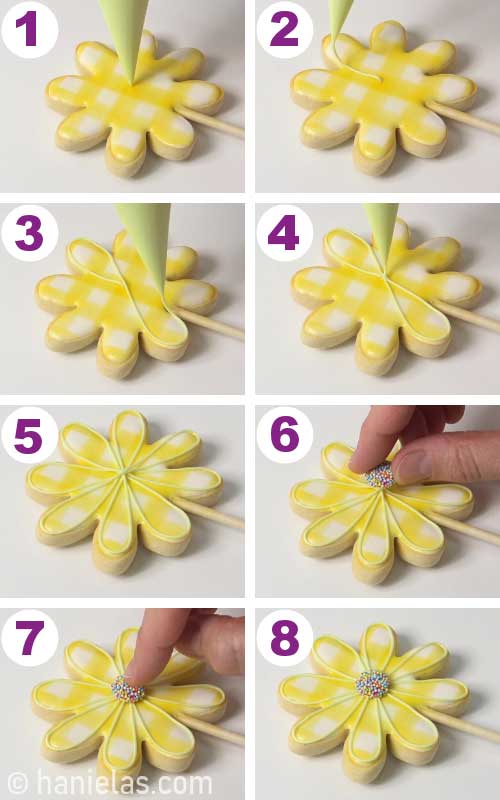
With a light, pastel green royal icing (piping consistency) pipe petal outlines onto the airbrushed daisy cookie. Start in the center and pipe infinity symbols continuously 4 times, (step 1-5). Then while icing is still wet carefully press the nonpareil flower center in the middle of the daisy cookie, (step 6-8).
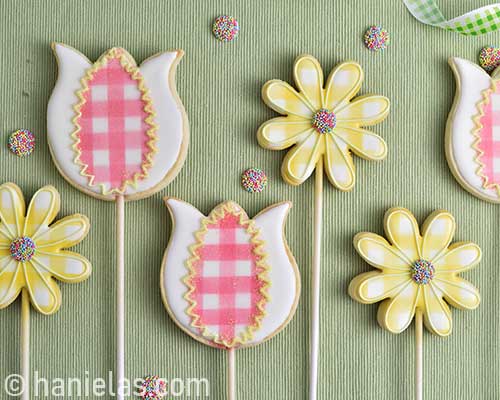
Get creative and use variety of colors to make pretty gingham cookies.
TULIP GINGHAM COOKIES
First ice the cookie with white royal icing (15sec). Outline and flood the cookie with this consistency and allow icing to dry, (step 1-8).
LAYERING STENCILS FOR AIRBRUSHING
In order to create gingham pattern just on a part of a tulip cookie we need to “block” parts of the stripe stencil so that only part of the cookie is exposed when we airbrush. To help me achieve this I used another easy to make at home stencil.
TO MAKE A SECTIONAL TULIP STENCIL YOU NEED
- Tulip Cookie Cutter
- Pencil
- Exacto Knife
- Cardstock or Mylar Sheet (6mil)
With a pencil and a tulip cookie cutter trace the tulip outline on a cardstock, leaving about 1.5 – 2 inches border around the tulip outline. Ideally you want the size of this sectional stencil be 6×6 inch. Draw an oval shape in the middle and cut it out with an exacto knife.
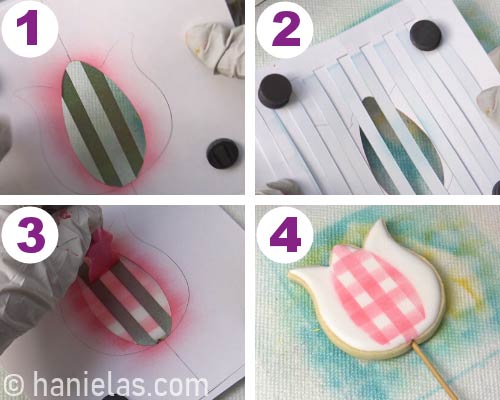
- Layer tulip cutout stencil over the stripe stencil. Secure both with magnets and layer the stencils over the cookie. Arrange the oval shape over the cookie following the curvature of the tulip shape, (step 1).
- Airbrush over the stencils with pink airbrush color. Lift up the stencil to reveal the striped design, (step 2-4).
Now we need to re-arrange stripe stencil so we can create gingham pattern, (step 1-2). Secure both stencils with magnets again, (step 3).
And then place the stencils over the airbrushed cookie. Again, take care to align the 1st airbrushed outline with the tulip cutout stencil shape. Airbrush with pink airbrush color, (step 3-4).
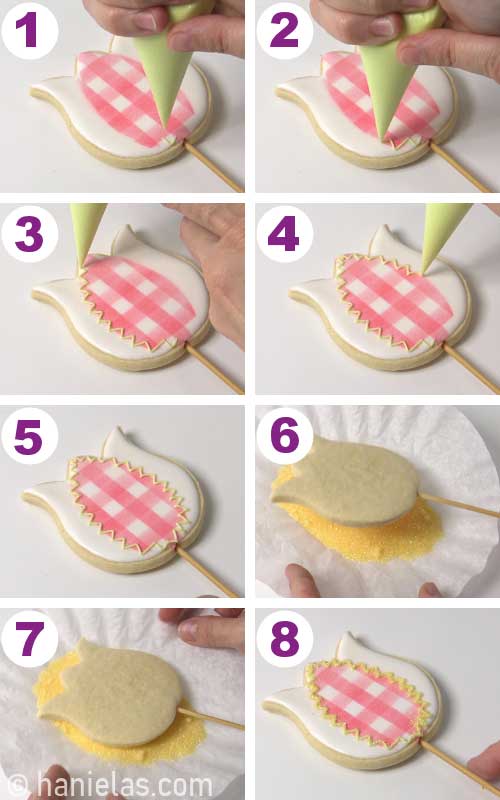
DECORATE WITH SANDING SUGAR
Often when I can’t decide on a final design detail I pipe the design on a wax paper. In this case I needed a visual of sanding sugar and nonpareils. And that is what you see below. 1st I dipped freshly piped zic-zac outline into a yellow sanding sugar. And I also tried dipping it in rainbow nonpareils. Which one do you like better?
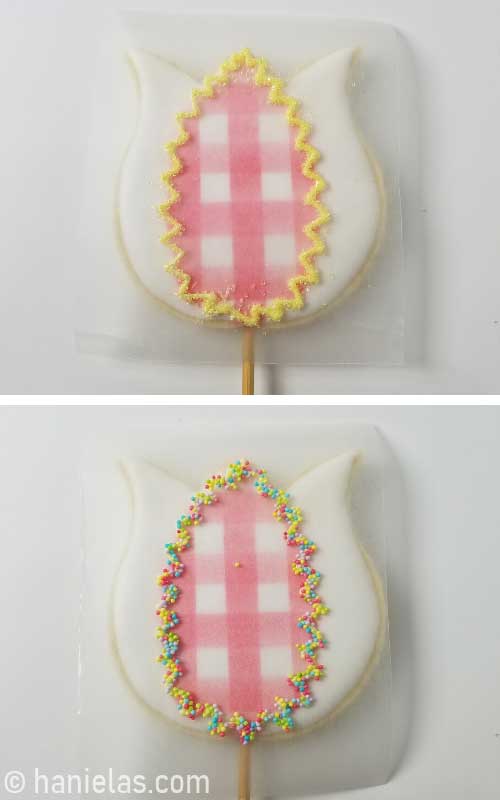
In this next step I used yellow royal icing (piping consistency) and I piped ziz-zac border around the gingham section. Then I dipped the cookie into yellow sanding sugar to coat the ziz-zac outline.
TIP : Allow airbrushed gingham pattern to dry for 10 minutes before applying sanding sugar. Sugar may still stick to the airbrushed section. When it does, gently shake it off or brush it off with a wide fluffy dry food only paint brush.
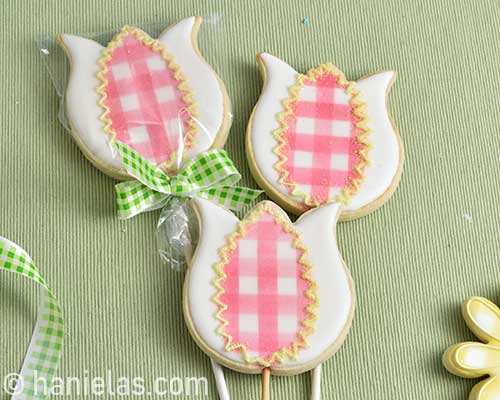
HOW TO PACKAGE GINGHAM FLOWER COOKIES?
Package cookies individually into clear poly bag and tie the bag with a festive ribbon. Or display cookies into a vase, basket or make a flower cookie bouquet.
DETAILS MATTER
I wanted to show how small details can change the whole design on these lollipop gingham flower cookies. Compare 2 pictures below. Top cookies have no details and bottom are with added details. What a change right?!

MORE SPRING DESSERT IDEAS
This post contains Amazon affiliate links that earn me a small commission, at no cost to you. I only recommend products that I use and love. Learn more about my affiliate policy here.

Hi, I’m Hani
Welcome!
Thank you for visiting Haniela’s. On my blog, you’ll find delicious sweet & savory recipes made with simple ingredients. Why not start a new adventure? Discover a world of cookie decorating with my step-by-step tutorials.

Hi, I’m Hani
Welcome!
Thank you for visiting Haniela’s. On my blog, you’ll find delicious sweet & savory recipes made with simple ingredients. Why not start a new adventure? Discover a world of cookie decorating with my step-by-step tutorials.
I LOVE these cookies but don’t have an airbrush tool. What do you suggest I use for the gingham design?
Hi Andrea,
you can use Color Mist Food Coloring Spray by Wilton, they come in different colors and for this project they will work.
Happy Creating.
Hani
Thank you for your great Tutorials
and greetings from Germany <3
Thank you June.
These really shout spring! Love the gingham, RIT , and so many good tips!
Thank you so much June, I love how these turned out. Totally getting Spring vibes from these.