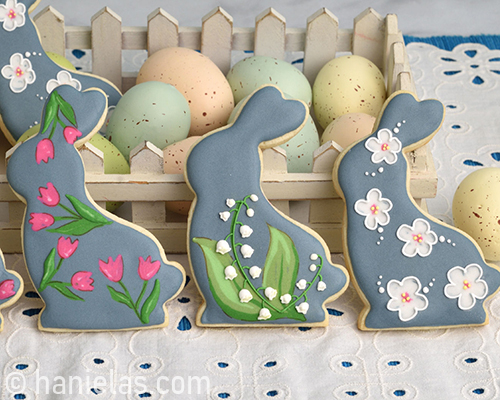
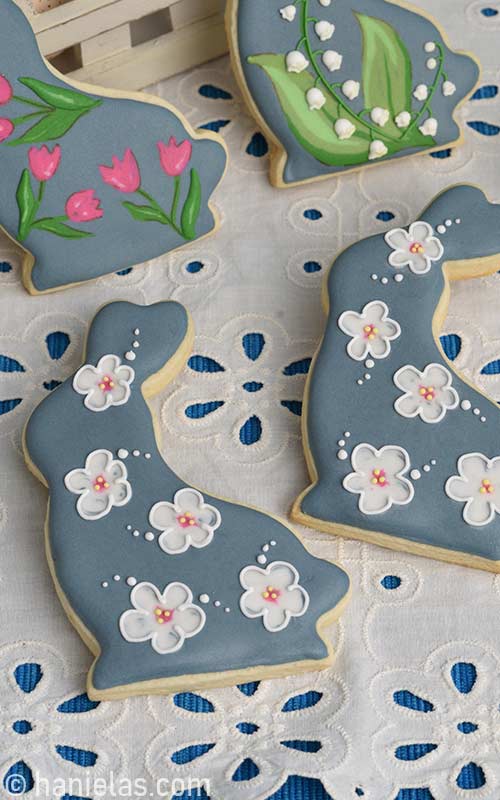
Floral Bunny Cookies
Today I’m going to show you how to make pretty decorated Floral Bunny Cookies. I’ll show how to create 3 floral designs utilizing one of my favorite cookie decorating techniques : Wet on Wet Royal Icing Decorating.

HOW TO MAKE WET ON WET FLORAL BUNNY COOKIES
You can use any of these Roll Out Cookie recipes to bake the cookies. I used my Sugar Cookie Recipe and Fresh Lemon Royal Icing to decorate. And if you are wondering where I got this classic sitting bunny cookie cutter check out the tools’ section at the bottom of this post.
HOW TO MIX DIFFERENT COLORS
In today’s tutorial I used several different colors. Most of them were mixed by mixing 2 colors together. When you are mixing royal icing colors you can utilize concentrated gel colors and you can also mix your own color by for example adding a teaspoon of yellow royal icing to green royal icing to make the green icing bit brighter. To make colors lighter add white icing.
- Wedgewood Blue – either start with light to medium gray royal icing that you have mixed previously. Or start with white icing and add a small amount of black gel color (tip of the toothpick) or little bit of black royal icing to make gray icing. And then add tiny amount of royal blue gel color (tip of the toothpick) or royal blue royal icing – this icing is the base color for all the bunny cookies
- Sage Green – start with a light green royal icing and then add a minuscule amount of black to it or gray royal icing, mix until you achieve desired color – this icing is used to make lily of the valley leaves
- Dark Leaf Green – use leaf green gel color with a touch of moss green – this color is used to make edges of lily of the valley leaves, tulip stems and leaves
- Bright Green – create bright green using sage green with a touch of yellow – this color is used for the shading of lily of the valley leaves and tulip leaves
- Fuchsia Pink – to achieve this color I used Pro Gel Claret food coloring – I used it to make the tulips and cherry blossoms’ centers
- Yellow – I used lemon yellow gel color – it’s used to make cherry flower centers
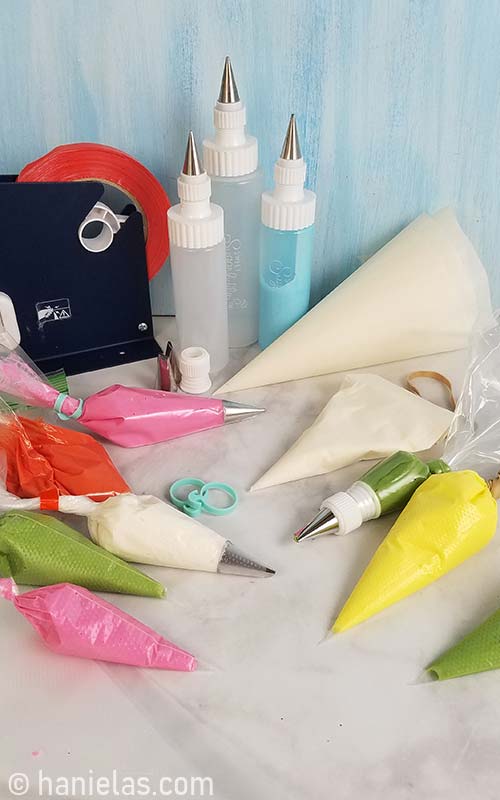
HOW TO FLOOD COOKIES WITH ROYAL ICING
To pipe icing I used disposable piping bags. And to flood the cookies I used 15 second consistency of royal icing to outline and to flood the cookies. If you are not familiar with 15 second consistency royal icing be sure to view my Ultimate Guide To Royal Icing Consistency
HOW TO CUT A DISPOSABLE PIPING BAG
First find a seam on the piping bag. Flatten it in the middle. Then cut a small tip with scissors. Cut should be perpendicular to the seam. With your fingers gently wiggle the cut tip to reshape it after it’s been flattened.

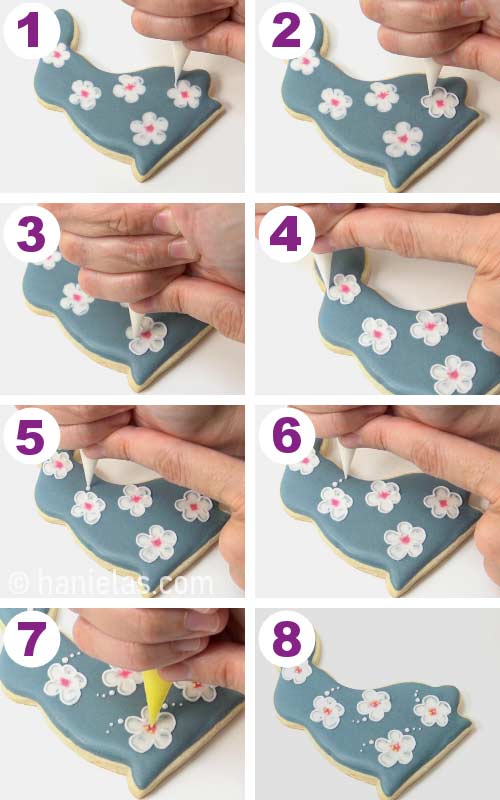
DECORATING STEPS :
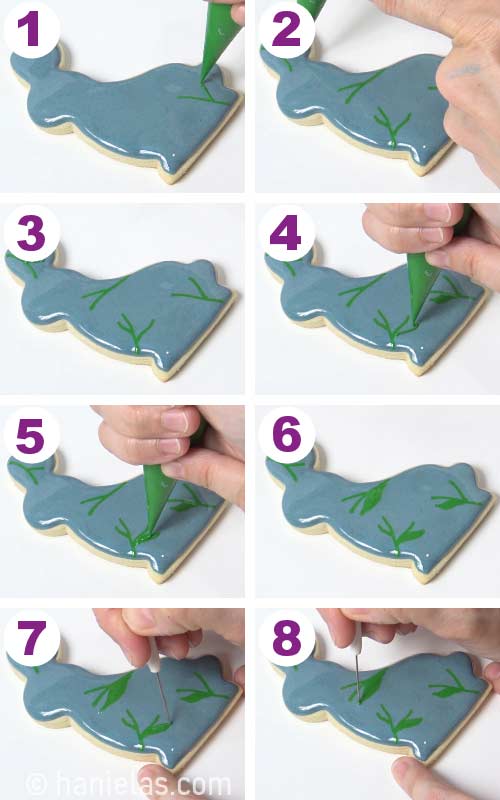
Let’s start with outlining and flooding a sitting bunny cookie with wedgewood blue royal icing (15sec), (step 1-5). Use a needle tool to distribute the icing evenly. Then immediately start working on wet on wet design, don’t allow icing to crust, (step 6-8).

LILY OF THE VALLEY BUNNY COOKIES
Dainty Lily of the Valley are one of my favorite flowers, if not favorite. Years ago I made simple round Lily of the Valley Sugar Cookies. And I even make Lily of the Valley Meringues.
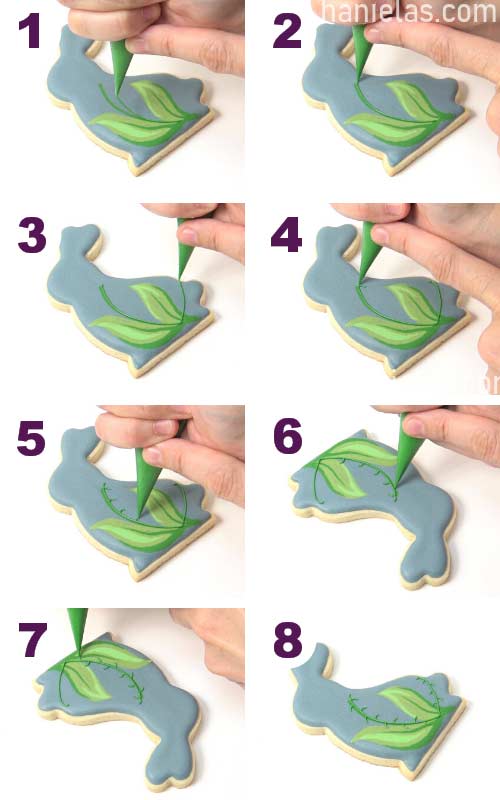
In this design I employed wet on wet royal icing technique to make the leaves. I used 3 shades of green. Though not necessary I think it gives leaves more depth and movement. Then I layered stems and clustered white bell shaped flowers on the top of dry icing. I finished decorating with an edible marker. I outlined leaves to give them more presence in this floral bunny design.
TIP : I used a fine tip edible marker (by Rainbow Dust). You can use brown or black marker. However for this design I think brown works a little better. It’s not as “harsh” as black and blends in with design naturally.
DECORATING STEPS :
Immediately after you flood the cookie start creating wet on wet design. Start by piping a dark green stem (15sec), (step 1). Then pipe a leaf outline with sage green (15 sec.) and flood the inside. Use a needle tool accentuate the tips of the leaf, (step 2-5).

Take dark green icing (15sec) and pipe a thick line just on the right edge of the leaf and then shorter thinner line thru the middle of the leaf. Use a needle tool to shape the icing, especially the ends, (step 1-5).
Now use bright green icing (15sec) and pipe it on the right side of the leaf and all the way to the tip of the leaf and then a short line down the left side of the leaf. Again shape the icing with a needle tool, (step 6-8).

Repeat the process on the left side, (step 1-8). And allow icing to dry overnight.

With a piping consistency dark green icing pipe the main stems and also short stems on each main stem. Pipe the short stems slightly curved down, (step 1-8).
PIPE BELL SHAPED FLOWERS
With white royal icing (25sec) pipe lily of the valley flowers. 1st two or 3 flowers at the very top can be just buds, (step 1-2). And as you go down the stem make the flowers bigger.
Pipe a puffy dot and then immediately shape the bottom so it resembles a bell shape. Use a needle tool to shape icing while wet, (step 3-8). Allow flowers to crust well.

To finish lily of the valley flower pipe an outline at the bottom of each bell shaped flower. Use white royal icing (piping consistency), (step 1-6).
Then take an edible marker, either black or brown fine tip and accentuate the leaves’ edges.

WET ON WET TULIP ROYAL ICING BUNNY COOKIES
Start by outlining and flooding the cookie with wedgewood blue icing (15sec). Then immediately pipe stems with dark green icing (15sec). Then pipe 1 leaf next to each main stem. Use a needle tool and shape the leaf, (step 1-8).
Don’t allow icing to crust. Continue with fuchsia pink (15sec) and pipe tulip outline and then fill it with icing. Shape 3 points of each tulip flower with a needle tool, (step 1-5). Then dip tip of a needle into a bright green icing (15sec) and create a line in the middle of each leaf by dragging the tip thru the middle of the leaf.

Shade the tulips with white icing. Pipe couple of small dost onto each tulip. Then blend it in with a needle tool. Allow icing to dry, (step 1-3).

Now add another leaf on the opposite site of the main stem. Pipe the leaf with dark green icing (20sec). Shape it with a needle tool. And then pick up a tiny amount of bright green icing (20 sec) with a tip of a needle tool. Drag the tip of a needle tool thru middle of a freshly piped green leaf.

Lastly, take a fine tip edible marker, either brown or black. And accentuate wet on wet leaves, stems and tulips.

These floral bunny cookies are perfect for celebrating Easter.

CHERRY BLOSSOM WET ON WET ROYAL ICING BUNNIES
In this last wet on wet floral design I’ll show how to make easy cherry blossoms.
Start by outlining and flooding a sitting bunny cookie with wedgewood blue icing (15sec). Don’t allow icing to crust. Immediately pipe flower shapes with white icing (15sec). First pipe the petal outlines and then fill each petal with more icing, (1-8).
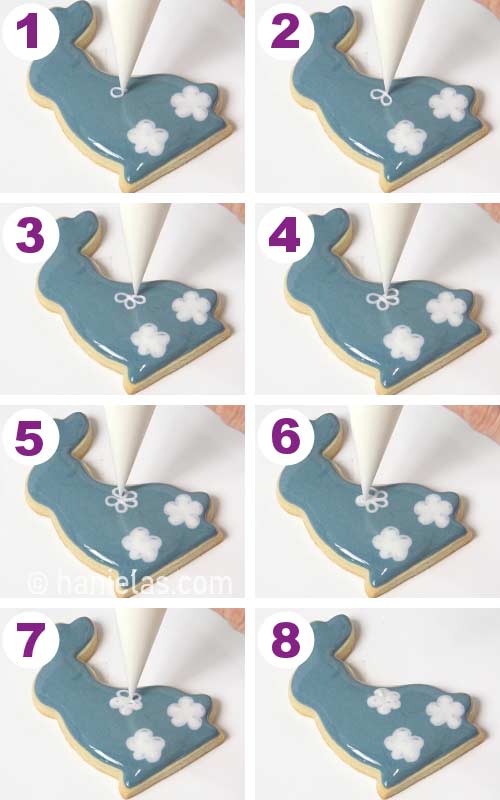
Repeat piping more flowers. Then take pink fuchsia icing (15sec) and pipe a large dot in the center of each flower. Take a needle tool and disturb the edges of pink dot slightly so the edges are not sharp and pink blends into the white icing surrounding it, (step 1-5).
After, accentuate flower petals. To do so use the tip of a needle tool and drag it thru the wedgewood blue and into the white to re-shape the flower petals. Allow icing to dry, (step 6-8).

OUTLINE
To accentuate flower shapes I outlined each flower with white royal icing (piping consistency). Pipe 3-4 dots graduating in size next to each flower. And lastly take yellow icing ( 25 sec) and pipe 3-4 dots in the middle of the flower, were the fuchsia pink is.
I’m really loving these cherry blossoms bunnies. They remind of cherry blossoms in full bloom in our back yard.
WET ON WET ROYAL ICING TIPS
- Try not to overfill cookie with a base layer of icing. Remember you’ll be adding more icing creating wet on wet designs. Too much icing on the cookie can cause excess icing to overflow.
- Don’t take breaks when working on wet on design. Once icing starts crusting it’s difficult to create beautiful seamless wet on wet designs.
- Use flood consistency to create wet on wet designs.
- Depending on the design and the size you are flooding you can use 10, 15, 20-25 second consistency icing to create wet on wet royal icing designs. Use a rule of thumb when deciding on proper consistency for your project.
- Larger the area longer it may take to create seamless wet on wet design so icing should be more fluid (10-15 second cosistency).
- And also, for example when making small tulip leaves you need icing that is thicker so it doesn’t spread too much and you don’t have cave ins, yet it should be fluid enough so you can add a leaf vein using lighter icing ( 20-25 second consistency).
- When icing crusts very fast, try remedy icing with little big of corn syrup. (Add up to 1/3 cup of corn syrup to a batch of royal icing made with 2lb of powdered sugar)
- Be aware of your ambient temperature, working by the heater, or having a fan running close by will cause your icing to crust quicker.
TO MAKE FLORAL BUNNY COOKIES YOU NEED
- RECIPES
- Roll Out Cookie Recipes
- Royal Icing
- Vegan Royal Icing with Aquafaba
- TOOLS
- Sitting Bunny Cookie Cutter
- Get all the tools in my AMAZON SHOP
- Disposable Piping Bag
- Needle Tool
- Food Colors : Pro Gel Claret, Leaf Green, Black, Yellow, Moss (refer to color mixing chart at the top of this post)
- Video Tutorial Lily of the Valley floral design
- Video Tulip and Cherry Blossom floral design
MORE WET ON WET COOKIE DECORATING :

This post contains Amazon affiliate links that earn me a small commission, at no cost to you. I only recommend products that I use and love. Learn more about my affiliate policy here.

Hi, I’m Hani
Welcome!
Thank you for visiting Haniela’s. On my blog, you’ll find delicious sweet & savory recipes made with simple ingredients. Why not start a new adventure? Discover a world of cookie decorating with my step-by-step tutorials.

Hi, I’m Hani
Welcome!
Thank you for visiting Haniela’s. On my blog, you’ll find delicious sweet & savory recipes made with simple ingredients. Why not start a new adventure? Discover a world of cookie decorating with my step-by-step tutorials.

Hi. When you use the fine tip brown edible pen to highlight the tulips, is then RI still wet? Or do you come back after it has dried? Thanks, beautiful!
Hi Emily, icing is dry when I draw outlines with edible markers. Thank you.
Looking for your AMAZING sugar cookie recipe! Love the thick and chewy version!!
💜Love your videos. Very new to Sugar cookie decorating!🍪
Thank you Michelle. Stay Safe.