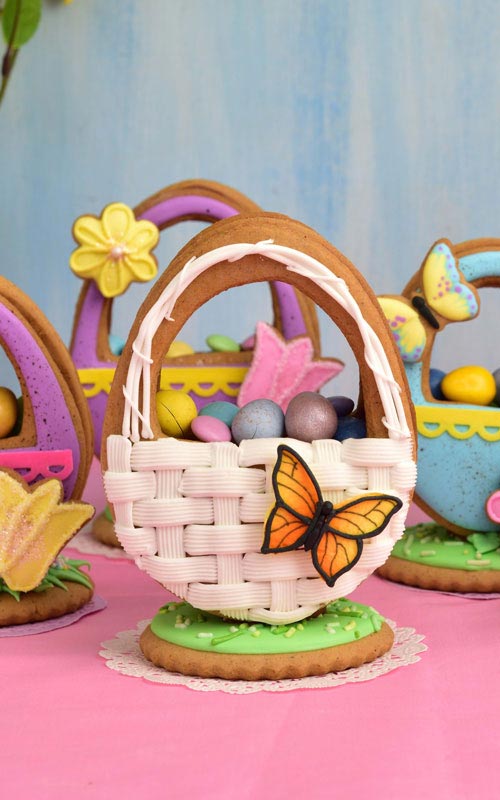
3D Easter Basket Cookies
Surprise your family and friends with these cute candy-filled 3D Easter Basket Cookies.
I love when I get the opportunity to collaborate with my friend Amber from SweetAmbs . Today we are celebrating the arrival of Spring and Easter with our beautiful 3D Easter Egg Cookie Treats!
Amber is sharing on her blog how to make 3D Easter Egg Cookie Pinatas.
3D EASTER BASKET COOKIES

COOKIE CUTTER
To make my 3D Easter Basket I used 2 egg cookies cutters. And I used a flower shape for the base. To make small accent decorations I used a few mini flowers and a butterfly cutter.
Ideally, egg cutters should be 1 inch apart in size. I used 4 inch and 3-inch egg cutters.

Since I didn’t have a cookie-cutter for the basket/handle opening I used one of my spare 2 inches round metal cookie cutters and I shaped it using pliers.
BAKE COOKIES
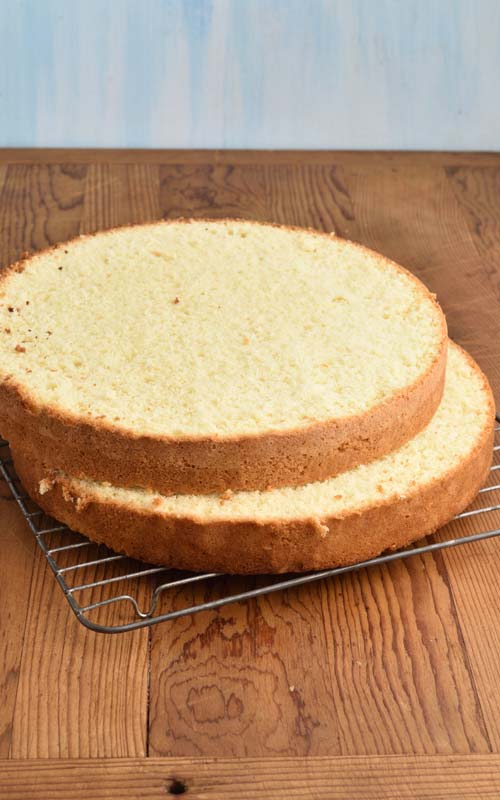
To make the cookies I used my Honey Cookie Recipe. It’s really easy to make and it’s absolutely delicious. If you haven’t tried it yet I highly recommend it. Baked cookies last for 4 weeks.
However, if you prefer another cookie flavor, you can find something different in my collection of Cut Out Cookie Recipes.
3D EGG BASKET
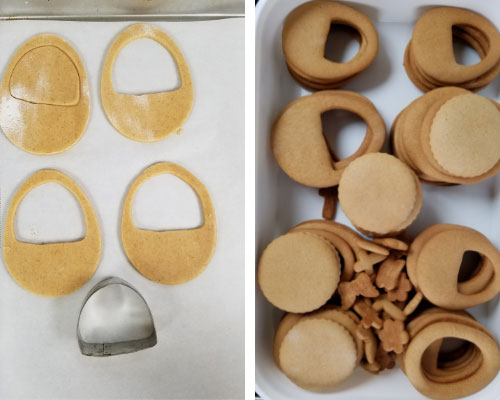
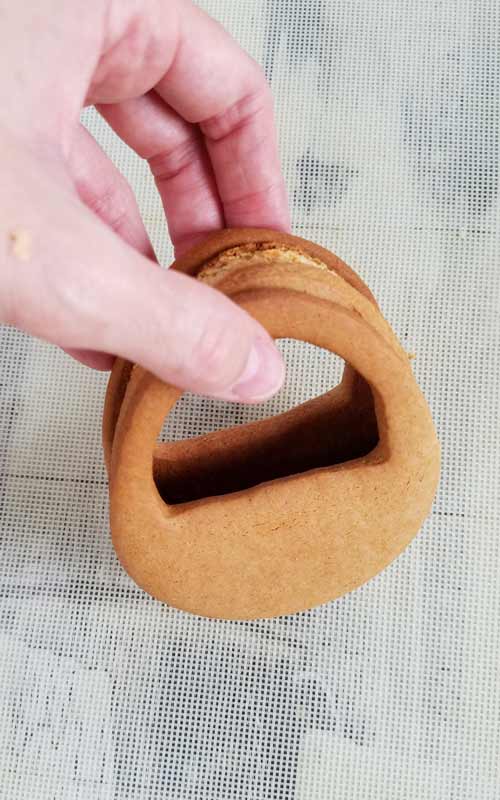
The basket itself is made out of 4 cookies that are glued together with icing: 2 are with the top cutout ( I used a cutter I shaped with the pliers or you can hand-cut with an Exacto knife). The other 2 cookies are hollow in the center. You’ll need one large egg cutter(4inch) and one a bit smaller(3inch) to cut out the center.
Even Cookie Thickness
When making cut-out cookies I always use rolling guides. They ensure even cookie thickness. If you haven’t used rolling guides before be sure to check my Sugar Cookie Recipe Tutorial. There I explain this process in detail.
For Easter Basket Cookies you will need about 1/4 inch thick rolling guides
Baking
- Roll out the chilled cookie dough either between 2 sheets of parchment or use Dough EZ rolling Mat. If the honey cookie dough is a bit sticky, dust your work surface with flour.
- Then cut out large egg shapes and transfer them onto 2 baking sheets lined with parchment. Chill the cookies for 15 minutes.
- Then cut out he basket opening on egg shapes on the 1st baking sheet, using a cutter shaped with pliers.
- 2nd baking sheet : cut out centers of the egg shaped cookies with a smaller egg cutter. Use a toothpick to lift up the center cutout, leaving the frame shape on the baking sheet.
- Bake at 390F for 7- 8 minutes.
- Make sure to let the cookies cool for 5 minutes on a baking sheet before transferring to a cooling rack. Use a flat cookie spatula to transfer cookies. Let cool completely.
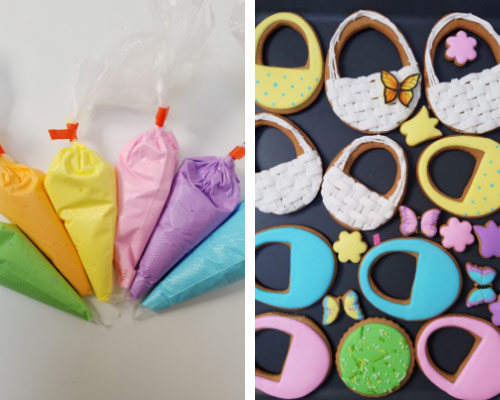
PREPARE ROYAL ICING
To decorate cookies I used Fresh Lemon Royal Icing.
DECORATE 3D EASTER BASKET COOKIES
- ROYAL ICING CONSISTENCIES
- Basket Weave, Basket handle : stiff royal icing
- Speckled Baskets : 15 second consistency
- Butterfly Cookies : 15 second consistency to make the wings, black piping consistency for the body
- Flower Cookies : 15 second consistency to flood, piping consistency for details
- Base : 15 second green royal icing
- Glue : white stiff to glue wafer paper decorations, brown stiff to glue the baskets cookies together, to attach cookie decorations and also to attach baskets onto the base cookie
HOW TO PIPE BASKETWEAVE
Basket Weave Piping Tip is great for piping basket weave pattern onto cakes and it works great on cookies, too. If this is your first time using this tip be sure to practice on a piece of wax paper and use stiff royal icing.
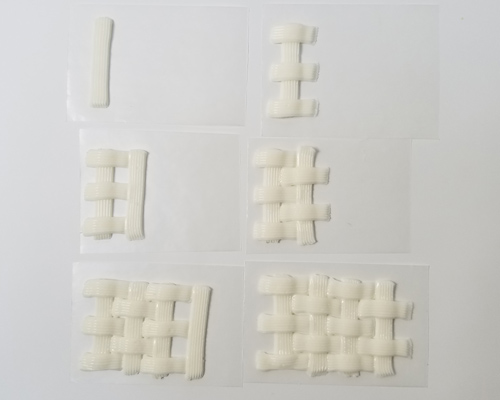
Right after I piped the basket weave onto the cookie I used a small yellow scraper tool to clean up the edges. Wipe the residue icing onto a damp paper towel.

To pipe the handle I used a Round Piping Tip #3 and Tip #1 for short lines across the thicker ones. Let dry overnight.
CREATE SPECKLED DESIGN
Ice the cookies with 15 second consistency royal icing. Then you have to let the icing dry overnight.
Before you proceed with the next step make sure to cover your work surface. I also like to prop up a board in front of the cookies. It catches the splatter.

Creating speckled design is really easy. All you need to do is make an edible paint. Add few drops of Chocolate Brown gel food coloring and dilute it with lemon extract.
When you watch the video you’ll see that I strained the edible paint through a fine mess sieve. When gel color is mixed with liquid often a sticky mass forms. Strain the mixture to remove the gunk.
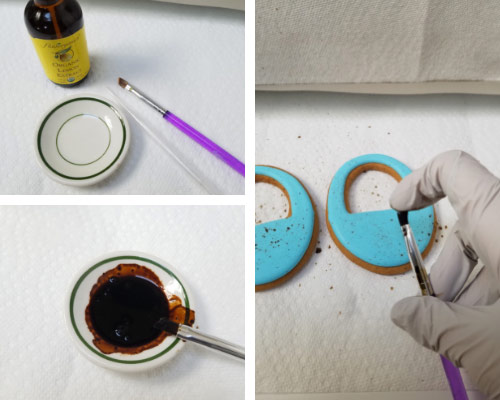
If possible use a flat food paint brush to create speckled design. Dip the brush into the edible paint. Then aim at the cookies and run your finger though the bristles towards you and watch what happens. Repeat as needed. Let dry for 10 minutes.
DECORATE BUTTERFLY COOKIES
Butterfly cookies are really fun to make. Watch the video to see how I made them.
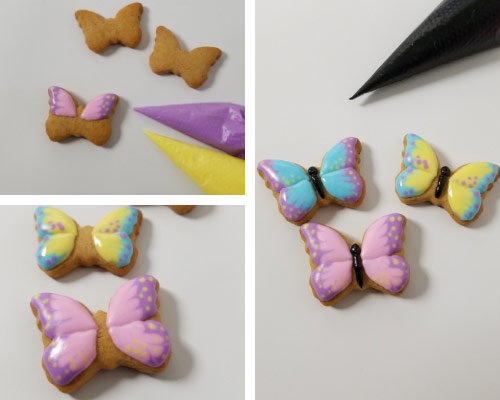
All you need is 15 second consistency icing and black piping consistency icing. Start with the top wings. Let them crust and continue with the bottom ones. Let crust again and then pipe the body with black piping consistency royal icing.
How do I make Black Royal Icing? – Royal Icing FAQ
Starting with white I add Super Black gel food coloring by Americolor brand until icing turns very dark grey. Then I stop and cover the icing and let it rest overnight or for several days at room temperature. Color deepens significantly overtime.
Another trick is to add 1tbl cocoa powder(not more) per one cup of white royal icing. So your starting point is not white icing but light brown hence less black to color icing. It also tastes super yummy. Then add black food coloring and continue with the same process as stated above. Make sure you don’t add too much cocoa powder as it can affect how royal icing dries and pipes.
DECORATE FLOWER COOKIES
What is that shiny sparkly stuff on the cookies? It’s called Jewel Dust. It’s edible, FDA approved and it can be use on cookies, cakes etc.

Ice the cookies with 15 second consistency royal icing and let dry. With piping consistency royal icing decorate the top of the flowers. Press a small edible pearl in the center.
Then you can either dip them into sanding sugar like I’ve done with the tulips. Or dip a dry food paint brush into the Jewel Dust and dust the cookies.
HOW TO MAKE ROYAL ICING BUTTERFLIES
I put together a detailed DIY tutorial how to make these pretty Royal Icing Butterflies. I used the Stenciling Technique, and I airbrushed the center, along with inner edges with orange airbrush color.
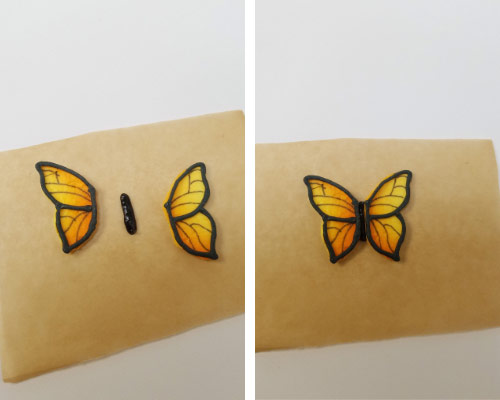
The using piping consistency black royal icing glue the wings together. Let the icing dry for 2 hours. Then carefully remove parchment paper and attach butterfly on the cookie. You can then add a body of the butterfly as well.
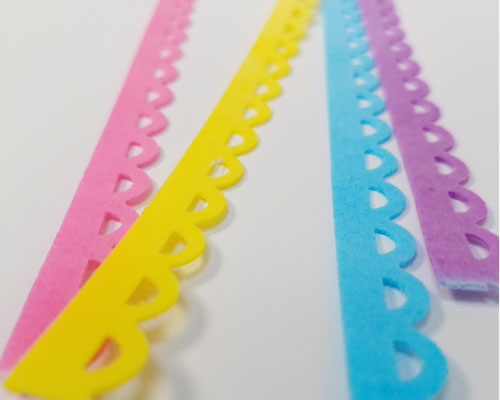
WAFER PAPER DECORATION
I picked up a bag of wafer sheets at a local craft store, you can also find these online. They work great for small projects.

With a craft punch I cut out decorative scalloped borders. Then using a ruler I measured 1cm deep(about ½ inch). And instead of scissors I used an exacto knife to cut them into strips.
DECORATE COOKIE WITH WAFER SHEET BORDER AND SMALL BUTTERFLY COOKIES
First, you need to cut wafer decoration to size.
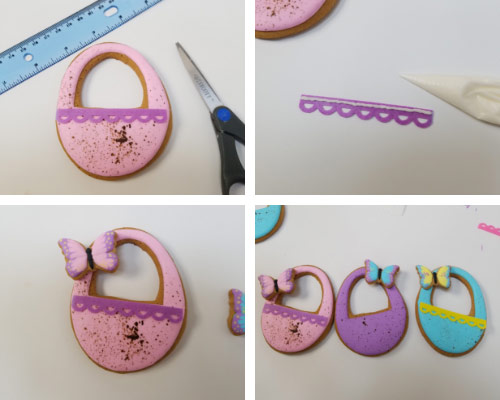
One side of the wafer paper feels little rough to the touch. Turn the wafer so the rough side is up. Then pipe a stiff royal icing across.
Position the wafer on a cookie and gently press it down. Immediately turn the cookie upside down. Let it dry for 15 minutes.
Once the wafer decoration is in place we can attach a mini butterfly cookie. Use stiff royal icing to glue the butterfly onto the basket handle. Let dry.
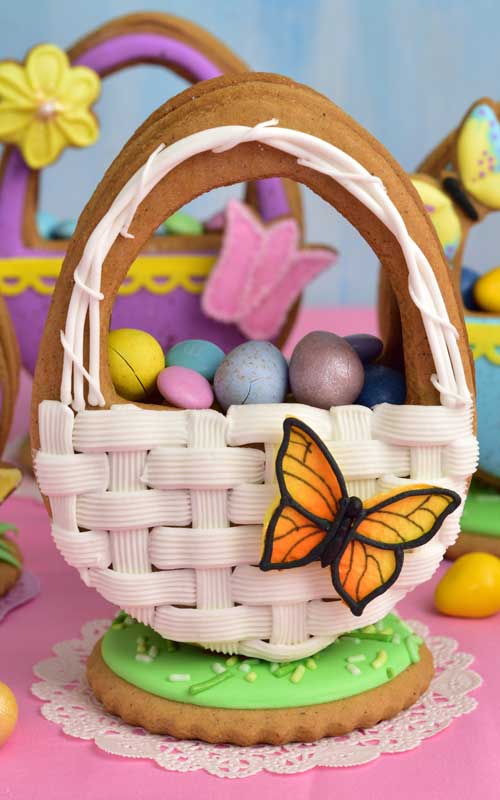
ASSEMBLE 3D EASTER BASKET COOKIES
To finish these adorable Easter treats color some stiff royal icing with Chocolate Brown and use it to glue the cookies together.

Attach Royal icing Monarch Butterfly decoration onto the basket weaved royal icing. Pipe the black body and let dry.

Ice the round cookie with 15 second consistency green icing and sprinkle green sprinkles on the top and let dry.
Glue the Easter Basket Cookie on the base cookie. Larger cookies may require support while icing is drying. Let dry for 2-3 hours.

FILL THE COOKIES WITH CANDIES

Fill the baskets with candies.
I just love making 3D cookies. These 3D Easter Baskets turned out so pretty and I can’t wait to gift them to our neighbors next week.

HOW DO YOU PACKAGE THESE EASTER TREATS?
Package Easter Basket Cookies using clear treat bags. Place a small paper doily on the bottom of the bag and carefully nest the Basket Cookies inside. Tie with a pastel ribbon. These can be made up to 4 weeks ahead.

TO MAKE 3D EASTER BASKET COOKIES YOU NEED
- RECIPES
- Honey Cookies , you can use other recipes for my Cut Out Cookies Collection
- Fresh Lemon Royal Icing
- Royal Icing Recipes ( using fresh eggs, liquid egg whites)
- Vegan Royal Icing
- TOOLS
- My Favorite Baking, Decorating Tools and Kitchen Tools via Haniela’s Amazon Shop
- Rolling Guides : about 1/4 inch thick
- Dough EZ Rolling Mat (comes with 1/4 inch thick rolling guides)
- Easter Egg Cutters (4 inch and 3 inch), Small 2.25 round cutter to be shaped with pliers
- Round Cutter 2.5 inch
- Pliers
- Mini Butterfly, Tulip, Flower Cutter
- Piping Bags, Couplers
- Basket Weave Piping Tip #47
- Round Piping tip # 3 and #1
- Food Colors
- Needle Tool
- Sprinkles
- Candy Wafer Sheets(ChocoMaker)
- Paper Border Punch (Apron Lace)
- Edible Jewel Dust
- Pink Sugar Pearls
- Food Paint Brush
- Lemon Extract
- Dropper
- PACKAGING
- Paper Doilies
- Gusseted Treat Poly Bags
- Ribbon
- USEFUL TUTORIALS
- How to Make Royal Icing Butterflies
- Royal Icing FAQ

- MORE BEAUTIFUL EASTER TREATS:
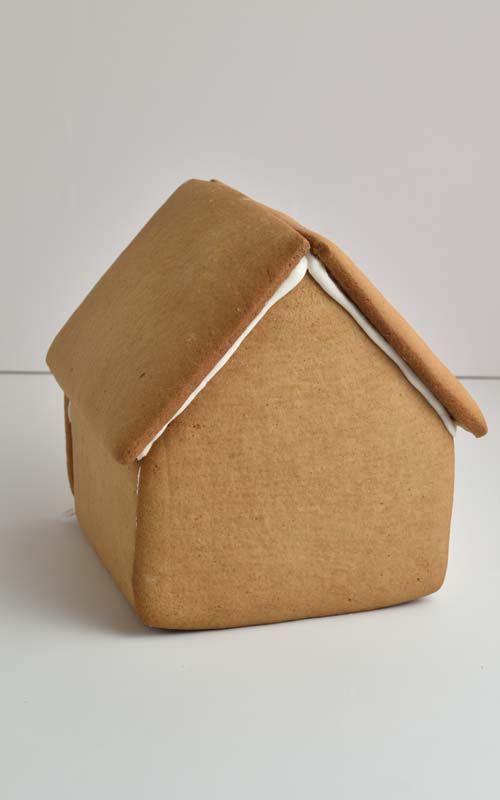
- Easter Gingerbread House
- Speckled Easter Cake
- Sugar Easter Egg Cake
- Chocolate Easter Bunnies
COLLABORATION WITH AMBER of SWEETAMBS
Aren’t these 3D Easter Egg Cookies gorgeous?! Be sure hop over to Amber’s Blog SweetAmbs and learn how to make these beauties.

PIN IT for later
This post contains Amazon affiliate links that earn me a small commission, at no cost to you. I only recommend products that I use and love. Learn more about my affiliate policy here.

Hi, I’m Hani
Welcome!
Thank you for visiting Haniela’s. On my blog, you’ll find delicious sweet & savory recipes made with simple ingredients. Why not start a new adventure? Discover a world of cookie decorating with my step-by-step tutorials.

Hi, I’m Hani
Welcome!
Thank you for visiting Haniela’s. On my blog, you’ll find delicious sweet & savory recipes made with simple ingredients. Why not start a new adventure? Discover a world of cookie decorating with my step-by-step tutorials.