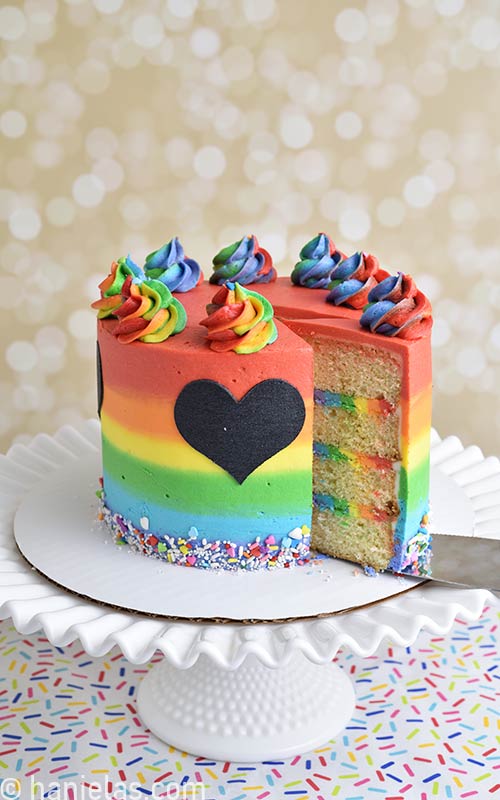
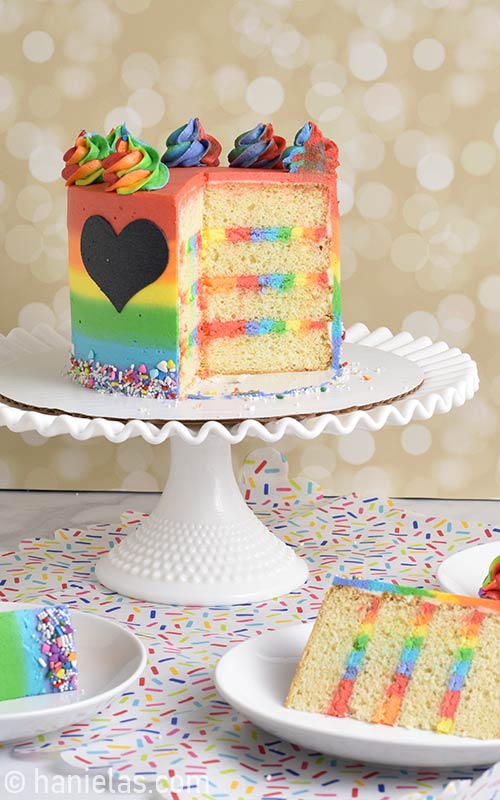
Easy Rainbow Buttercream Cake
If you love colorful, joyful cakes, this rainbow buttercream cake is such a fun one to make. Instead of coloring each cake layer, we’re creating a surprise rainbow inside the cake using vibrant layers of American buttercream, so every slice reveals a beautiful pop of color.

HOW TO DECORATE EASY RAINBOW BUTTERCREAM CAKE
This cake is perfect for birthday parties and any celebration that calls for something bright and cheerful. The cake itself is made with our favorite classic sponge, which is light, soft, and perfect for layering. I’ll walk you through every step, from making the buttercream, torting and filling the cake, creating rainbow layers inside and outside of the cake, to stenciling and piping pretty swirls and adding rainbow sprinkles.
THINGS YOU NEED
- Find all the tools in my Amazon Shop
- Cake pans – I used 6-inch cake pans
- Buttercream smoother or a large smooth bench scrapper
- Decorating bowls to mix buttercream
- Gel Food Colors – I used Americolor Brand
- Spatula
- Piping Bags
- Piping Tip 1M
- Rainbow Sprinkles Mix: rainbow hearts, rainbow jimmies sprinkles, white nonpareils, coarse sanding sugar, white pearlized jimmies sprinkles, silver star sprinkles
- Heart Stencil: 3-inch heart stencil
This post contains Amazon affiliate links that earn me a small commission, at no cost to you. I only recommend products that I use and love. Learn more about my affiliate policy here.
INGREDIENTS
- Cake Layers – I used vanilla sponge cake. Feel free to switch things up and use a different cake base.
- Eggs
- Sugar
- Oil or melted butter
- Water or Milk
- Vanilla Extract
- Flour
- Baking Powder
- Salt
- American Buttercream – simple to prepare and colors easily. For a less sweet option, you can use Swiss buttercream. Follow my instructions for coloring Swiss buttercream.
- Unsalted butter – at room temperature
- Powdered sugar – for smooth buttercream, it’s best to use powdered sugar (confectioner’s sugar). Usually marked as 10x – this number indicates the number of times it’s been processed to a super fine powder
- Salt
- Milk, Heavy Cream, or Water
- Extracts – Vanilla, Almond, Lemon extract or other flavorings
- Simple Syrup
- Sugar
- Water
- Vanilla, Almond Extracts
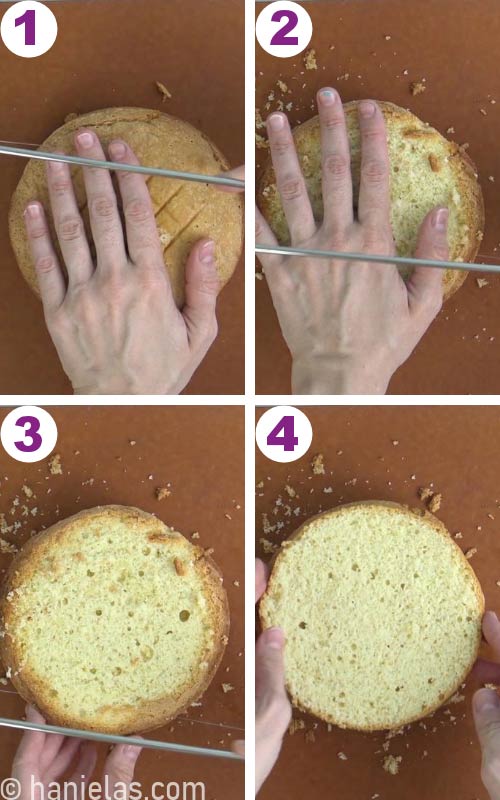
BAKE A CAKE
First, bake the cake using my simple sponge cake recipe. I made two 6-inch cakes. Once cooled, trim the tops and torte them to create four even layers (steps 1–4).
PREPARE BUTTERCREAM
To fill and frost the cake, I used American buttercream. It’s incredibly easy to make and takes color beautifully, making it perfect for creating vibrant designs. You can use it for filling and frosting, as well as piping swirls, flowers, and decorative borders. You’ll find the full recipe in the recipe card at the bottom of this post.

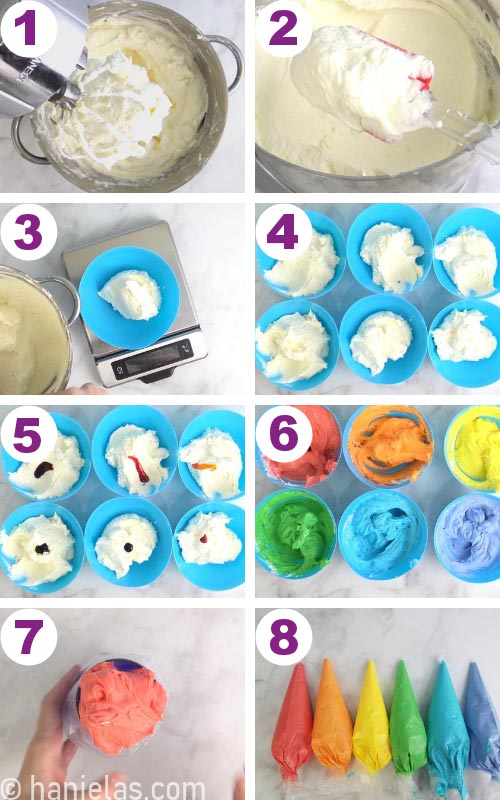
RAINBOW BUTTERCREAM
American buttercream is very easy to color. Just be sure to use concentrated gel food colors and avoid liquid colors from the grocery store.
- Divide the prepared buttercream into 7 equal portions.
- Color 6 portions in rainbow shades, leaving 1 portion uncolored for the crumb coat (steps 1-6).
- Transfer the colored buttercream into piping bags and set aside (steps 7-8).
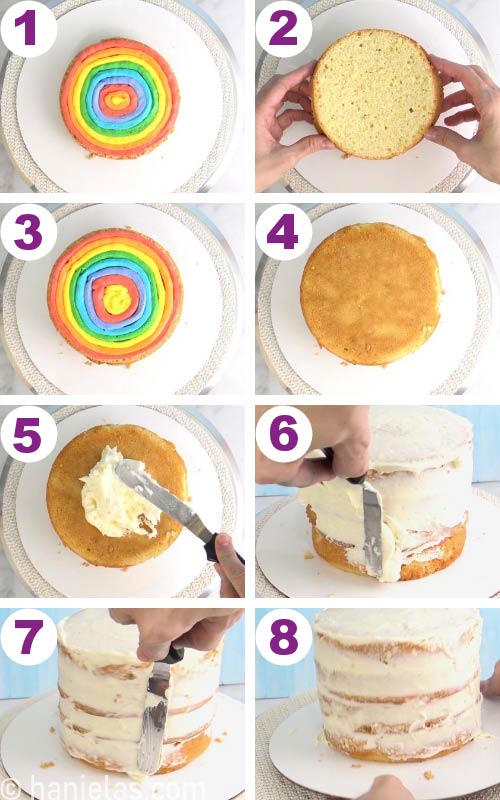
FILL THE CAKE
- To fill the cake with rainbow buttercream layers, start by spreading a small amount of buttercream onto a cake board to anchor the cake.
- Place the first cake layer on top, or use a cake stand if you don’t have a board.
- A cake board makes it much easier to move the cake in and out of the fridge or onto a serving stand (steps 1-3).
- Snip the ends of each piping bag, keeping the openings roughly the same size.
- Begin piping the buttercream from the outer edge, creating rings of color.
- Start with red, then pipe orange, yellow, and continue the rainbow pattern.
- Repeat the sequence as needed until the entire surface is covered with buttercream (steps 4-8).
TIP: Use a cake turntable. It makes the process of making a DIY rainbow cake much easier.

CRUMB COAT THE CAKE
- Place the next cake layer on top of the rainbow buttercream layer, then repeat until all 4 layers are stacked (steps 1-4).
- To crumb coat, spread a thin layer of plain white buttercream over the top and sides using a spatula. Smooth it out, then chill the cake for about 1 hour, or until the crumb coat is firm (steps 5-8)
TIP: Crumb-coating seals in all the loose cake crumbs. This is important so the cake crumbs don’t get mixed into the final coat of frosting.
FROST THE CAKE
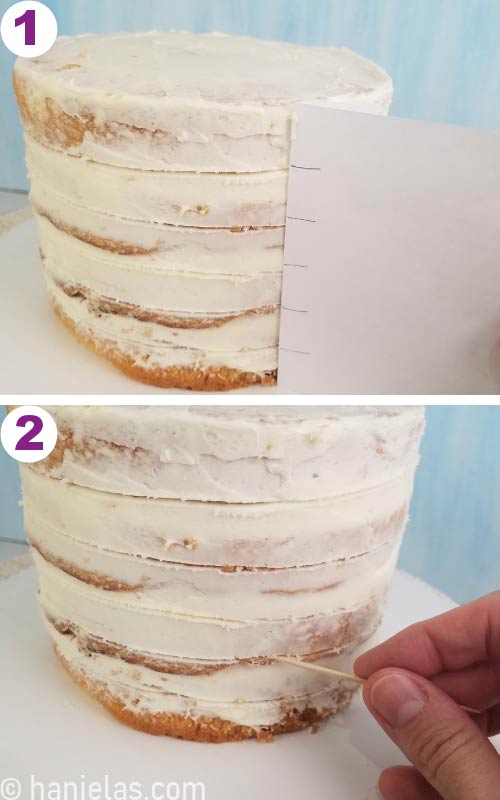
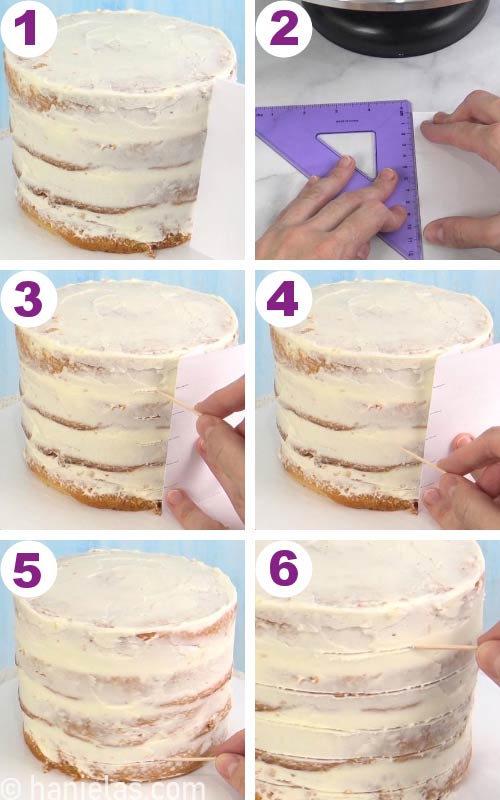
- To frost the cake with rainbow layers, first divide the sides into even sections (steps 1-2).
- Measure the cake’s height and divide it by 6.
- Use a simple paper template to mark the sections, then transfer the guidelines onto the cake with a toothpick (steps 1-6).
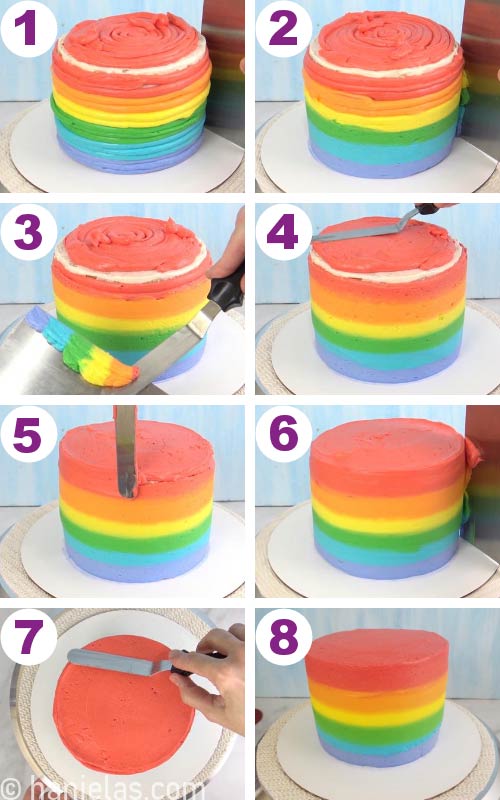
Chill the cake. Before piping the rainbow layers, make sure the cake is well chilled and the crumb coat is firm. Start at the bottom of the cake and follow the toothpick guidelines as you pipe each color onto its section (steps 1-4). Then continue by piping the frosting onto the top of the cake (steps 5-8).

Smooth the top. Now smooth the top and sides of the cake. Use a flat smoother and a small offset spatula to even out the rainbow buttercream, or a bench scraper if you have one. Once you’re happy with the design, chill the cake for about 1 hour, or until the buttercream is firm and no longer sticky to the touch.
TIP: Wipe the buttercream smoother clean after each use. It also helps to warm the smoother in hot water before smoothing the buttercream. Be sure to wipe it dry before using.
STENCILING ON BUTTERCREAM
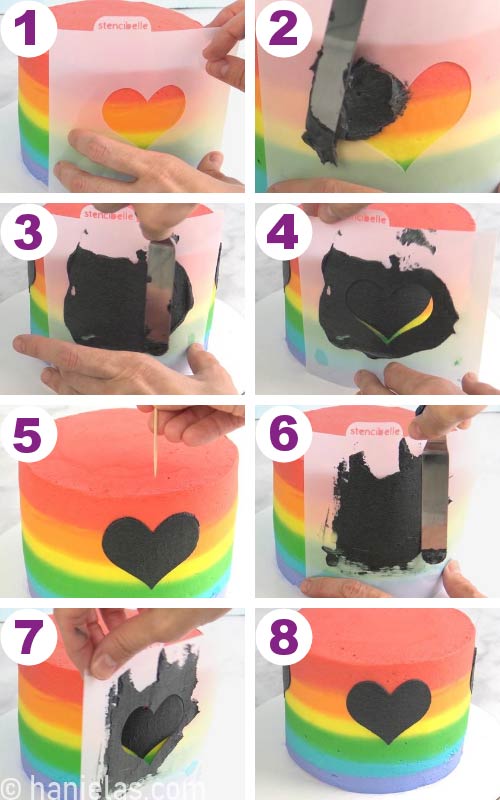
I felt the cake needed a little extra detail, so I decided to decorate the sides with stenciled black hearts. First, I tinted some leftover buttercream with black gel food coloring (steps 1-4).

- Before placing a stencil on the cake, make sure it is well chilled, and the buttercream is no longer sticky.
- Position the heart stencil on the side of the cake, then spread a thin layer of black buttercream over it. Hold the stencil gently and avoid pressing too hard on it to prevent denting the rainbow buttercream (steps 1-3).
- Carefully lift the stencil away from the cake (step 4).
- I stenciled four hearts around the sides.
- To space them evenly, I marked the spot opposite the first heart with a toothpick before adding the second.
- Then I placed the remaining two hearts evenly between the first two, creating a balanced design (steps 5-8).
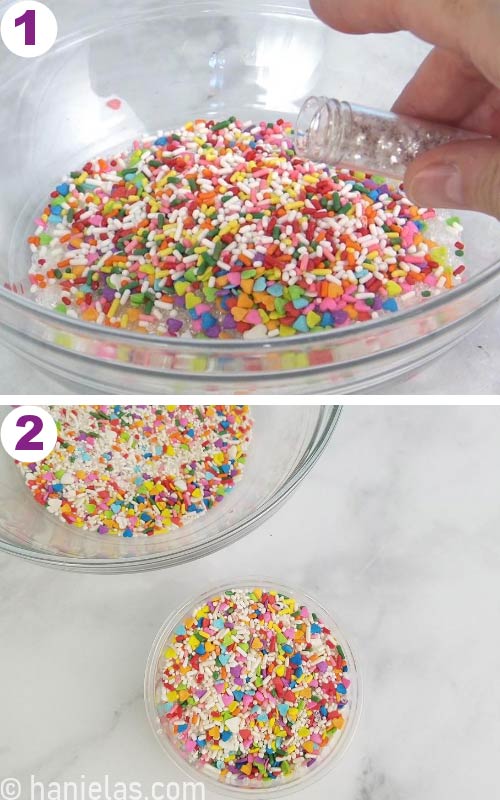
HOMEMADE SPRINKLE MIX
Sprinkle mixes are a fun and popular way to decorate cakes and cookies. While you can buy them pre-mixed, it’s just as easy to make your own custom mix at home. I created my mix using heart-shaped rainbow sprinkles, rainbow and pearl jimmies (the cylindrical ones), white nonpareils, and coarse sanding sugar. Simply combine equal parts of each in a bowl (steps 1-8).

For an extra sparkle, I added silver star sprinkles. Store your sprinkles mixes in an airtight container (steps 1-2).
TIP: Learn how to make your own confetti sprinkles with royal icing and stencils.
DECORATE WITH SPRINKLES
To decorate the cake sides with sprinkles, you have two options: let the buttercream soften slightly and press the sprinkles directly onto it, or spread a thin layer of soft buttercream onto the sides and gently press the sprinkles into that layer to help them stick.
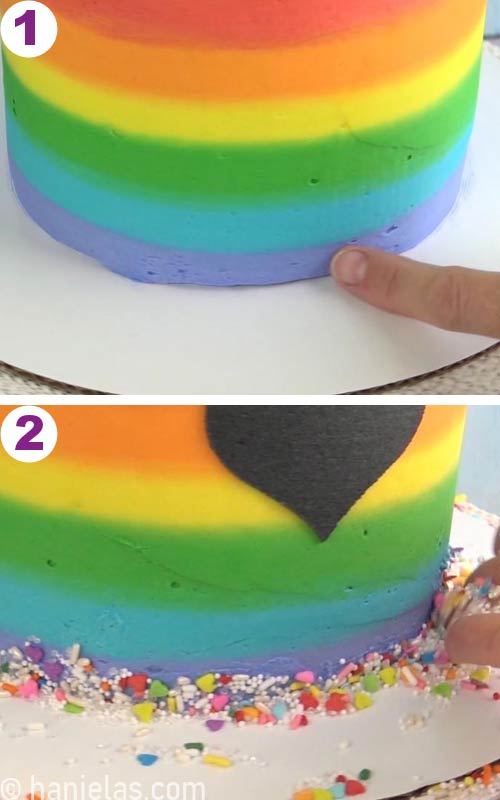
Alternatively, you can attach a piece of parchment paper to a chilled cake (step 1) and spread a thin layer of buttercream below and slightly overlapping it (step 2). This soft buttercream layer acts as glue, helping the sprinkles stick. Gently press the sprinkles onto the cake, then carefully peel away the parchment. This method also helps prevent sprinkles from landing in areas where you don’t want them.

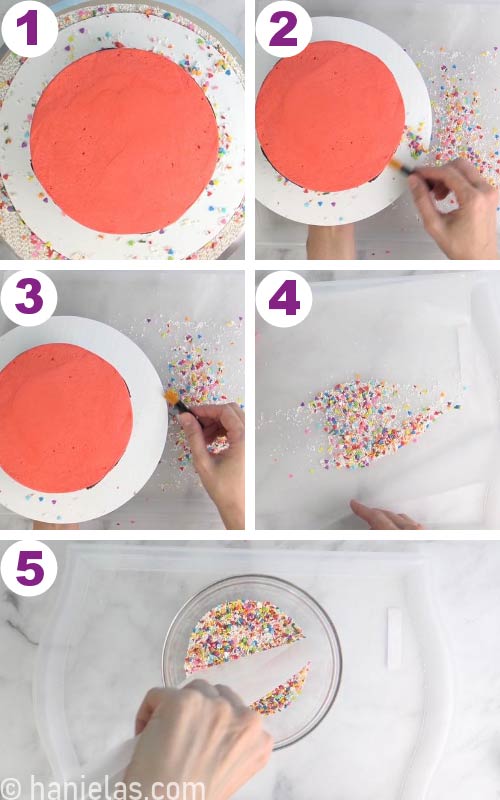
Applying sprinkles on the sides of a cake can be a messy business. Take a small, dry, food-only paintbrush or a pastry brush and brush the sprinkles away from the cake board. Let them drop onto wax paper, then pour any unused sprinkles back into a bottle/container (steps 1-5).
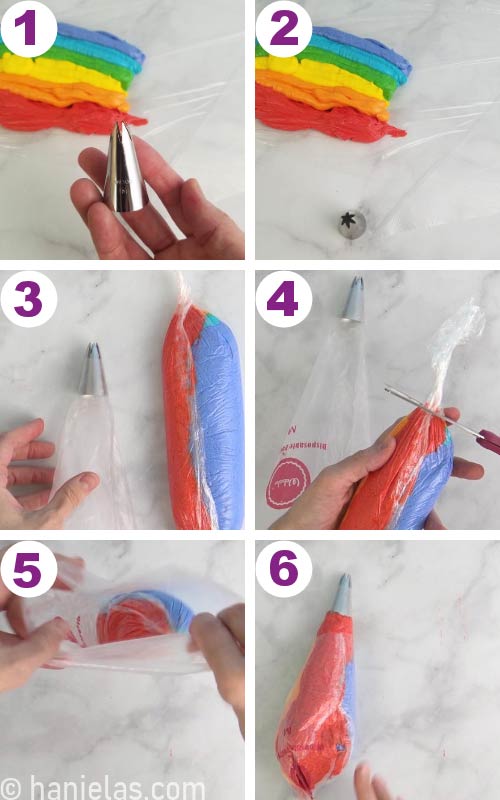
RAINBOW BUTTERCREAM SWIRLS
- I decorated the top of the cake with vibrant rainbow buttercream swirls.
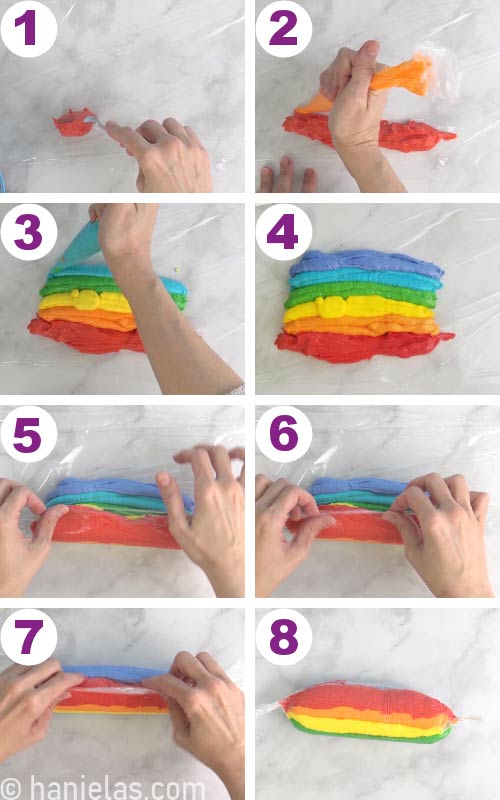
- Prepare a rainbow buttercream pouch by spreading or piping the rainbow buttercream layers onto a piece of food wrap (steps 1-4).
- Fold one side of the wrap toward the center, then fold the other side over as well, so the red and purple layers meet in the middle and sit side by side (steps 5-7).
- Finally, twist both ends of the buttercream pouch to seal it (step 8).
Rainbow Buttercream Swirls To pipe beautiful rainbow buttercream swirls, I used a Wilton 1M star tip (steps 1-2). First, fit a piping bag with the star tip and trim one end of the rainbow buttercream pouch (steps 3-4). Then insert the buttercream pouch into the piping bag (steps 5-6).
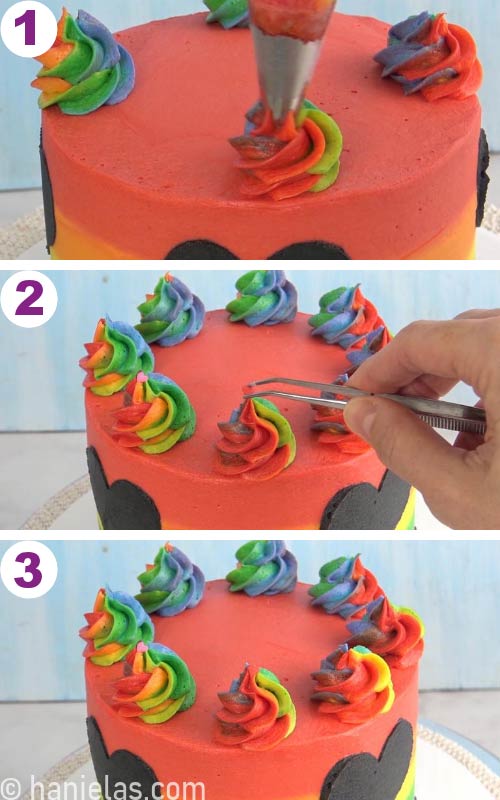
Pipe rainbow swirls on top of the cake. Pipe 4 opposite swirls, then pipe the swirls between them (step 1). Lastly, decorate the tops of the swirls with rainbow heart sprinkles (steps 2-3).
MORE CAKE IDEAS
- Brown Sugar Cake with Caramel Sail
- Chocolate Raspberry Cream Cheese Cake
- Baileys Cake
- Fresh Strawberry Cake Recipe
- Raspberry Cake Filling
Easy Rainbow Buttercream Cake
Ingredients
Sponge Cake layers
- 4 large eggs, separated and at room temperature
- 1 1/2 cup all-purpose flour 210 grams
- 1 cup granulated sugar, divided 200 grams, divided
- 4 tbsp oil or melted butter, cooled 55 grams
- 4 tbsp warm water or milk 60-65 grams
- 1 tsp baking powder
- 1/4 tsp salt
- 1 tsp Vanilla Extract
- pinch of cream of tartar or use 1/2 tsp lemon juice or vinegar – add it to the egg whites, it helps to beat them to their full volume and also it helps to prevent over beating of meringue. or use 1/2 tsp lemon juice or vinegar
AMERICAN BUTTERCREAM
- 5 sticks unsalted room temperature butter 556 grams, 1 stick is 113 grams
- 7 cup powdered sugar 840-875grams
- 1 tbsp Vanilla Extract
- 4 tbsp milk, heavy cream 60-65 grams
- 1/8 tsp salt
Instructions
Sponge Cake
- Preheat oven to 350°F/180°C. Grease and flour 2 – 6inch baking pans, line the bottoms with parchment. In a large bowl, whisk together flour (1 and 1/2cup, 210 grams), salt (1/4tsp), and baking powder (1tsp); set aside
Prepare Meringue
- In a clean, grease-free bowl, whip egg whites ( 4 egg whites) with a pinch of cream of tartar or 1/2 teaspoon lemon juice/white distilled vinegar. Beat until foamy. Then gradually add 1/2 of the granulated sugar (1/2 cup, 100 grams)). Beat until stiff and shiny peaks are formed. Don't overbeat, or the meringue will be dry.Gently scrape the meringue into another bowl. Set aside. Now we are going to prepare the egg yolk mixture; no need to clean the mixer bowl.
Egg Yolks and Sugar – Ribbon Stage
- Pour 4 egg yolks into the mixing bowl you just used to whip the meringue. It is okay; it doesn't have to be spotless. Add the remaining granulated sugar (1/2 cup, 100 grams) to the egg yolks. Beat using a wire whip attachment. Beat the egg yolks at medium-high speed. Scrap the bowl once or twice to ensure all egg yolks are well blended. Beat until the ribbon stage is reached. About 5-6, minutes. The mixture will be thick, doubled in volume, and pale in color.Gradually, in one continuous pour, add oil ( 4 tablespoons, 55 grams) and mix well. Then, gradually add warm water. Scrape the bowl in between. Beat in the Vanilla extract and beat for 2 more minutes.
Sponge Cake Batter
- Using a fine-mesh strainer, sift about 1/3 of the flour mixture into the egg yolk mixture, carefully fold the flour in with a spatula, then add about 1/3 of the meringue and fold it in. Continue with the rest of the flour and meringue until no streaks are visible. Then make the last 3 folds, making sure you go with the spatula all the way to the bottom of the bowl. Be gentle and don't overmix. You are looking for a light and airy batter.
Bake
- Fill your prepared baking pans and bake until a toothpick inserted in the center comes out clean, about 25-30 minutes. Let the cake cool for 5 minutes in the pan. Invert it on a cooling rack and let it cool completely. Wrap them in a food-safe plastic wrap.
Storage
- Undecorated cakes keep well at room temperature, well covered, for up to 3 days.
American Buttercream
- On low speed and with a paddle attachment, beat room-temperature butter (5 sticks, 565 grams) until smooth, about 2 minutes. Then gradually add sifted powdered sugar (7 cups, 840-875grams), 1 cup at a time.Once the powdered sugar is mixed, increase the speed to medium and beat well for about 2-3 minutes. Then add Vanilla Extract (1 tablespoon) and heavy cream/milk/ (2 to 4 tablespoons). You can add more cream if the icing is too stiff and a thinner icing is desired. Whip until smooth and silky.TIP: If your powdered sugar has lumps, sift it before using it.
- Divide buttercream into 7 portions. Color 6 with rainbow food gel colors. And continue cake decorating process using step by step tutorial listed in the blog post or watch the video.
Notes
- Can I make this cake ahead of time? Absolutely. You can make the cake 3-4 days ahead. Store in the airtight cake cover in the fridge until ready to serve. If preparing the cake ahead of time, it might be a good idea to use some simple syrup on the cake layers to keep it moist.
- Can I keep this cake at room temperature? It can be kept at room temperature for up to 2 days.
- Why do you use cream of tartar, vinegar, and lemon juice in egg whites? It helps unfold tight protein chains, making meringue more stable and voluminous, and it also helps prevent overbeating.
This post contains Amazon affiliate links that earn me a small commission, at no cost to you. I only recommend products that I use and love. Learn more about my affiliate policy here.

Hi, I’m Hani
Welcome!
Thank you for visiting Haniela’s. On my blog, you’ll find delicious sweet & savory recipes made with simple ingredients. Why not start a new adventure? Discover a world of cookie decorating with my step-by-step tutorials.

Hi, I’m Hani
Welcome!
Thank you for visiting Haniela’s. On my blog, you’ll find delicious sweet & savory recipes made with simple ingredients. Why not start a new adventure? Discover a world of cookie decorating with my step-by-step tutorials.

For dummies… do you mean 4 tbsp water and 4 milk and 4 cream or one of the three ingredients for buttercream. Thank you for sharing your hard work!
Hi Delphine,
one of those, not all of them. Thank you.
I love this buttercream ! It satisfy a my sweet tooth!
Thank you June. ♥