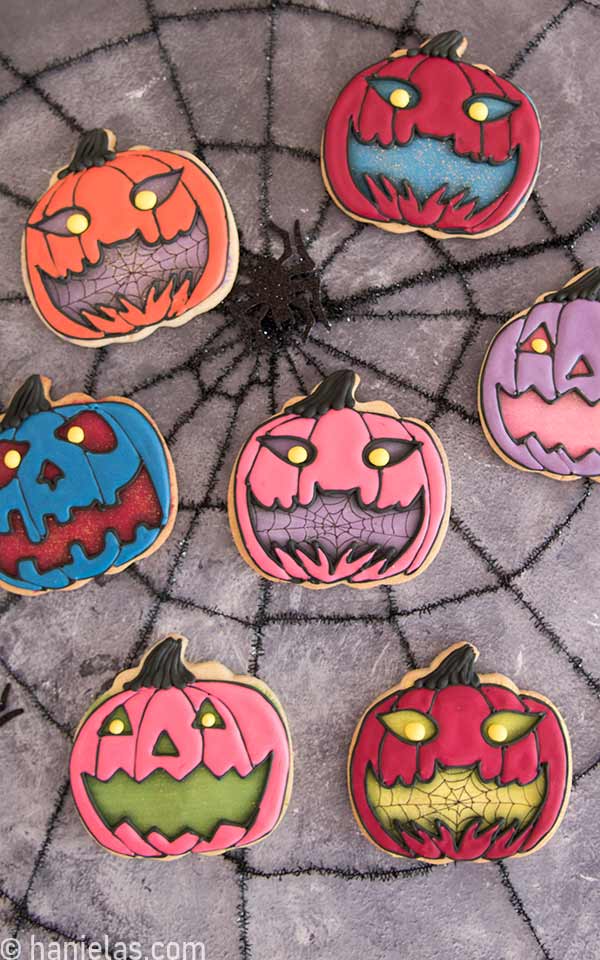
Decorated Jack-O’-Lantern Cookies
Carved and hollowed-out pumpkins have a deep-rooted connection to Halloween traditions. Popular with kids and adults alike, I can’t imagine celebrating Halloween without them. To ensure this iconic Halloween symbol is present on your dessert table, I’ll show you how to make decorated Jack-o’-Lantern Cookies.
DECORATED JACK-O’-LANTERN COOKIES
- Beginner’s Guide To Cookie Decorating
- Ultimate Guide to Cut-Out Cookies (tips, tricks, troubleshooting)
- Royal Icing Recipe
- Small Batch Royal Icing Recipe
- Cookie Icing Recipes (includes vegan royal icing, glaze, fondant)
- Guide To Royal Icing Consistencies with Visual Help(what is stiff, flood icing, etc.)
- How To Freeze Royal Icing
- How To Make Royal Icing Transfers
- Royal Icing FAQ ( for example: how to make black icing, color bleeding, storage, and more)
- How To Make a Cookie Cutter Template
- Ultimate Guide To Cookie Decorating Tools
Subscribe to Haniela’s Cookie Club on Patreon and get access to exclusive and ad-free tutorials, templates, sneaks peeks, and more.
THINGS YOU NEED
- Pumpkin Cookie Cutter (4-inch)
- Jack-o’-Lantern Cookie Decorating Templates
- Gel Food Colors
- Palette Knife
- Paintbrush
- Scribe Tool
- Fine Tip Black Edible Marker
- Edible Gold Paint or Gold Luster Dust
- Piping Tip #2
- Airbrush
- Black Airbrush Food Coloring
- Everclear (high-proof grain alcohol)- use it if you are using powder luster dust to make edible metallic paint
This post contains Amazon affiliate links that earn me a small commission, at no cost to you. I only recommend products that I use and love. Learn more about my affiliate policy here.
ROYAL ICING COLORS AND CONSISTENCIES
- Purple, Green, Burgundy Icing: first layer of icing, this the thin layer of icing applied with a spatula and a paintbrush: 10-15 second consistency
- Black Icing: piping consistency – use it to pipe the design outlines, and a stem
- Orange, Pink, Blue Icing: 20-second consistency – use to flood the cookie)
- Yellow Icing: 25 to piping consistency – this icing can be use to make the eyes
JACK-O’-LANTERN WITH A BAT MOUTH
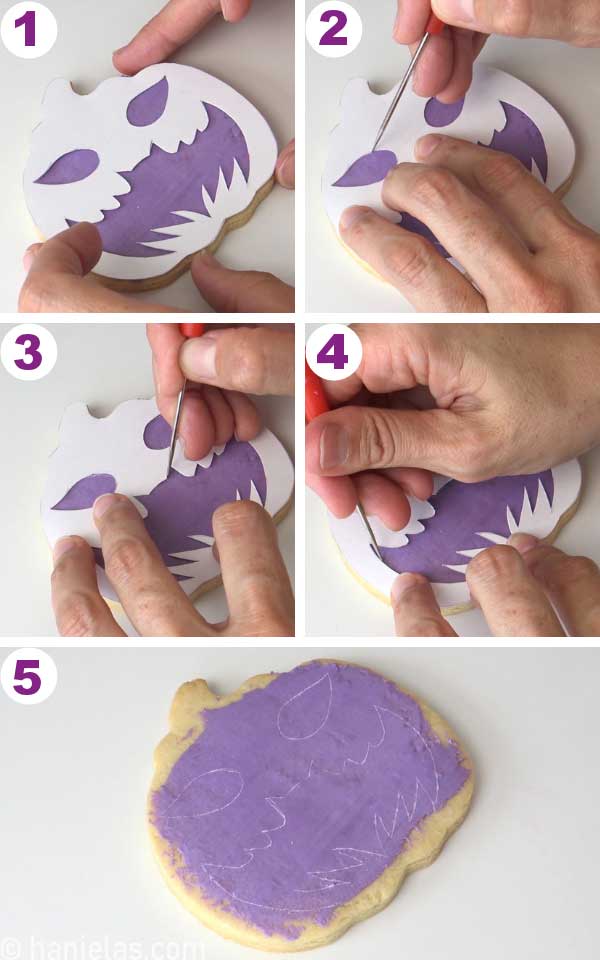
Spread a thin layer of 10-15 second icing across the cookie and let it dry for an hour or so (steps 1-5).

BAT MOUTH TEMPLATE
Using a template, trace the mouth and eye outlines onto the dry icing. To facilitate this, use a scribe or fine-tip edible marker.
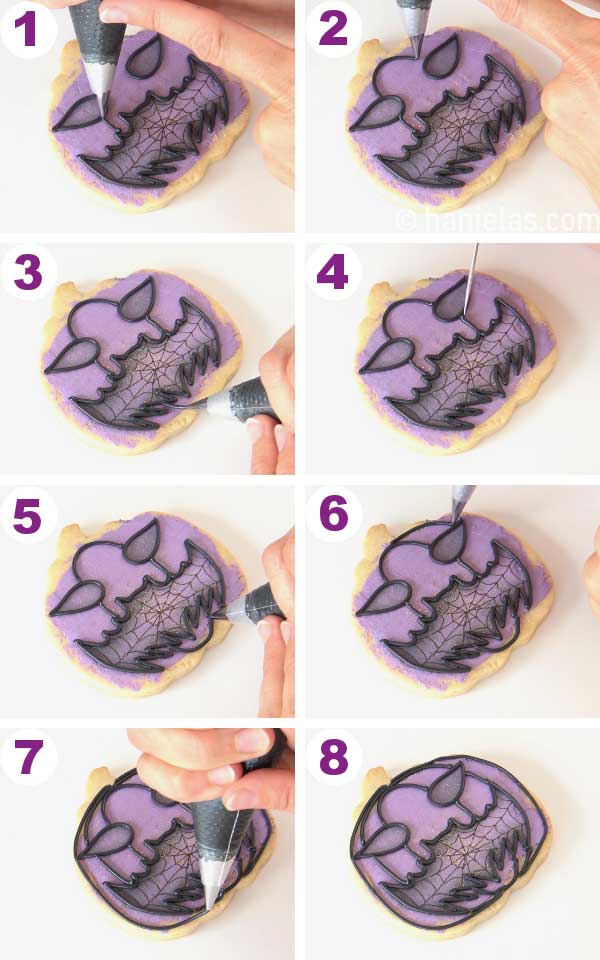
DRAW SPIDER WEB WITH AN EDIBLE MARKER
Then with a fine tip edible marker, draw the spider web inside the bat’s mouth (steps 1-3).

AIRBRUSH JACK-O’-LANTERN MOUTH
Into the airbrush paint cup, pour black airbrush food coloring, and secure the template onto the cookie with magnets. Airbrush the mouth and eyes’ edges with a light mist of black airbrush coloring (steps 1-8).

SPLATTER ICING WITH EDIBLE GOLD PAINT
To create gold splatter, I optioned for ready-to-use metallic edible paint. If you don’t have pre-mixed edible paint use gold luster dust and mix it with a few drops of Everclear (clear high-proof grain alcohol). Dip food-only paintbrush into the paint, hold the paintbrush above the cookie, or where you want the splatter, and run a finger or a scribe tool thru the bristles, aiming at the cookie. Watch the small droplets of gold paint fall onto the icing. Repeat if necessary (steps 1-6).

OUTLINE WITH BLACK ICING
Use a piping bag fitted with a round piping tip #2 and filled with a piping consistency icing to pipe the outlines (steps 1-8). Allow icing to crust for 5-10 minutes before flooding the sections.
FLOOD JACK-O’-LANTERN
Then fill in the sections. Take special care not to overfill the sections so the orange icing doesn’t overflow from one outlined section to another. Use the scribe to distribute the icing and accentuate the corners (steps 1-8). Allow icing to crust well before making the stem.

PIPE THE STEM AND EYE
To finish the first of three jack-o’-lantern cookies pipe the stem with black, piping consistency icing (steps 1-3).

And make yellow eyes using 25-second consistency icing ( steps 1-3).

Get creative and use different background colors. Look, how yellow icing makes the jack-o’-lantern cookie luminous!


JACK-O’-LANTERN WITH WIDE ZIG-ZAG MOUTH
In this second design, I used the same decorating technique as in the first one, but a different mouth template. Spread a thin layer of icing onto the cookie. Make sure icing covers eye area and the mouth (steps 1-4).

Secure the stencil onto a cookie and airbrush the edges with black airbrush color (steps 1-5).

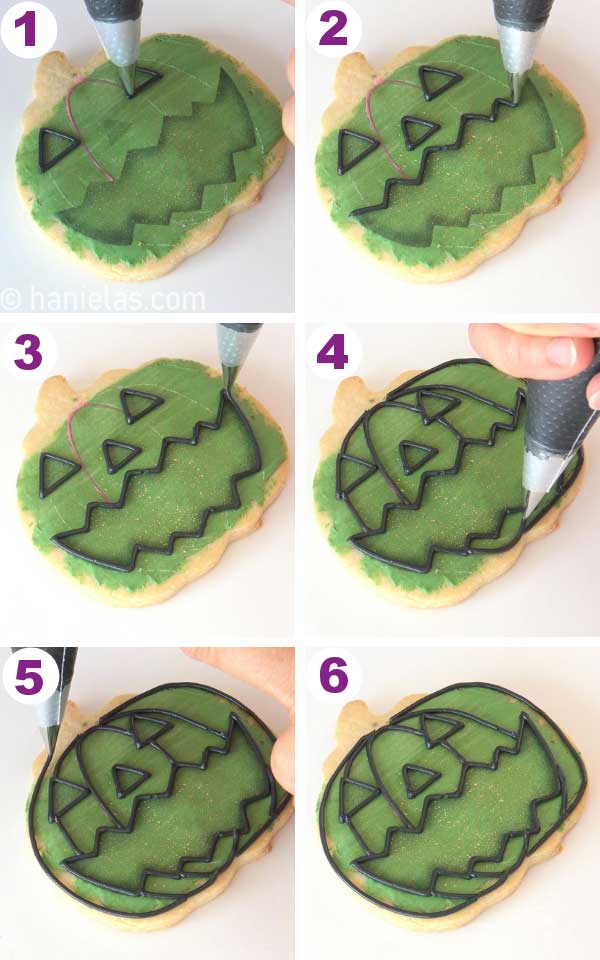
Splatter the icing with gold luster dust paint (how to splatter icing with edible gold paint). If unsure where to pipe the segment outlines, use a scribe tool to make the guides. Gently scratch dry icing as if you were drawing (steps 1-3).

Outline the eyes, mouth and segments with black icing (steps 1-6). Let black outlines crust for 5-10 minutes.
Fill the sections with 20-second consistency pink icing. Use a scribe tool to distribute the icing. Don’t overfill sections so icing doesn’t overflow and covers the black outlines (steps 1-8). Let icing crust then make the stem.

Pipe the stem with piping consistency black icing (steps 1-8).

Now, into the eye cavities pipe yellow dots (steps 1-2).


JACK-O’-LANTERN COOKIES WITH SCARY MOUTH
Use a palette knife or a flat paintbrush to spread the icing across the cookie.

In this last, 3rd design I used a scary mouth template. Airbrush the edges with black airbrush color.

Splatter the cookie with gold edible paint, if using (steps 1-2). Then use piping consistency black icing to pipe the outlines for the eyes, mouth and segments (steps 1-8). Let icing crust for several minutes then flood the sections.

Fill the sections with 20-second consistency blue icing. Use a scribe to move the icing into the hard to reach areas (steps 1-5). Then pipe two large dots into the eye cavities (steps 6-8). Allow icing to crust before piping the stem.

Lastly, pipe the stem. Stem consists of several short lines (steps 1 -5).


MORE DECORATED HALLOWEEN COOKIES
- Candy Corn Cupcakes
- Halloween Pumpkin Decorated Cookies
- Vampire Teeth Cookies
- Easy Buttercream Halloween Cookies
- Trick or Treat Ghost Cookies via Semi Sweet
- Hocus Pocus Decorated Gingerbread House

JACK-O’-LANTERN COOKIES VIDEO
Did you make these Decorated Cookies? Tag @hanielas on Instagram and hashtag it #hanielas


Hi, I’m Hani
Welcome!
Thank you for visiting Haniela’s. On my blog, you’ll find delicious sweet & savory recipes made with simple ingredients. Why not start a new adventure? Discover a world of cookie decorating with my step-by-step tutorials.

Hi, I’m Hani
Welcome!
Thank you for visiting Haniela’s. On my blog, you’ll find delicious sweet & savory recipes made with simple ingredients. Why not start a new adventure? Discover a world of cookie decorating with my step-by-step tutorials.


Where can I purchase the templates you use.
Hi Rose, link to the templates is at the top of the page under the section with the title “things you need”