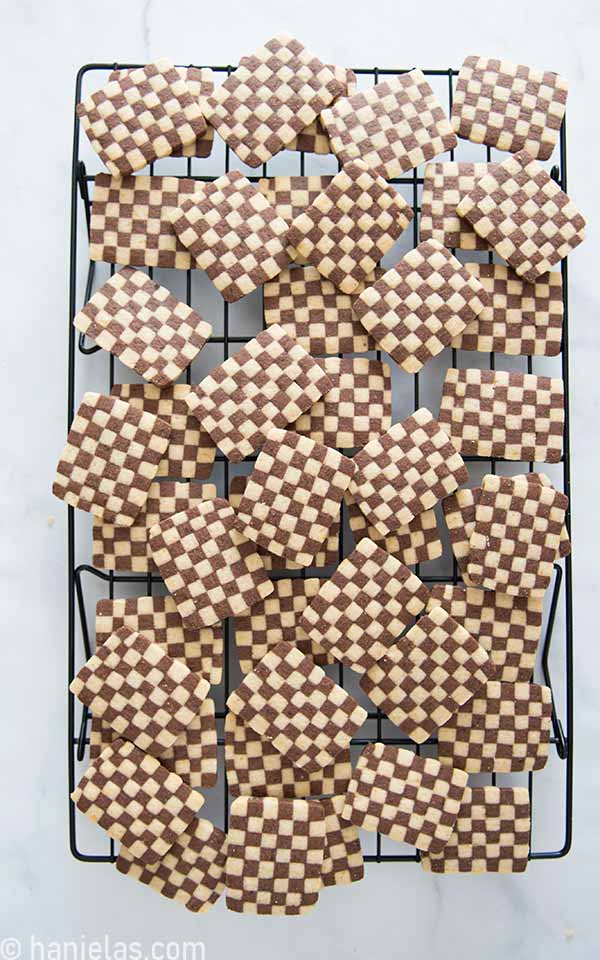
How to Make Checkerboard Cookies Step-by-Step
If you’ve ever looked at checkerboard cookies and thought, “There’s no way I could make those,” you’re not alone. They look fancy and complicated, but the secret lies in patience, chilled cookie dough, and your inner child wanting to build something delicious.

CHECKERBOARD COOKIES STEP-BY-STEP
Classic checkerboard cookies are a pair of vanilla and chocolate cookie doughs. Stacked into a beautifully chess-patterned cookie. Originating in Sweden in the early 20th century, they gained popularity, especially around holidays. And I like to sprinkle them into family and friends gatherings all year round. Why save them only for holidays?
WHY I LOVE THIS RECIPE
- Not too sweet
- This recipe is not too sweet. The chocolate cookie perfectly balances the sweetness of the Vanilla dough.
- Freeze the log or baked cookies
- I love that the cookie logs freeze well and slice quickly for a quick cookie treat. Plus, a bonus is the freshly baked cookie smell before the party.
- Visually Arresting!
- Their symmetrical design is so visually appealing. And even if the squares aren’t perfect, they are beautiful, and each one is unique.
- Make a Variety of Flavors
- Try different flavors. Orange, caramel, coffee, and almond.
- Stand out in a crowd
- Sprinkle them into a tray of chocolate chip cookies for a special treat.
- Holidays and Parties
- Perfect for holidays and parties.
- I love layers!
- I love layered desserts, and this one is no exception.
THINGS YOU NEED
- Mixing Bowls
- Hand-held mixer or stand mixer
- Kitchen Scale (my favorite)
- Food wrap or parchment paper
- 1/4-inch rolling guides
- Rolling Pin
- Sharp Knife
- Baking Sheets
- Cutting Board
This post contains Amazon affiliate links that earn me a small commission, at no cost to you. I only recommend products that I use and love. Learn more about my affiliate policy here.
INGREDIENTS
- Cookie Dough Base
- All-Purpose Flour
- Powdered Sugar
- Salt
- Butter
- Eggs
- Vanilla Extract
- Uncolored Cookie Dough – I made lemon-flavored dough using zest and lemon flavoring, but you can play with different flavors or stick with Vanilla.
- Lemon Zest or Orange Zest
- Lemon and Orange Flavorings
- Chocolate Cookie Dough
- Cocoa powder – preferably Dutch Cocoa Powder
- Boiling Water or Coffee
- Almond, Caramel, Coffee flavorings

REVERSE CREAMING METHOD – COOKIE DOUGH BASE
- I decided to use the reverse creaming method to prepare cookie dough.
- This method starts by preparing dry ingredients and then beating butter into the dry ingredients
- Reverse creaming methods help facilitate the inhibition of gluten development. And therefore making the cookies super tender with a melt-in-your-mouth feel.
- Into a bowl, sift flour, powdered sugar, and salt (step 1-4).

- I’m using room-temperature butter, and you want to beat the butter into the dry ingredients until it’s evenly distributed throughout the flour.
- You shouldn’t see any large chunks of butter.
- The mixture should have a consistency similar to sand (steps 1-4).

- Now we can add wet ingredients for the base.
- Beat egg – Vanilla Extract mixture into the dry mixture until you see uniform cookie dough chunks (steps 1-8).

DIVIDE DOUGH
- We’re going to divide the dough in half.
- Use a scale to weigh the dough and then divide it into two bowls.

UNCOLORED COOKIE DOUGH
- As far as the uncolored cookie dough, you can keep it vanilla, or you can add extra flavorings.
- I added lemon zest and lemon flavoring (steps 1-3).
- Then beat the dough until combined, about 30 seconds, and shape it into a ball (steps 4-6).

CHOCOLATE COOKIE DOUGH
- First, we need to bloom cocoa powder. I recommend you bloom the cocoa powder before you start with the recipe. It takes some 20 minutes for the bloomed cocoa to cool to room temperature.
- Be sure to sift cocoa powder (preferably Dutch cocoa). And into the sifted cocoa powder, add boiling water. Alternatively, you can use hot coffee to infuse a nice coffee flavor.
- Whisk it until I have a thick paste formed/
- It’s important, that you cover the bloomed cocoa powder so it doesn’t dry out.
- And let it cool completely before adding it to the cookie dough.

- Once the bloomed cocoa powder paste is cool, we can add it to half of the cookie dough (step 1).
- Beat the dough until it’s homogeneous (steps 2-5).
- If the dough appears too sticky, you can add one tablespoon of flour (steps 6-8).

ROLL OUT COOKIE DOUGH
- Roll out each cookie dough into rectangles about 10 inches by 8 inches in size.
- It’s best to roll out the dough between sheets.
- You can use food wrap, silicone baking mats, or parchment sheets.

- Shape the dough into a log that is about 10 inches long (step 1).
- Put rolling guides (1/4 inch (6mm) thick) on each side of the log (step 2).
- Press the dough slightly down with the palms of your hands (step 2).
- Place another sheet on top and roll the rolling pin on top of the dough and across the guides. These ensure that the sheet of dough is rolled out evenly to 1/4 inch thick throughout.
- Trim the parts of the dough that exceed the size you need and redistribute them to make a 10-inch x 8-inch rectangle. Roll it out again with a rolling pin (steps 4-8).

- Once you have a nice rectangle, transfer it to food wrap and chill it until it is firm (step 1-8).

- Repeat with the chocolate dough.

CHILL COOKIE DOUGH
- Layer two sheets on top of each.
- To prevent food wraps from sticking to each other, add a piece of parchment/paper towel between them so the cookie dough layers don’t stick together (steps 1-3).

SHAPE AND CUT STRIPS
- Brush a thin layer of egg white, or you can use water, or some people use jam on the white layer.
- And then carefully peel off the food wrap of the chilled chocolate layer.
- Place the chocolate layer on top of the white layer.
- For the cookie dough sheet to be easily handled, it is paramount that it is well-chilled (steps 1-6).

- Cut the 2-layer cookie dough sheet in half.
- Carefully separate the halves (steps 3-4).
- Brush the top of the chocolate layer with egg white (step 5).
- Place the second half atop, making sure layers alternate (step 6).
- Gently press the cookie dough layer down, wrap it, and chill, if needed, until firm, about 10 minutes. (steps 7-8).

- Make a quarter-inch marking across the width of the cookie dough layer.
- Use a sharp knife and cut the strips of layered cookie dough (steps 1-8).
- If the cookie dough layer becomes too soft, stick it in the fridge or freezer to firm up.
- It’s very important to check the blade of your knife. If you notice that it has cookie dough sticking to it or is smeared with chocolate or vanilla cookie dough, ensure that you clean it thoroughly so you don’t transfer the residue to the next cookie dough strip.
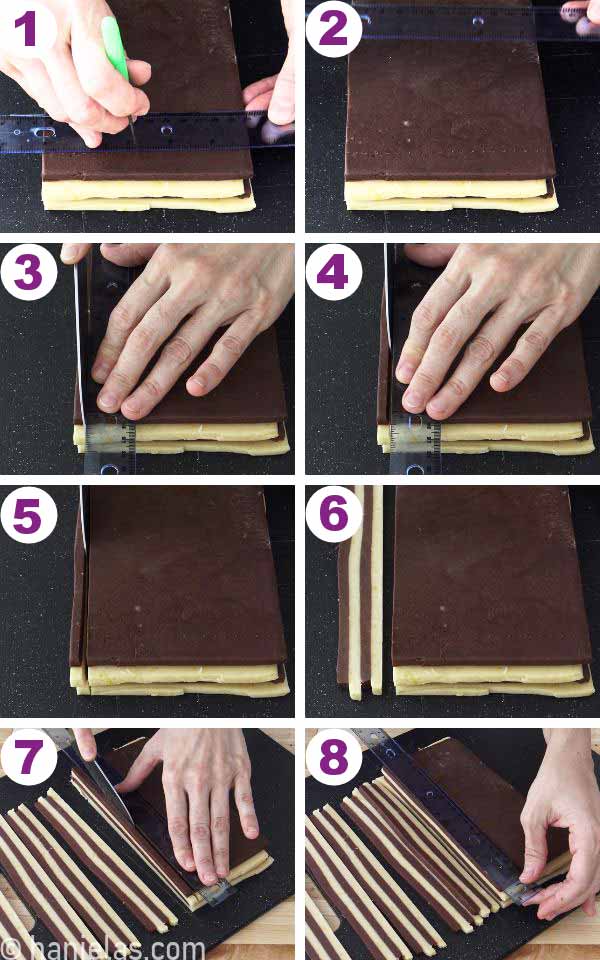
- I usually cut half of the cookie block into strips, and then I return it to the fridge. While it’s chilling, I assemble two checkerboard cookie logs.

ASSEMBLE THE CHECKERBOARD LOG
- To assemble the checkerboard log, you need to glue cookie strips, alternating the pattern to form a checkerboard profile.
- Brush each layer with egg white (step 1).
- Then carefully pick a layered strip of dough and place it on the bottom layer, aligning the chocolate with the white sections.
- To form a square log, stack 4 strips of dough.
- Remember to alternate the colors for a successful checkerboard pattern (steps 2-6).
- It is easier to work with chilled strips of dough. When they are soft, it’s hard to lift them without sinking a finger into the dough and mishaping them.
- Chilling of the dough is the key in this step.
- Wrap the cookie log in food wrap, and place it into the fridge while you work on the remaining logs (steps 7-8).
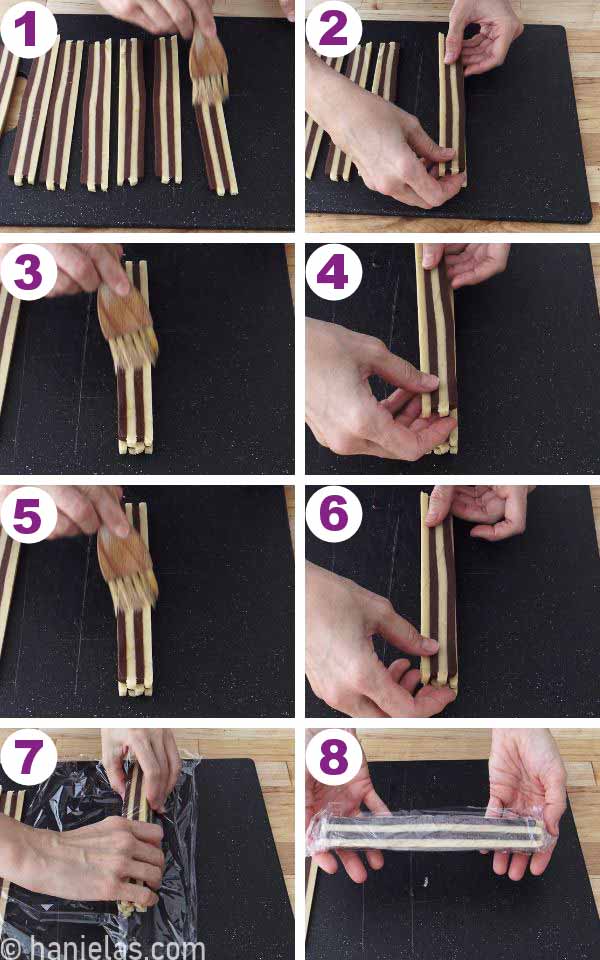
- You should have four long logs and some short ones (made from the leftover two strips of layered dough)
- Wrap them and chill if they get soft.
- You can also freeze them for up to 3 months.
- Slice them and bake them as needed.

LARGE CHECKERBOARD COOKIE LOG
- If you’d like to create a large checkerboard cookie log all you have to do is glue four logs together.
- Brush the connecting sides with egg white, and then glue together the logs (step 1).
- Make sure that the chocolate piece of the dough is aligned with the white dough (step 2).
- Fine-tune the edges if needed for a better fit. I noticed excess dough on the side, and I trimmed it with a knife (step 3).
- Continue with the remaining two logs. Make sure to check the correct color alignment (steps 4-8).

WRAP AND CHILL COOKIE LOG
- Wrap a large checkerboard log in food wrap and chill it until firm, or freeze it for up to 3 months in a freezer-safe ziploc bag.

SLICE CHECKERBOARD COOKIES
- Slice well-chilled log into 1/4 inch (6mm) cookies (steps 1-6).

BAKE COOKIES
- Transfer cookies onto a baking sheet and bake cookies at 350°Fahrenheit (180°Celsius).
- Bake cookies for about 9 to 10 minutes until they are puffy in the middle and set around the edges.
- If you like your cookies with light caramelization around the edges, bake them for about 12-13 minutes.


OTHER CHECKERBOARD COOKIE SHAPE VARIATIONS
You can build rectangular cookie logs and bake rectangular checkerboard cookies instead of square ones.

CHECKERBOARD COOKIES SUCCESS TIPS
The checkerboard cookie will test your patience. There is a lot of inactive chilling time that is crucial for successful checkerboard pattern building.
Make sure the dough is well chilled. Chilling is the key. Use a sharp knife.
Use a ‘glue’ like egg white, water, or jam to glue the strips together. This will help them bond better.
Handling dough that is too soft and warm can cause chocolate to transfer to the vanilla layer. Be sure to chill it properly.
Make sure to wipe the blade of your knife if the dough is sticking to it.
While it’s not necessary to use extra flavorings. You can play with other flavors.
Make sure to chill the cookie before baking.
Make sure to create 1/4-inch markings across the block of the layered dough. Take time to cut. Don’t rush it.

WATCH THE VIDEO
TRY THESE RECIPES
- Cranberry Pistachio Cookies
- Chocolate Chip Cookies
- Snowball Cookies
- Classic Candy Cane Cookies
- Chocolate Crinkle Cookies via Happi Home Made

Checkerboard Cookies
Ingredients
- 3 cups All-purpose flour 430 grams
- 1 1/4 cup powdered sugar 160 grams
- 1/8 tsp salt
- 2 eggs
- 2 tsp Vanilla Extract
- 2 sticks unsalted butter 226 grams room temperature butter
- 1/3 cup cocoa – preferable Dutch 33 grams
- 4 tbsp boiling water
- 1 tbsp lemon zest (optional)
- 1 tsp lemon extract (optional)
Instructions
Bloomed Cocoa Powder
- Into the bowl, add 1/3 cup (33 grams) sifted cocoa powder. Pour 4-5 tablespoons of boiling water over cocoa powder. Whisk well until a smooth paste is formed. Cover well with food wrap and allow to cool completely.
Cookie Dough Base – Reverse Mixing Method
- In a small dish, whisk one whole egg and one egg yolk (reserve the egg white for later), and add 2 teaspoons of Vanilla Extract. Set aside.
- Into a large mixing bowl, sift 3 cups (430 grams) all-purpose flour, 1 1/4 cups (160 grams) powdered sugar, and 1/4 teaspoon of salt. Whisk to combine.To the flour mixture, add room temperature unsalted butter. Beat on medium speed until butter is evenly dispersed throughout, and the mixture has a consistency similar to sand. This will take about 2-3 minutes. If using a stand mixer, use a wire attachment for this step.
- Into the flour-butter mixture, pour the egg mixture and beat on medium speed until large chunks of dough are formed. If using a stand mixer, use a paddle attachment for this step.
- Weigh the cookie chunks, and divide them equally into two mixing bowls
Vanilla/Lemon Cookie Dough (uncolored)
- If making vanilla-flavored dough, you don't need to do anything else; just gather the dough into a ball.If adding additional flavors, now it's time to add them. Into the 1st half of the cookie chunks, add 1 tablespoon of lemon zest and 1 teaspoon of lemon extract. Beat until combined, about 20 seconds, and gather the dough into a ball.
Chocolate Cookie Dough
- Into the 2nd half of the cookie chunks, add cooled, bloomed cocoa powder. Beat on medium speed until well combined and homogeneous, about a minute. Gather the dough into a ball.
Layer Vanilla and Chocolate Dough
- Roll out each dough into a 10-inch by 8-inch rectangle. Chill well for about an hour.Brush the vanilla layer with egg white, and place the chocolate layer on top of it. Cut a two-layer sheet in half. Brush the top chocolate layer with egg white and stack the second half on top of it. Ensure it is layered with dough alternating to create a striped pattern. Cover with food wrap and chill until firm.
Checkerboard Cookie Log
- Make 1/4-inch (6mm) markings on the short end of the layered sheet (striped) of cookie dough.With a sharp knife, cut the 1/4-inch (6mm) strips of striped cookie dough.Stack 4 strips, brush each strip with egg wash and layer them, alternating vanilla and chocolate layers, creating a checkerboard pattern.Repeat until you have 4 cookie log forms.Wrap each log in food wrap and chill again until firm.To make a large cookie log, 'glue' 4 cookie logs using egg whites.*see blog post for step-by-step pictures
Bake
- Slice the cookies 1/4 inch (6mm) thick and transfer them to a baking sheet lined with parchment or a perforated mat. Bake at 350℉ (180℃) for about 9-10 minutes for large cookies and about 7 minutes for smaller cookies.
Notes
- How long do cookies keep? Baked cookies keep in an airtight container for up to 10 days.
- Can I freeze the cookies? Sure, baked cookies can be frozen for up to 3 months. You can also freeze unbaked cookie logs, wrapped well in food wrap, and stored in a freezer-safe container or ziploc bag.

Hi, I’m Hani
Welcome!
Thank you for visiting Haniela’s. On my blog, you’ll find delicious sweet & savory recipes made with simple ingredients. Why not start a new adventure? Discover a world of cookie decorating with my step-by-step tutorials.

Hi, I’m Hani
Welcome!
Thank you for visiting Haniela’s. On my blog, you’ll find delicious sweet & savory recipes made with simple ingredients. Why not start a new adventure? Discover a world of cookie decorating with my step-by-step tutorials.